Individuals with speech difficulties encounter unique challenges impacting their social interactions and communication. Unfortunately, these difficulties can lead to anxiety, self-consciousness, and, sometimes, shame. Live Speech is one of the Accessibility features Apple designed to help individuals with speech difficulties.
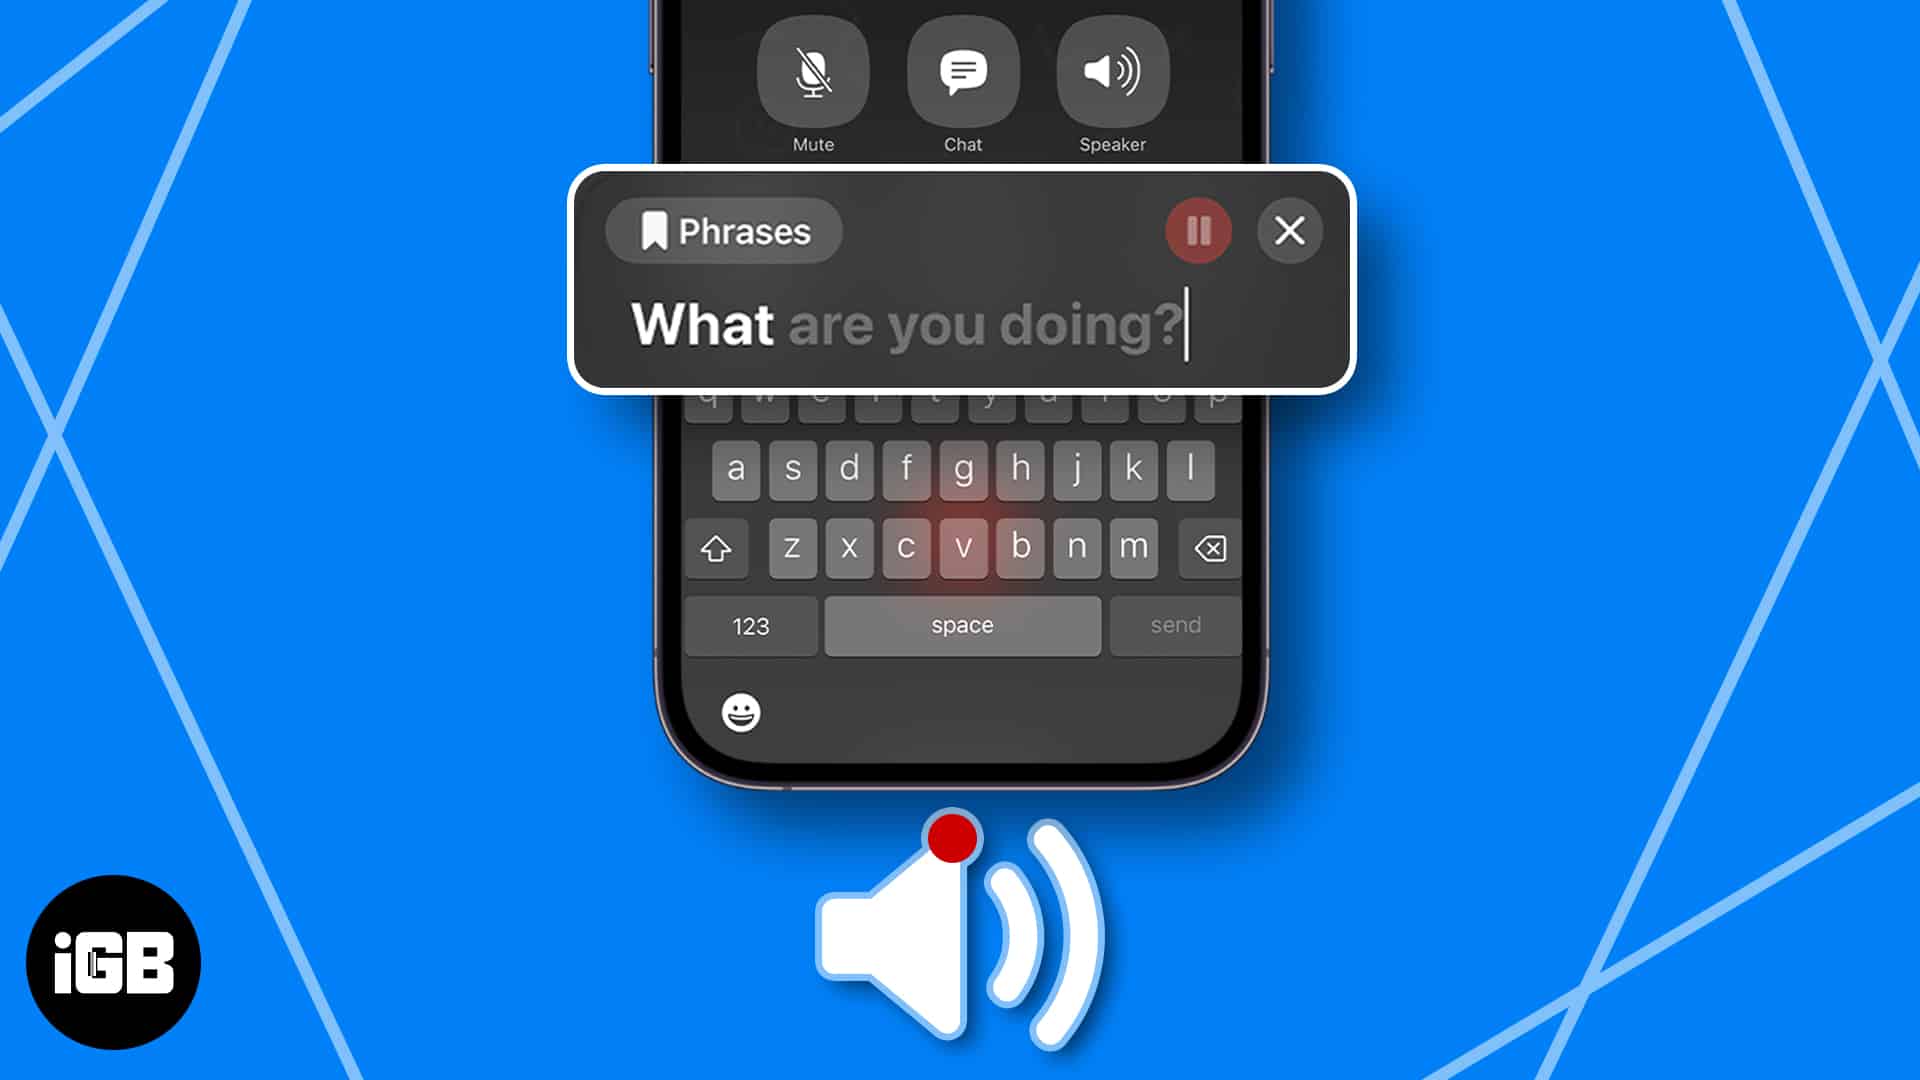
Live Speech lets users type what they want to say and have their iPhone, iPad, Mac, or Apple Watch speak to them out loud during in-person or digital conversations. While earlier, you could use this only in a single language, iOS 18 now allows you to use Live Speech in up to three different languages. Here’s everything you need to know.
Table of Contents
What is Live Speech, and where can you use it?
Live Speech is an accessibility feature designed by Apple to help people with speech difficulties. It lets users type what they want to say and lets the devices speak them out loud. The feature works on the following:
- Regular phone calls
- FaceTime calls
- In-person conversations
- Other communication apps that use voice and video calls, like Facebook Messenger
- Assistive communication apps that use voices, including Personal Voice
Who is Live Speech for?
Live Speech is for everyone who has trouble producing speech. This includes those with temporary voice loss due to strain, health conditions that cause speech difficulties, or conditions that result in progressive loss of speech.
Or, if you simply don’t want to speak at the moment, you can also use Live Speech to convert text to voice. This feature can also be handy in scenarios where speaking could be disruptive, such as during conferences or meetings or in environments where background noise may hinder clear communication over the line.
Requirements to use Live Speech
You need to have a compatible device to use Live Speech. Below are the compatible Apple devices that support Live Speech:
- iPhone XS or later
- Mac with Apple silicon
- iPad Air (5th generation)
- iPad Pro 11-inch (3rd generation) or later
- iPad Pro 12.9-inch (5th generation) or later
- Apple Watch Series 3 or later
- Further, to use Live Speech on your device, you should run at least iOS 17, iPadOS 17, macOS Sonoma, and watchOS 10 or later.
Running the latest OS lets you utilize other newly added accessibility features, such as Personal Voice and Assistive Access, in addition to live speech.
How to use Live Speech on iPhone and iPad
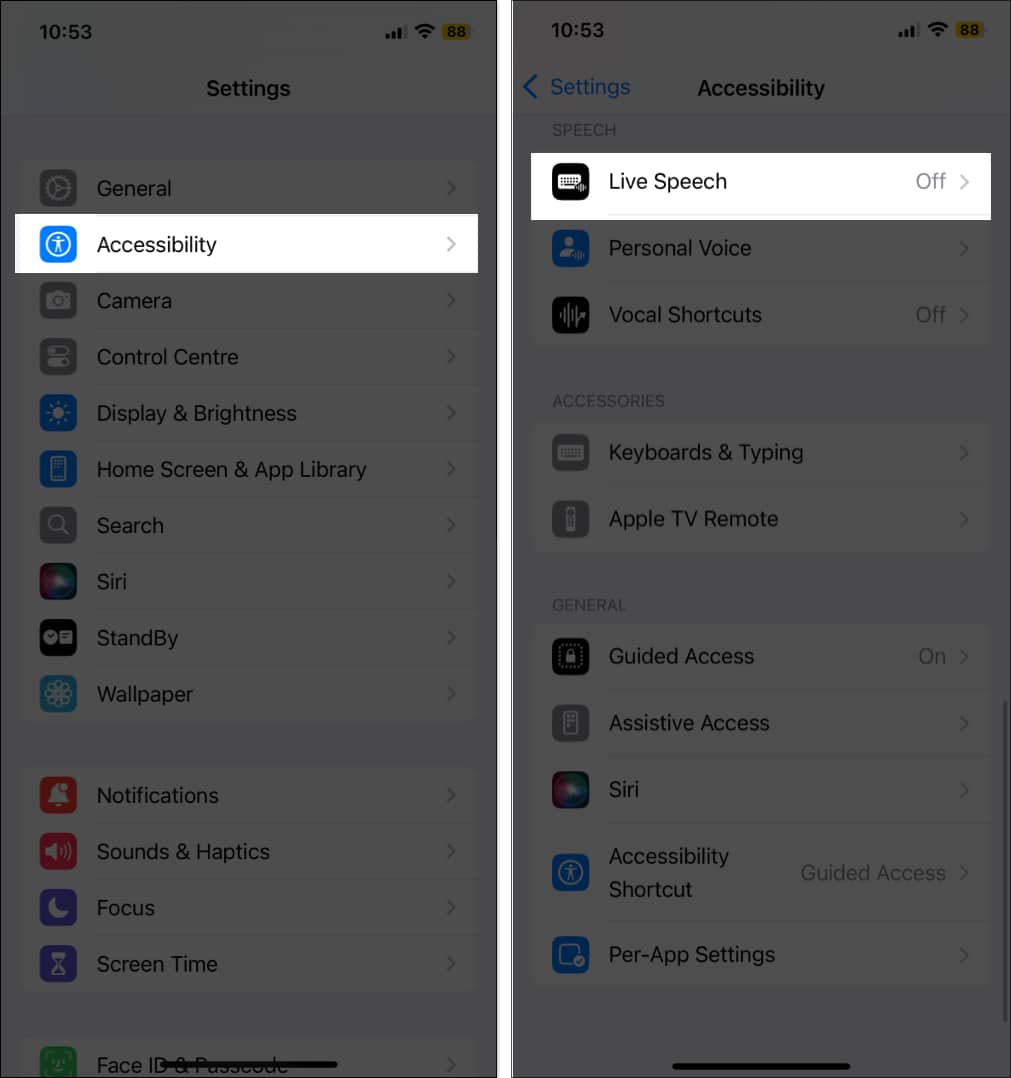
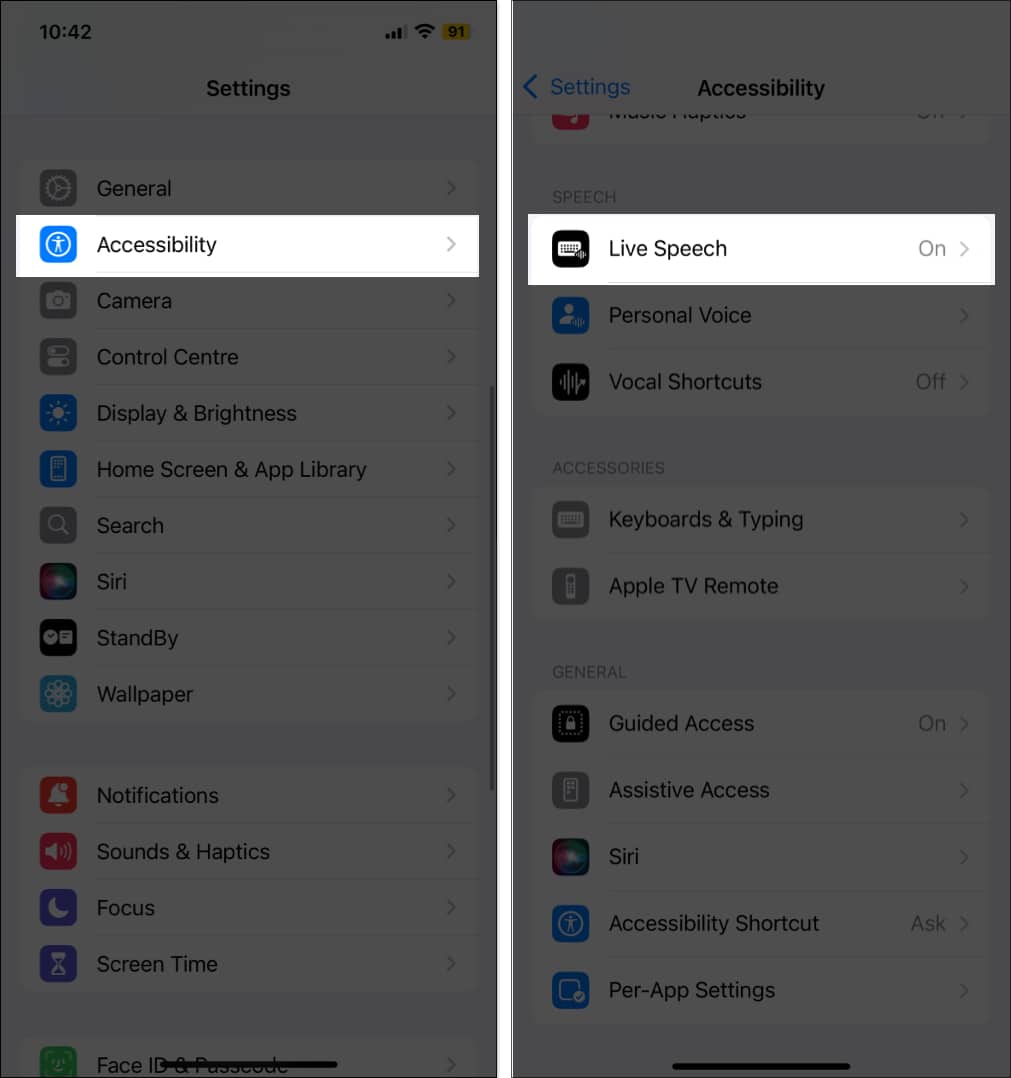
- Open Settings on your iPhone → Tap Accessibility.
- Under Speech, tap Live Speech.
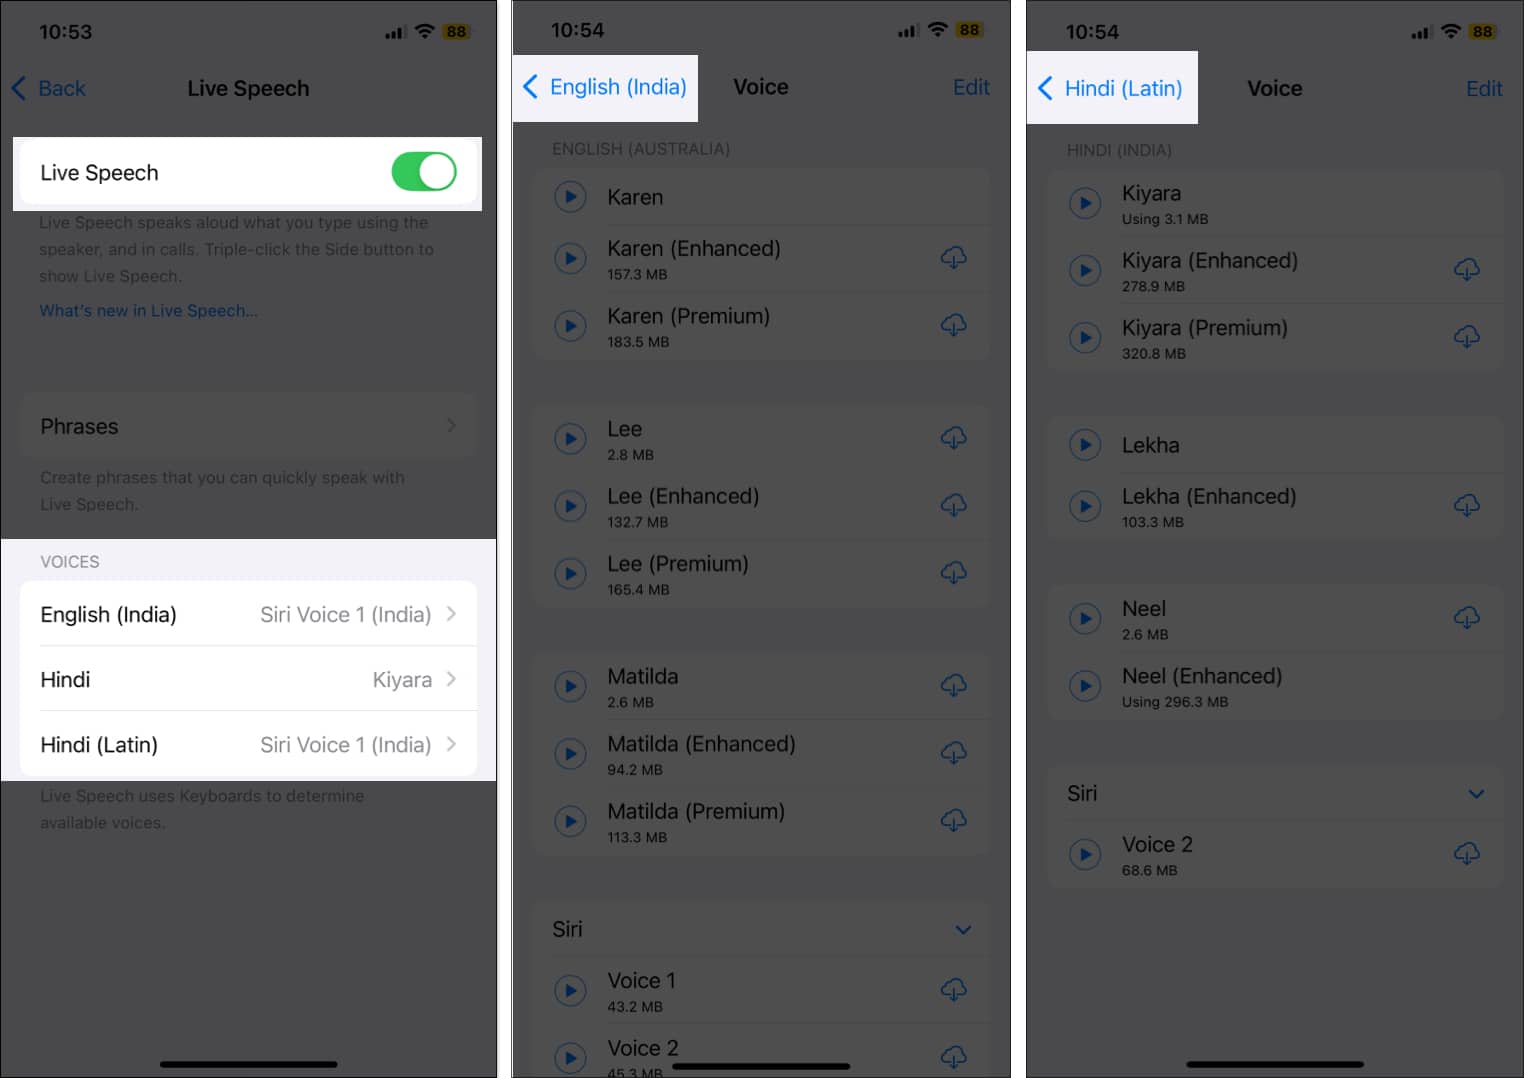
- Toggle on Live Speech.
- Under Voices, choose your preferred voice. Live Speech works with any voice, including Personal Voice (if you’ve already set up one for yourself).
- If your iPhone has a multilingual keyboard, you’ll see two voice options, one for each language you added to it.
- Under Voices, choose your preferred voice. Live Speech works with any voice, including Personal Voice (if you’ve already set up one for yourself).
- When you’re ready to use Live Speech, triple-click your iPhone or iPad’s Side or Home button to access Accessibility Shortcuts.
- If you’ve assigned more than one accessibility feature for the Accessibility Shortcut, select Live Speech from the popup that appears. The Live Speech window will then appear on your screen.
How to use Live Speech on Mac
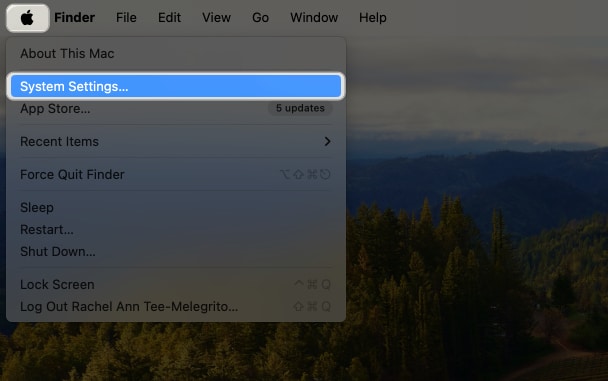
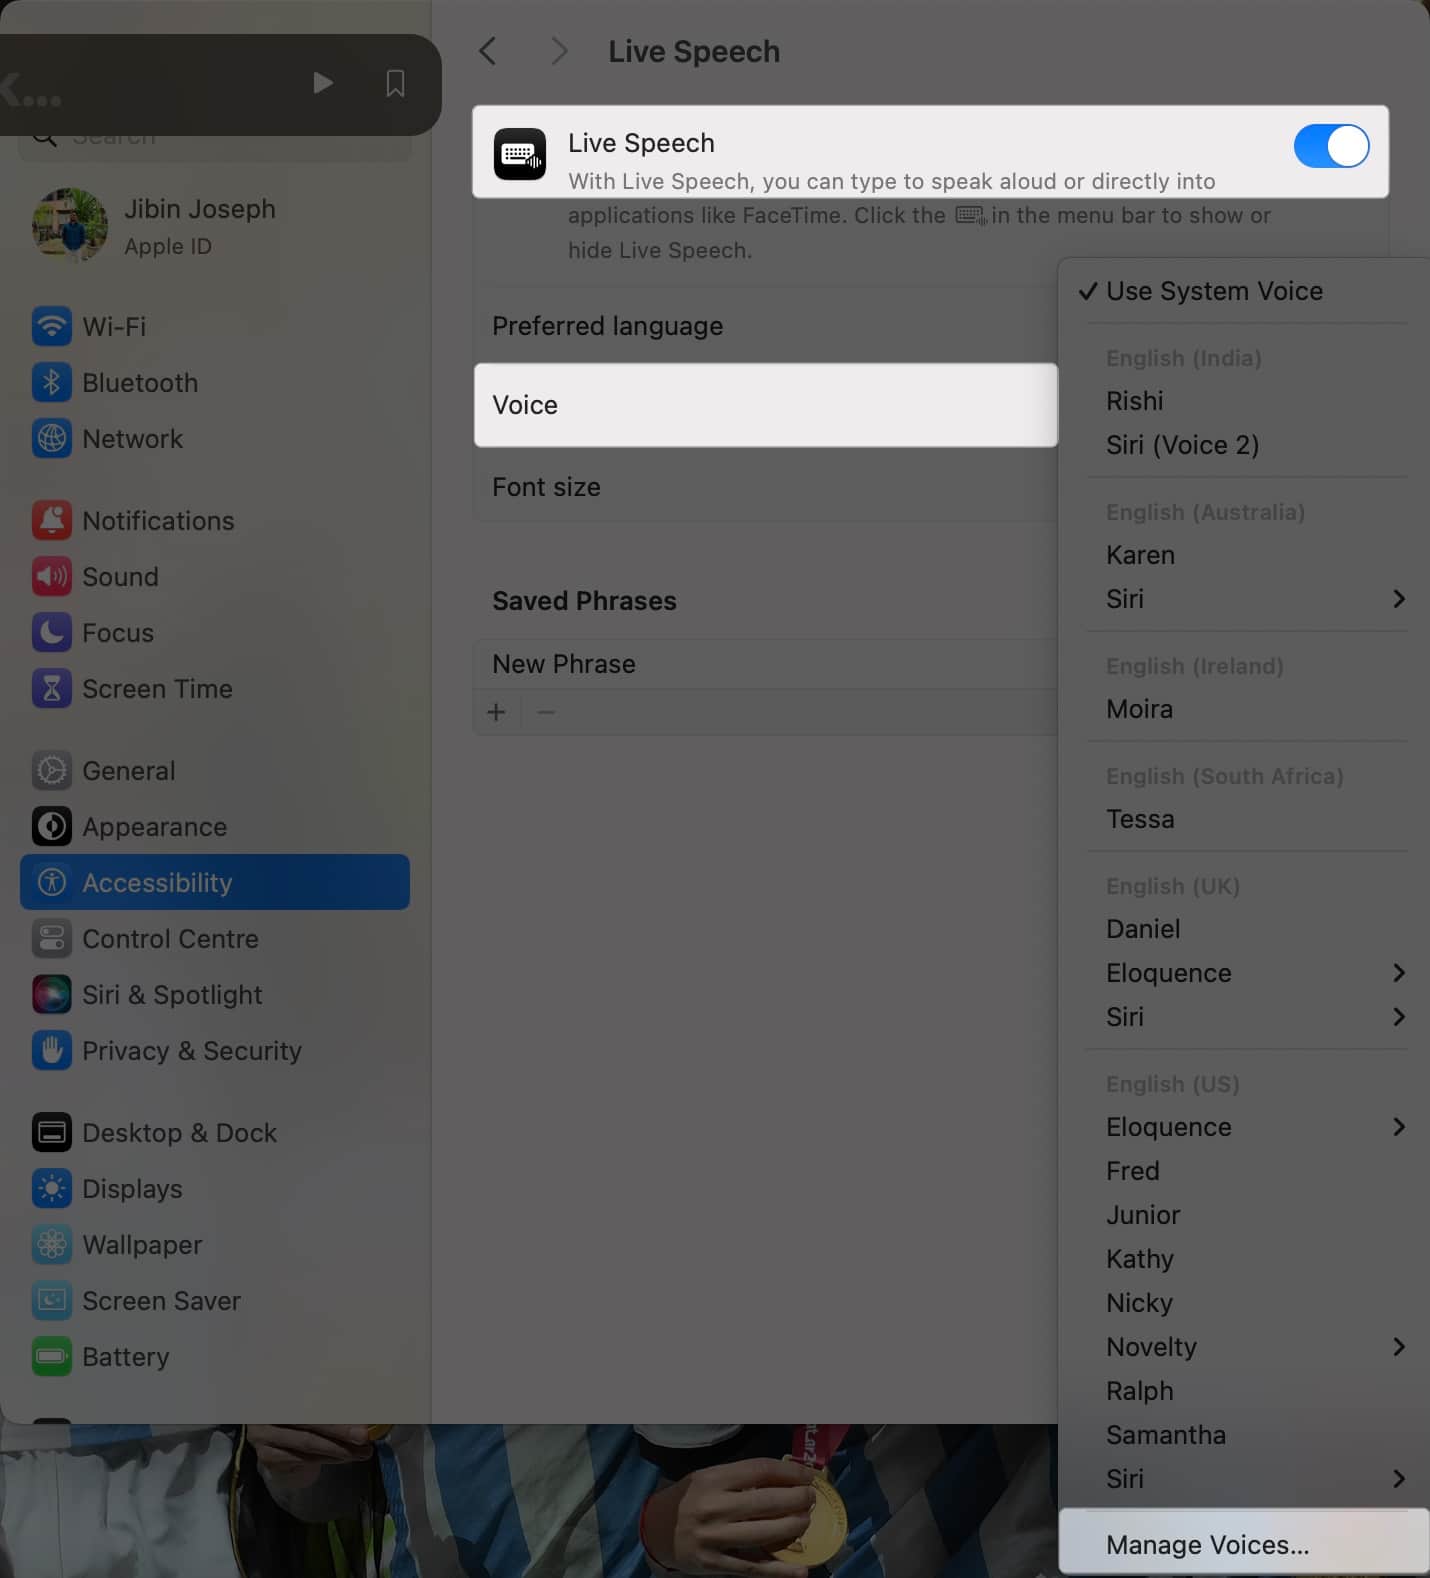
- Go to the Apple menu on your Mac→ System Settings.
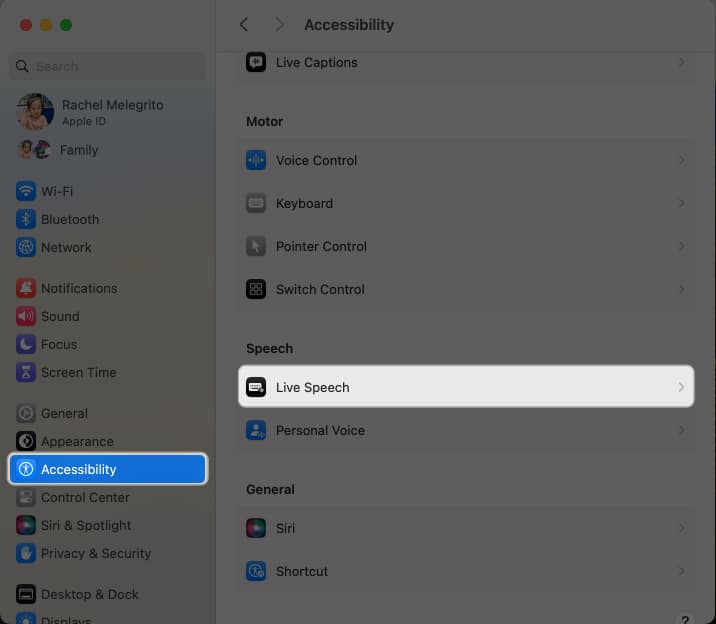
- Select Accessibility on the sidebar → Tap on Live Speech.
- Toggle Live Speech on.
- Select a voice to use next to Voice. Select Manage Voices to see more voice options.
- If your preferred voice isn’t downloaded into your Mac yet, click the Download button beside it first. You can use the voice once you’ve finished downloading it. You can also increase text size by increasing or decreasing pt size besides Font size.
- If your preferred voice isn’t downloaded into your Mac yet, click the Download button beside it first. You can use the voice once you’ve finished downloading it. You can also increase text size by increasing or decreasing pt size besides Font size.
- Open Live Speech and launch the messaging or call app you want to use. Click the Type to Speak text field in the Live Speech window and begin typing. Click the Speak (>) button or press Return.
- The participant should hear your words spoken through their device’s headphones or speakers. If you’re using your Mac to aid you in speaking during in-person conversations, the voice will be heard through your Mac’s speakers.
Apple’s Live Speech feature is also very accessible on your Mac’’s desktop. Tap the Live Speech icon in the menu bar to hide or show the Live Speech window.
How to use Live Speech on Apple Watch
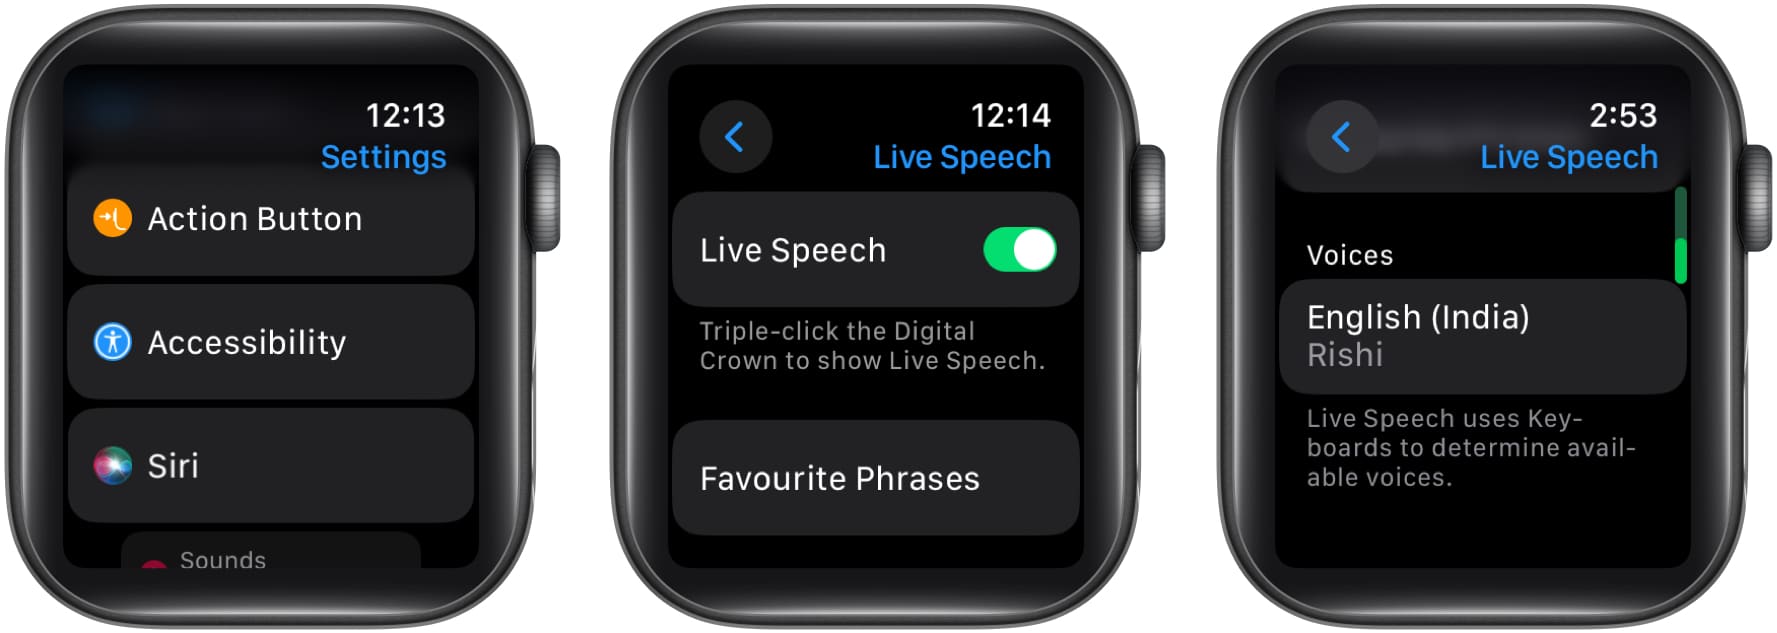
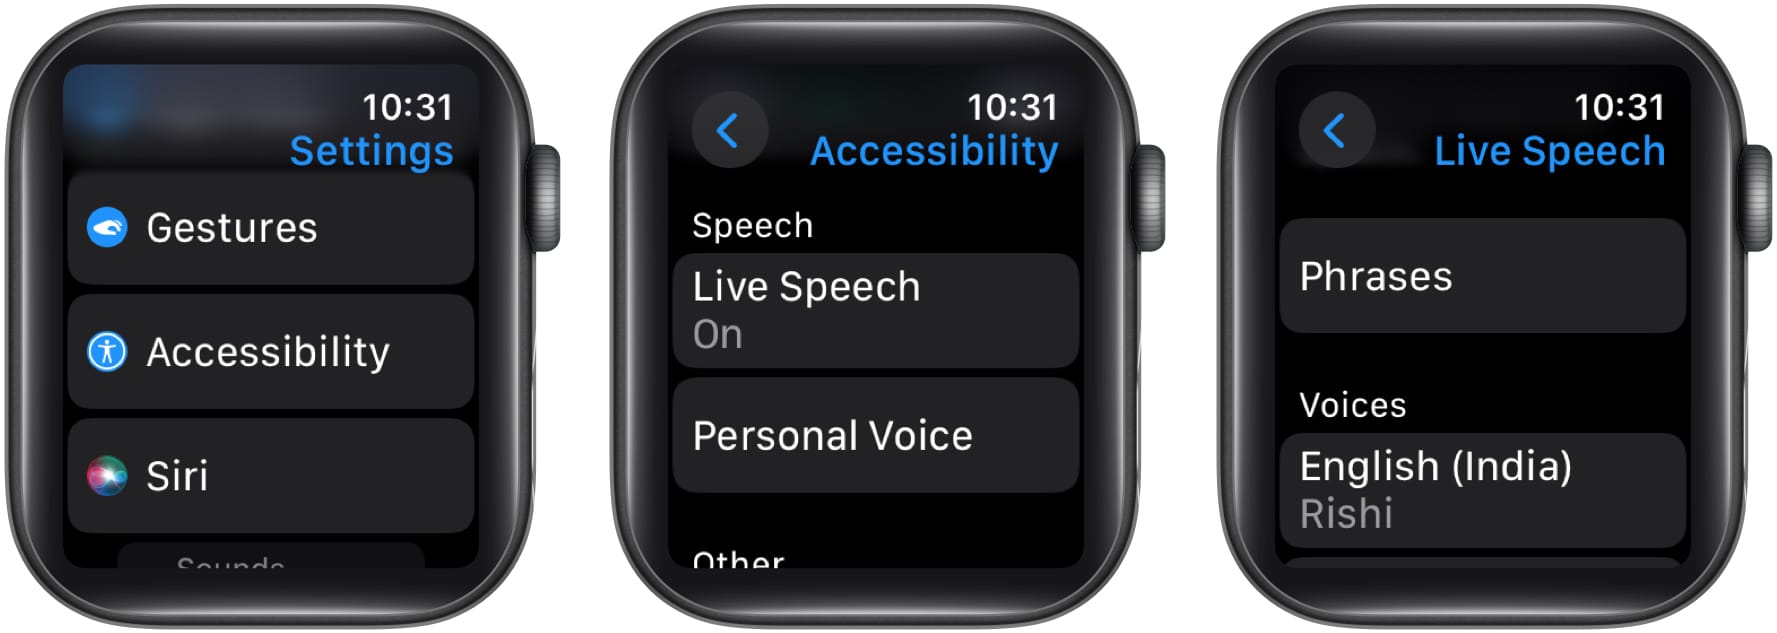
- To activate Live Speech on your Watch, go to Settings → Accessibility → Live Speech.
- Choose a voice you want to use (you must download it before selecting it).
- To initiate Live Speech on your Apple Watch, simply triple-click the Digital Crown.
- If you have previously assigned an accessibility feature, you might encounter two features when activating the Accessibility shortcut. In this case, select Live Speech to proceed. Enter the message you want your watch to speak and hit Send.
You can also use the feature while making regular or FaceTime calls with your Apple Watch.
How to add or remove favorite phrases on Live Speech
Typing during conversations can be time-consuming. Consider preparing by saving phrases, questions, or answers to your device to make interactions more fluid and allow quicker responses. This preparation can help ensure conversations run more smoothly and enable you to participate more promptly.
On iPhone
- Open Settings and head to Accessibility
- Here, choose the Live Speech option under the Speech section.
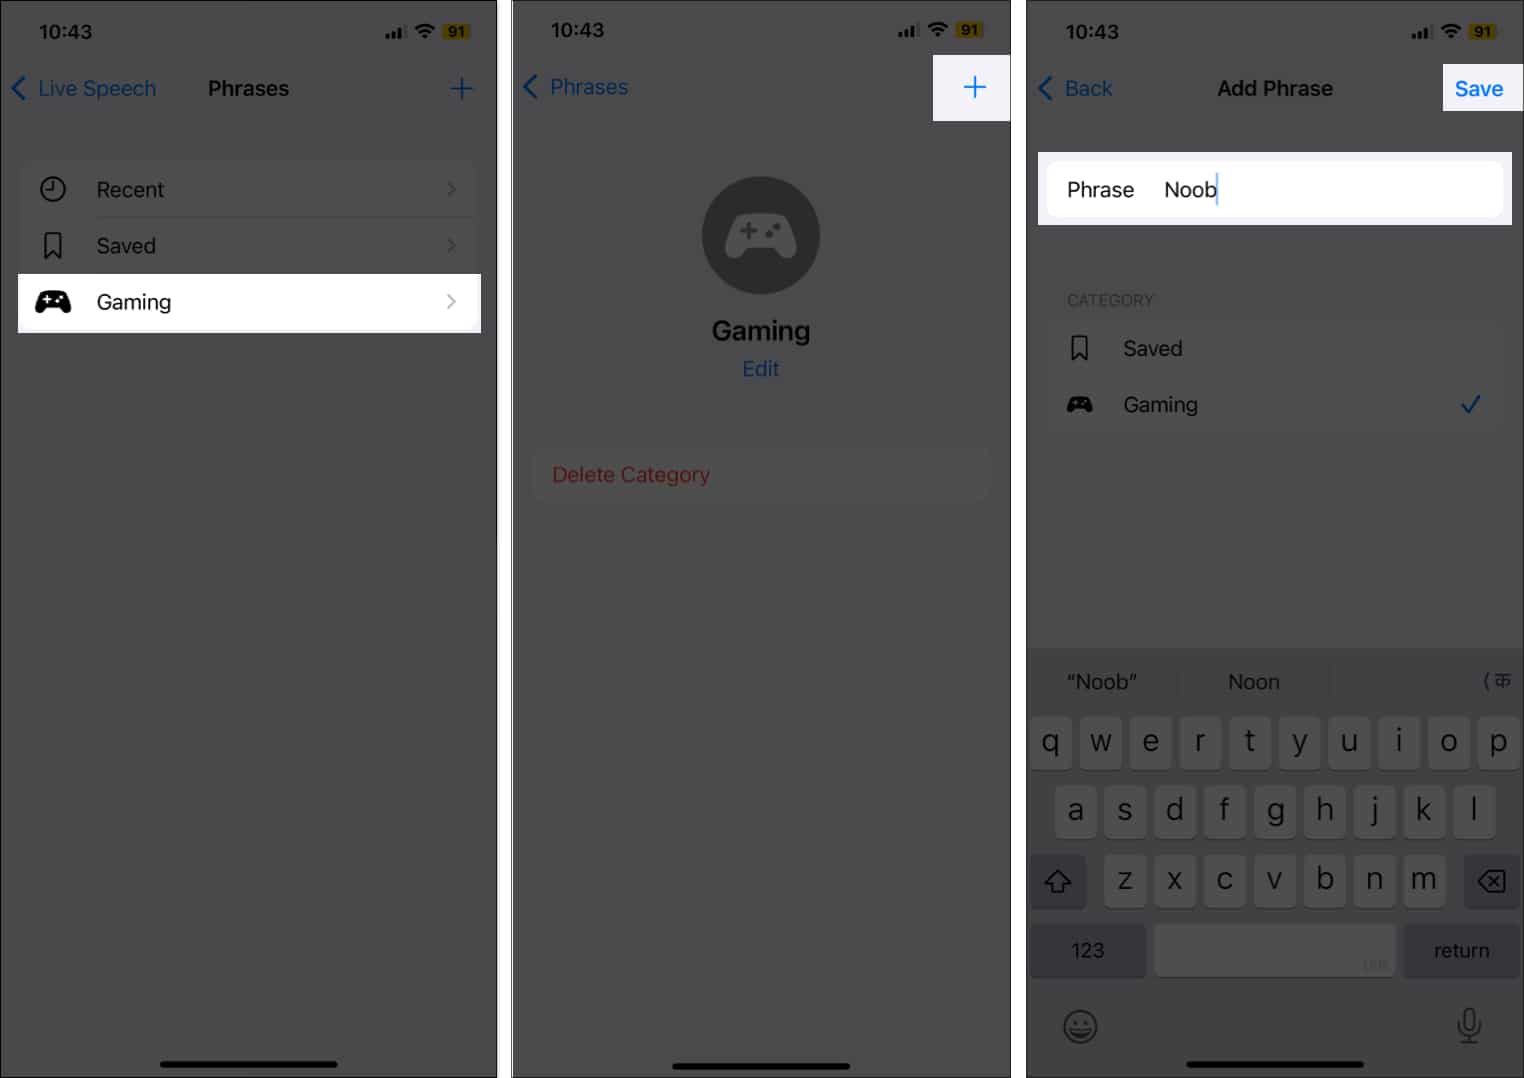
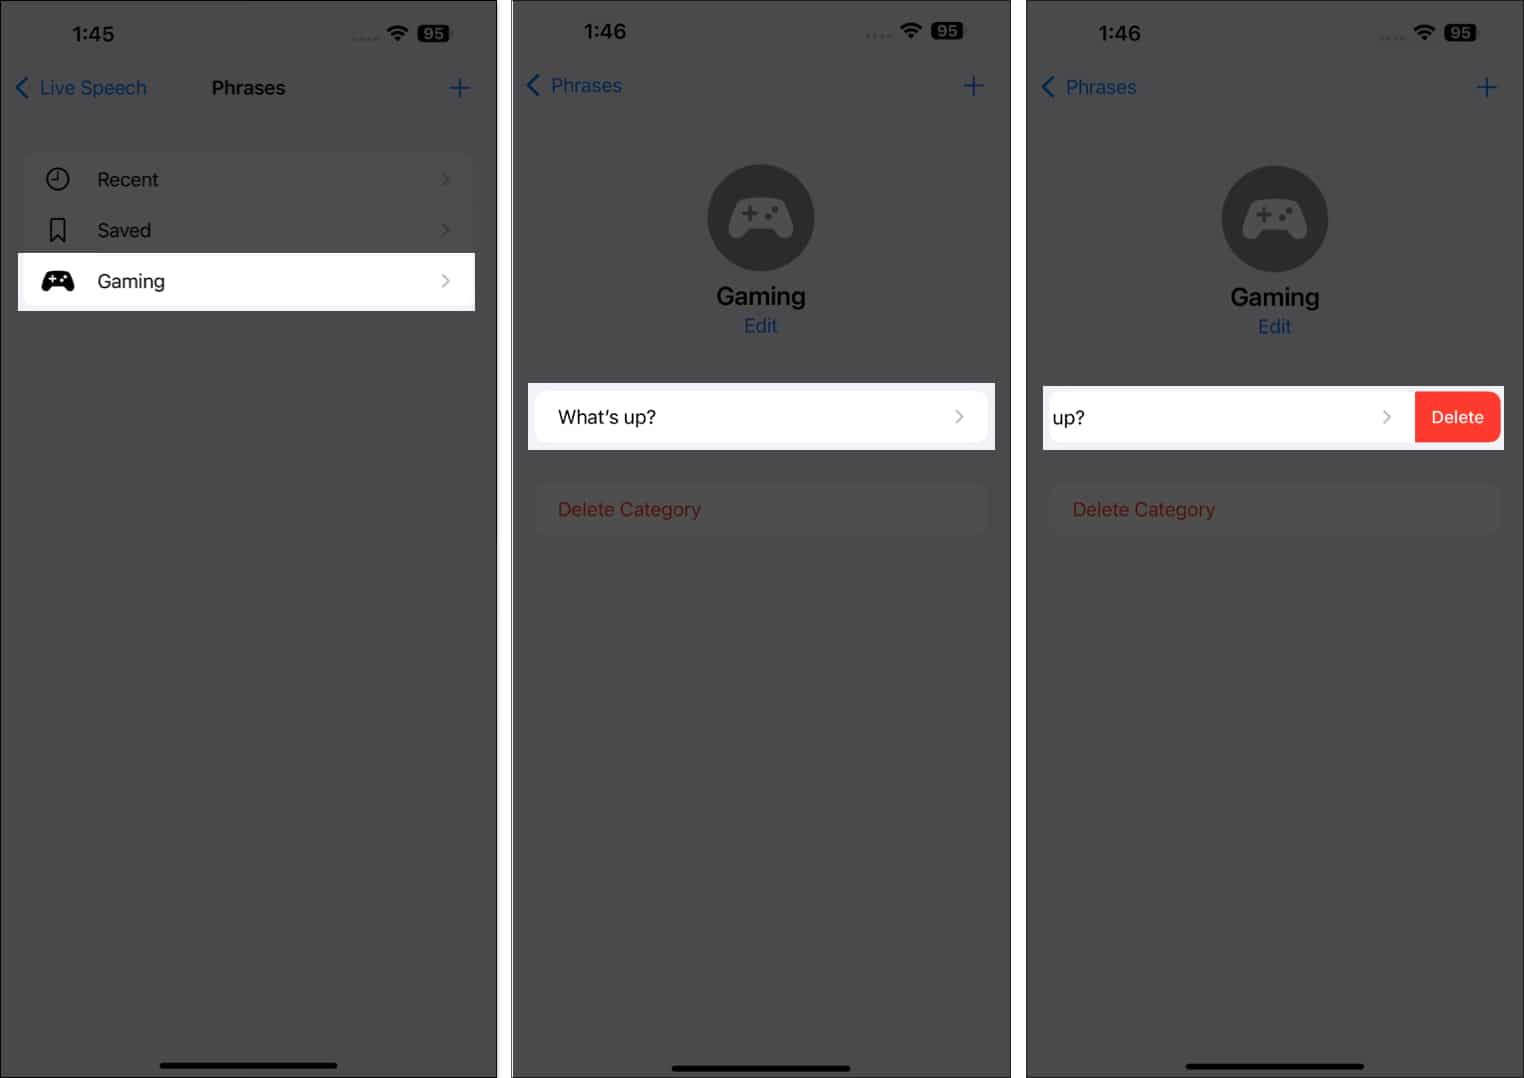
- Now, tap on Phrases, then tap the + button at the top right corner. Alternatively, you can add new phrases to the pre-created Saved category as well.
- Then, create a Category for the Phrase and tap the Done button.
- Select the created Category, then tap the + button at the top right corner of the subsequent menu.
- To remove a phrase, tap Phrases, select the Category, then select the Phrase you want to delete and tap Delete. Alternatively, you can tap on Delete Category to delete an entire phrase category.
To use it, tap Phrases at the top of the Live Speech window. Your iPhone will read the phrase as soon as you tap it.
On Mac
- Open System Settings and head to Accessibility.
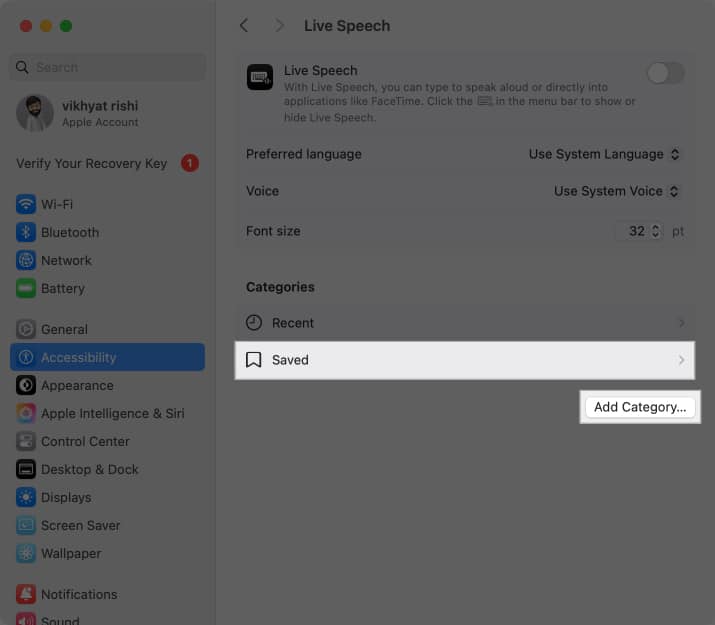
- Here, click on Live Speech.
- Now, click on Saved under Categories or the Add Category button if you want to create a new phrase category altogether.
- Next, click the + button, enter the new Phrase, and click the Done button.
To remove a phrase, select a phrase from the Saved Phrases and click Remove (-).
To use it, type the saved icon beside the play button, select the favorite Phrase you like, and hit Return or Play.
On Apple Watch
- Open Settings, then select Accessibility.
- Here, scroll down, locate & tap Live Speech.
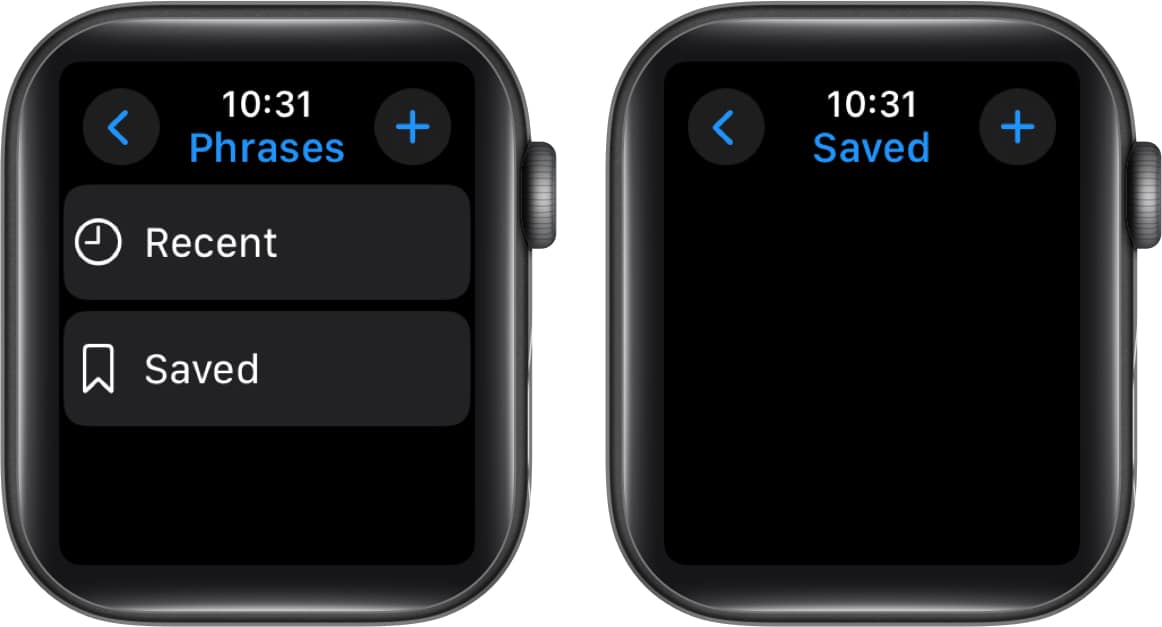
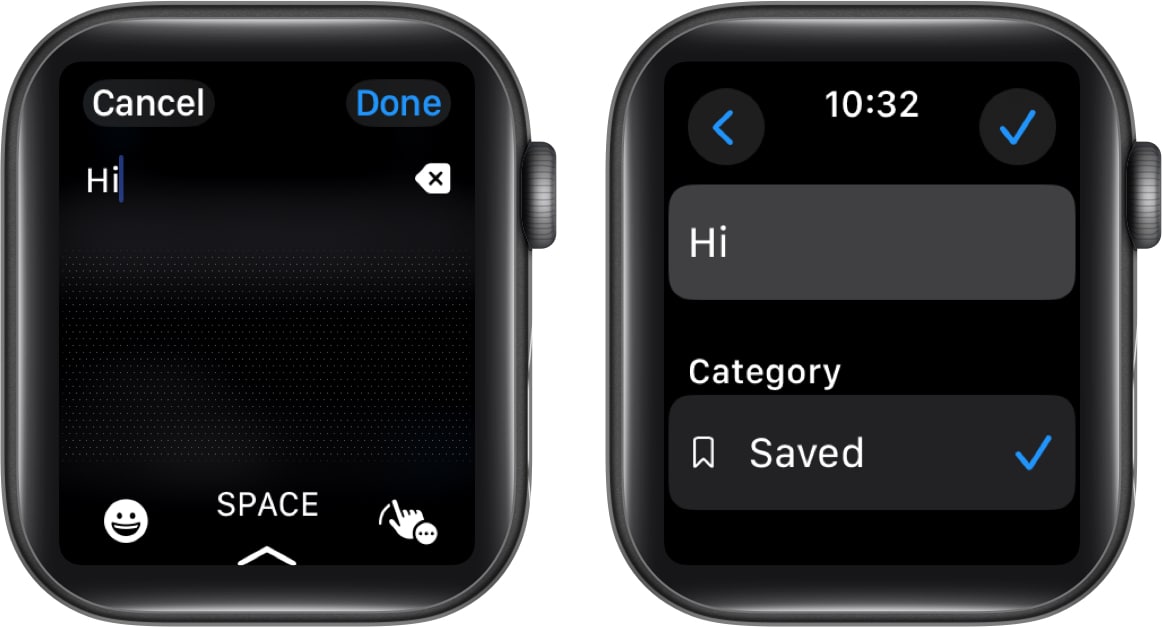
- Next, tap on Phrases and choose whether you want to create a new phrase category or add a new Phrase to Saved phrases.
- Now, tap the + button at the top right corner.
- Here, type the new Phrase and tap Done.
- Finally, tap the Done (tick) button.
To delete a phrase, simply swipe left on it and tap Delete.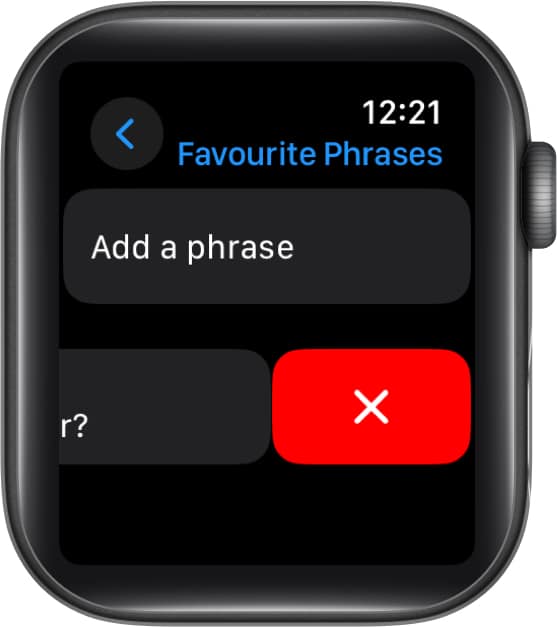
Wrapping up…
Live Speech is an excellent addition to the array of accessibility features Apple has in store for its users.
What are your thoughts on Live Speech? Can you think of any unique applications or situations where it might be especially beneficial? Share them below!
Read more:

