A few times, while browsing social media or after playing a game, I found that the mouse cursor disappears on my Mac. It’s a random thing and not limited to any one specific app or a particular version of macOS.
One thing that I’ve observed is that the mouse cursor most often disappears when I use heavy software like Photoshop and connect multiple displays. The mouse pointer is also liable to keep disappearing if I have too many tabs open in Safari or Chrome.
This bug may even occur after you update to the latest macOS version. Let’s check out some surefire ways to fix it.
- Shake your mouse or move your finger quickly across Mac Trackpad
- Right click on Mac
- Try to bring the mouse cursor to Dock
- Use Mission Control to locate the mouse cursor
- Switch to a Finder or a different app
- Bring up the Force Quit menu
- Adjust the size of the mouse cursor on Mac
- Turn off keyboard shortcuts to zoom
- Check firmware updates for a third-party mouse or Trackpad
- Check the battery of the connected mouse
- Restart your Mac
- Reset the NVRAM or PRAM and SMC
- Try a third-party mouse locator app
How do you fix if mouse cursor disappears on your Mac
1. Shake your mouse or move your finger quickly across Mac Trackpad
This is the easiest way to find the disappeared mouse cursor on Mac. All you have to do is to shake the mouse or move a finger on your Trackpad rapidly. The lost mouse cursor will appear on the screen and may also increase in size so that you can easily see it.
2. Right click on Mac
One of the easiest ways to locate your vanished mouse cursor is to right-click (either using Cmd + left click or clicking with two fingers). When you right-click, the mouse cursor is immediately visible.
3. Try to bring the mouse cursor to Dock
While you’re not able to see the mouse pointer, you can still use it as if you could. Move the invisible cursor down to the Dock. Once the vanished mouse pointer hovers over the Dock, it’ll reappear.

4. Use Mission Control to locate the mouse cursor
When you’re playing a full-screen video on YouTube or working in a full-screen app, the right-click method may not bring success. This is where accessing Mission Control on Mac can help you locate the mouse cursor.
Three methods to enter Mission Control:
- Click the Mission Control key (F3) from top row or Touch Bar, or
- Press Ctrl + Arrow up (△) key, or
- Swipe up with four (or three) fingers on the Trackpad
5. Switch to a Finder or a different app
Press Cmd (⌘) + tab to quickly switch to a different app or Finder. You should see the mouse cursor. Now go back to the app you were working on.

6. Bring up the Force Quit menu
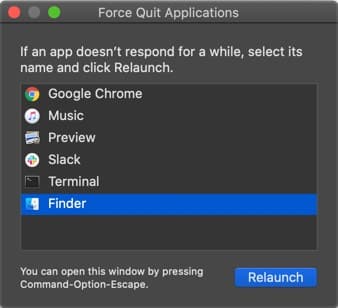
On your keyboard press Cmd (⌘) + Option (⌥) + esc. The Force Quit Applications pop-up appears. You don’t have to quit out of any apps. Just opening the menu brings up the hidden mouse cursor.
7. Adjust the size of the mouse cursor on Mac
macOS lets you set the mouse pointer size according to your liking. To increase the cursor size launch System Preferences → Accessibility → Display from the left sidebar → Cursor → drag the Cursor size slider.
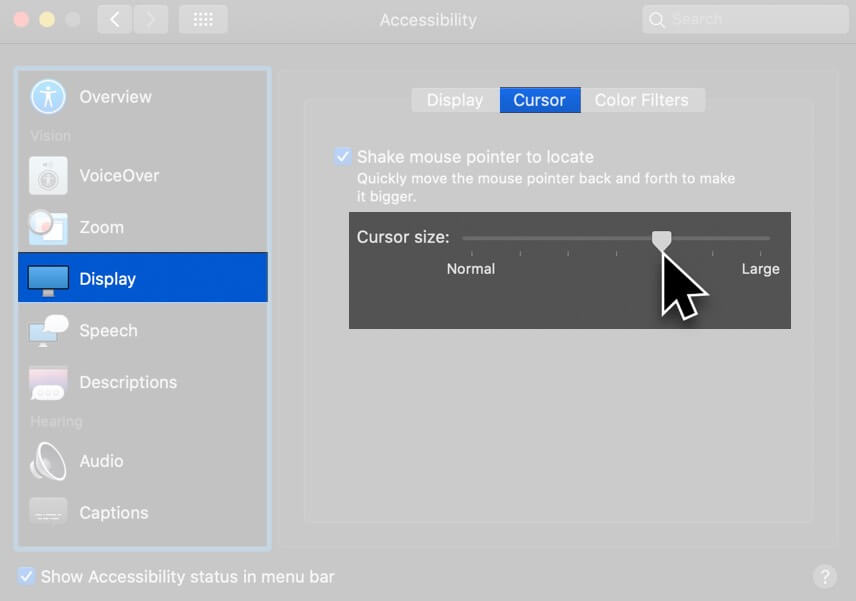
Also, enable Shake mouse pointer to locate.
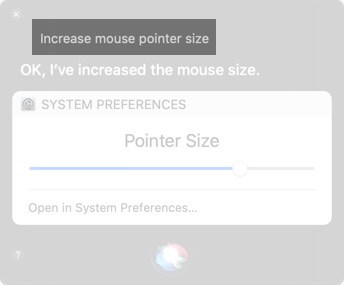
You can also launch Siri from the top right of the menu (or touch) bar or press and hold Cmd (⌘) + Space Bar. Now ask Siri ‘Increase mouse pointer size.’
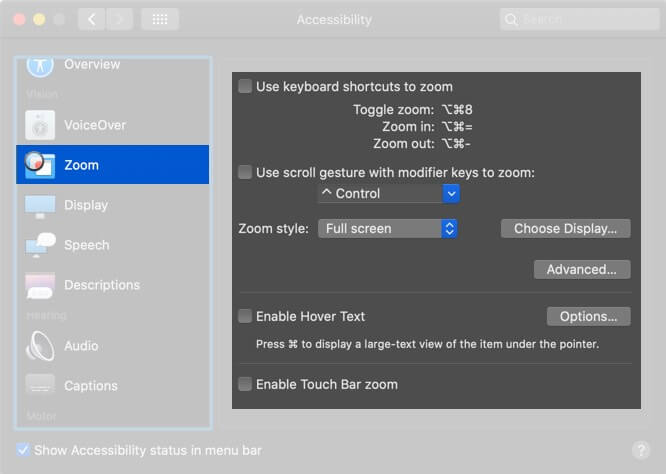
8. Turn off keyboard shortcuts to zoom
Accessibility features are beneficial, but they may cause little issues here and there. Disabling keyboard shortcuts to zoom is a good hack to address a mouse that’s suddenly up and gone.
Launch System Preferences → Accessibility → Zoom → make sure everything is unchecked here.
9. Check firmware updates for a third-party Mouse or Trackpad
If you’re using a non-Apple brand peripheral, visit their website or ask the company if there are any pending driver updates to improve compatibility and fix glitches.
10. Check the battery of the connected mouse
Replace the removable batteries or charge your mouse and Trackpad if it has a rechargeable internal battery.
11. Restart your Mac
If none of the solutions worked for you, try restarting your macOS device. A restart usually fixes these temporary issues. Click on the Apple logo from the top left and select Restart.
12. Reset the NVRAM or PRAM and SMC
- NVRAM: Non-volatile Random-access Memory
- PRAM: Parameter Random-access Memory
- SMC: System Management Controller
NVRAM and PRAM store some specific settings in a location that macOS can access quickly, like designated startup disk, display resolution, or speaker volume.
SMC is a vital chip on Intel-based Macs that controls small hardware components and processes like keyboards, fans, thermal and power management, battery charging, hibernation, etc.
If your mouse cursor keeps disappearing on Mac, try to reset the SMC and NVRAM/PRAM.
13. Try a third-party mouse locator app
If this issue persists, you can install a third-party application that helps you find your cursor. One app you can try is Simple Mouse Locator. It’s a paid app that hasn’t received an update since 2015, but there are reviews of praise from as recent as 2019. Try it out—if it doesn’t work for you, request a refund!
These are some of the ways to fix a mouse cursor that keeps disappearing on Mac. Finally, I recommend that you learn some keyboard shortcuts for macOS. If you have time, also check out macOS Dock shortcuts. They’ll surely improve your productivity and make your experience swift and enjoyable.
What are your thoughts on this article? Share your feedback with us in the comment section. We’ll do our best to answer any questions!
You may also like to read…


