Wondering why there is no internet connection even when your MacBook is connected to Wi-Fi? Fret not; it is a fairly common issue. However, it can hinder your work as this would prevent any browser from loading web pages.
Don’t worry! In this article, I will explain what to do when your MacBook is connected to your Wi-Fi network but has no Internet. But first, let’s understand why it happens.
Table of Contents
- Why is my MacBook connecting to WiFi but not Internet?
- How to fix MacBook connects to Wi-Fi but has no Internet connection
- 1. Restart MacBook and router
- 2. Forget Wi-Fi Network and Reconnect
- 3. Setup date, time, and location
- 4. Check for macOS updates
- 5. Change DNS on Mac
- 6. Use MacBook wireless diagnostic tool
- 7. Disconnect USB accessories
- 8. Renew DHCP lease
- 9. Clean up usernames and profiles
- 10. Create a new network location
- 11. Reset Network Preferences
- 12. Stop mDNSResponder
Why is my MacBook connecting to WiFi but not Internet?
Wrong settings or your router could cause the underlying issue. We also need to understand that Wi-Fi and the Internet are separate entities. Successful connection to a Wi-Fi router doesn’t mean you are connected to the internet.
Before proceeding, try connecting your laptop to a mobile hotspot. The fault probably lies in your Wi-Fi connection if you can access the internet. If the problem persists, move ahead with this guide!
How to fix MacBook connects to Wi-Fi but has no Internet connection
DNS settings, macOS, Date, Time, Location, and other issues could break the internet on your Mac. Here’s a list of fixes that should help fix the issue.
1. Restart MacBook and router
As always, a restart could work wonders. Turn off your Mac and restart it after a while. Do the same with your router. If your setup includes an Optical Network Unit, switch it off, too.
Now, check if the Wi-Fi issue is sorted after the restart. If you are still facing the issue, proceed to the next troubleshooting step.
2. Forget Wi-Fi Network and Reconnect
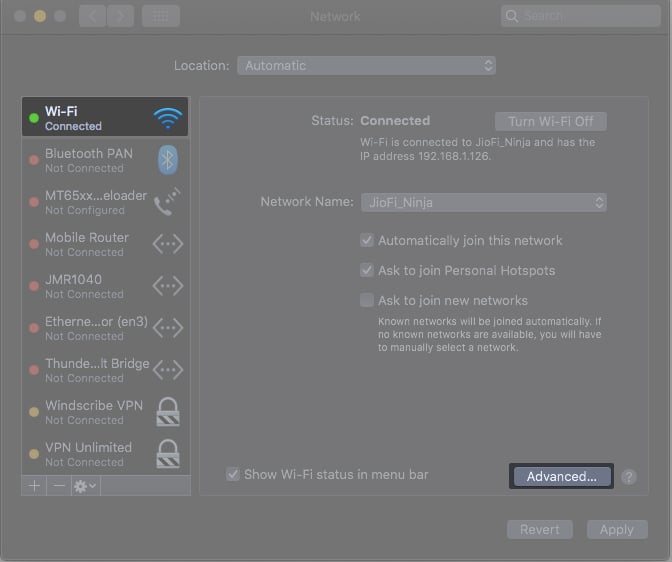
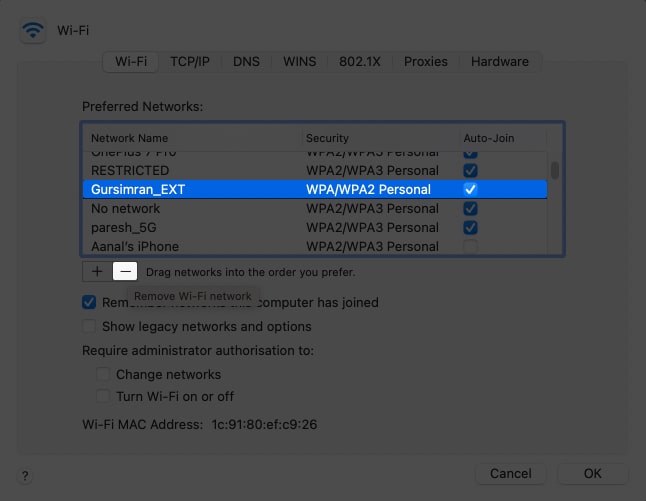
Sometimes, conflicting network information can wreak havoc. In such cases, a fresh Wi-Fi connection could work wonders. Follow the steps to forget Wi-Fi on a Mac.
- Click the Apple icon at the top left → System Preferences → Network.
- Select Wi-Fi on the left panel.
- Click Advanced at the bottom right.
- Click the network name and click the – icon below the box.
Now, wait for the network to reappear. - Re-enter the password and connect again.
3. Setup date, time, and location
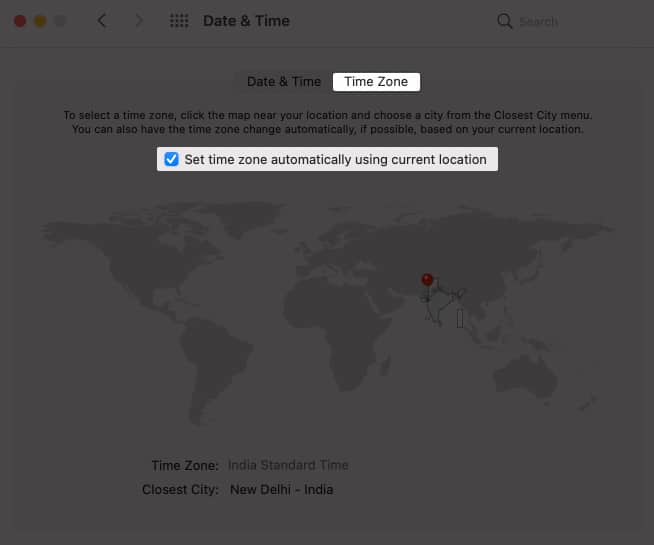
It might sound weird, but the date, time, and location can cause internet issues. Let us check the settings and make some changes if needed.
- Open System Preferences.
- Click Date & Time → Time Zone.
- Hit the lock icon at the bottom-left and enter the password (use Touch ID).
- Next, check the box for Set time zone automatically using current location.
4. Check for macOS updates
Outdated or older versions of macOS could potentially cause connectivity issues. The best way out is to update to the latest macOS. Head over to a cafe or any public place with Wi-Fi access once you get access to the internet update to the latest macOS.
On the flip side, you need an internet connection to update. Skip this step if your Mac is not connecting to any Wi-Fi networks. If possible, use Ethernet and download the update.
5. Change DNS on Mac
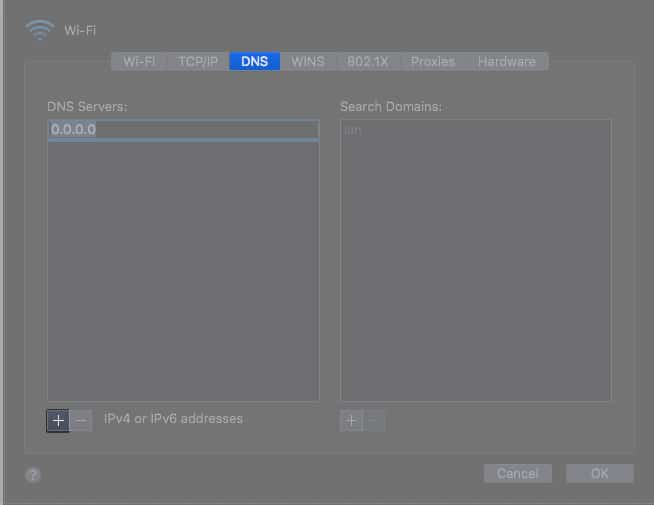
Domain Name System (DNS) is a protocol through which browsers interact with the internet. Whenever we type in a domain name, the DNS translates it to IP addresses for the browser. Sometimes changing DNS helps resolve connectivity issues on Mac.
Follow the steps below to change DNS.
- Close all browsers.
- Open System Preferences → Network → Select Wi-Fi.
- Choose Advanced and navigate to the DNS tab.
- Click the + button to add the IPv6 DNS server of your choice.
- Google uses 8.8.8.8 as primary and 8.8.4.4.
- Cloudflare uses 1.1.1.1 for primary and 1.0.0.1 for secondary.
- Once done, select OK.
6. Use MacBook wireless diagnostic tool
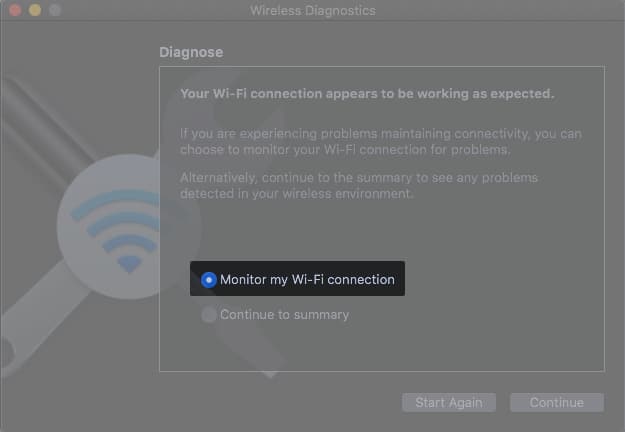
MacBook wireless diagnostic tool is the best option if you don’t want to rack your brain. The tool is entirely automated and troubleshoots the network with a single click.
- Open Spotlight by pressing command + spacebar.
- Search for Wireless Diagnostics.
- Run Diagnostics.
- Monitor my Wi-Fi connection continuously diagnoses your Wi-Fi.
When you notice any problem, you can check the summary.
7. Disconnect USB accessories
Malfunctioning USB accessories can hamper your connectivity. Software conflicts or driver settings could prevent your Mac from connecting to the internet. Remove USB accessories from your Mac and see if it makes any difference. If the internet is working, the accessory is to be blamed.
8. Renew DHCP lease
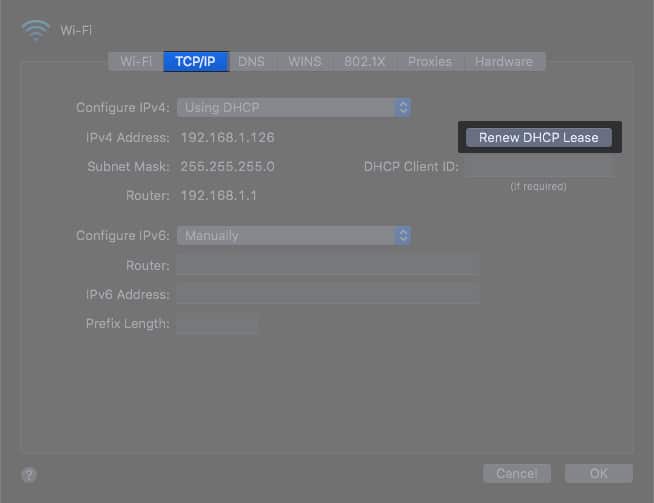
DHCP lease is when a temporary ID is assigned to a device on the network. It is useful for managing multiple devices connected to the same network. The IP address for every device on the network is assigned temporarily, thus the term “lease.”
Internet on Mac might not work if there are any DHCP Lease issues. Let us renew the DHCP lease with the help of the following steps.
- Open System Preferences → Network.
- Click Wi-Fi and select Advanced.
- Open TCPP/IP tab.
- Click Renew DHCP lease.
9. Clean up usernames and profiles
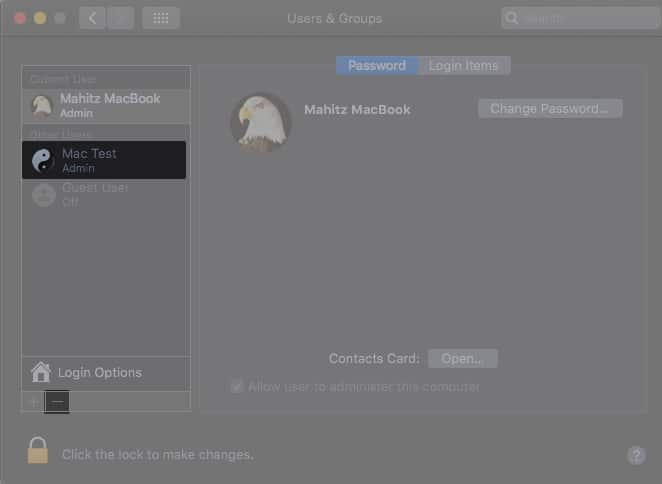
Sometimes, user profile data could cause your MacBook to connect to Wi-Fi but have no Internet connection. Remove profiles and check if Wi-Fi starts working on Mac.
- Open System Preferences.
- Select Users & Groups.
- Click the lock icon at the bottom left → enter your Mac’s password to unlock it.
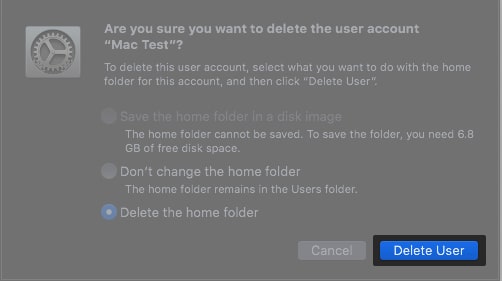
You’ll now be able to delete the user profile - Select the user profile you wish to delete and click the – icon.
- Select Delete the home folder → hit Delete User.
Now, restart the Wi-Fi and check if you can access the internet. Repeat it after deleting each user profile. If this doesn’t help, proceed to the next step.
10. Create a new network location
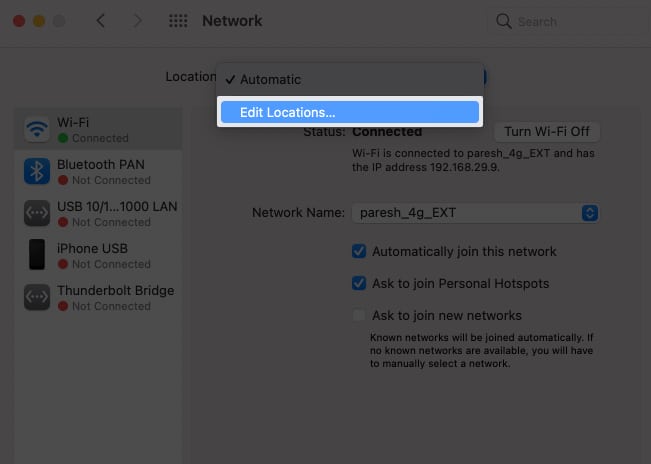
Mac assigns a location whenever you connect to the internet. If there are any errors in the set location, the internet will cease to work. Manually setting a new network location is the right thing to do.
- Open System Preferences → Network.
- In the drop-down menu beside Location, choose Edit Location.
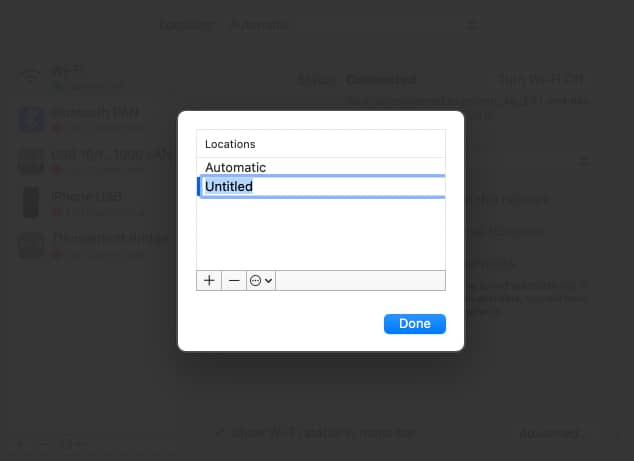
- Click + to add a new location.
- Now, click Done → Apply.
11. Reset Network Preferences
Certain network preferences might be playing foul and causing connectivity issues. I would suggest you backup all settings and reset network preferences. Follow the steps below to reset network preferences.
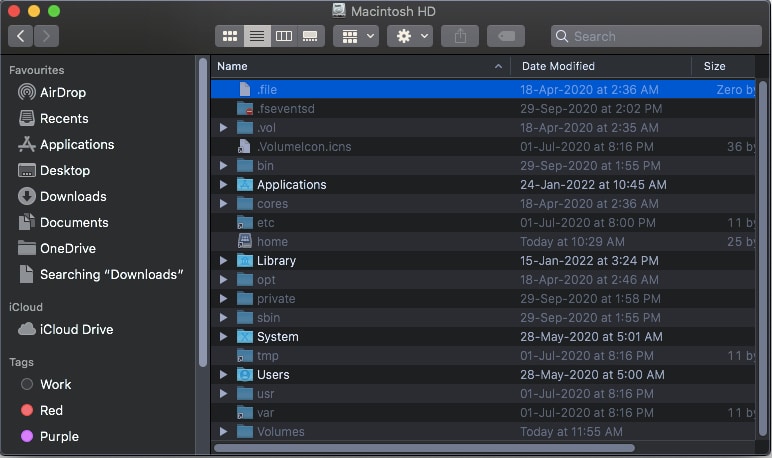
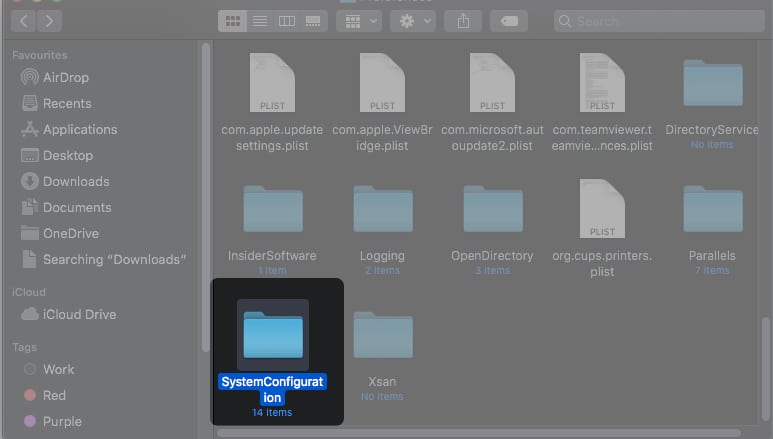
- Open Finder → select Go at the top menu bar.
- Select Computer → open Macintosh HD → open the Library folder.
- Go to Preferences → System Configuration.
- Now, Search and delete the following files-
- com.apple.airport.preference.plist
- com.apple.network.identification.plist
- NetworkInterfaces.plist
- preferences.plist
- Settings.plist
12. Stop mDNSResponder
mDNS is part of Apple’s Bonjour network configuring process. It is a critical part of the system that helps scan other Apple devices. Programs like iTunes require mDNSResponder to work.
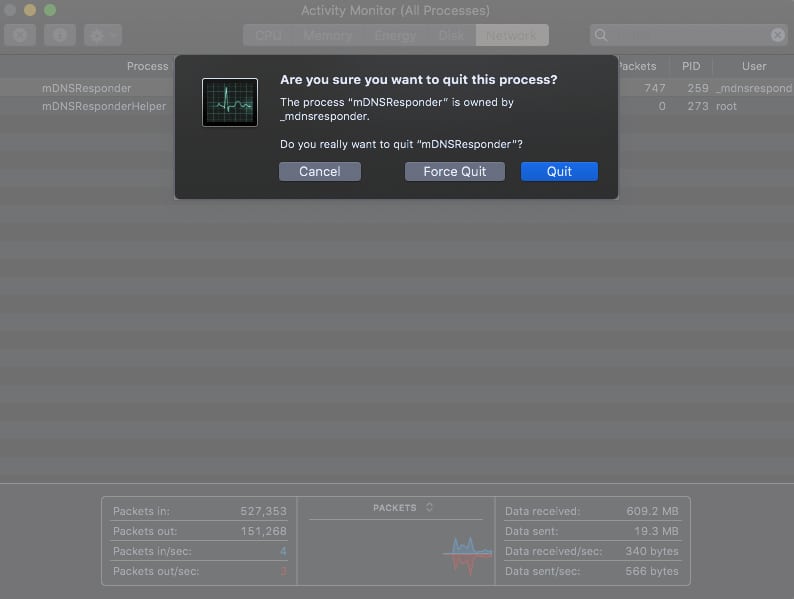
However, when things are not right, the process could cause problems with the internet. Here is how you can stop mDNSResponder.
- Go to Finder → Applications → Utilities → Activity Monitor.
Alternatively, you can press command + spacebar to launch Spotlight and search Activity Monitor. - Go to Network → Process Name.
- Search for mDNSResponder.
- Next, click the ‘X‘ symbol.
That should help you resolve the problem. Have more questions? See if we have covered your query in the below section.
I hope this guide covered all the bases and helped you regain internet access on your MacBook. If you have more queries, feel free to drop them in the comments below.
FAQs
The exclamation mark indicates you are connected to Wi-Fi, but the internet is unavailable. The troubleshooting steps listed in this article should help solve this issue. If the internet is not working after updating to macOS Monterey, see how to fix it.
Wi-Fi on a MacBook could be slow if you are sharing bandwidth with others. Check if others in your network are downloading large files or streaming high-resolution videos. Further, restart your device and reconnect your Wi-Fi. If nothing works, take your Mac to the nearest Apple service center and get it checked.
Read more:


Great article! I was struggling with my MacBook connecting to Wi-Fi but not having internet access. I tried the DNS flush method you mentioned, and it worked like a charm! Thanks for the helpful tips!
Thank you for this helpful post! I was struggling with my MacBook connecting to Wi-Fi but not having internet access. I tried the DNS and renewing the DHCP lease tips you mentioned, and they worked like a charm! Appreciate your detailed explanations for each fix!