Mac has a lot to offer, but we often fail to use it to its optimum. That’s because we don’t tweak enough the macOS to suit our requirements. Over the years of using my Mac, I’ve found customizations that have helped improve my workflow and overall experience. If you are one such Mac user who wishes to boost your productivity, efficiency, and comfort, the following are the Mac settings you should change right now.
Table of Contents
- 1. Update your computer’s name
- 2. Set up additional Touch ID fingerprints
- 3. Personalize your Mac’s appearance
- 4. Customize your Mac’s Dock
- 5. Make invisible apps transparent
- 6. Fix the Sharing menu on Mac
- 7. Modify Keyboard’s Autocorrect settings
- 8. Add multiple virtual desktops
- 9. Customize Mac Menu bar
- 10. Customize Control Center
- 11. Add Accessibility Shortcuts to the Control Center or Menu bar
- 12. Customize your Mac toolbar
- 13. Automatically launch programs at the start
- 14. Enable Fast User Switching
- 15. Adjust behavior of your mouse, keyboard, and trackpad
- 16. Add widgets to the Notification Center
- 17. Choose where Spotlight searches
- 18. Change Finder settings
- 19. Show Path Bar and Status Bar
- 20. Setup Bookmarks in Safari
- 21. Create Safari Tab Groups
- 22. Choose a different browser
- 23. Take Screenshots in JPEG Format
- 24. Create Smart Folders
- 25. Make Smart Albums
- 26. Organize your Files with Tags and Stacks
- 27. Create Custom Keyboard Shortcuts
- 28. Personalize Siri
- 29. Create Customized Focus
- 30. Mute Notifications
- 31. Enable Spatial Stereo
- 32. Customize Mac Sounds
- 33. Setup a Hot Corner
- 34. Enable Handoff
- 35. Automate software updates
- 36. Stop Autoplay content
- 37. Setup iCloud Backup
- 38. Customize Location Privacy settings
- 39. Manage Battery settings
- 40. Turn on File Vault
- 41. Enable Unlocking Mac with Apple Watch
- 42. Add Legacy Contacts to your iCloud
- 43. Enable Mail Privacy Protection
- 44. Setup iCloud recovery contacts
1. Update your computer’s name
When you first set up your Mac, macOS automatically assigns a name to your device. But macOS isn’t particularly creative — if you own several Macs, it just sticks your name on there and adds a number for each new device. So, you must change this Mac setting to distinguish it:
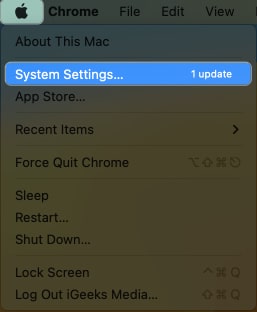
- Click the Apple menu → System Settings.
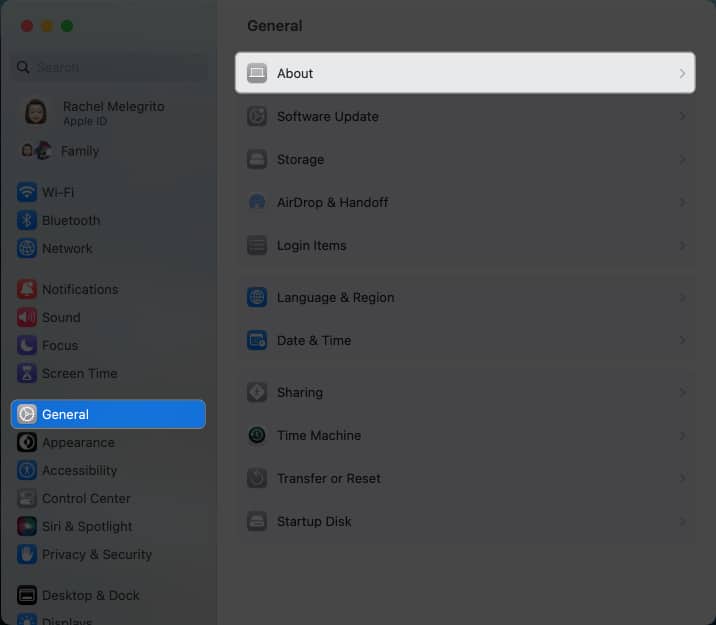
- Choose General on the sidebar → Click About.
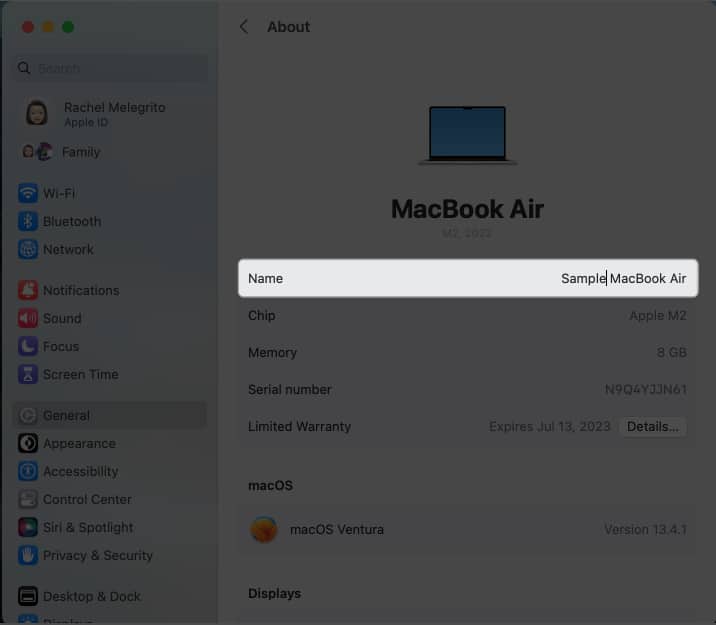
- Overwrite your current Mac’s name.
2. Set up additional Touch ID fingerprints
During the initial setup, your Mac only prompts you to register just one fingerprint, but did you know your Mac can accommodate up to three?
Let’s face it. Life puts us in tricky spots when our primary hand is occupied. Those are the moments when unlocking our devices with the registered fingerprint seems an impossible feat.
- To add more, go to Apple menu → System Settings
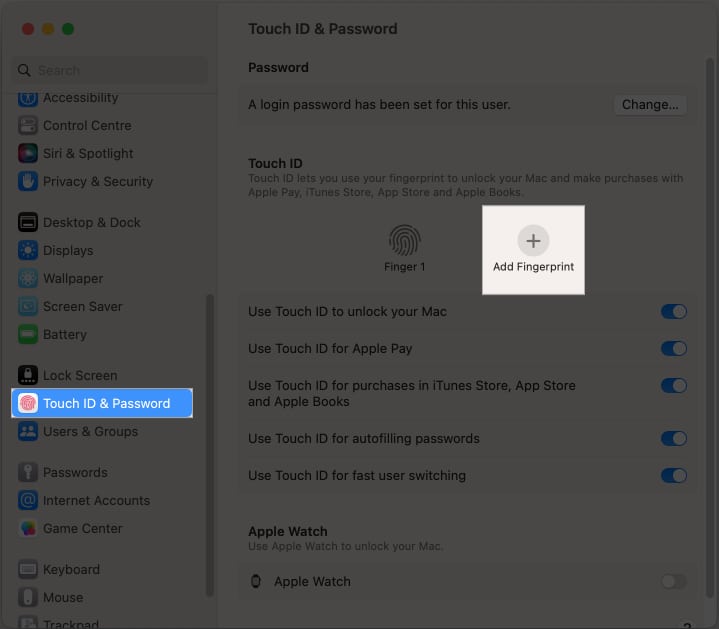
- Find Touch ID & Password on the sidebar → Click Add Fingerprint (+)
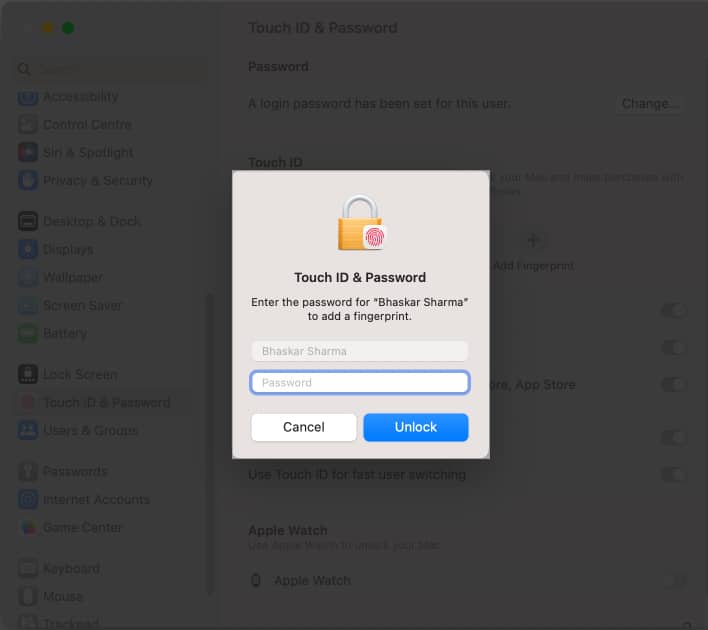
- Enter your password and follow the onscreen prompts.
3. Personalize your Mac’s appearance
Think of your Mac as an extension of your workplace and a reflection of your personality. To add, if you work in front of your screen for hours on end, it’s essential to fine-tune your display to make it easy for your eyes.
Set a custom color scheme
You can mix and match color presets and create a fresh color scheme for your Mac.
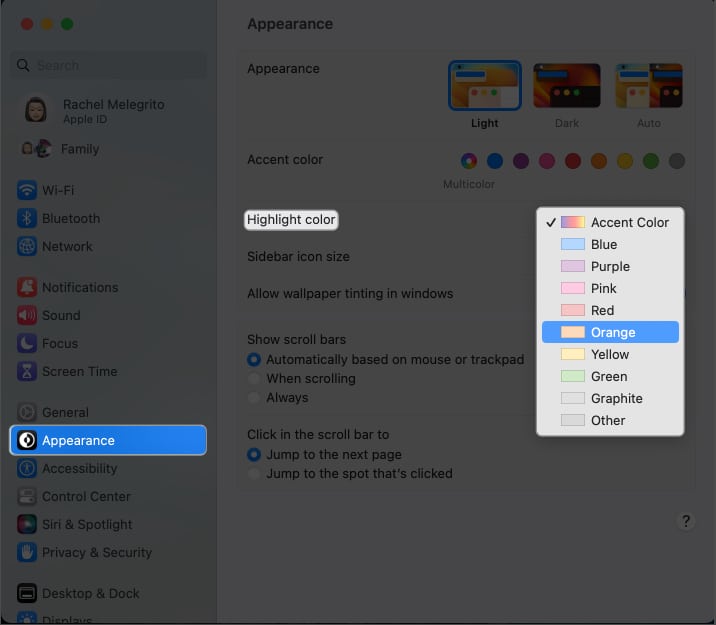
- Go to System Settings → Appearance.
- Select new colors under Accent color and Highlight color.
Create custom icons for folders
Customization isn’t limited to color schemes. You can change the icon of any file or folder using icons downloaded from the web, an icon from another file or folder, or using your own pictures! To do this:
- Select a picture or icon you want to use → Open the file → Copy it into the Clipboard.
- Go to the file or folder whose icon you want to replace.
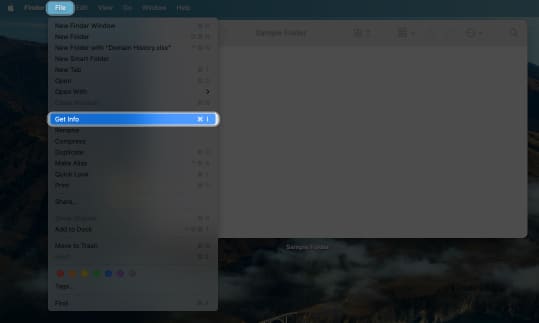
- Go to File in the menu bar → Get Info.
- Click the icon thumbnail at the top of the Info window. Once it’s highlighted, click Edit → Paste.
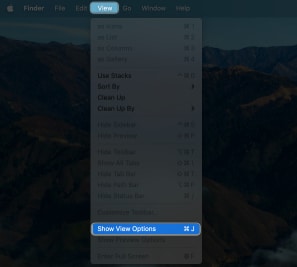
You can also increase or decrease the icon’s size. On Finder, click View → View Options. Move the Icon size slider.
Personalize your login screen
Personalization extends to your login screen—the first thing you see when you open your Mac. You can add a welcome message for your Mac’s Lock screen and change your user account’s picture to a different one or even a moving Memoji.
To do this, go to Apple menu → System Settings → Click User & Groups. Click the info button next to your profile → Select your Memoji. Now, you can set your desired profile picture.
Besides, if you want to set a message on your login screen, navigate to Lock Screen from the sidebar → Toggle on Show message when locked → Click Set and write your message.
Enable Dark Mode
You can also enable Dark Mode on Mac for a darker UI that follows your color scheme for an easy-on-the-eye display. It works system-wide and includes all the built-in and third-party apps supporting the feature.
You can also turn on Night Shift on your Mac to shift its display colors to a warmer tone after dark. By changing display settings on your Mac, you can have a more appealing experience.
Utilize your Mac’s Display
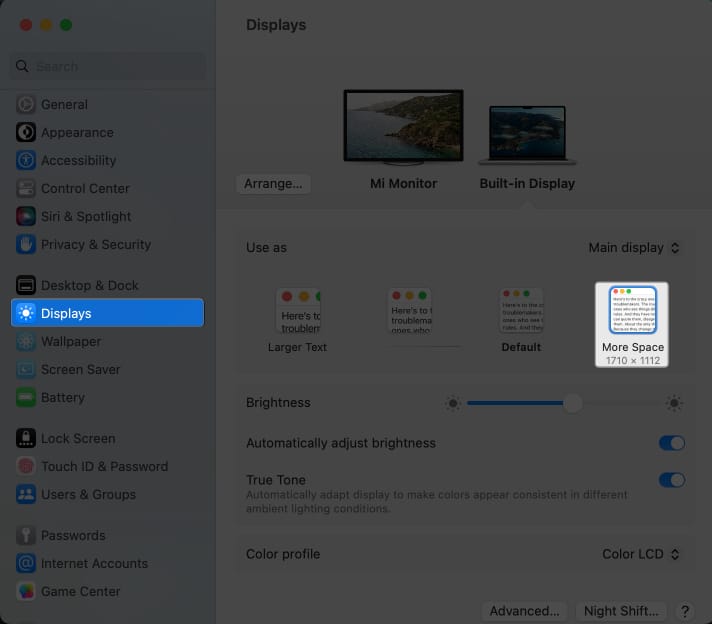
Macs come with a resolution scaling feature. The smaller the items on your screen, the more items you can fit into your display. You can use the Scaled option to get more space and fit more space on your Mac. To do this:
- Go to Apple menu → System Settings.
- Select Display on the sidebar → Select More Space.
4. Customize your Mac’s Dock
The Dock is a prominent feature, enabling you to interact with your Mac in countless ways. It lets you quickly launch, open, close, and switch between apps. You can also customize its appearance, including changing the color of your Dock. It’s a fluid feature that you can customize.
- To delete apps, just control-click an app → Hit Options → Select Remove from Dock.
- You can also add your favorite apps to the Dock. If you have an app in the Dock because you’re currently using or have recently used it, just control-click it → Select Options → Choose Keep in Dock.
If it’s not yet in the Dock, open Finder → Choose Applications on the sidebar. Choose and drag an app to the Dock’s main section (leftmost section).
Here are other easy-to-use macOS Dock shortcuts to further help boost your productivity. However, the Dock can sometimes be an eyesore and block important windows from view.
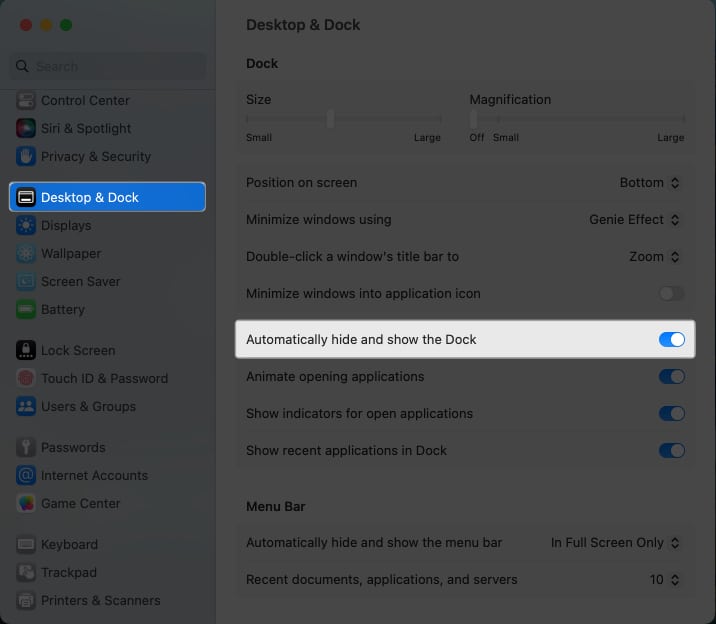
- To keep it hidden until you need it, go to System Settings. Click Desktop & Dock. Toggle on Automatically hide and show the Dock.
While Apple doesn’t have a feature that allows you to add a spacer between icons on the Dock, you can use the Terminal.
5. Make invisible apps transparent
Having a lot of windows open could lead to a cluttered environment. One thing you likely do is hit Cmd + H. This hides the window that you can see on your screen or your Dock. The downside of this shortcut is that it’s pretty easy to forget that the app is running.
A workaround is to make the hidden apps transparent. To do this, open Terminal and copy and paste this directly: defaults write com.apple.Dock showhidden -bool TRUE && killall Dock.
6. Fix the Sharing menu on Mac
Sharing is very convenient, especially within the Apple ecosystem. You can share just about anything, including Notes, Reminders, and even Books.
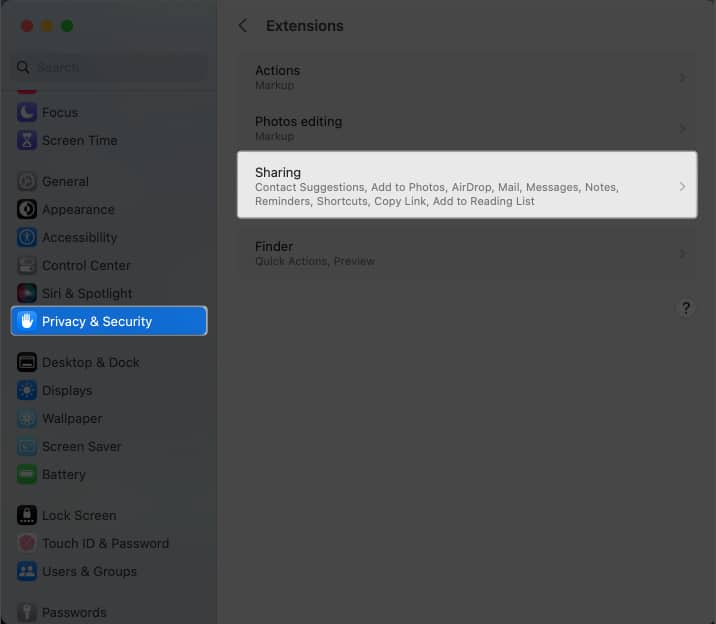
But things can get pretty messy, and accidental clicks can cause you to send items to different people mistakenly. To limit which apps you’d like Sharing options to appear:
- Go to Apple menu → System Settings.
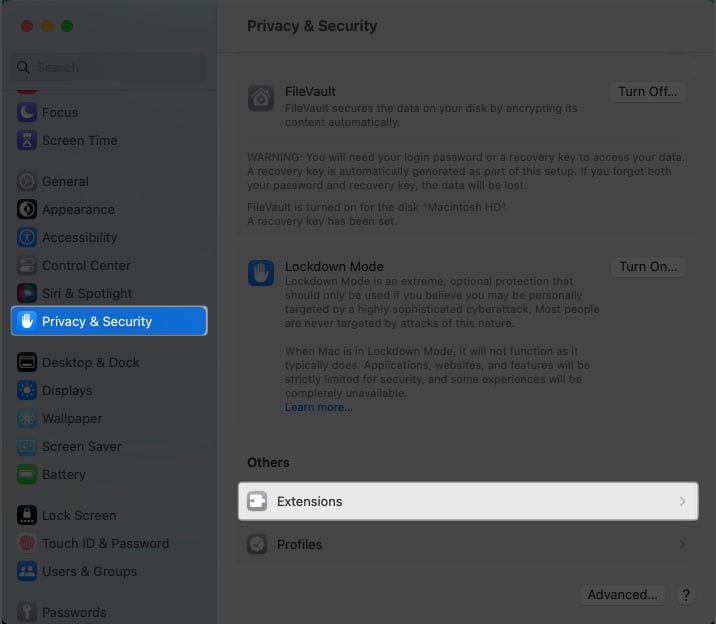
- Select Privacy & Security → Choose Extensions under Others.
- Click Sharing and untick all the apps you don’t need a Share menu to appear.
7. Modify Keyboard’s Autocorrect settings
While Autocorrect is a great way to check your spelling, it can also result in many errors. Without a keen eye, autocorrect can easily mess up what you’re trying to type.
Turn off autocorrect to eliminate wrong suggestions and word guesses for good.
8. Add multiple virtual desktops
The downside of a small monitor is that it easily gets cluttered over time, especially if you don’t have an external monitor.
Fortunately, your Mac lets you create multiple virtual desktops. To do so, enter Mission Control, and click the Add (+) icon.
9. Customize Mac Menu bar
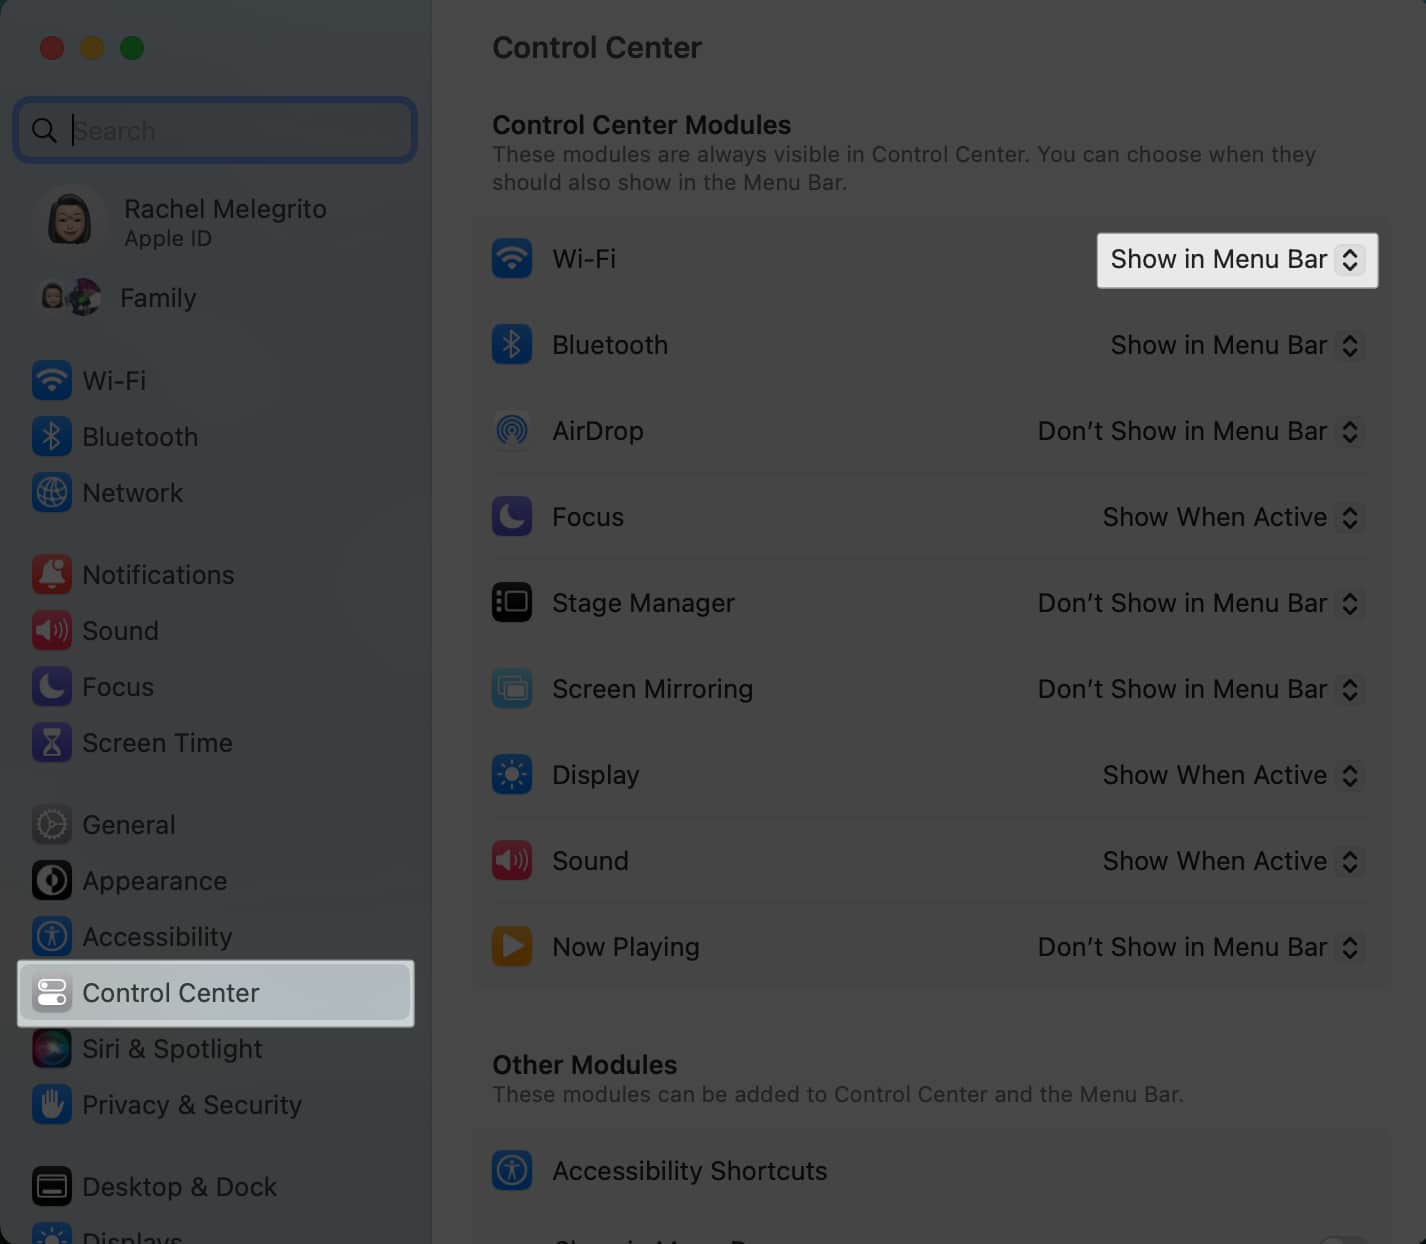
If you don’t always need to access functions like Bluetooth or Wi-Fi, you can remove them from your Menu bar. Just change the following on your Mac Menu bar settings:
- Go to System Settings → Control Center.
- You should see a list of icons that can appear in the menu bar. Click the dropdown menu and select Show in Menu Bar if you always want it to appear there.
Additionally, if you find the Menu bar distracting, you can make it automatically hide and appear only when you hover your cursor over it.
- Just go to System Settings → Control Center.
- Under Menu Bar, click the dropdown menu beside Automatically hide and show the menu bar.
- Select In Full Screen Only, Always, or On Desktop Only.
10. Customize Control Center
Mac’s Control Center consolidates key macOS system settings, serving as a one-stop shop for all the Menu bar items and controls you need, including volume, brightness, Focus modes, and Wi-Fi.
Our guide can help you learn more about how to use Control Center on your Mac.
11. Add Accessibility Shortcuts to the Control Center or Menu bar
Several accessibility functions in Macs help people navigate and interact with their Macs better. Adding color filters on your Mac may be beneficial if you have color blindness. Meanwhile, you can go hands-free when using Voice Control on your Mac.
If you use these accessibility functions often, you can opt to add them to your menu bar or Control Center.
- Go to System Settings → Control Center.
- Under Other Modules, toggle Show in Control under Accessibility Shortcuts.
12. Customize your Mac toolbar
A helpful useful feature is the toolbar. The toolbar is a useful feature that gives you easy access to valuable tools. The toolbar is a small bar that contains shortcuts to functions.
Not many people know that you can customize every folder’s toolbar.
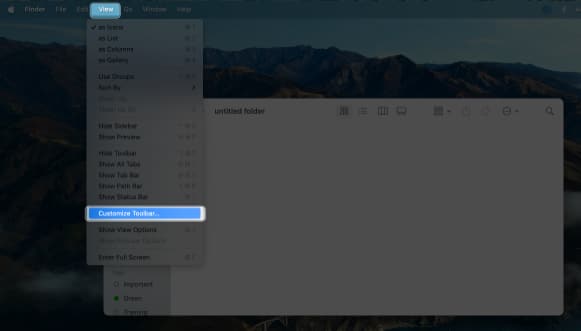
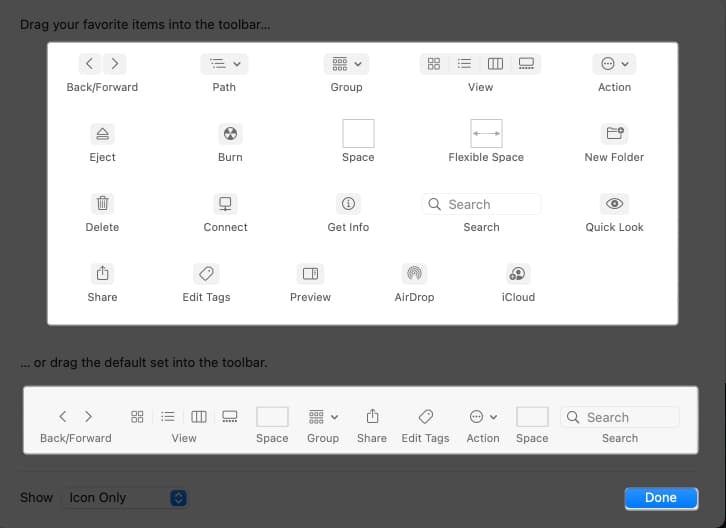
To do this, open a folder, then go to the Finder menu bar → Click View → Customize Toolbar.
The toolbars will start to jiggle. Drag the tool you want to add to the toolbar. Click Done.
13. Automatically launch programs at the start
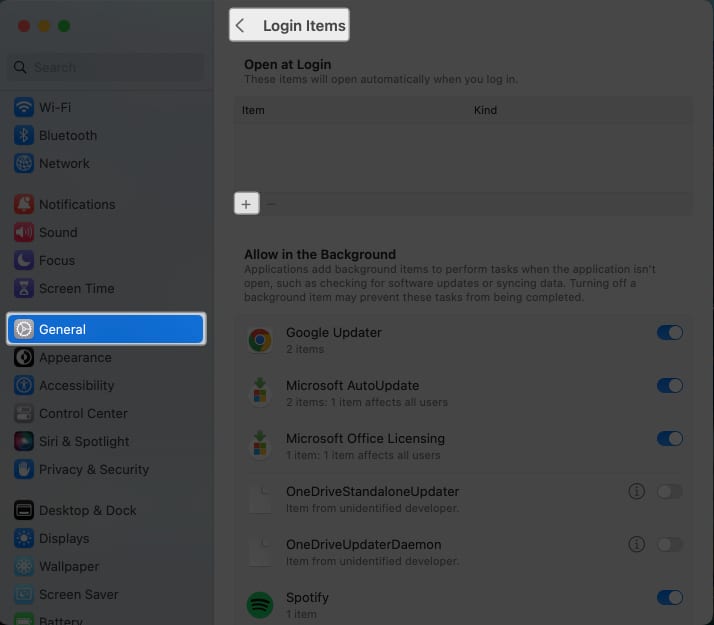
If you always open the same apps and programs for your workflow, you can customize your login items – that is, the programs that launch automatically when you log in to your Mac:
- Open System Settings → General.
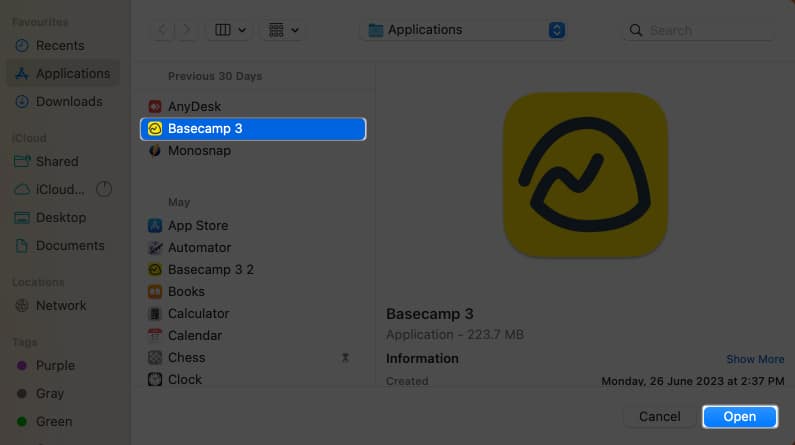
- Select Login Items. Under Open at Login, hit the Add (+) button.
- Choose the application you wish to add → click Done.
14. Enable Fast User Switching
Switch between accounts quickly by enabling Fast User Switching. Changing this Mac setting, you can alternate between your main account and any other account you have set up in seconds. Just do the following:
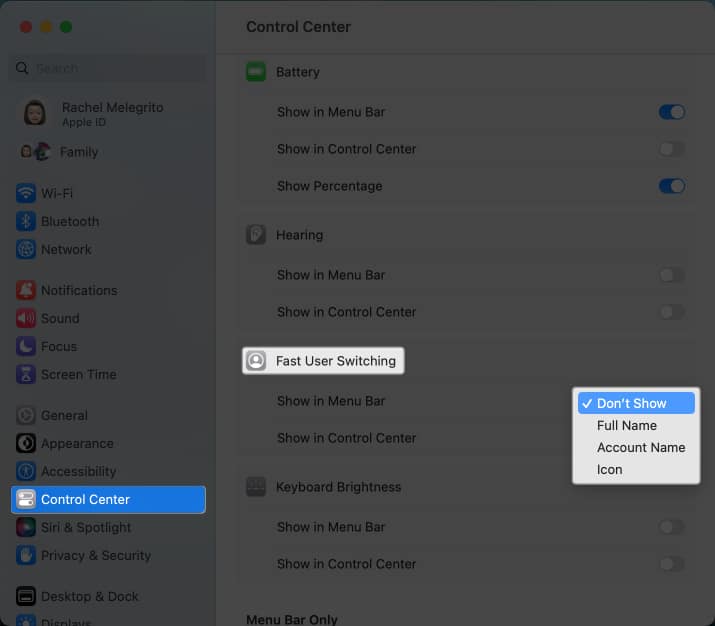
- Go to System Settings → Control Center.
- Scroll down to find Fast User Switching.
- Click the dropdown menu beside Show in Menu Bar and select which item you’d like to appear on the menu bar.
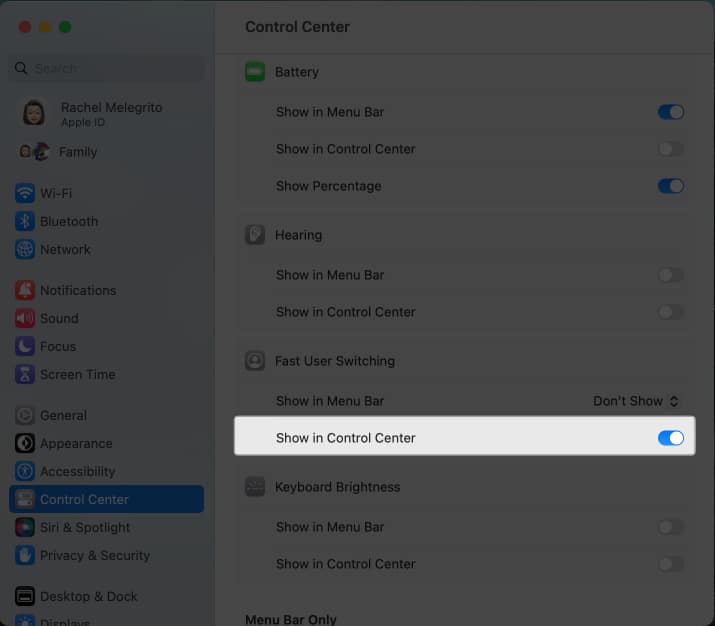
- Toggle Show in Control Center to see it in your Control Center.
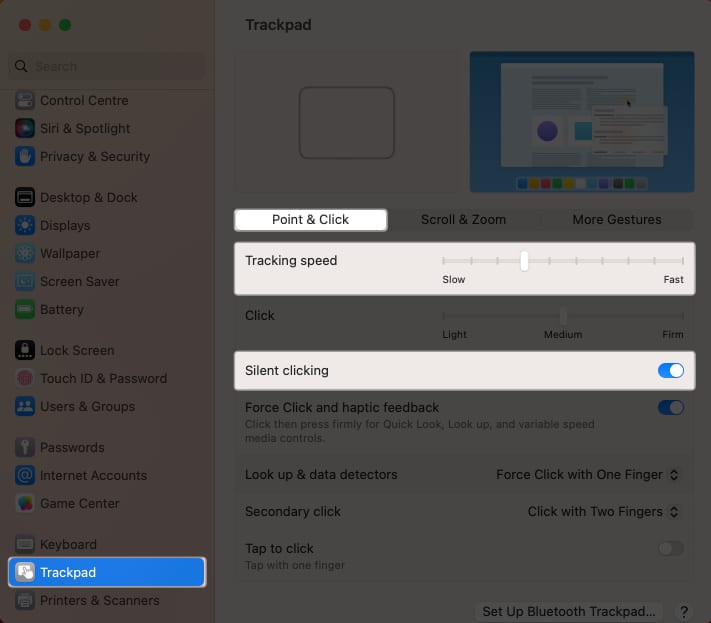
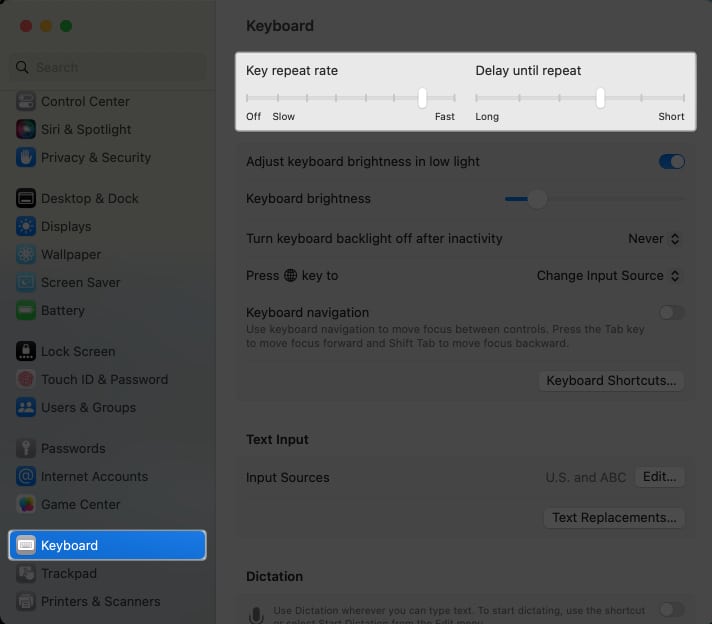
15. Adjust behavior of your mouse, keyboard, and trackpad
Since you interact with your Mac primarily through the keyboard and trackpad, adjusting their behavior to your liking can help enhance your overall Mac experience.
Go to System Settings → Choose Trackpad, Mouse, or Keyboard to adjust things, such as Silent Clicking and Tracking Speed.
For your keyboard, things worth adjusting include Key Repeat and Delay Until Repeat, which affect its responsiveness.
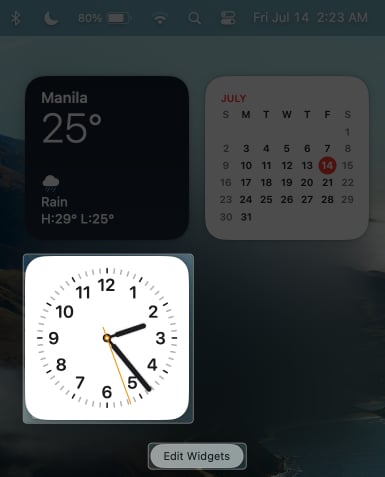
16. Add widgets to the Notification Center
Widgets are glanceable snippets of information from your apps that keep you updated without opening the app. On Mac, these stay in the Notification Center.
To add a widget, click the Date on the menu bar → Edit Widgets. Select an app from the left and drag a widget.
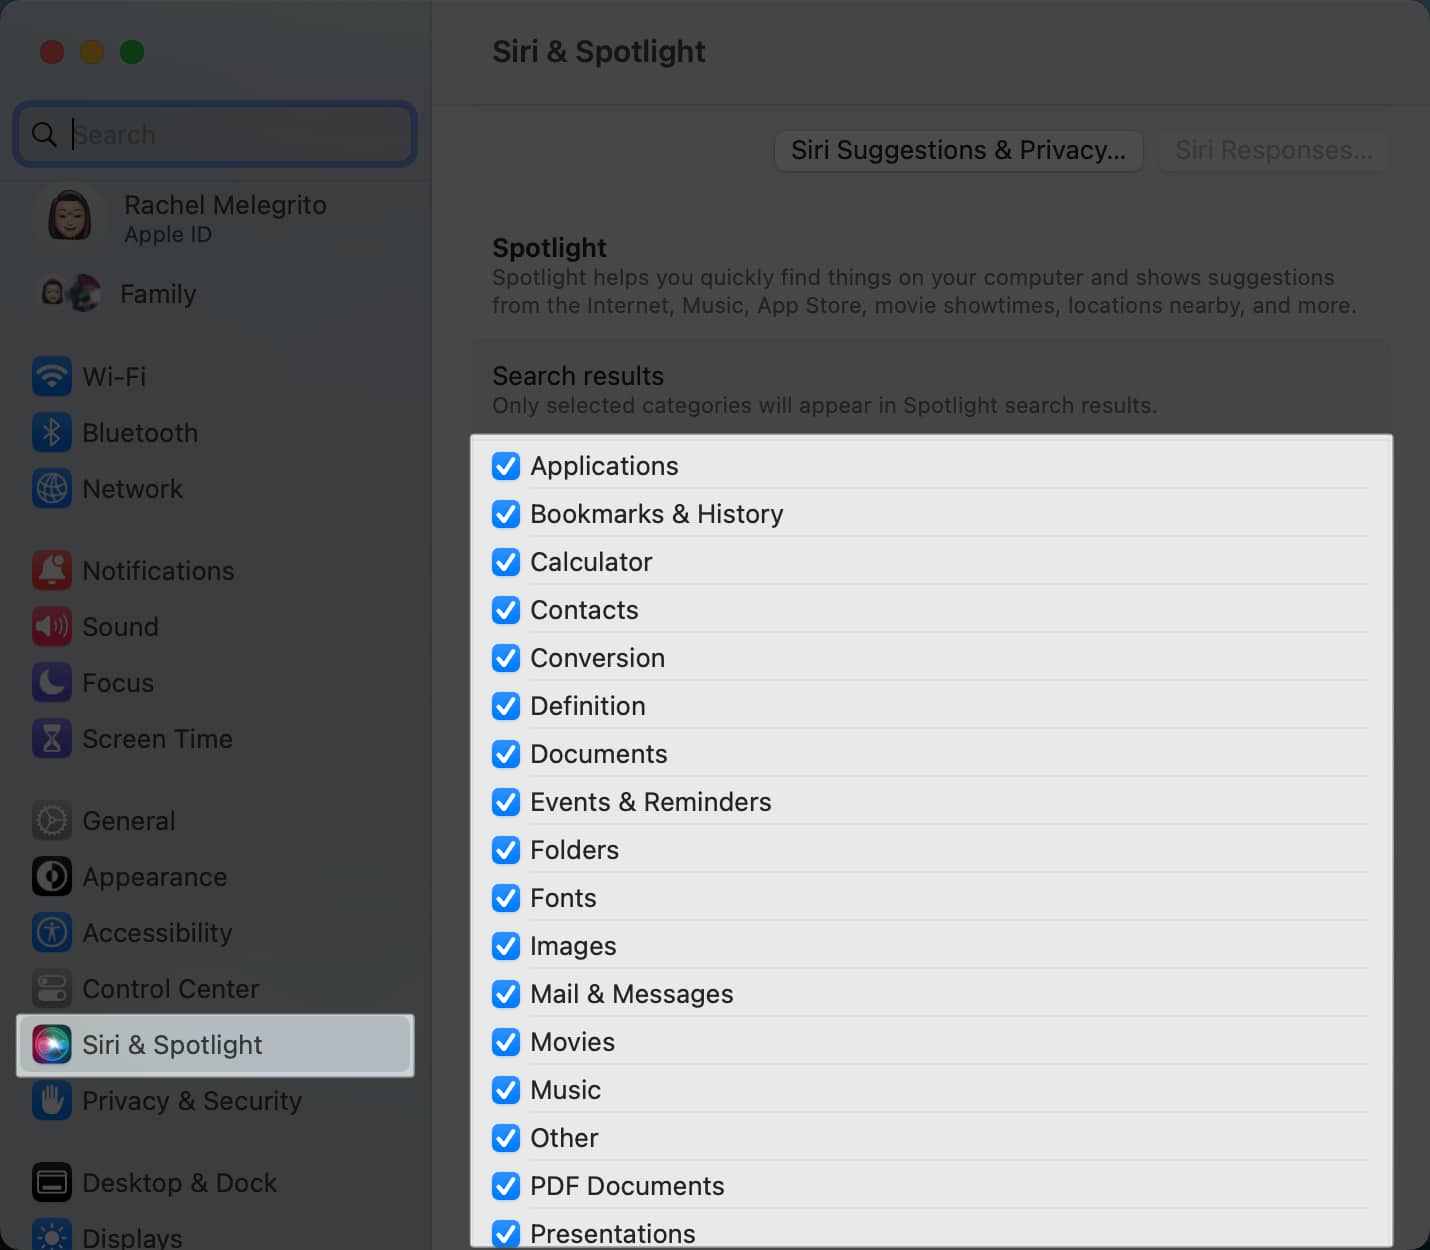
17. Choose where Spotlight searches
Spotlight lets you search for anything and everything on your Mac. If you often search for items from the same destination, you can select where you want Spotlight to search. This reduces wrong hits and makes the search more efficient.
- Go to System Settings → Siri & Spotlight.
- Under Spotlight, select the locations you want Spotlight to search for your queries.
There’s much more to Spotlight than meets the eye, though. To appreciate the feature, check out our complete guide on using Spotlight on Mac.
18. Change Finder settings
Finder is the iMac’s file manager. It gives you access to all your files, folders, apps, and downloads on your Mac and lets you customize many things to make searching and launching apps and files easier.
For starters, you can specify which window Finder will show when you launch it, which is Recents by default. To change this:
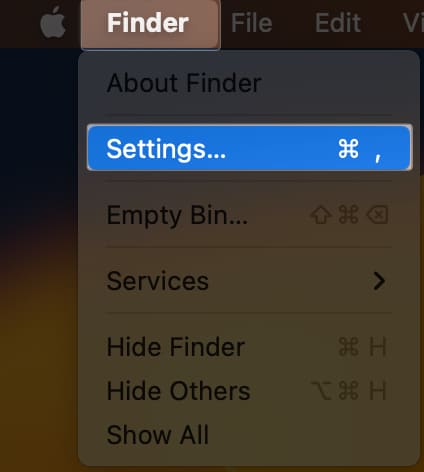
- Go to Finder → Settings in the menu bar.
- Click the dropdown menu under the New Finder window show and select the folder you want Finder to open by default.
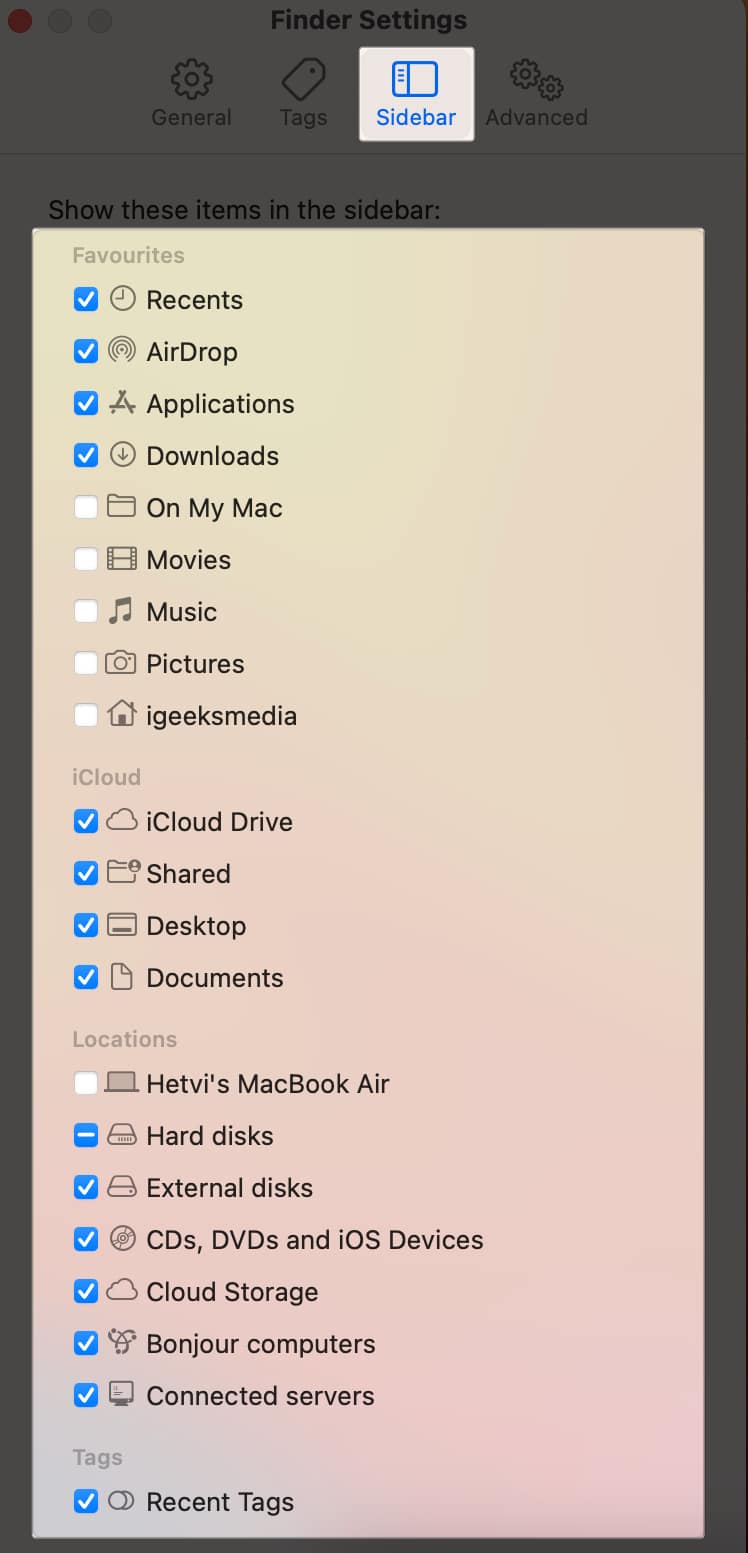
Customizing your Finder sidebar based on your usage and preferences can boost your productivity and help reduce clutter.
To manage your Finder sidebar:
- Under Finder Settings, click the Sidebar tab.
- Tick the items you want to appear on Favorites, iCloud, Locations, and Tags.
If you’re always dealing with files of all formats, you can make the file extensions appear to avoid confusion. On the Finder window, click the Advanced tab. Tick Show all filename extensions.
19. Show Path Bar and Status Bar
Searching for files can be challenging if you have so many files and folders on your Mac. Sure, you can just use Spotlight — but there are times when you need physical access to them from their location.
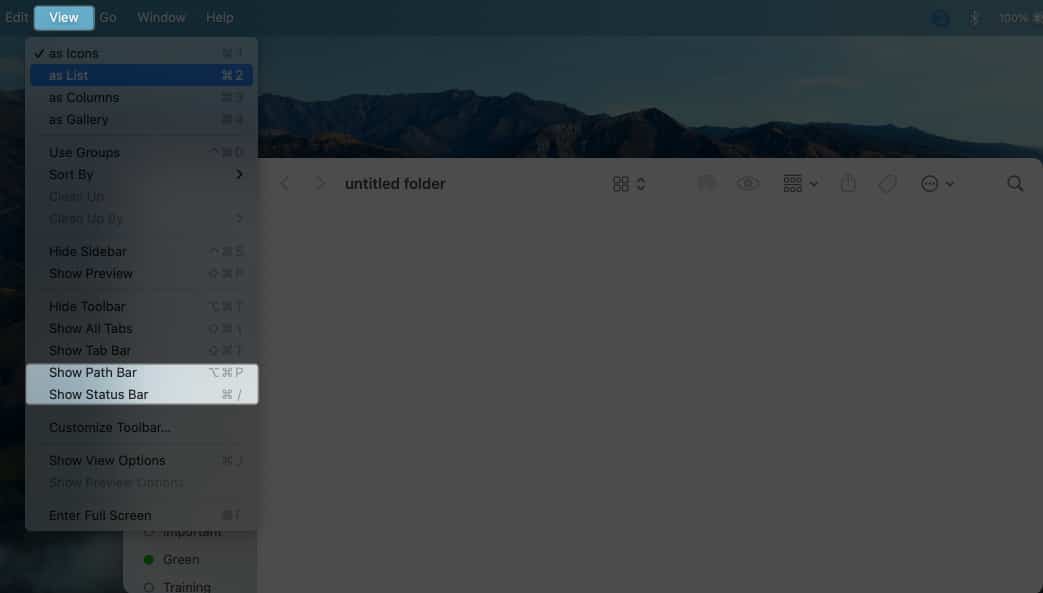
- In Finder, click View → Tick Show Path Bar. This will show you an intuitive way to find your item’s specific location, starting from the Disk and going to the specific folder it’s part of.
- You can also tick the Show Status Bar. This gives you an idea of the folder’s size, such as its number of items and disk space occupied.
20. Setup Bookmarks in Safari
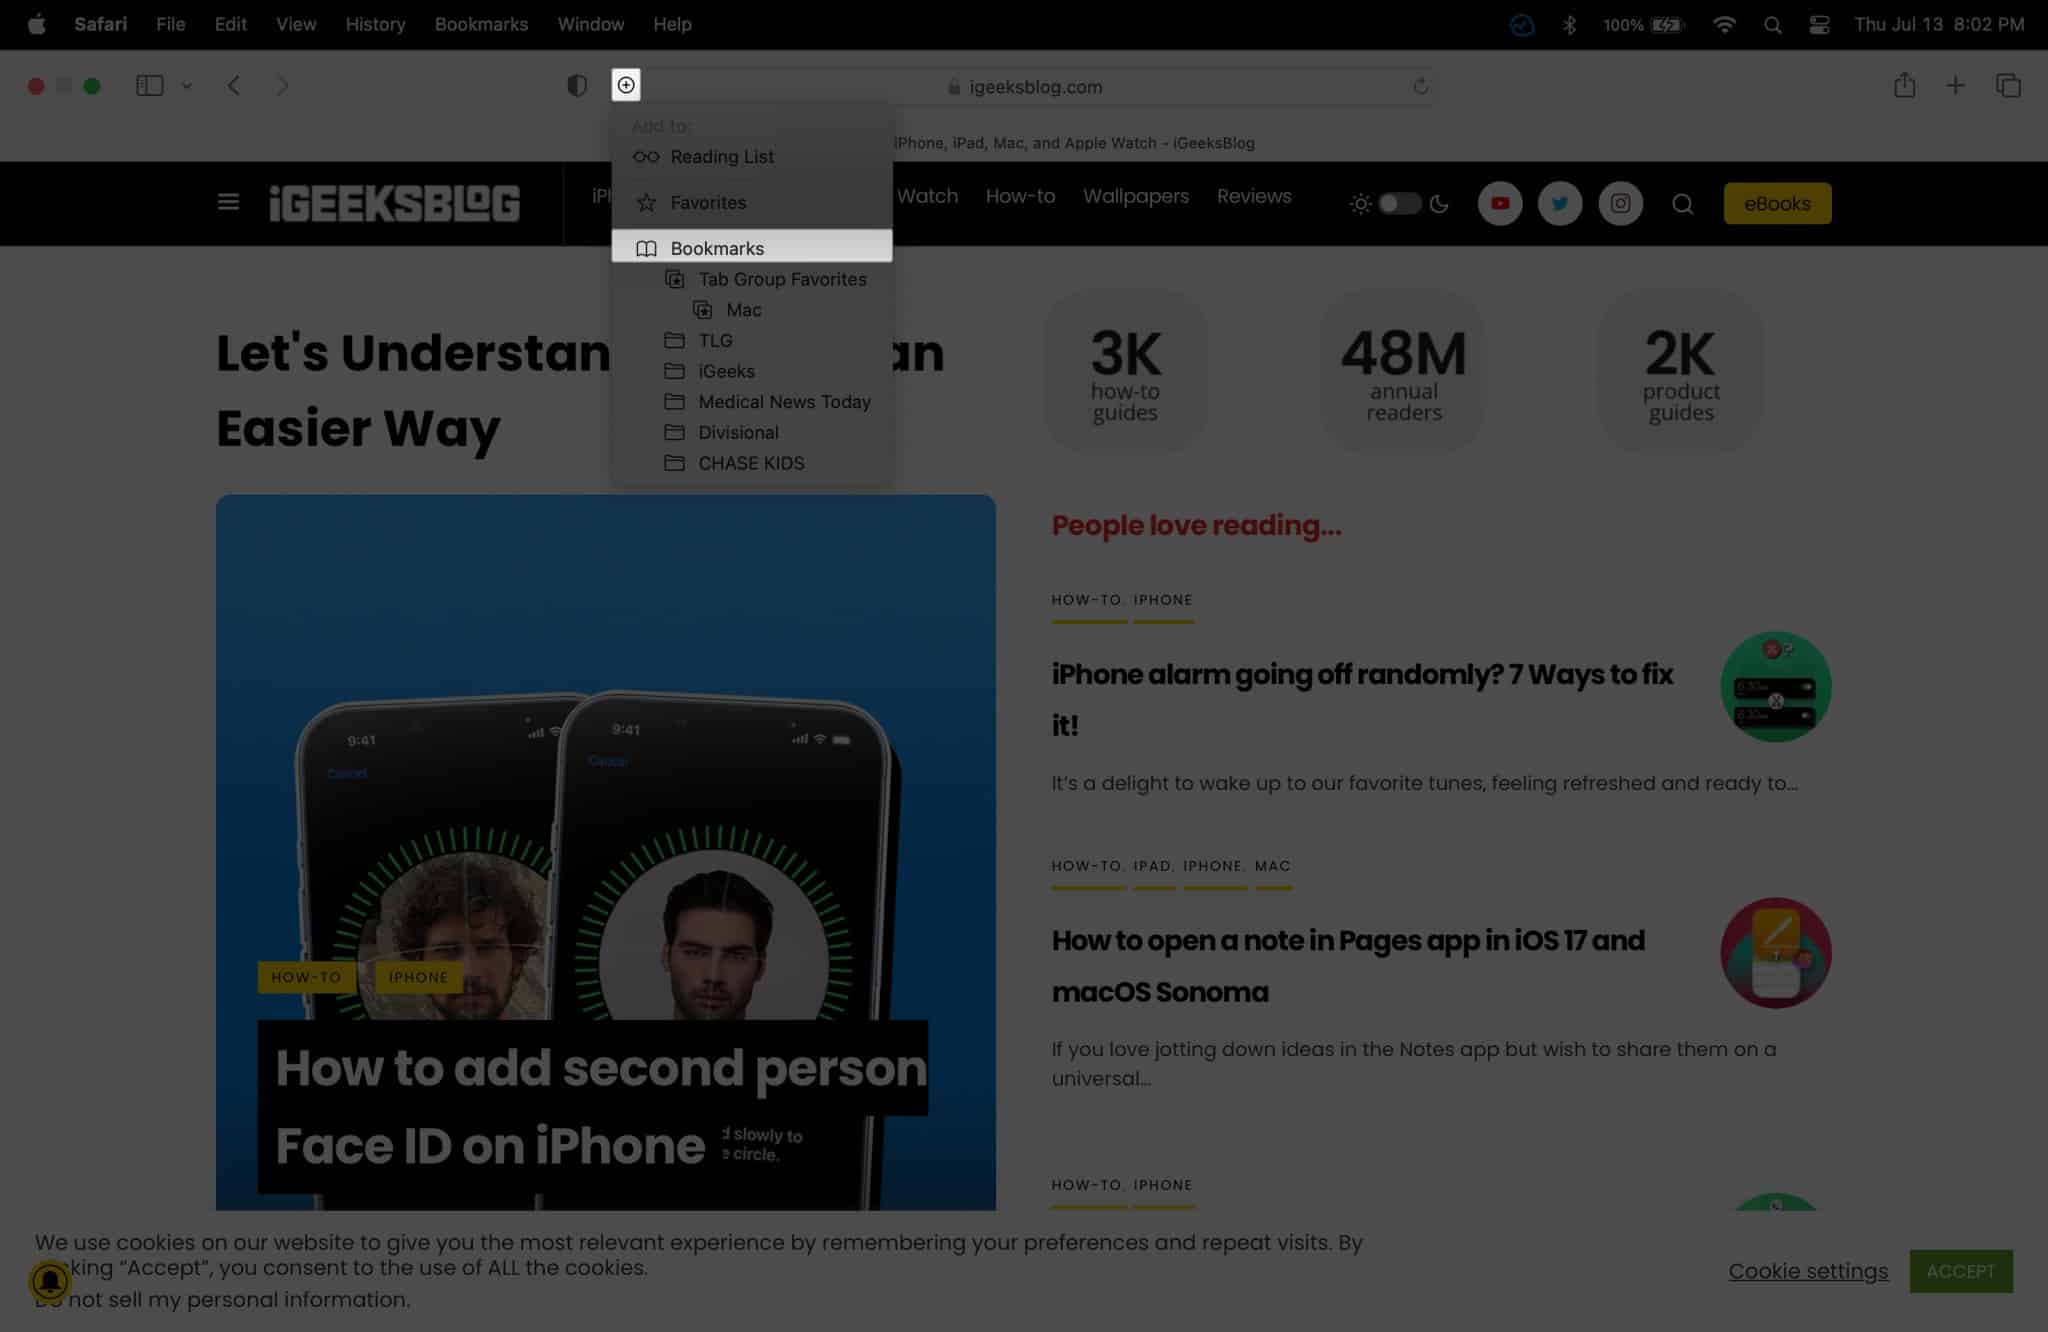
If you frequent websites, you can set up bookmarks to quickly revisit them later. To add a bookmark on Safari, just hover your mouse over the Safari search field until an Add (+) button appears. Hold it and select Bookmark. You can add the link to a specific Bookmark folder if you have one.
To create a bookmark folder, click the Bookmarks Sidebar between the window and arrow buttons. Double-click anywhere on the sidebar, then click Add Folder. Drag any existing bookmarks from the sidebar into the folder.
21. Create Safari Tab Groups
Aside from bookmarks, you can also create Safari Tab Groups for webpages you want to get back to again, but it isn’t part of your workflow that deserves to be bookmarked. It groups all the opened tabs on your current Safari window.
22. Choose a different browser
If you aren’t a fan of Safari, you can always change your default browser on your Mac to Chrome, Edge, or some other browser. Mac lets you customize the browser settings so that you can elevate your user experience.
23. Take Screenshots in JPEG Format
All screenshots you take from your Mac will be in PNG format by default. While this format is excellent, it’s uncompressed and is typically large. Not only that, but this file is also not as widely supported as JPEG.
You can use Mac’s Terminal to convert the format. Just open Terminal and copy and paste this command: defaults write com.apple.screencapture type jpg
By changing this Mac settings, my half workload was off immediately. Such a lifesaver!
24. Create Smart Folders
If you have ever wanted to declutter your Mac’s desktop or organize specific files, you know how useful Smart Folders can be.
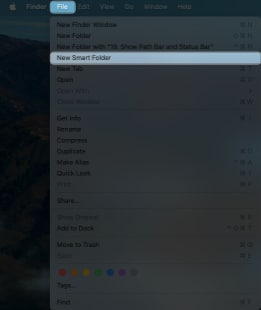
Smart Folders are essentially virtual folders that can be created using any combination of criteria, making them extremely versatile and customizable. To create a Smart Folder:
- Go to Finder → Click File → New Smart Folder.
- Click the + icon on the rightmost side to add criteria. Click the dropdown menu to modify it.
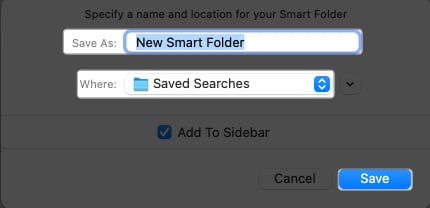
- Select Save.
- Enter a name and location → Save.
25. Make Smart Albums
If you love saving photos on your Mac, creating a Smart Album in Photos is an excellent way to quickly sort and organize your images.
The feature allows you to save conditions or criteria that the app uses to sort your images automatically. The conditions include the type of camera you used, the date when it was captured, or whether you used a flash to take the shot.
26. Organize your Files with Tags and Stacks
Using tags can save your life if you have many files and folders for different workflows. Tags are colored categories that make it easier to locate your files, whether on your Mac or iCloud.
To add a tag to a file, control-click, select a color, or click Tags to choose one of your tags. You can also tag open files in some macOS applications like Pages and Numbers.
Simply hover your cursor on the right side of the document’s title, click the Tags field, select a tag from the dropdown list, or enter a new tag.
Stacks are another great way to organize your desktop clutter. To use them, control-click and tick Use Stacks. This feature groups similar files, such as photos and files, into a single stack.
27. Create Custom Keyboard Shortcuts
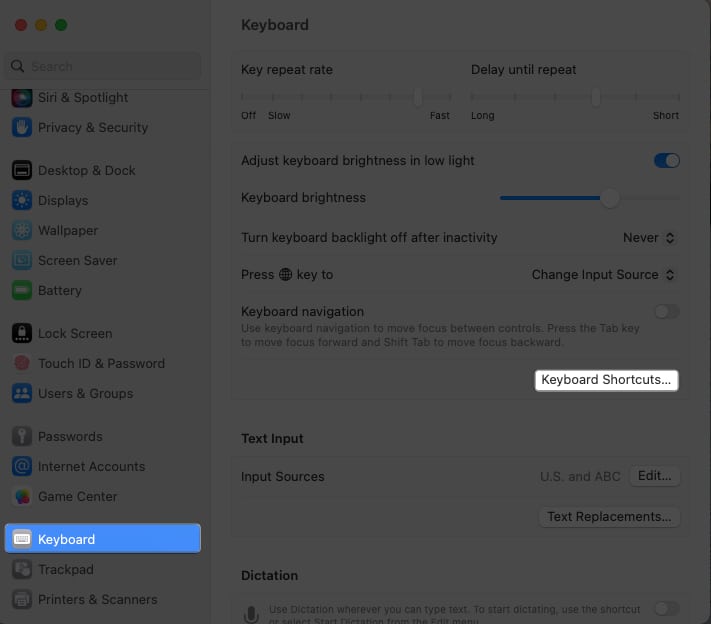
You also have the option to create your own keyboard shortcuts, which is valuable if a certain global shortcut causes conflicts with a specific app shortcut. To do this:
- Open System Settings → Keyboard → Click Keyboard Shortcuts.
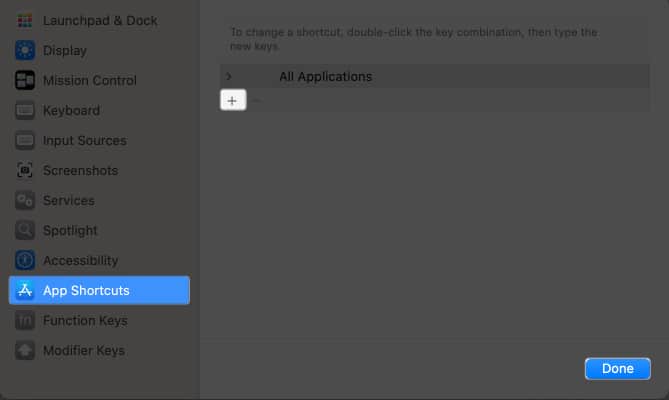
- Select an App Shortcut on the left, double-click the key combination, and then type the new key combination you want.
28. Personalize Siri
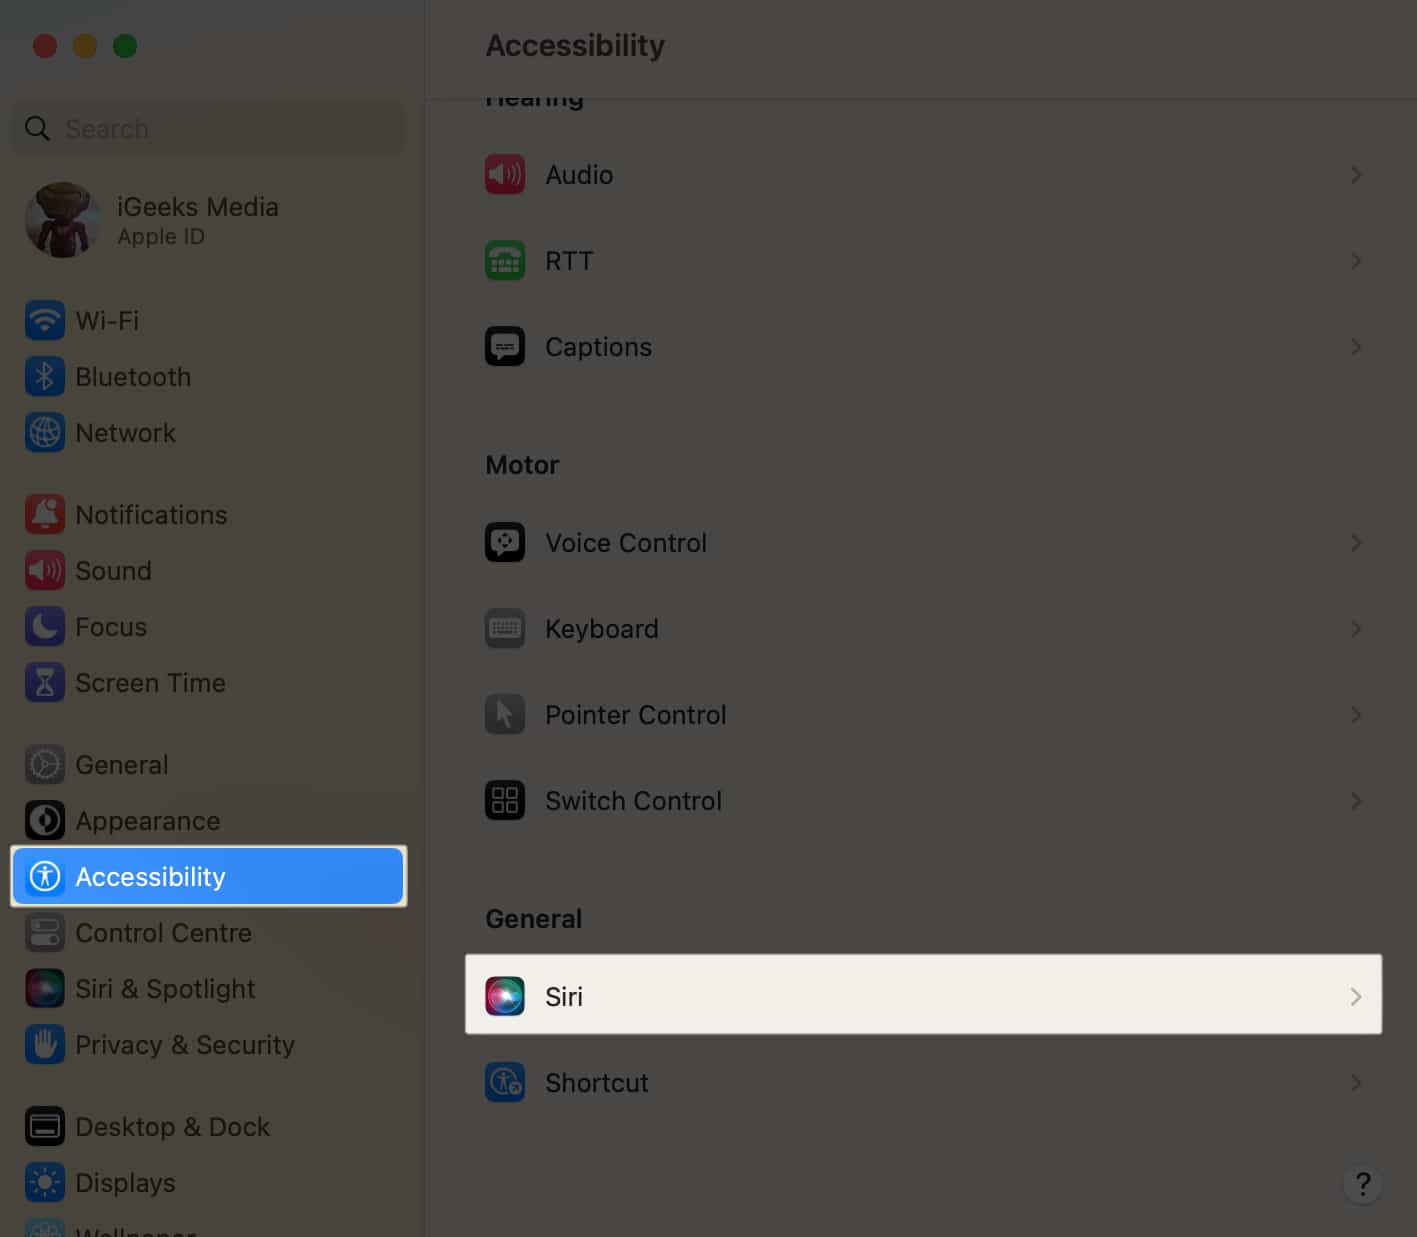
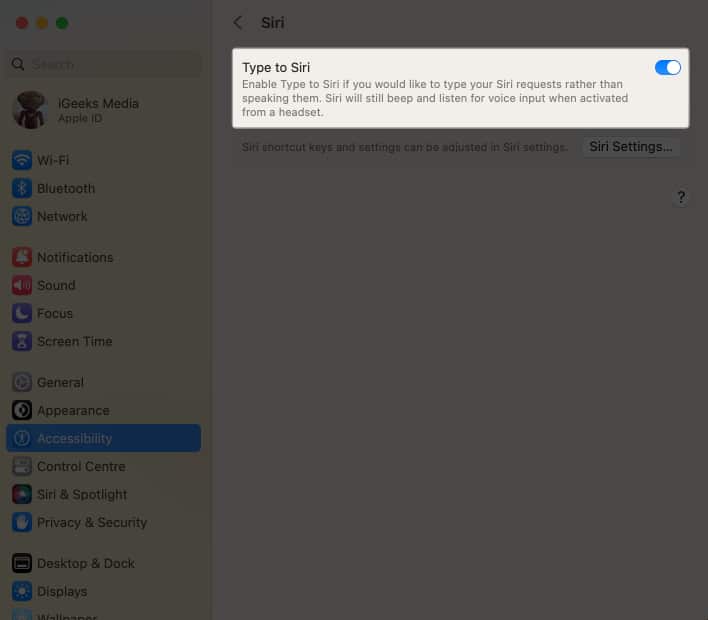
A lot of people find Siri annoying and turn it off entirely, which is understandable. But if you do want to use Siri but don’t want it butting in all the time, you can turn off audio interactions with it and type your prompts instead. To change this Mac settings:
- Open System Settings → Accessibility → Click Siri.
- Toggle on Type to Siri.
29. Create Customized Focus
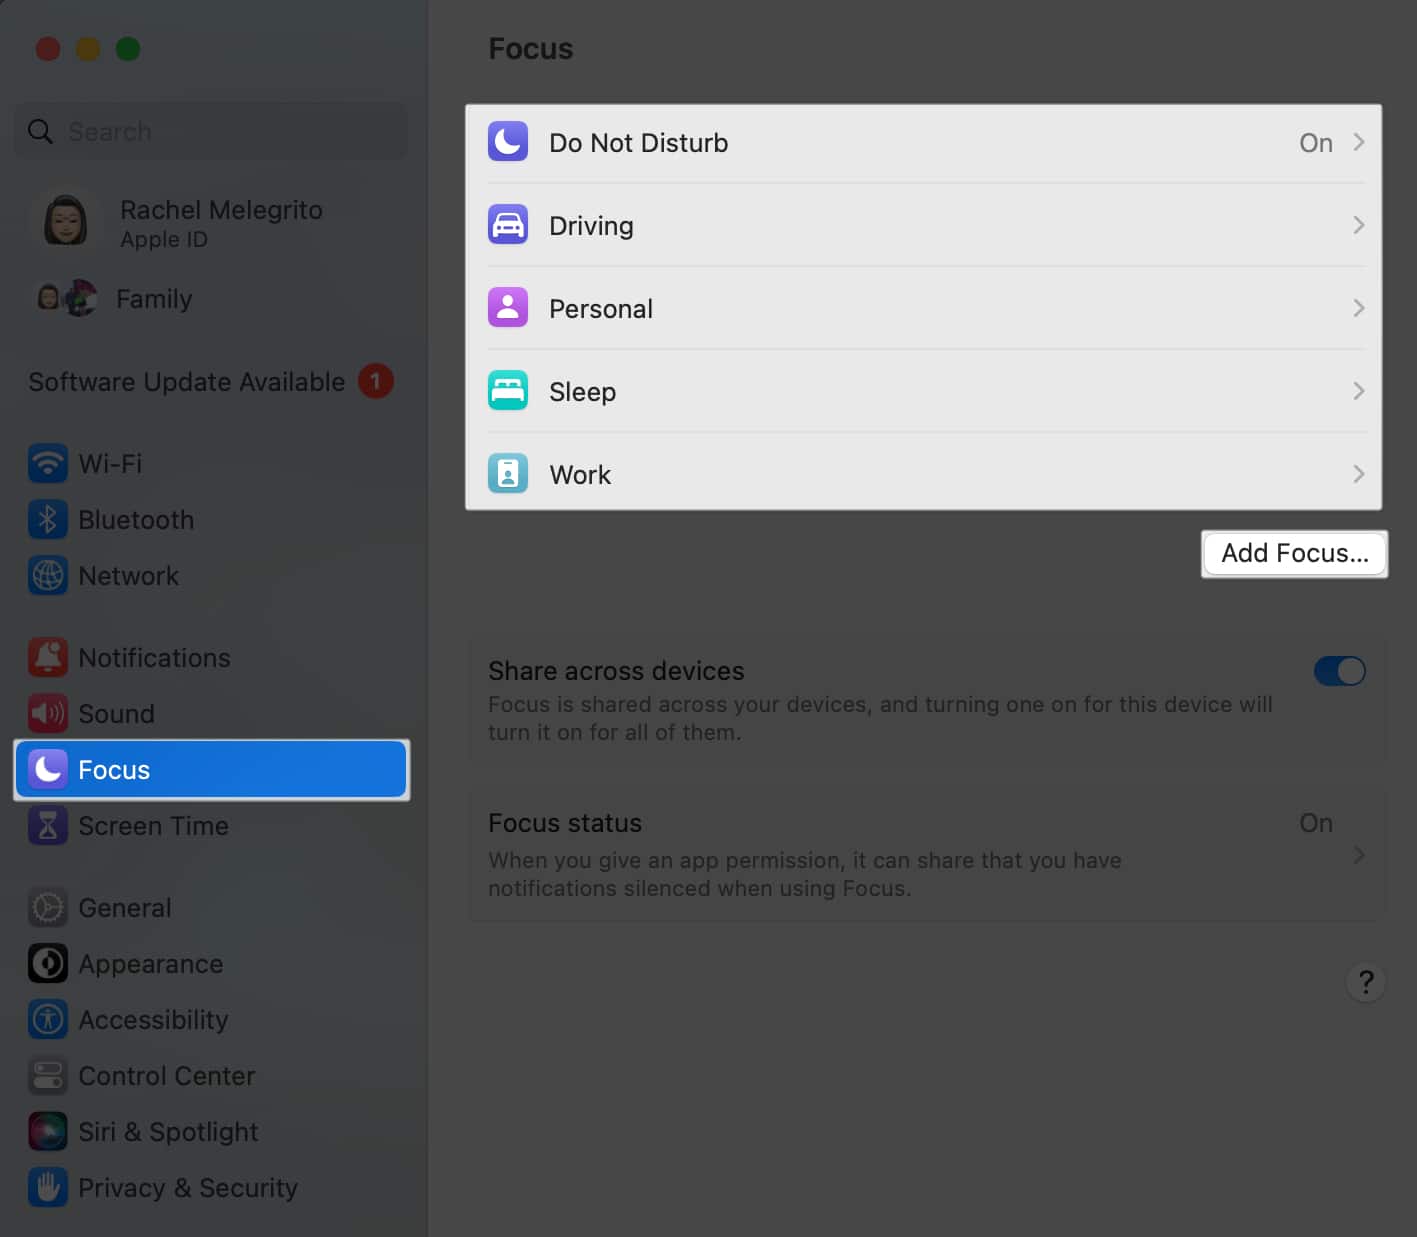
Focus is a nifty feature that allows you to control which notifications and alerts can reach you so you can focus on the tasks on your plate. If you already have Focus mode on iPad and iPhone, you can simply sync and use the same Focus settings across your Apple devices.
To set up Focus on your Mac:
- Open System Settings → Focus.
You can select a provided Focus or create your own by clicking Add Focus. - Begin selecting the notifications from certain people and apps that you would allow. You can also schedule when your Focus will automatically turn on and off.
30. Mute Notifications
Getting hundreds of notifications from apps and messaging platforms can distract and ruin your moment. We’ve written a guide that shares different ways of turning off notifications on your Mac. By changing these settings, you can boost your productivity on your Mac.
31. Enable Spatial Stereo
If you’ve Spatial Audio on iPhones and Macs, Spatialize Stereo will excite you. It uses software magic to play any non-Dolby stereo mix into a surround sound experience.
When listening to a typical stereo mix, go to the Control Center → Click anywhere on the Sound pane → Select Spatialize Stereo.
Note: This only works with a compatible hearing device and a Mac.
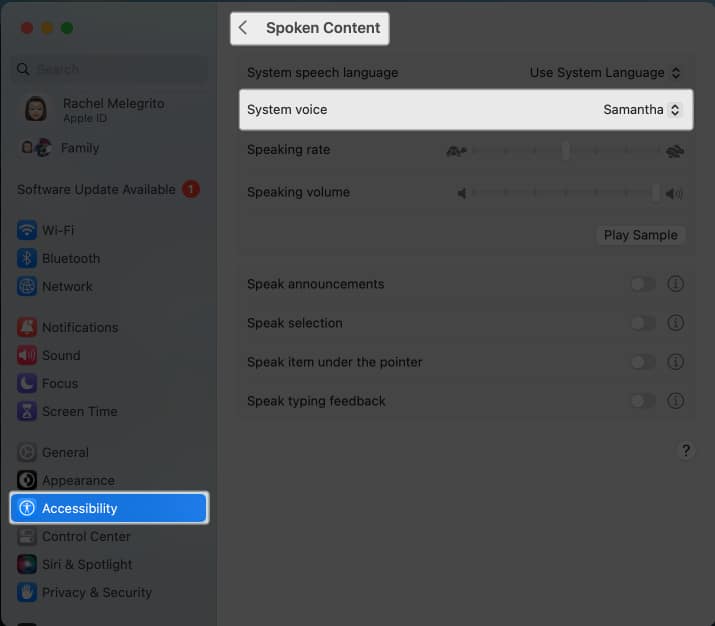
32. Customize Mac Sounds
If you want to extend the personalization further, you can go to System Settings → Accessibility → Spoken Content → System Voice.
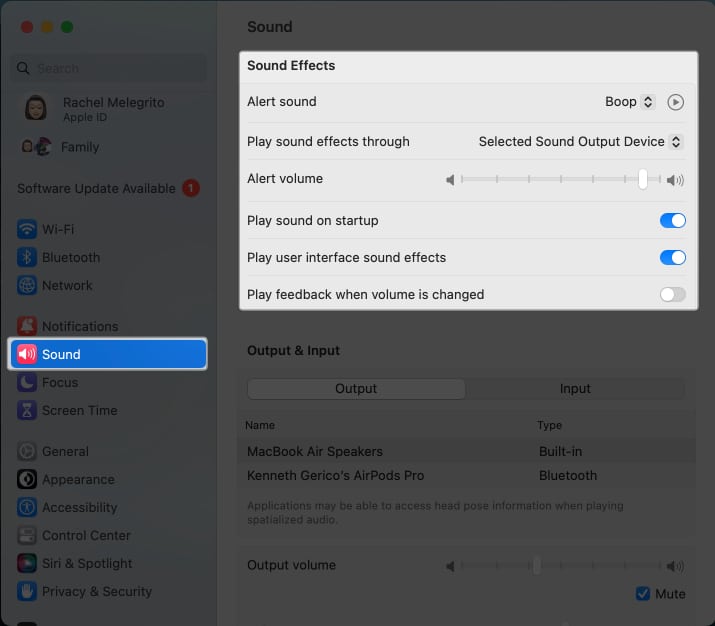
You can also customize your alert sounds on your Mac by going to System Settings → Sound → Sound Effects.
33. Setup a Hot Corner
Hot Corner is an underrated feature that allows you to use either or all the corners of your Mac screen to trigger actions like opening the Launchpad or accessing your desktop.
Customize how you use Hot Corner on your Mac to make your workflow seamless. You can even use it to keep people from snooping on your screen’s contents!
34. Enable Handoff
If you have several Apple devices, use Handoff to make the most of the Apple ecosystem. This feature allows you to begin something on one device and continue it on another.
Part of this is the Universal Clipboard that lets you copy-paste items from your Mac to your iPhone and vice versa.
35. Automate software updates
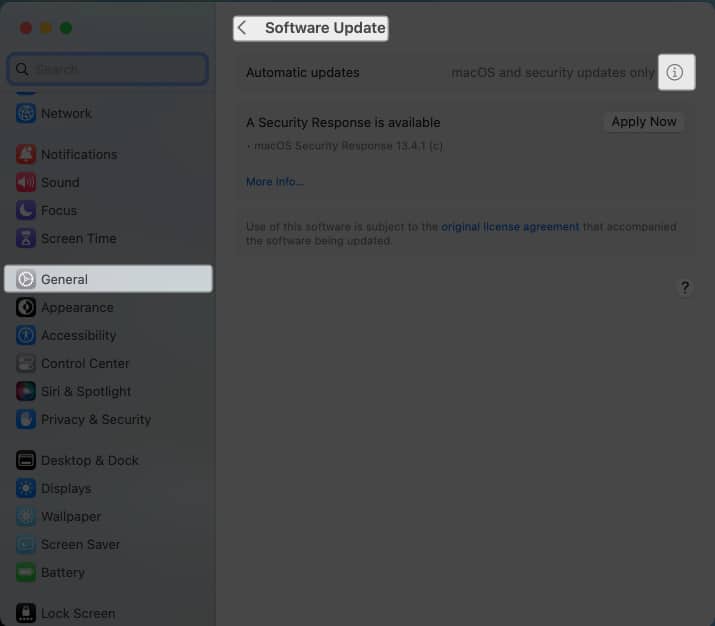
Aside from significant software upgrades, Apple consistently releases software updates to fix bugs and potential security issues. You can configure and change your Mac settings and set software updates to automatic to avoid manually checking for them.
To do this:
- Go to the Apple menu → General → Software Update → Click the Info (i) button.
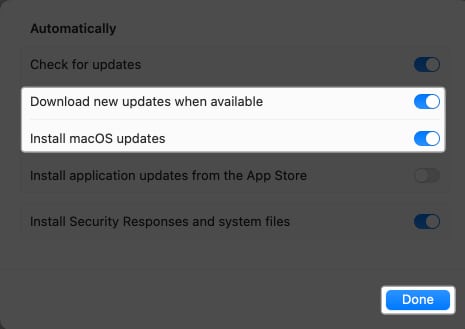
- Toggle on Download new updates when available, and Install macOS updates.
36. Stop Autoplay content
If you use your Safari for browsing, chances are you’ve encountered irritating background sounds or automatically playing videos. While harmless, this can be extremely annoying if several tabs are open.
To stop this:
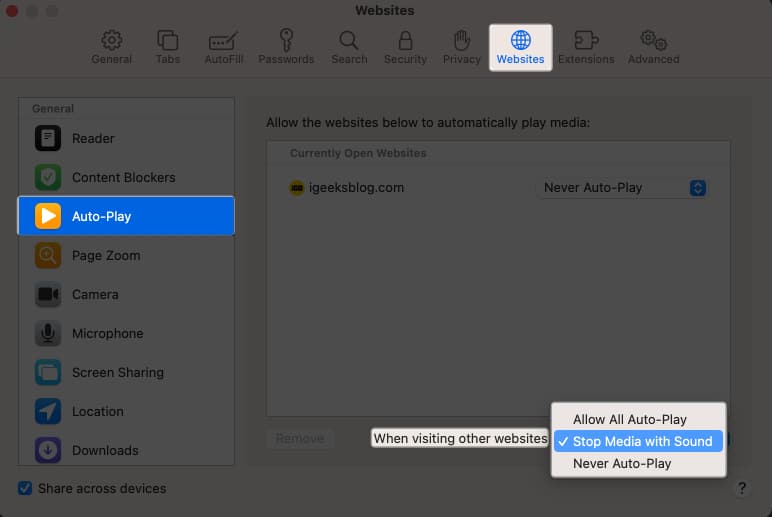
- Open Safari → Settings.
- Select Websites → Click Auto-Play.
- Click the dropdown menu beside When visiting other websites and select Never Auto-Play or Stop Media with Sound.
- Click the dropdown menu beside When visiting other websites and select Never Auto-Play or Stop Media with Sound.
37. Setup iCloud Backup
Apple offers a free cloud service for syncing and storing files and folders. Syncing apps and folders to your iCloud storage helps back up files on your Mac and ensure that you have access to the latest version of your files on whatever device you’re using.
38. Customize Location Privacy settings
In this day and age, you don’t want to flippantly allow random apps to track your current location unless necessary—such as for delivery services and the weather app. See which apps track your location so you can block those you do not trust.
To change this Mac settings:
- Go to System Settings → Privacy & Security.
- Select Location Services.
- Untick all the apps you don’t want to share your location with.
39. Manage Battery settings
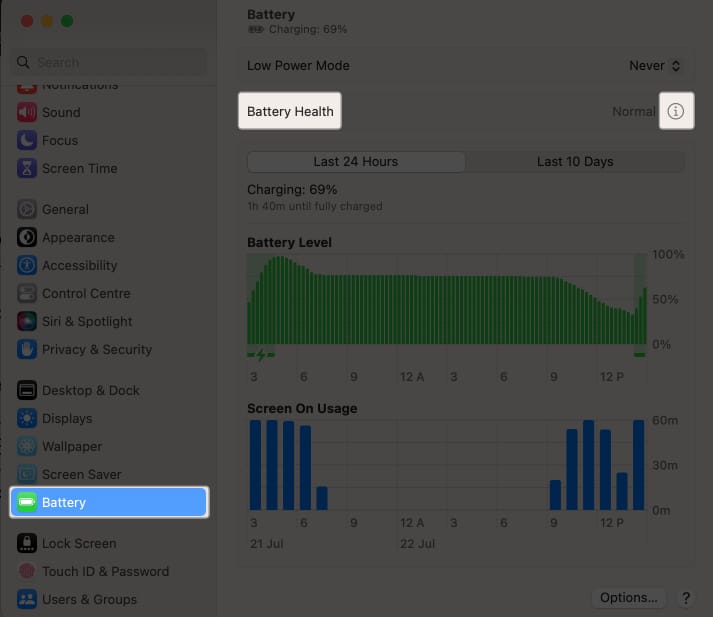
While Macs are designed to be efficient, there are other ways to reduce energy usage and preserve your Mac’s battery life. One of the basic things you should do is check your Mac’s battery health.
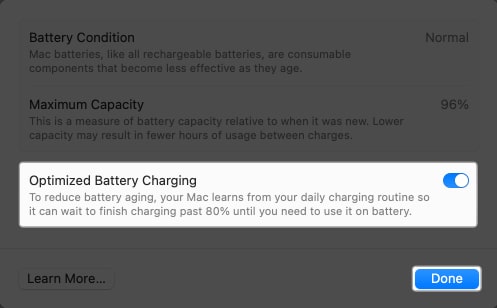
You can also enable Optimized Battery Charging to improve your Mac’s battery health. This reduces the time your Mac spends fully charged.
- Go to System Settings → Battery → Click the info (i) button beside Battery Health.
- Tick Optimized Battery Charging.
40. Turn on File Vault
As a precaution, you may want to encrypt your data if your Mac is stolen or lost. For this, you can use File Vault, Mac’s built-in disk encryption feature. It asks you to select a Recovery Key or your iCloud account to decrypt your data.
41. Enable Unlocking Mac with Apple Watch
If you have an Apple watch, you can use your Apple Watch to unlock your Mac. This saves you from the need to type in your password or hold the Touch ID. However, this will only work if your Apple Watch is unlocked and resting on your wrist.
42. Add Legacy Contacts to your iCloud
Apple Digital Legacy is a feature that allows you to pass on your Apple ID and all the private information it contains once you pass on. This may be beneficial if you have sensitive data that your family or friends might need, like business and health files. So, it’s a must Mac settings you should change according to your preference.
43. Enable Mail Privacy Protection
If you regularly receive spam and follow-ups, spammers are likely tracking how you behave. They often use tracking pixels to check how you have interacted with their emails.
Using Mail Privacy Protection ensures that they won’t have anything other than non-specific information they can’t use to profile you or track your behavior. Here’s what you need to do:
- Open Mail → Settings.
- Click the Privacy tab → tick Protect Mail Activity.
44. Setup iCloud recovery contacts
I’ve always feared the thought of forgetting my own Apple account login details. If you’re like me, setting a recovery contact might be for you. This involves selecting a trusted contact to whom Apple will send a six-digit recovery code, which you can then use to reset your Apple ID password.
That’s it!
These are some of the settings that I use on my Mac, and they have helped me. You can and should explore changing your Mac settings. But it doesn’t end here! Go ahead and browse through our articles to find other useful features to explore. What’s new to you in these settings? Share it below.
Read more:

