Picture this: You’re eagerly awaiting an important call, and your phone is right beside you. Yet, somehow, you miss it because the call goes straight to voicemail without ringing. Frustrating, right?
Don’t worry; you’re not alone. This issue has left many iPhone users feeling disconnected and anxious. In this article, we’ll share why iPhone calls go straight to voicemail and provide some easy solutions to fix it.
Why is my iPhone going straight to voicemail?
There could be several reasons why your iPhone calls are going straight to voicemail. It could be because of a simple setting that’s turned on accidentally, or there might be a more technical issue at play. Let’s break down the possible causes:
- Focus mode such as Do Not Disturb is enabled.
- No cellular signal or poor network coverage.
- Outdated carrier settings.
- Call forwarding is enabled.
- You have blocked the caller accidentally.
- Interference with third-party call blocking apps.
- Network service provider issues.
10 ways to fix iPhone calls going straight to voicemail
Below are some fixes you can try when your iPhone calls keep going to voicemail.
1. Restart the iPhone
Sometimes, restarting the iPhone can do wonders. When you do this, it clears the memory and resolves minor glitches that may cause your calls to go straight to voicemail.
2. Turn off Airplane Mode
It might sound obvious but ensure Airplane Mode isn’t turned off on your iPhone. Airplane Mode cuts off your phone’s connection to all wireless and cellular networks. This means your phone won’t be able to receive calls, and by default, the calls will go to voicemail without ringing.
If Airplane Mode is enabled, you’ll see an airplane icon in the status bar. To turn it off, access the Control Center, long-press the connectivity tile, and tap the airplane icon.
If it’s not enabled, you may turn on the Airplane mode for a few seconds and disable it to refresh the network connection.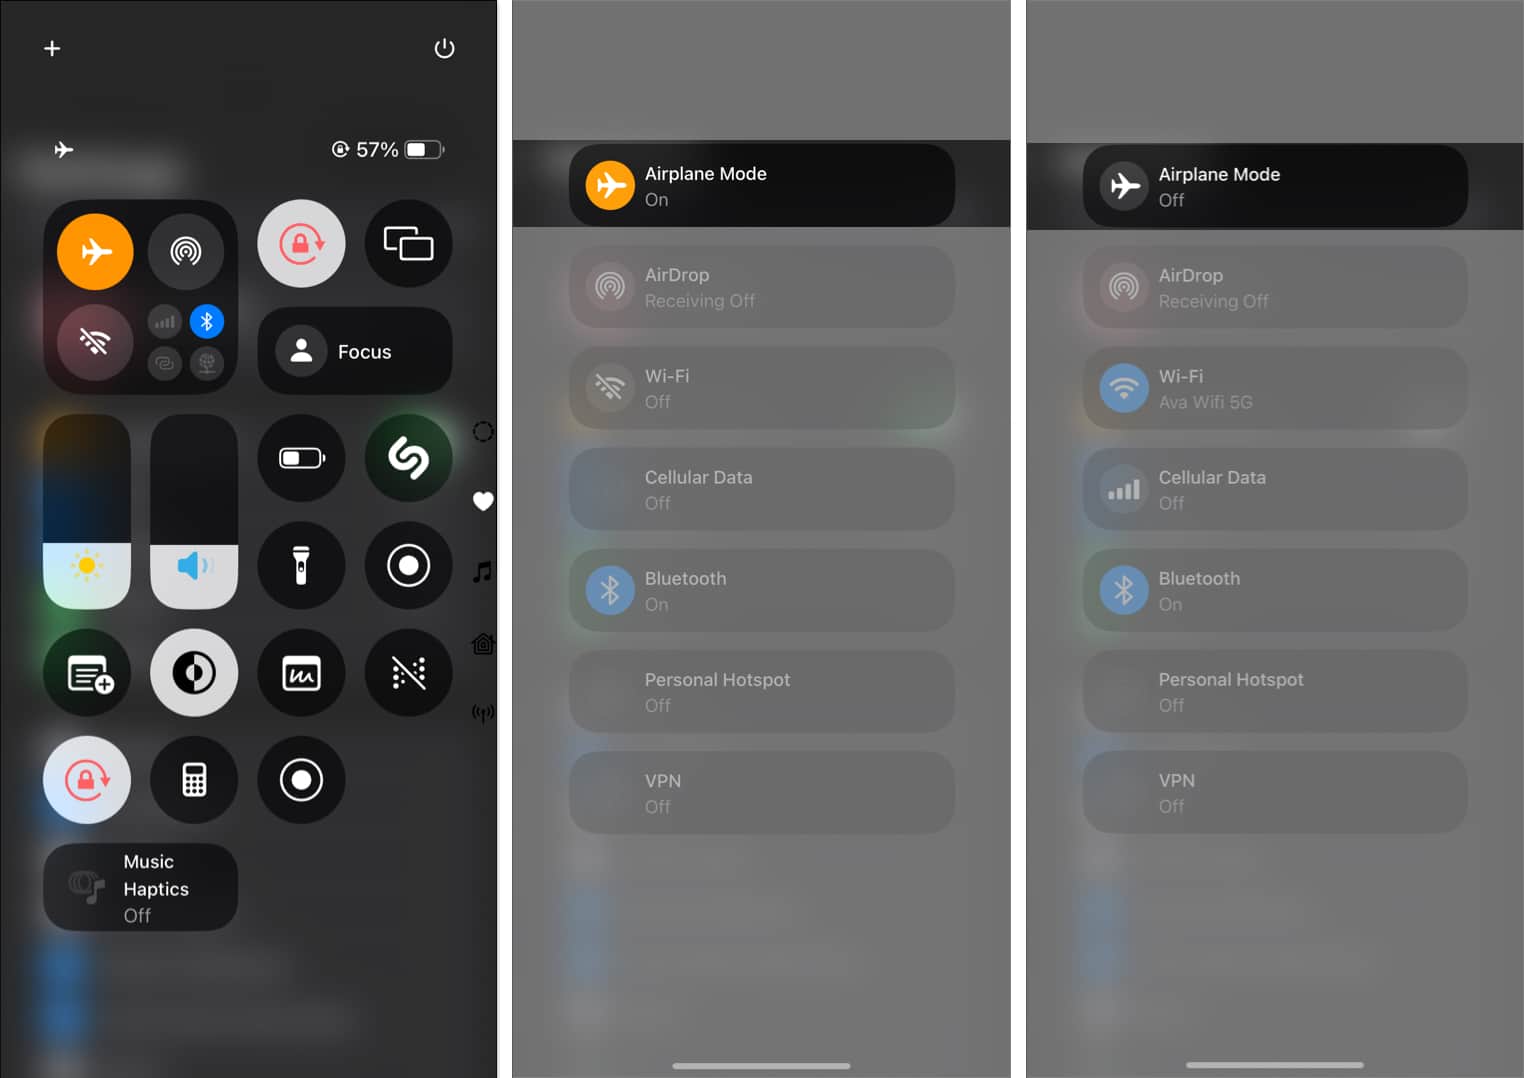
3. Check blocked numbers
If you’ve accidentally blocked a contact or number, their calls won’t come through and may end up in your iPhone voicemail. Unblock the number to see if that helps.
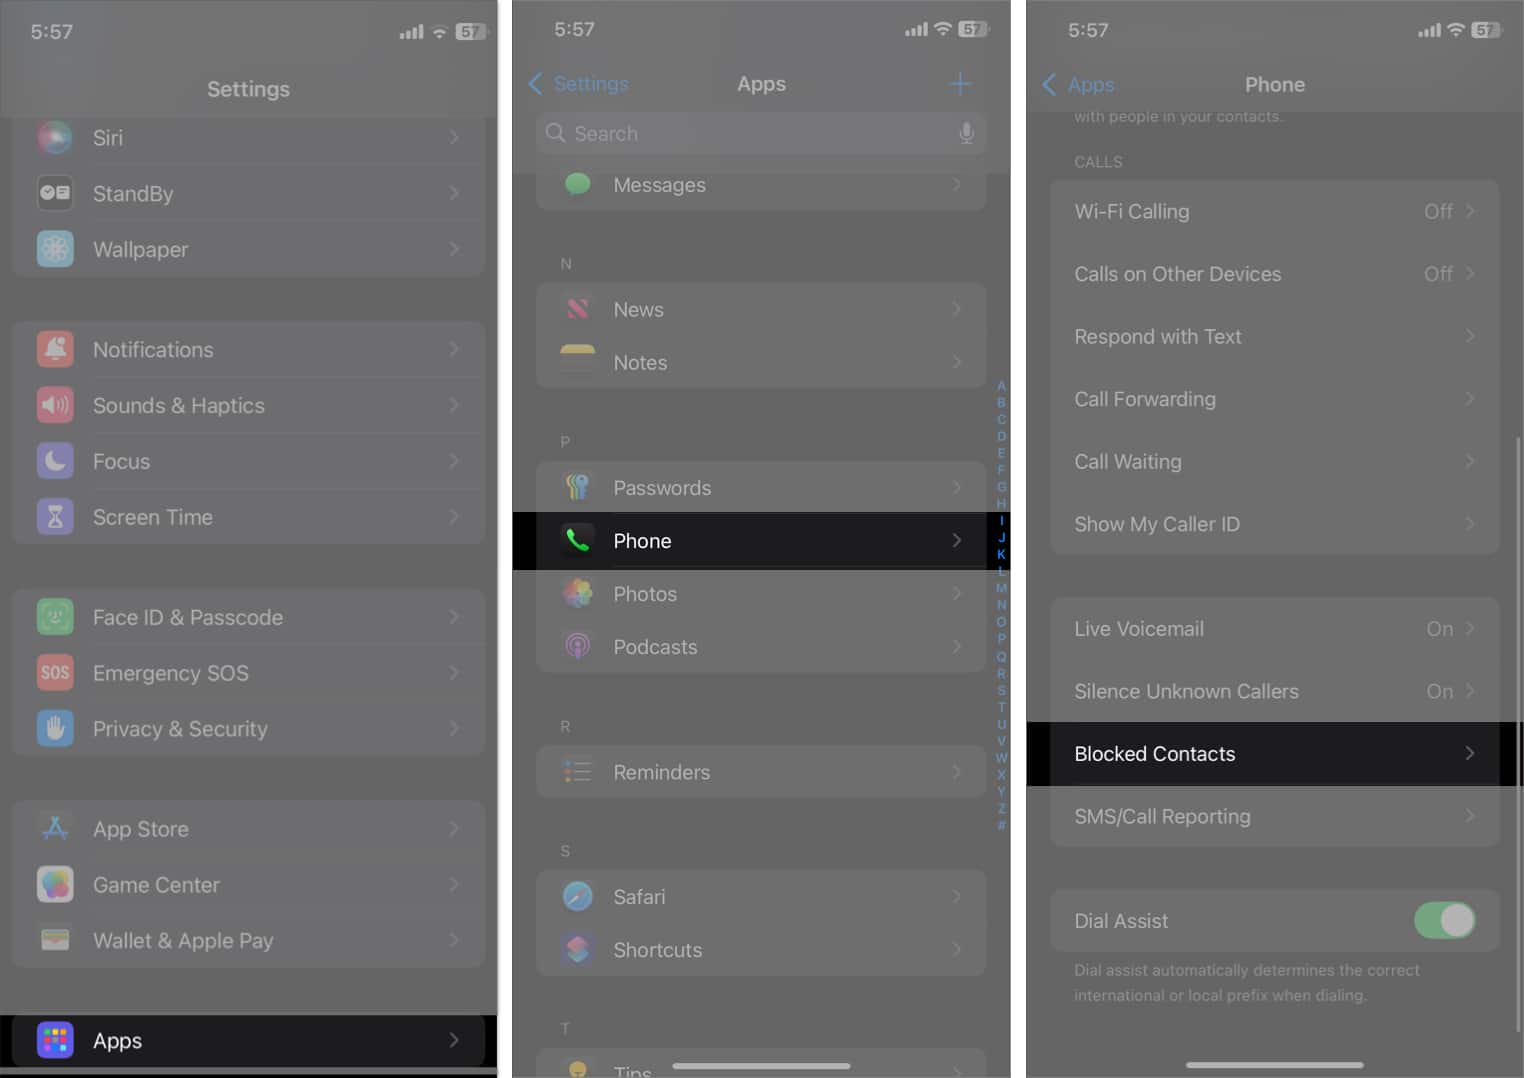
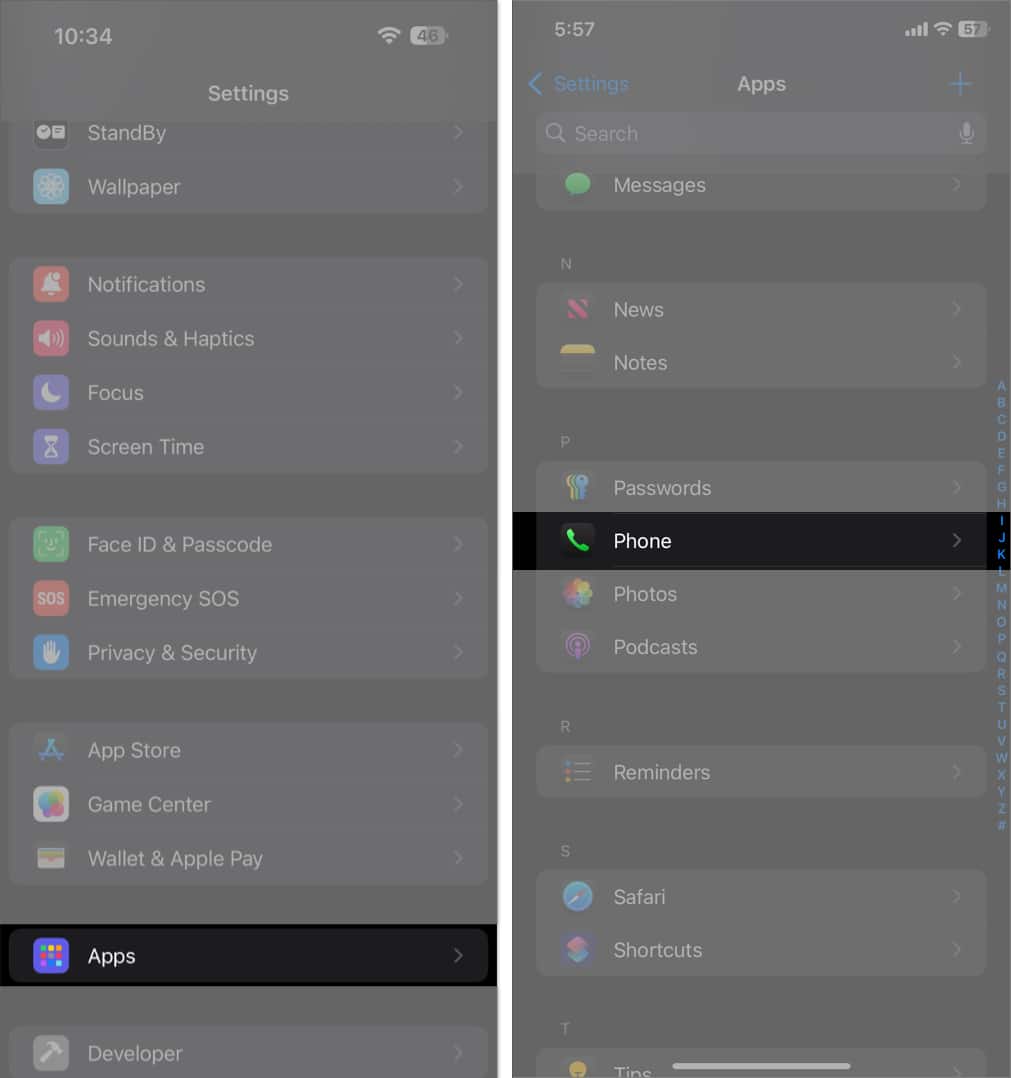
On iOS 18:
- Go to Settings and select Apps.
- From the apps list, find and select Phone.
- Now, tap Blocked Contacts to see if the number is listed there.
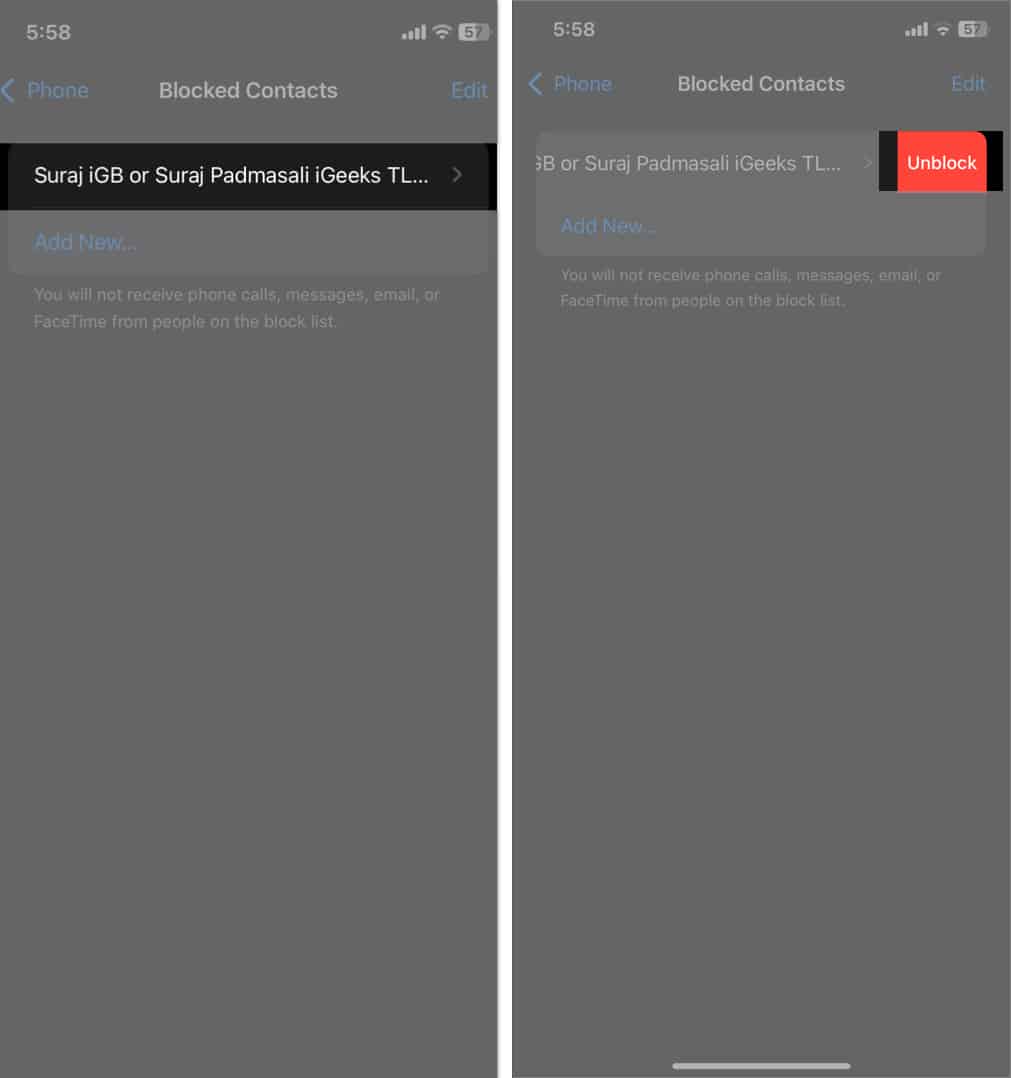
- If it is, swipe left on the number and tap Unblock.
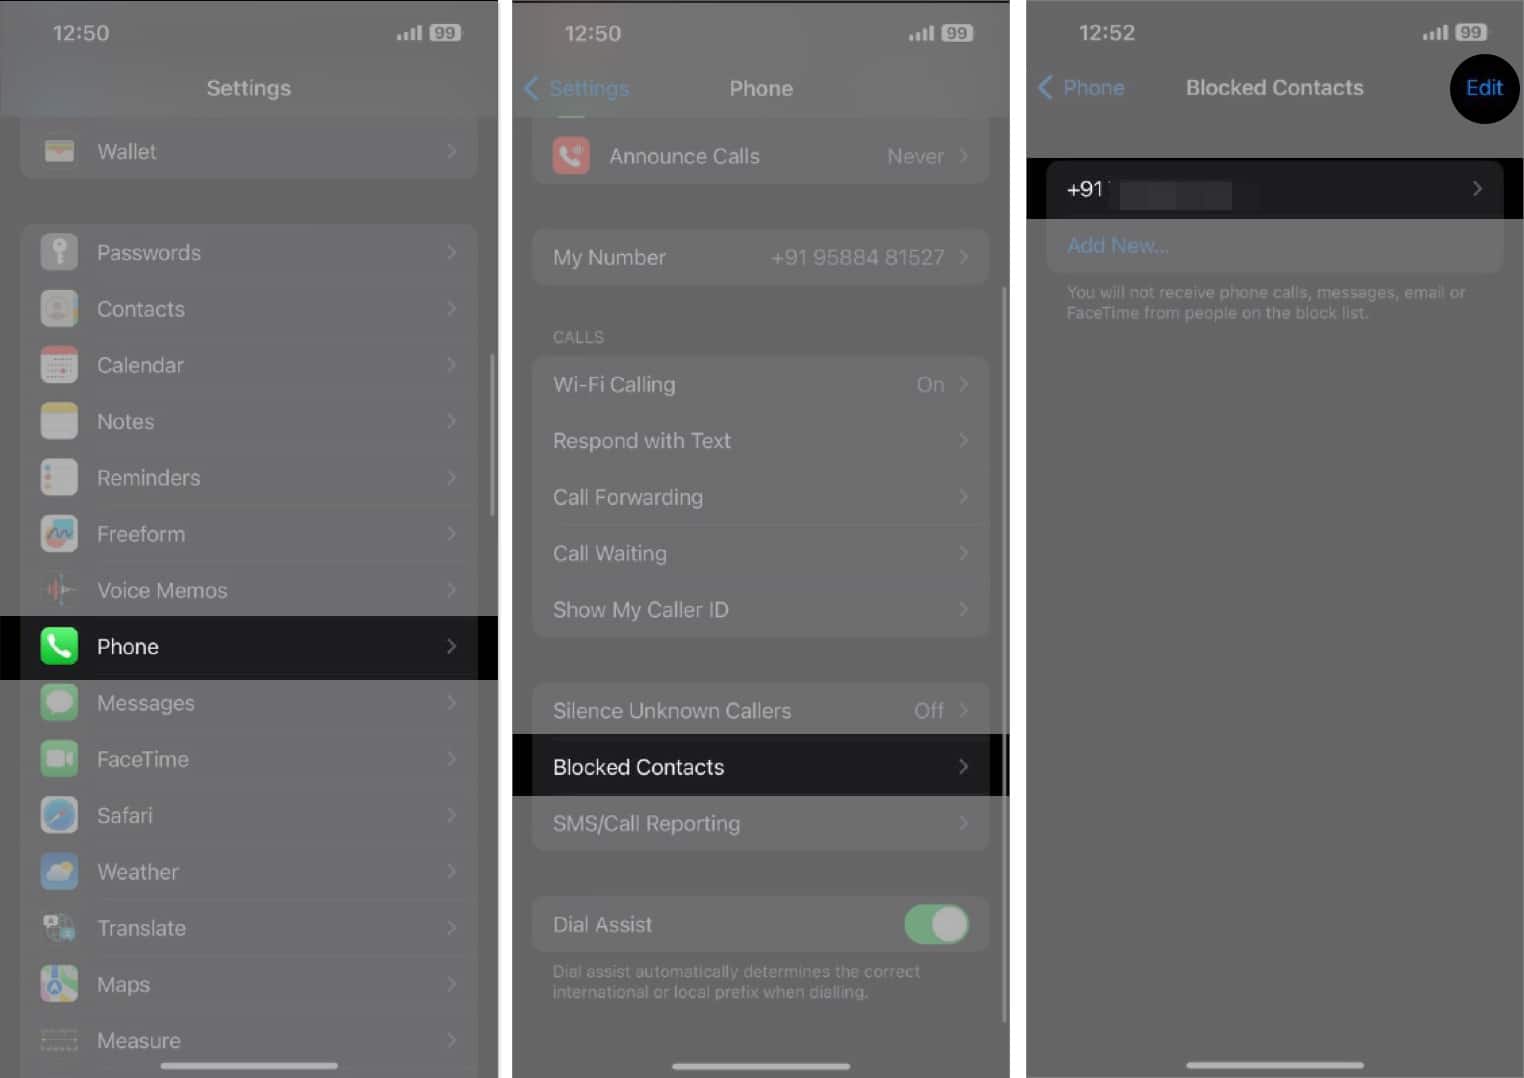
On iOS 17:
- Open Settings.
- Go to Phone and select Blocked Contacts.
- Now, search and unblock the number you want to start receiving calls from again.
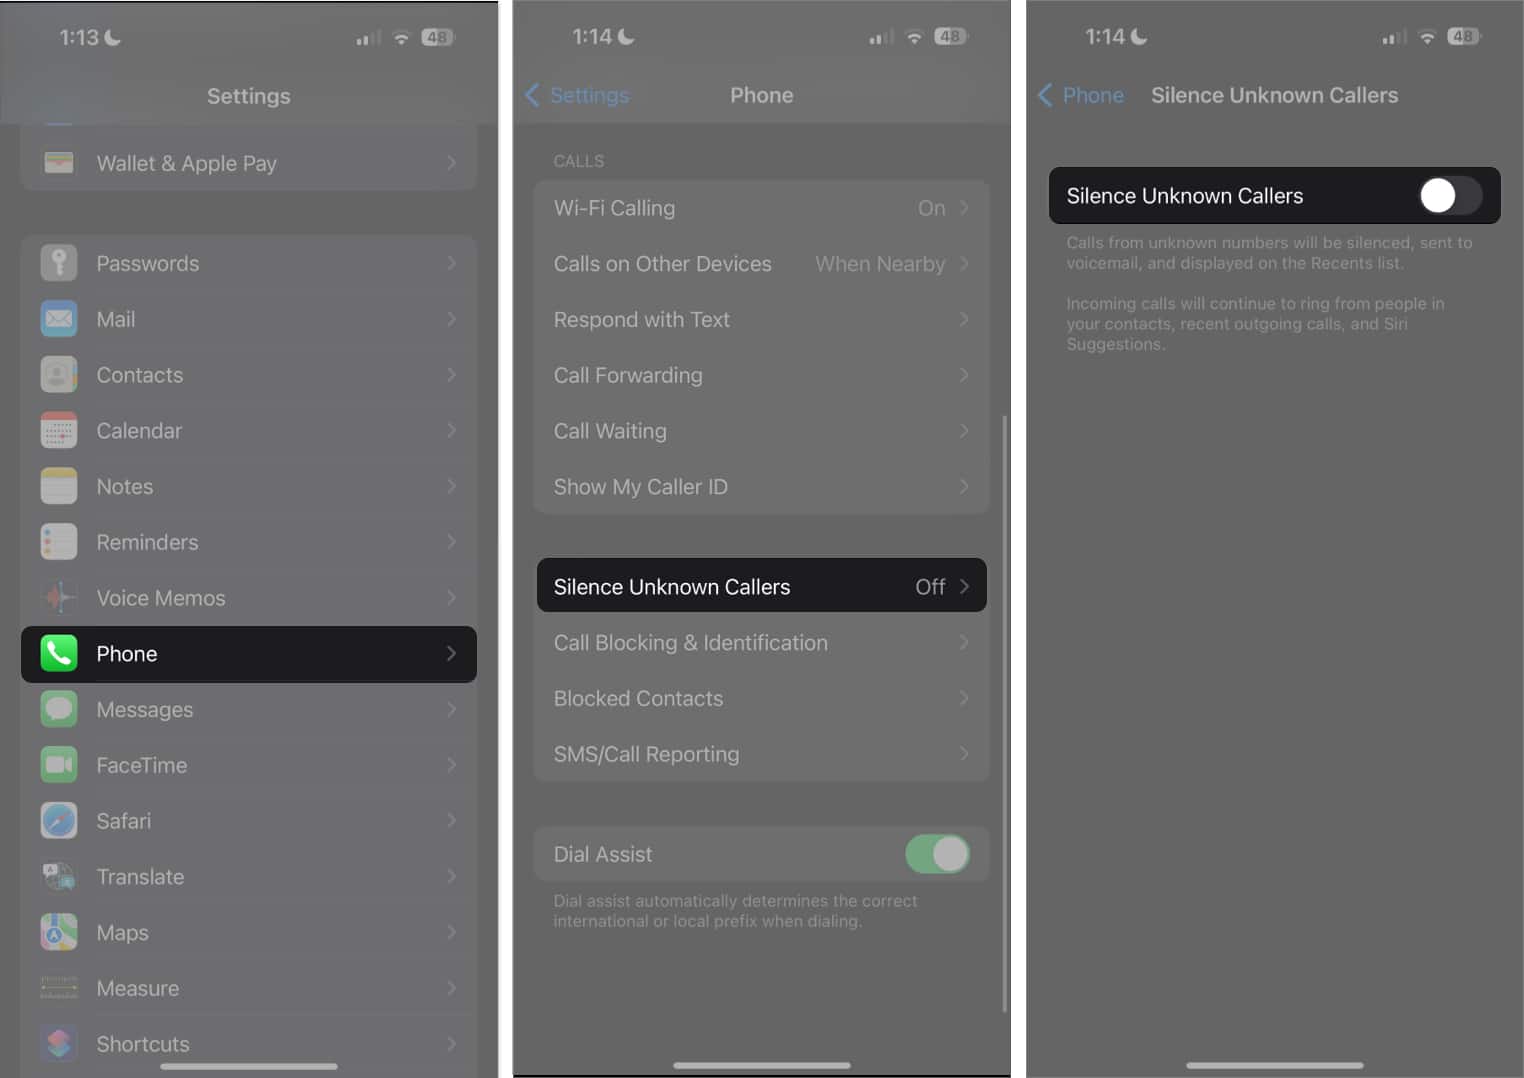
4. Turn off Silence Unknown Callers
The iPhone has a spam protection feature, Silence Unknown Callers, that silences incoming calls from unknown numbers. If calls in your voicemail only consist of people you don’t know and those not saved in your contacts list, it’s possible that the Silence Unknown Callers feature is enabled.
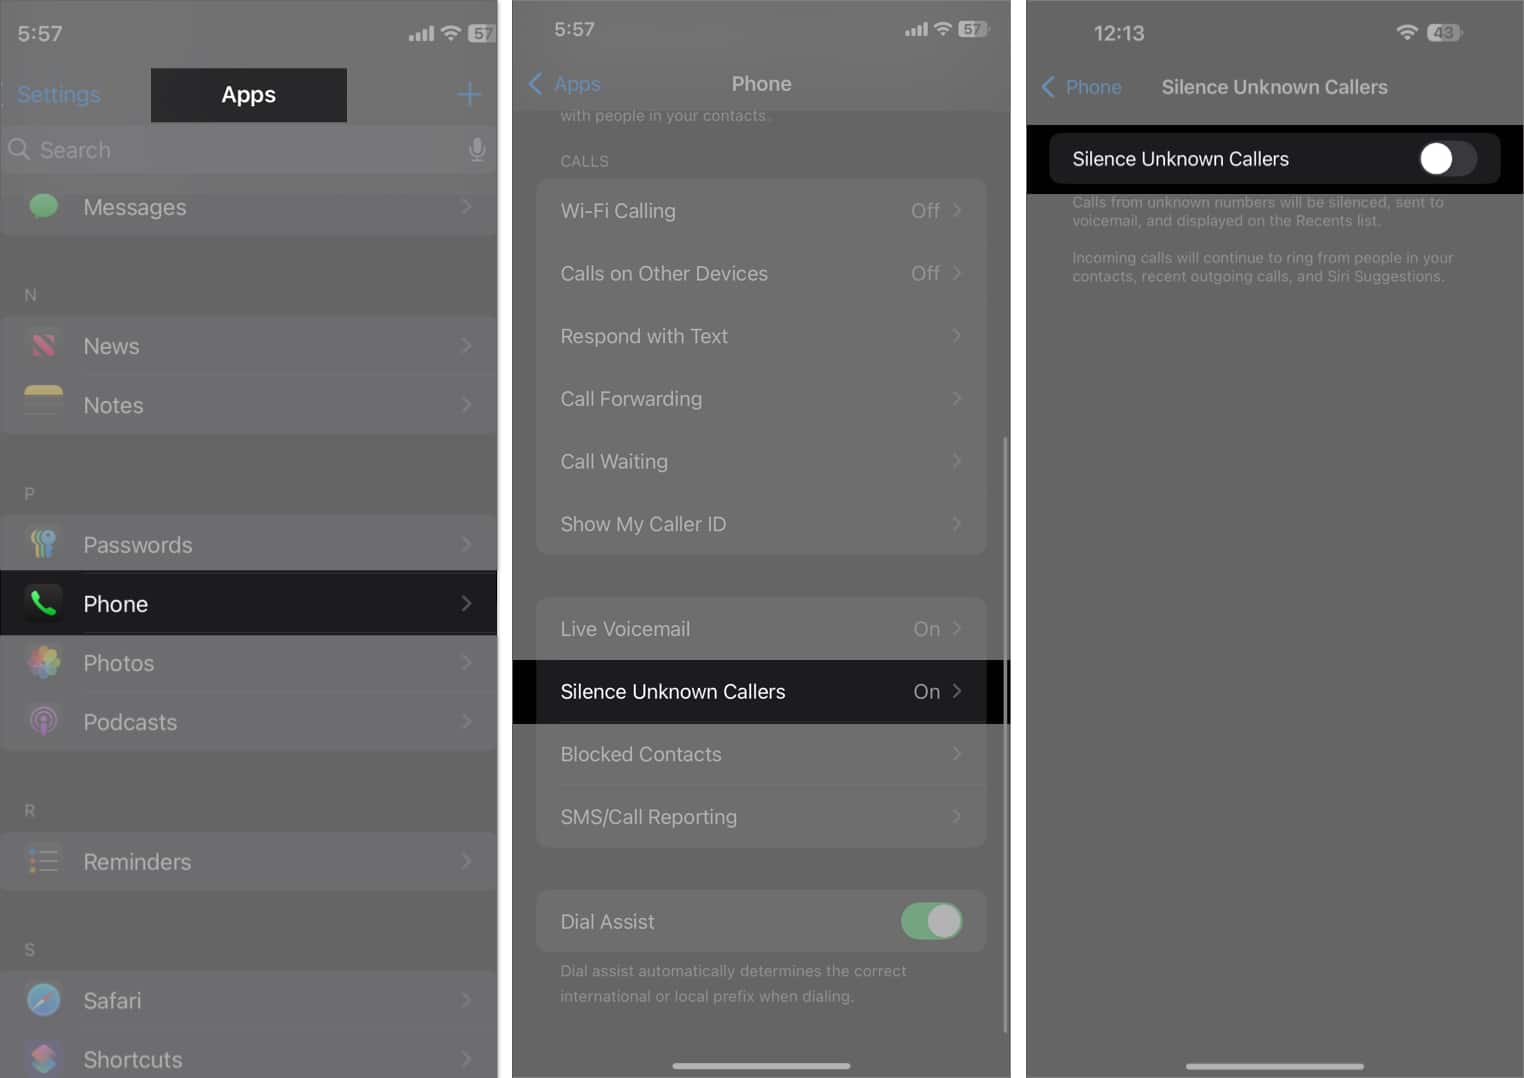
On iOS 18:
- Open Settings.
- Select Apps → Phone.
- Next, tap Silence Unknown Callers and toggle off Silence Unknown Callers.
On iOS 17:
- Open Settings.
- Go to Phone → Silence Unknown Callers and toggle it off.
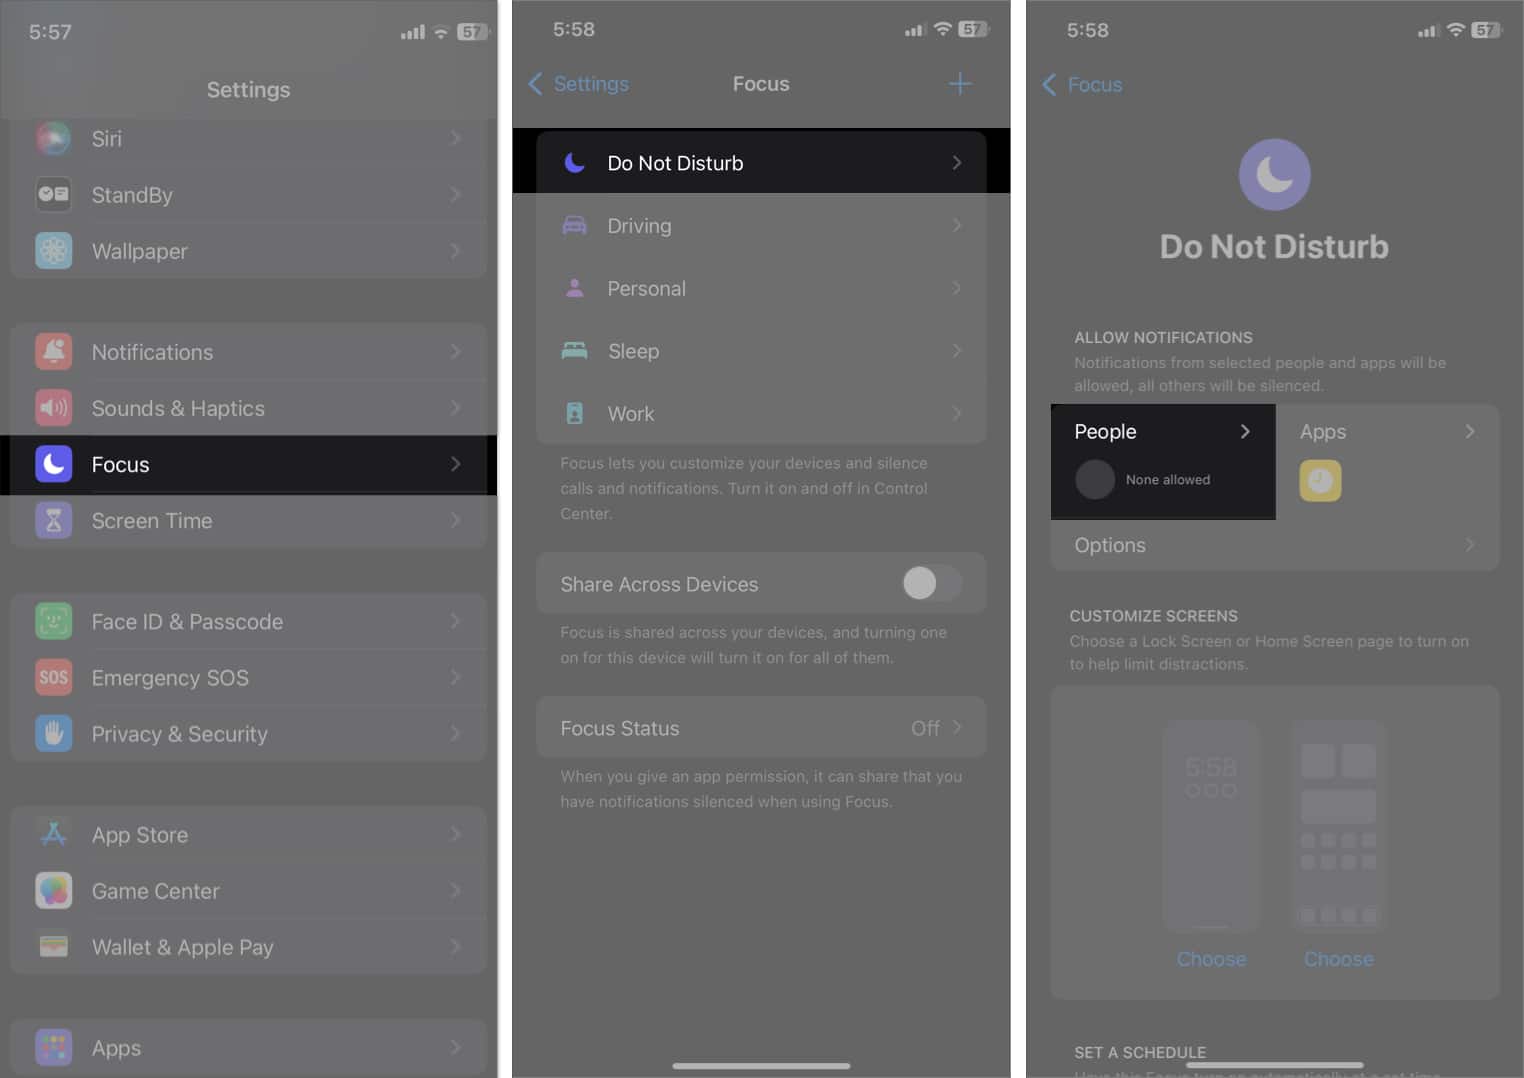
5. Turn off Do Not Disturb or Focus Mode
When you enable Do Not Disturb or any other Focus Mode, it silences the calls, alerts, and notifications to avoid distractions. You’ll still get calls, but your iPhone doesn’t ring, vibrate, or light up, so they eventually go to your voicemail. It’s best to customize the Focus mode settings or turn it off to avoid this.
To turn off a Focus mode, open the Control Center and tap the Focus button (with eclipse icon). This will open the Focus list. Finally, select the Focus name to disable it.
If you want to keep the Focus mode turned on to prevent notifications from bothering you, but still want to be reachable—at least to certain people—you can do so. Here’s what you need to do:
- Head to Settings and tap Focus.
- Now select the Focus mode you use.
- Tap People.
- Select the Allow Calls From drop-down under Phone Calls.
- Choose Contacts Only. If you want every call to ring, select Everybody.
Additionally, you may toggle on Allow Repeated Calls. This makes sure iPhone won’t silence a second call from the same person within the next three minutes.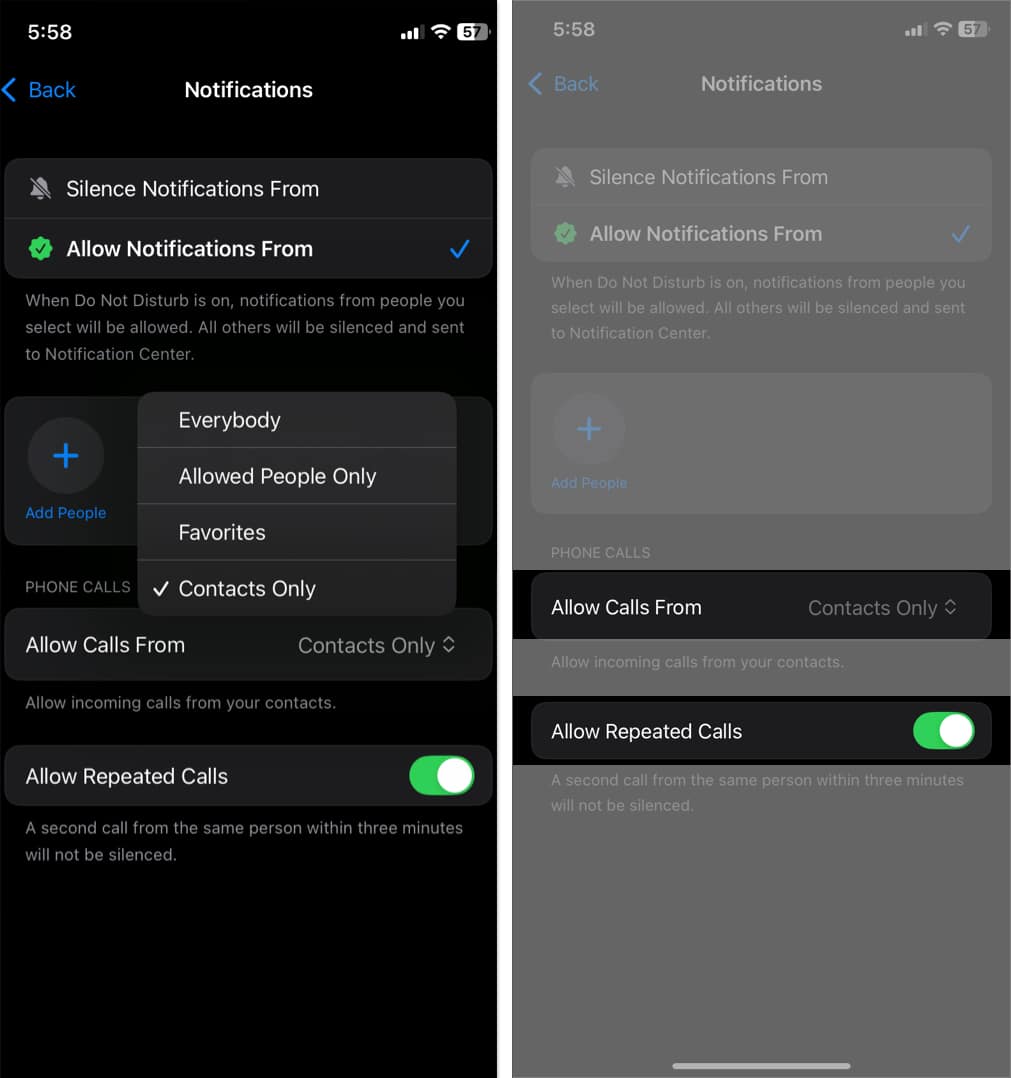
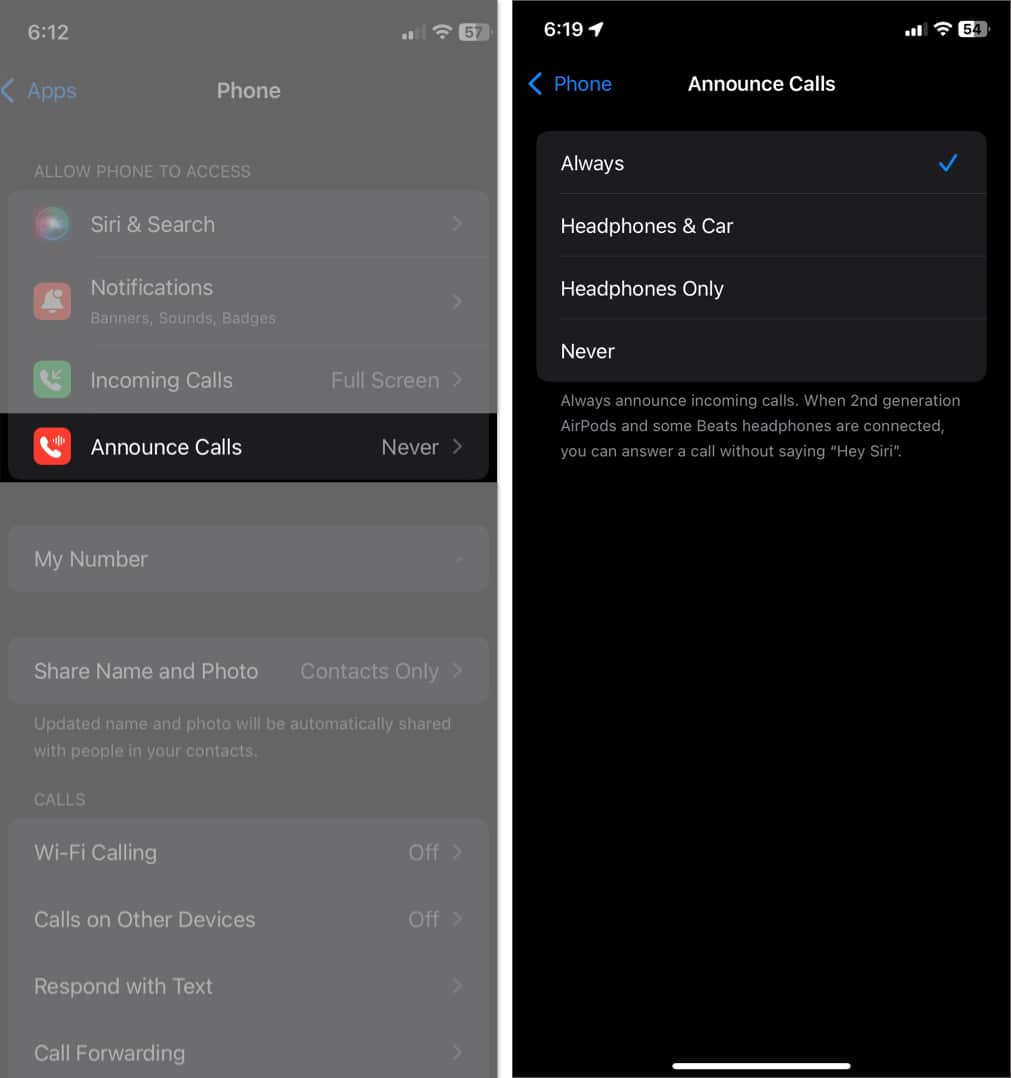
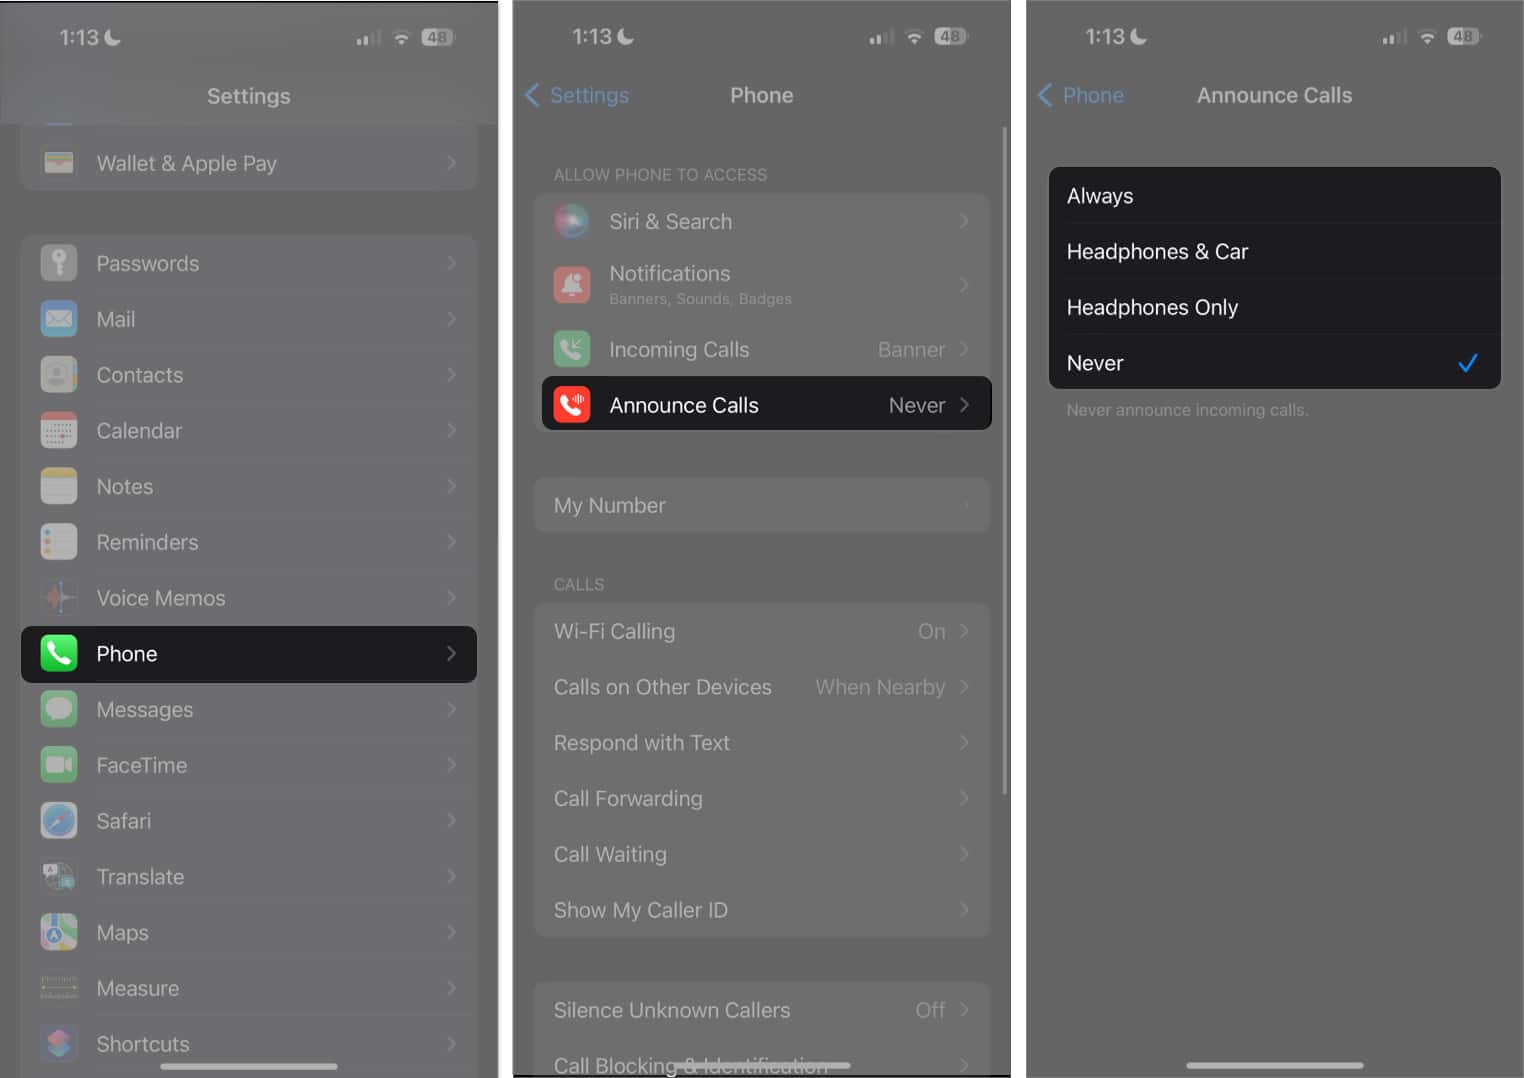
6. Check the Announce Calls settings
It’s common for iPhone users who set their phones to silent or vibrate mode to miss calls, especially when in busy environments. In such cases, ensuring that notifications are audible can prevent you from missing your calls.
When enabled, the Announce Calls feature on the iPhone announces incoming calls so you won’t miss them. You can specify if you only want your iPhone to announce calls when in your car, using your headphones, or all the time.
On iOS 18:
- Open Settings.
- Select Apps → Phone.
- Tap Announce Calls, then select when you want your iPhone to announce your calls.
- Open Settings.
- Select Phone and tap Announce Calls.
- Select Never on the following screen.
7. Update your carrier settings
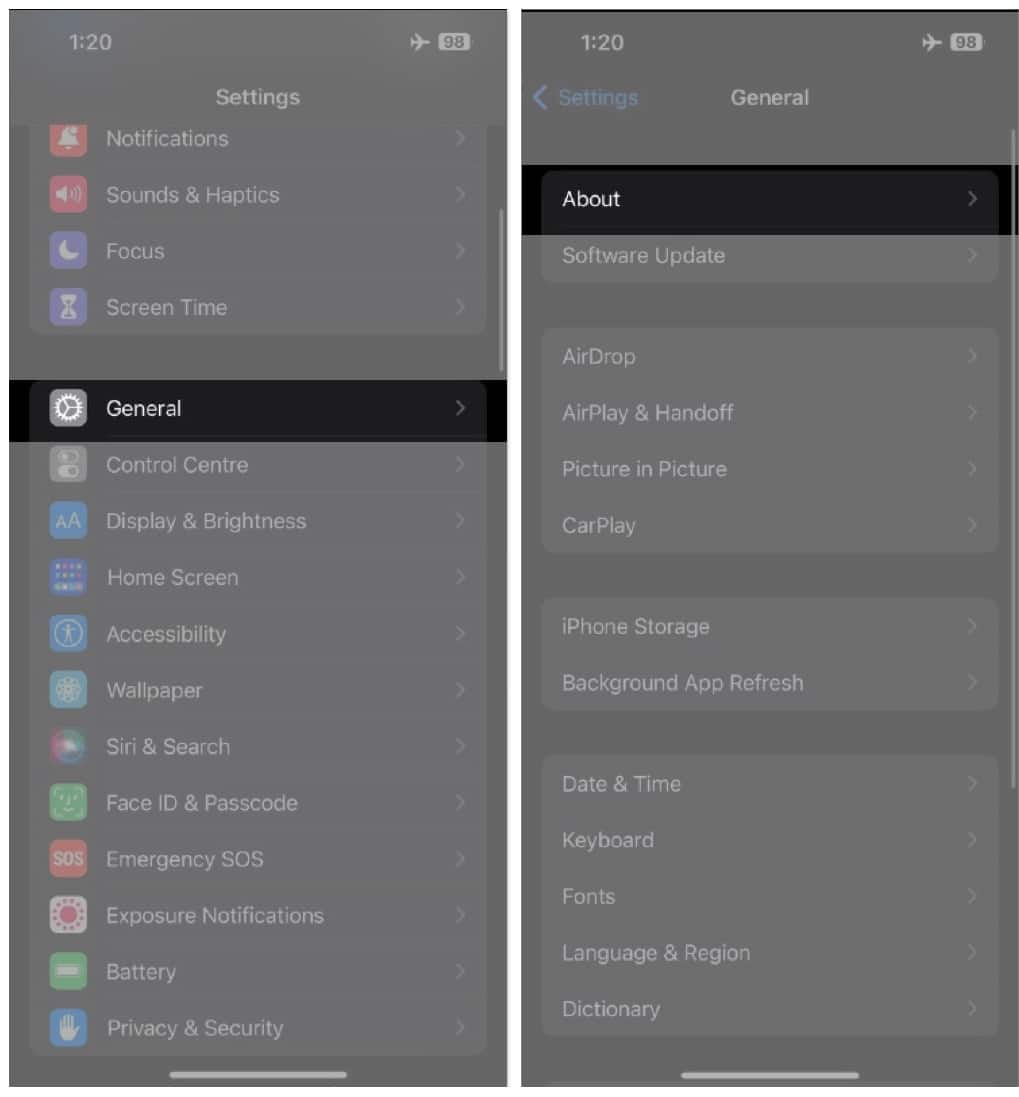
Outdated carrier settings may prevent your iPhone from connecting to your carrier’s network, which can cause your calls to go straight to voicemail. Try manually updating your iPhone’s carrier settings to see if this improves your voicemail situation.
- Open Settings.
- Go to General → About.
- If there’s an update available, you’ll see a prompt to update your carrier settings. Follow the on-screen instructions to install it.
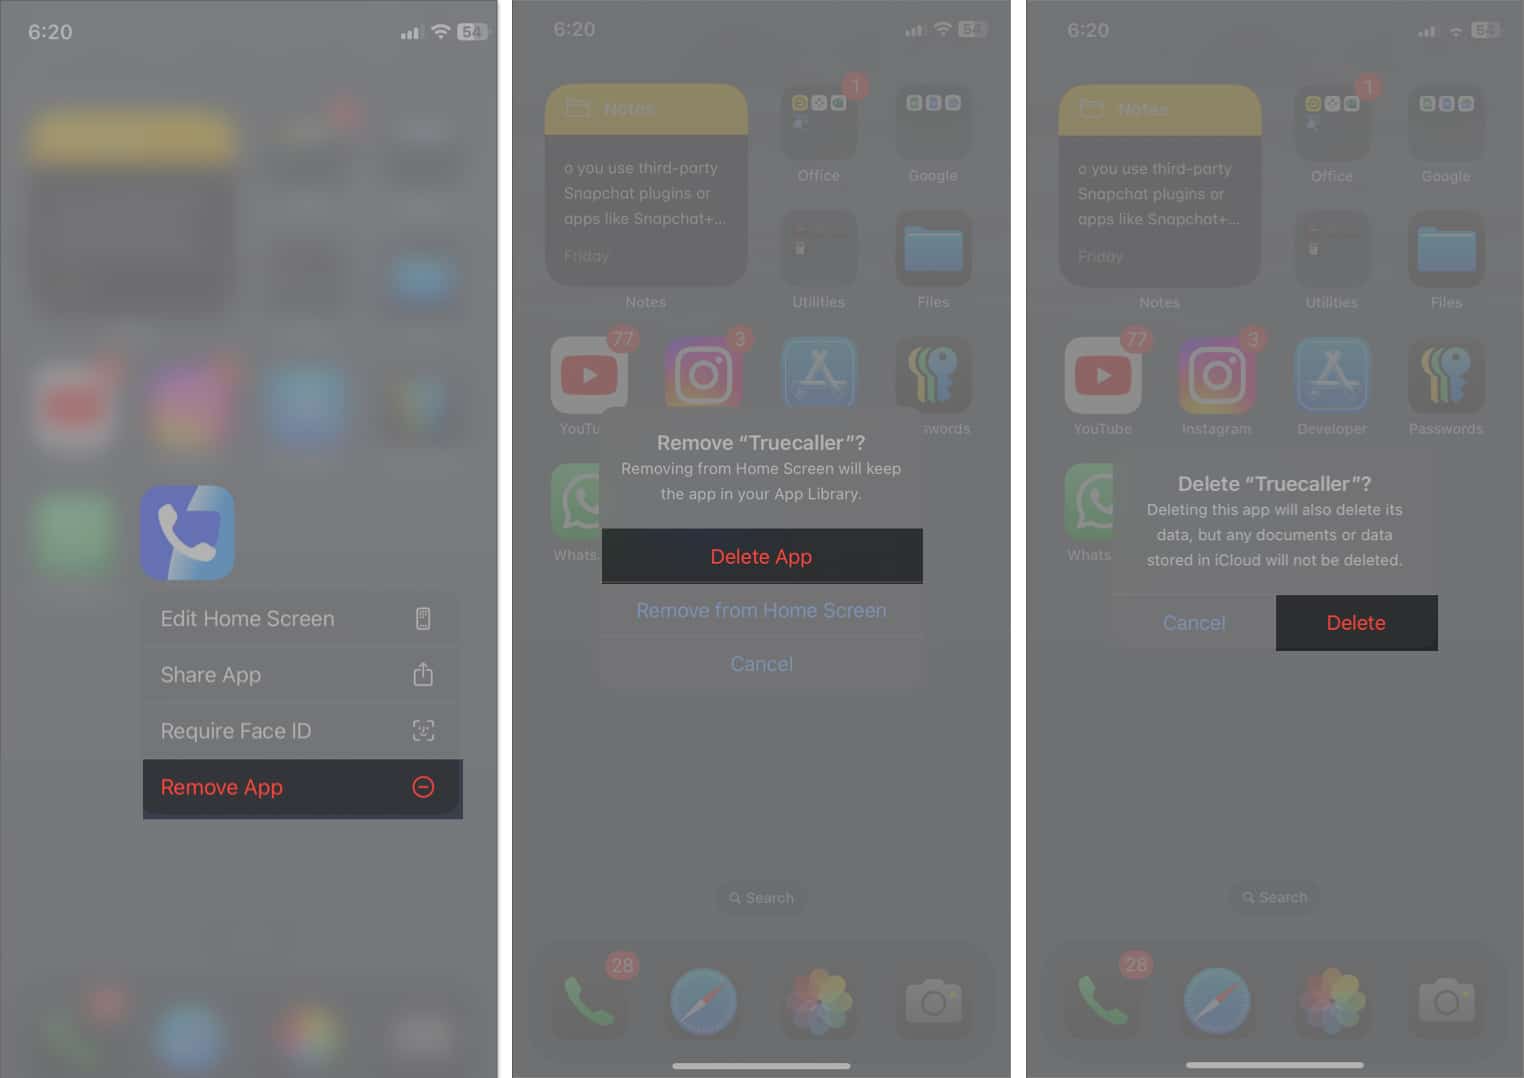
8. Remove spam blocking apps
Sometimes, spam-blocking apps may also interfere with your calls by mistakenly tagging calls as spam and blocking them from reaching you. Consider removing these apps to see if it solves the problem.
- Tap and hold the app on the Home Screen.
- Select Remove App.
- Choose Delete App, and then hit Delete to uninstall it.
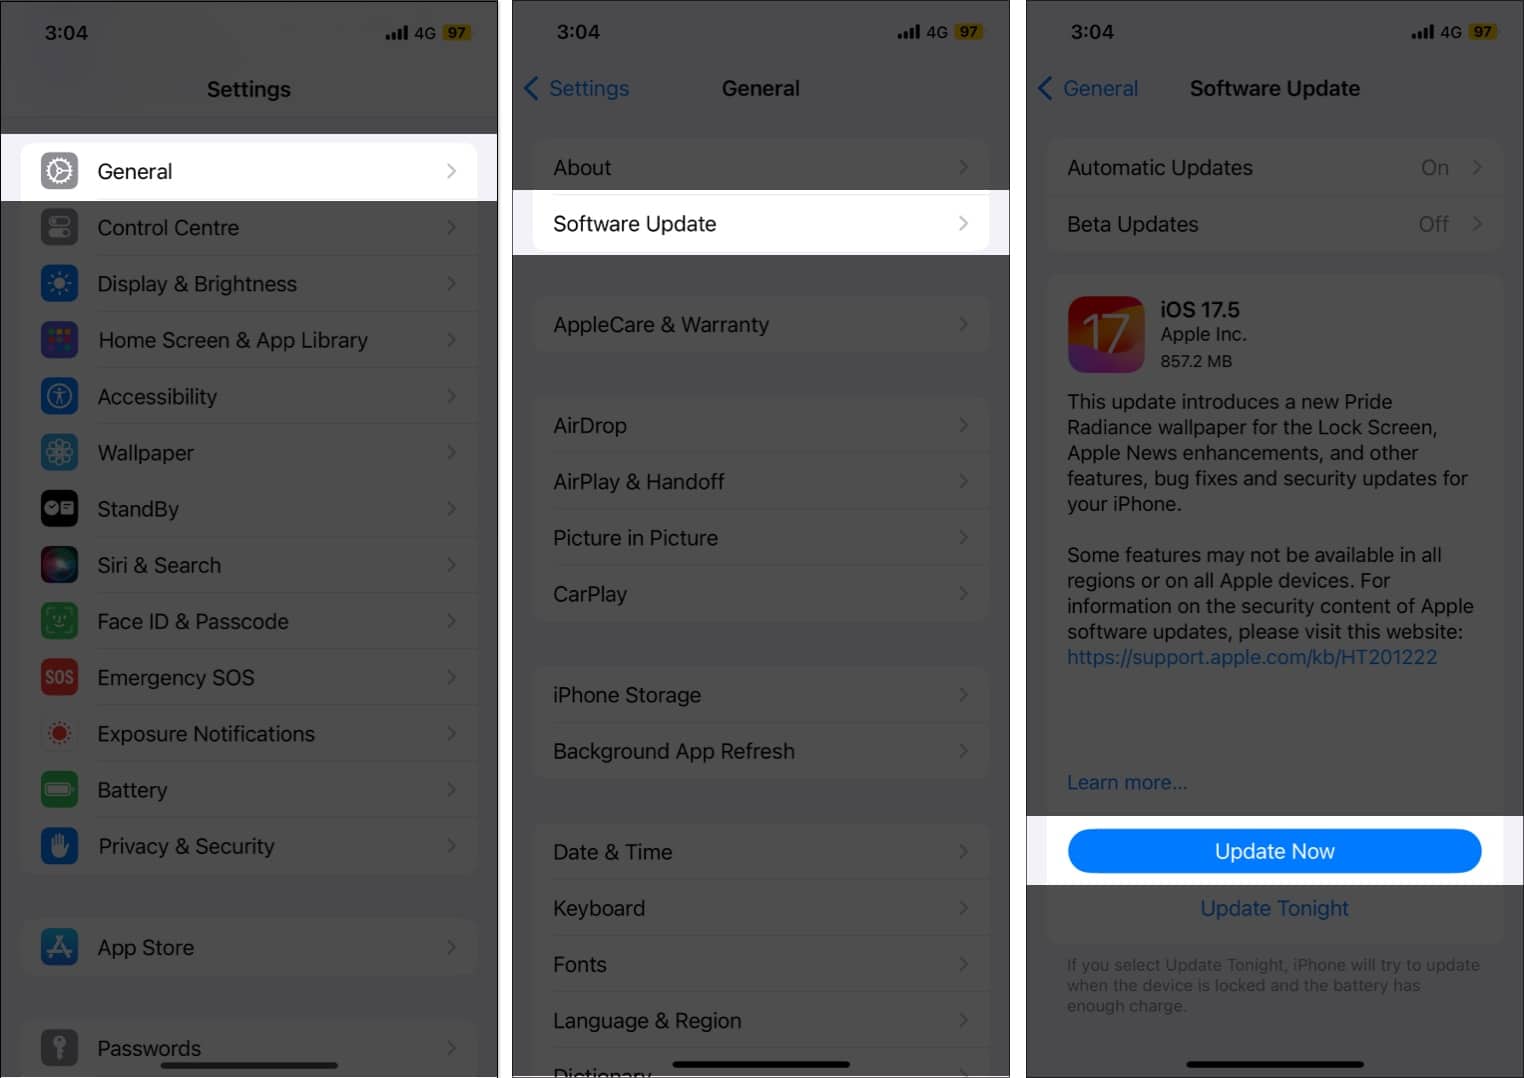
9. Update your iPhone
Ensure your iPhone is running the latest version of iOS, as software updates often include bug fixes for issues like this.
- Open Settings.
- Go to General → Software Update to see if there’s a new iOS version available.
- If one’s available, tap Download and Install to install it.
10. Contact your carrier
If you’ve tried the methods above, but all your incoming calls still go straight to your voicemail, you must contact your carrier. There could be an issue with your number that only they can resolve. If you’re not the only one in the area having the issue, you can ask your carrier if there’s a problem with a nearby tower.
Get your iPhone ringing again
iPhone calls going straight to voicemail without ringing can be incredibly frustrating. Fortunately, you can resolve the issue using the above steps and ensure you never miss an important call again. If the problem persists, contact Apple Support for further assistance.
Read more:

