Professionals around the world are adopting a hybrid work model. This change in work habits comes with limitations, such as no in-person meetings. However, Zoom has emerged as a savior. A free-to-use video conferencing software, it allows you to make and attend video and audio calls.
Available as a web and mobile app for Windows, macOS, Android, and iPhone, Zoom has an easy-to-use interface and allows up to 100 participants. To help you make the most, we have prepared a complete guide on how to use the Zoom app on iPhone and iPad.
- How to set up the Zoom app on iPhone and iPad
- How to start a new meeting on the Zoom app for iPhone
- Join a meeting using meeting ID on the Zoom iOS app
- How to host a scheduled Zoom meeting on iPhone
- Change your Zoom backgrounds on iPhone
- How to share screen on the Zoom iOS app
- Edit personal meeting room settings on the Zoom app for iPhone
- How to chat on Zoom
- Use Siri Shortcuts to join or start a Zoom meeting
How to set up the Zoom app on iPhone and iPad
Once you have downloaded Zoom from the App Store, here’s how you can proceed to set it up on your device.
Pre-requisites
- iOS 8.0 or above for iPhone
- iPadOS 8 or above for iPad
- Working internet connection with minimum 600kbps bandwidth for one-to-one calls with high video quality
- Minimum 1.2 Mbps for HD video calls
- 600kbps or 1.2Mbps for group calls and 1.5 Mbps for group video call
Permissions
You need to grant the following permissions to run the Zoom app on your iPhone:
- Contacts: To make a video/audio call.
- Location: To generate an Emergency Response Location. This location will be used as a reference while dialing emergency services from the Zoom app.
- Calendars: Zoom will add a scheduled meeting as an event to the default calendar app.
- Microphone: To use the microphone when joining a meeting or webinar.
- Camera: To allow one-to-one or group video calls.
- Photos: To send images in chat or for screen sharing during a meeting.
- Background App Refresh: To send notifications.
- Notifications: To notify regarding meetings, meeting invites, scheduled meetings, and more.
- Siri & Search: To join the next meeting, view today’s meetings, and start a personal meeting by setting up Siri shortcuts.
Now that you have granted all necessary permissions, it’s time to learn more about using Zoom. Keep scrolling!
How to start a new meeting on the Zoom app for iPhone
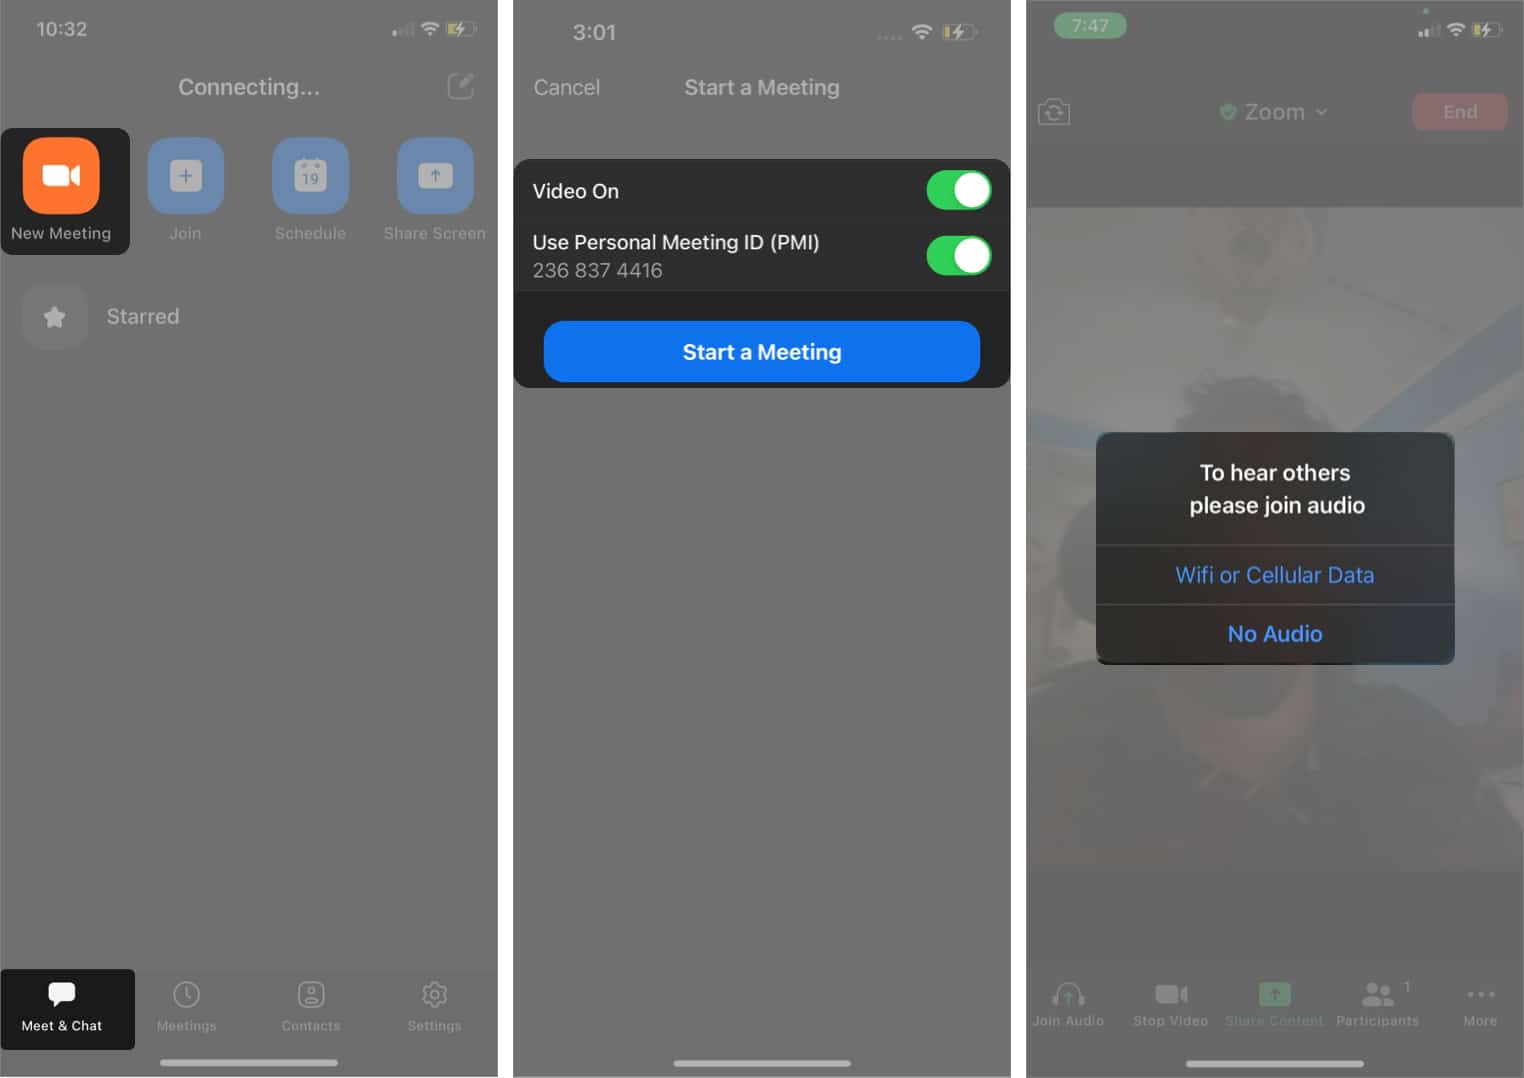
- Go to the ‘Meets & Chat‘ tab.
- Tap New Meeting.
- Next, toggle on to start a video meeting.
- Optional: Enable your Personal Meeting ID (PMI) to create a private meeting room and start or schedule a meeting at the specified time. (More on this later).
- Tap the start meeting button.
You can choose to keep ‘No Audio‘ in the meeting.
Here’re some more controls to run your meeting smoothly.
- Tap the ‘Zoom’ button at the top to get information about your meeting like Meeting ID, host name, passcode, invite link, encryption, and more.
- To invite participants to the meeting, tap Participants → invite. You can invite contacts directly if you have granted permission to the default Contacts app or copy and share the invite link.
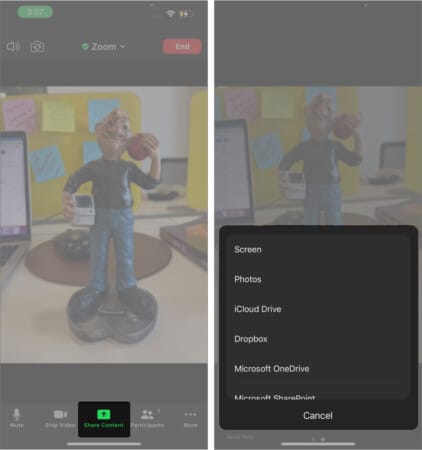
- To share content in a Zoom meeting, tap Share content and choose the type of content you want to share.
Note: To leave a meeting temporarily, click the end button at the top right. You can choose ‘end meeting for all‘ if you are the host.
Join a meeting using meeting ID on the Zoom iOS app
If someone has invited you to a Zoom meeting, there are two ways to join it. One is by directly clicking the shared link, and another is by using the meeting ID. Here’s how you can join a meeting using the meeting ID.
Note: The host must enable and share the meeting ID to join the meeting.
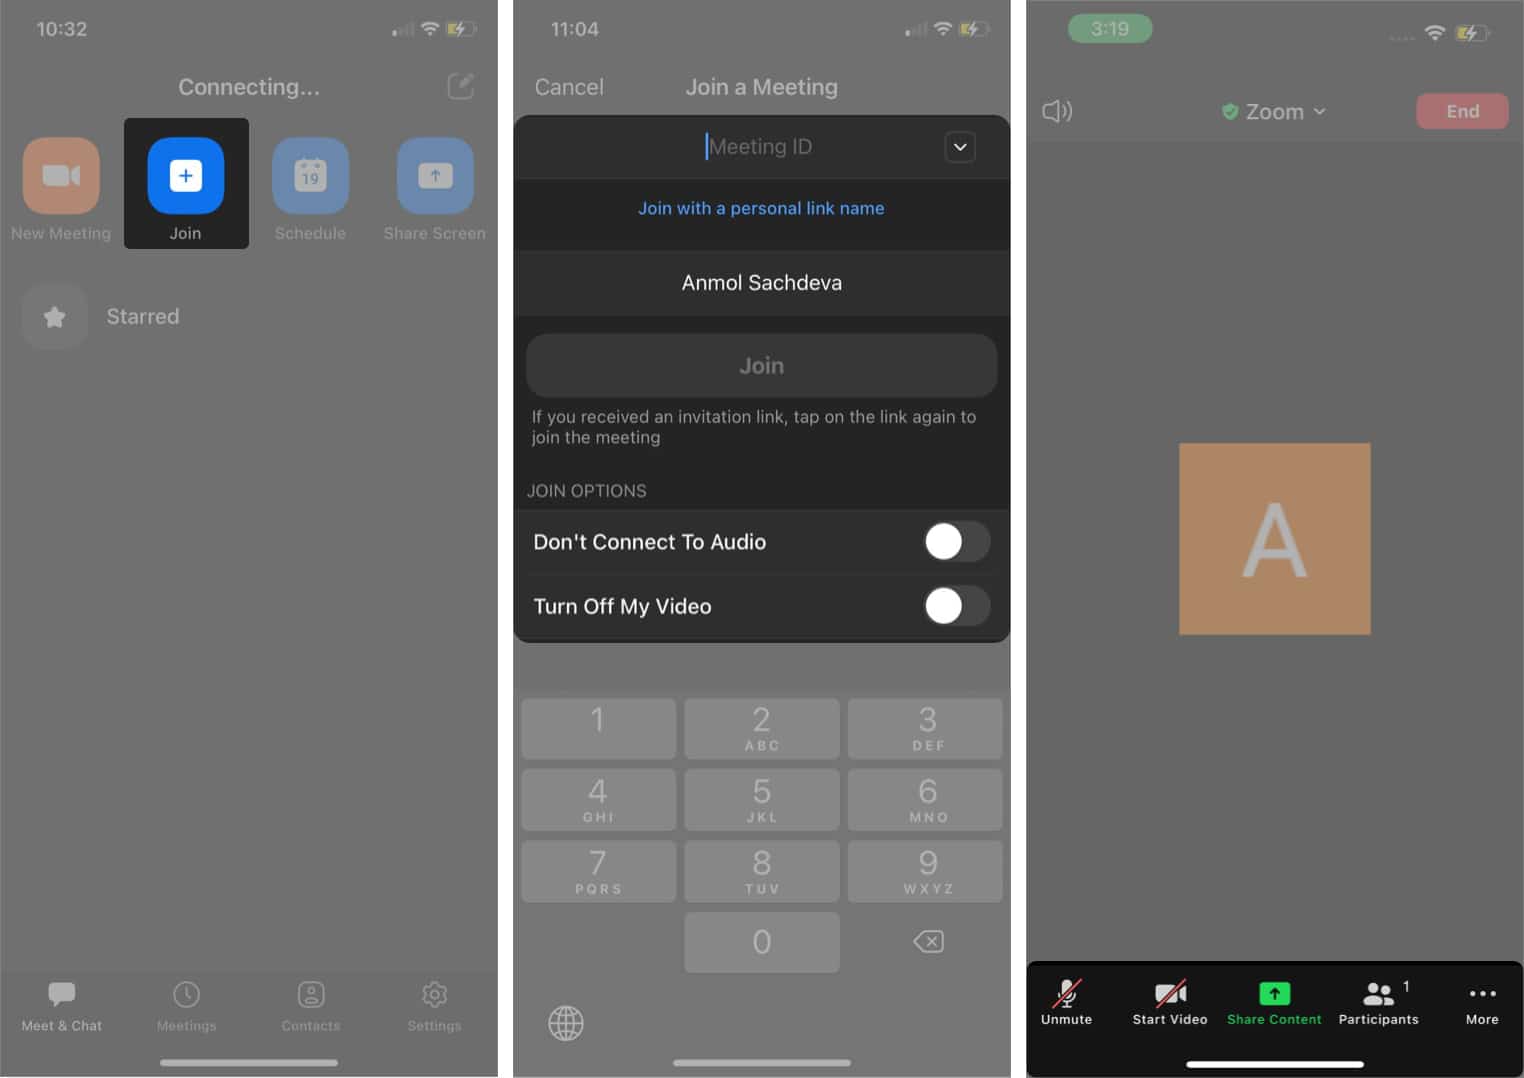
- Launch Zoom and tap Join in the ‘Meet & Chat’ tab.
- Enter the meeting ID and enter your name that will appear when you join the meeting.
- Optional: You can turn off the video or connect without audio.
How to host a scheduled Zoom meeting on iPhone
Sometimes, you might want to schedule a meeting in advance. Zoom offers an option to schedule meetings for your desired date and time. You can even schedule a recurring meeting. Here’s how:
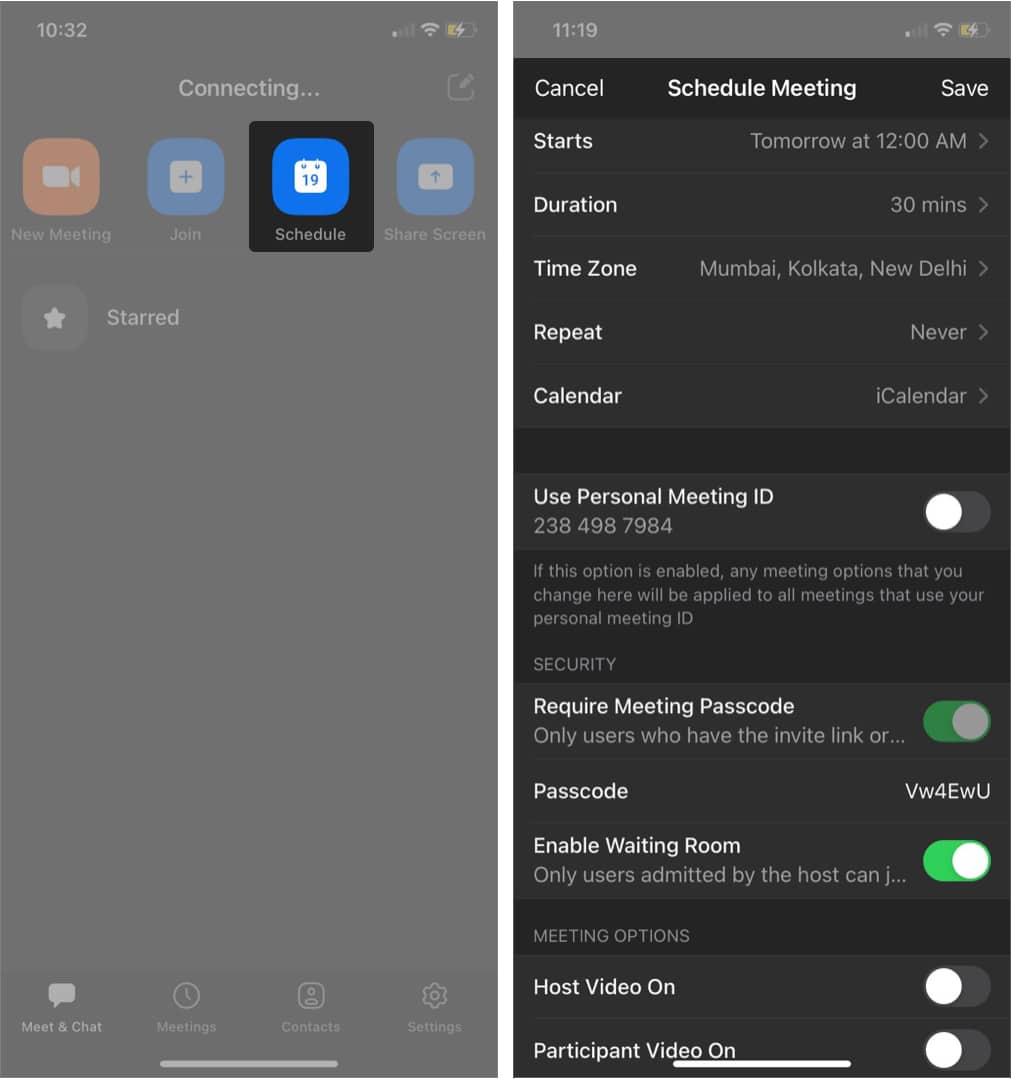
- Open Zoom and go to the ‘Meet & Chat‘ tab.
- Now, tap Schedule.
- Set the start time and duration.
- Optional: You can change the default calendar for the meeting notification, use a personal meeting ID (PID), enable waiting room, and modify other additional meeting options.
- Once done, tap Save. That’s it!
Note: A non-recurring meeting ID will expire after 30 days. However, you can restart it within 30 days.
To schedule a recurring meeting:
- Follow the above steps and hit Repeat.
- Now, select the suitable time interval for the recurring meeting: Every Day, Every Week, Every 2 Weeks, Every Month, or Every year.
- Tap Done.
- Once the changes have been made for the meeting, hit Save.
Change your Zoom backgrounds on iPhone
If you don’t want to show your messy room while attending a meeting, Zoom offers an option to apply a virtual background. You can choose from a list of virtual backgrounds or set a custom one.
For example, you can set a virtual background with a birthday cake to celebrate someone’s birthday in the meeting, etc.
Here’s how you can change backgrounds in Zoom:
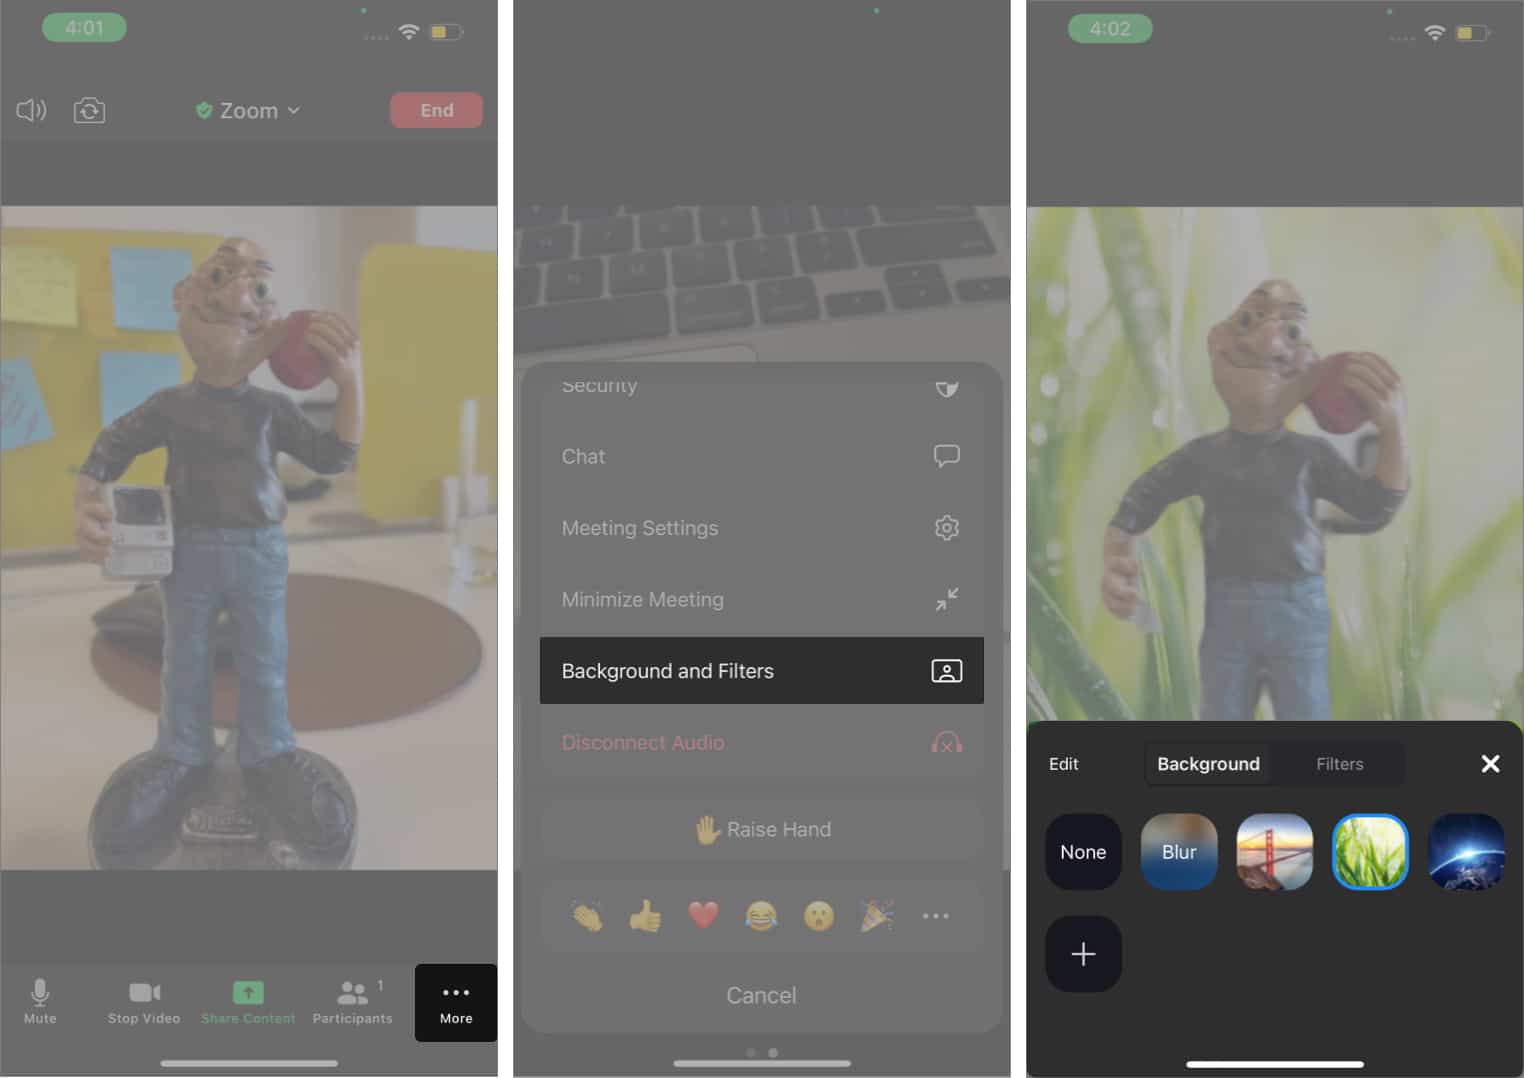
- Start or join a meeting.
- Tap More at the bottom right.
- Now, choose Backgrounds and Filters.
- Swipe right to view the preset backgrounds or tap + to use an image from your device’s storage.
- Tap Done.
How to share screen on the Zoom iOS app
Zoom is majorly used in businesses where collaborating on documents and projects is important. Hence, its screen sharing feature is helpful. You can share your screen to show its content to participants. Here’s how:
- In a meeting, tap Share Content at the bottom.
- Tap the screen from the list of options.
- Select the start broadcast option.
You can also share photos, folders, or files from iCloud, Drive, Dropbox, Microsoft OneDrive, Microsoft SharePoint, Google Drive, Box, Website URL, and Bookmark.
Note:
- While sharing the screen, your notifications will be visible to all the participants. Therefore, I recommend enabling Do Not Disturb.
- To stop screen sharing, tap the red-colored timer at the top left and select stop sharing.
Edit personal meeting room settings on the Zoom app for iPhone
Zoom offers a high level of customizability for meetings. You can edit settings for your meeting room while in a meeting. Tap More and select Meeting Settings.
You will get the following options:
- Meeting Topic: You can edit the meeting topic to your liking and tell the participants more about the agenda.
- Mute Upon Entry: Use this option to mute yourself in the meeting.
- Play Join and Leave Sound: Toggle it on if you want to be notified via a sound when a participant enters or leaves.
- Always Show Meeting Controls: Disabling this option will auto-hide the meeting control bar. I recommend turning it on to access meeting controls easily.
- Show Self View: Turn it off to hide your video view from the meeting’s display
- Show my connected time: It shows how long you have been in a meeting.
- Touch Up My Appearance: This option uses AI to enhance your digital appearance in real-time.
- Closed Captioning: Turning it on will provide subtitles of the in-meeting verbal communication. It helps follow the conversation easily or meet accessibility requirements.
- Show Name when Participants Join: Enable it to display each participants’ name when joining the meeting.
- Show non-video participants: Show or hide participant’s names or profile pictures on the Zoom Room’s display if their video is turned off.
How to chat on Zoom
Besides being one of the most popular video-conferencing apps, Zoom also doubles down as a messenger. You can chat with other participants in the meeting.
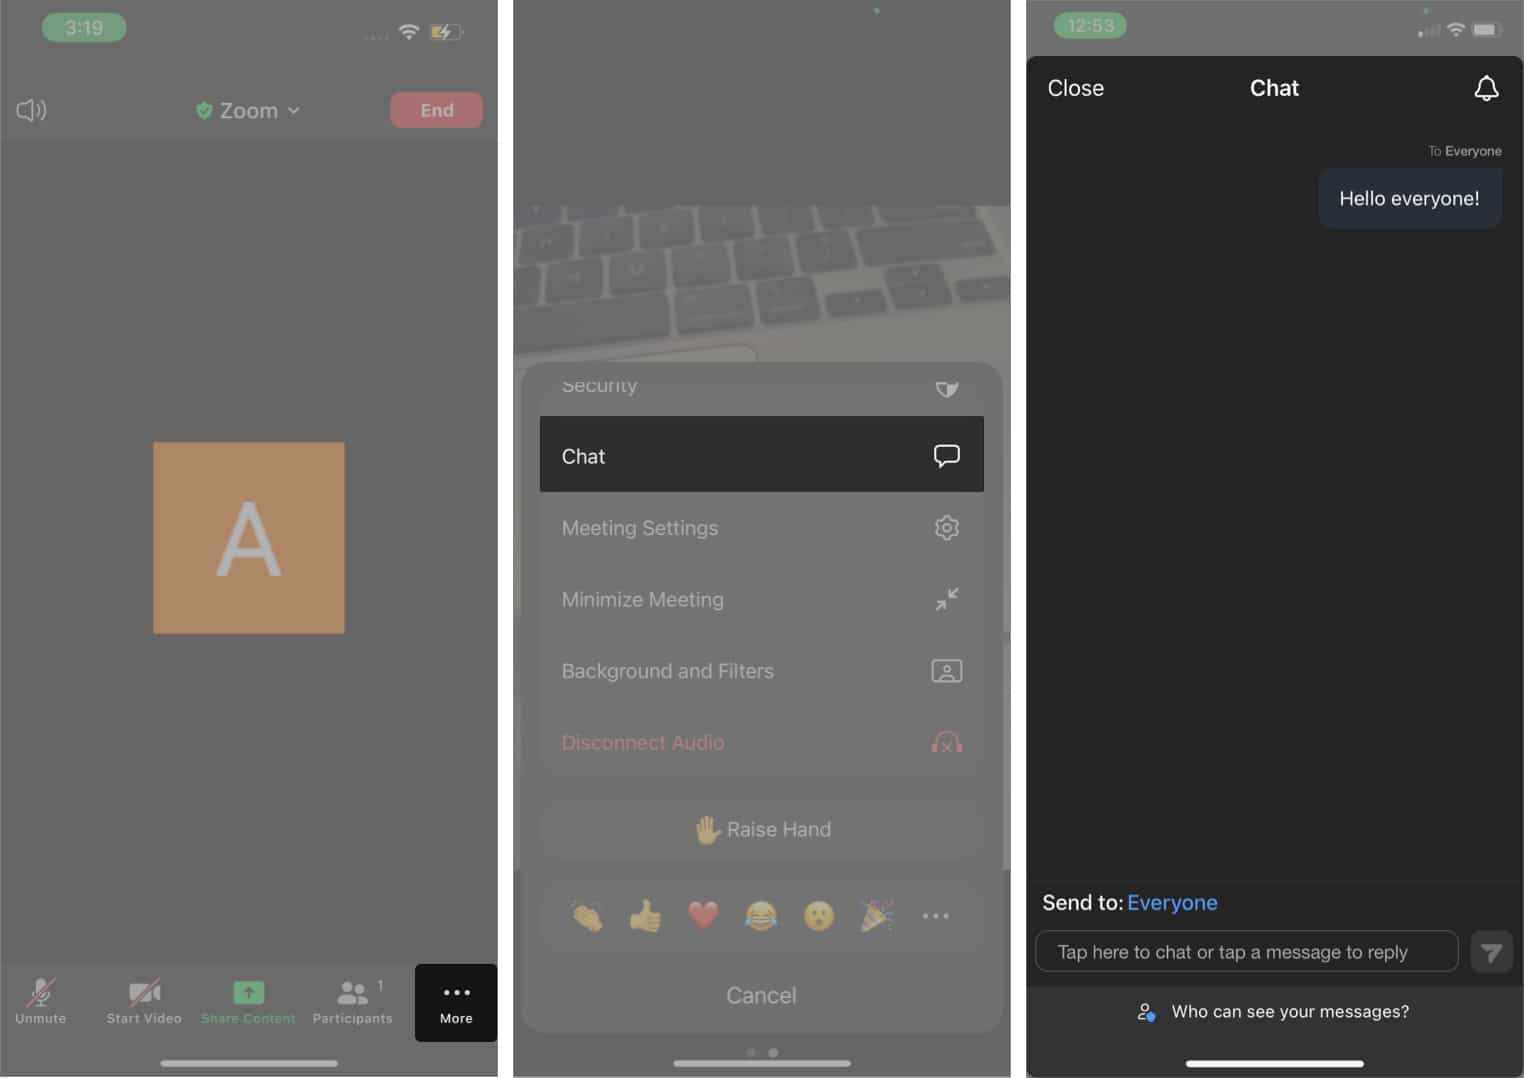
- While you are in a meeting, tap More → Chat.
- Select whom you want to send the message: everyone or a specific person.
- Now, type the message and tap send.
Note: You can also mute chat notifications by clicking the bell icon at the top right under the Chat tab to avoid disturbance during the meeting.
Use Siri Shortcuts to join or start a Zoom meeting
Zoom also works perfectly with Siri. If you use Siri Shortcuts daily, you will enjoy the fact that you can join or start a Zoom meeting using Siri Shortcuts. For the uninitiated, Siri Shortcuts are commands used to perform tasks by triggering custom Siri phrases or tapping a button.
Here’s how to check available Siri Shortcuts that you can use with Zoom:
Note: Before setting up Zoom Siri shortcuts, ensure that Hey Siri is enabled on your iPhone/iPad.
- Open Zoom and tap Settings at the bottom right.
- Tap Siri Shortcuts.
- Here you will see three Siri Shortcuts you can use:
- Join the Next Meeting: To join the meeting using Siri, you need to trigger the shortcut by saying, “Hey Siri, Join the next meeting.”
- View Today’s Meetings: To view your Zoom meetings for the day, ask Siri, “Hey Siri, View today’s meetings.”
- Start My Personal Meeting: You can start a personal meeting by triggering Siri with the following phrase: “Hey Siri, Start my personal meeting.”
There’s also an option to change the voice phrase to trigger the action using a custom phrase. After adding the Siri Shortcuts, you can edit them or remove them from the Shortcuts app on your iPhone/iPad.
That’s it!
The hybrid work model is the new normal, and Zoom is one of the best tools to quickly adapt to the new normal. I hope that our guide on the Zoom app for iPhone or iPad helped you get the hang of it. If you think we skipped something important in this guide, share it in the comments below, and we will try to add it.
Here’re other Zoom guides:


