Ever been in a situation where you see an interesting spot for a photo shoot but have no one with you to click your pictures, and you’re too shy to ask a stranger? The timer feature in the iPhone Camera app can make your life easier in such situations. Once enabled, it gives you enough time to compose your shot and head back to the spot to pose before the camera clicks the picture.
Follow along, and we’ll show you how to set a timer on the iPhone Camera app.
How to set an iPhone camera timer
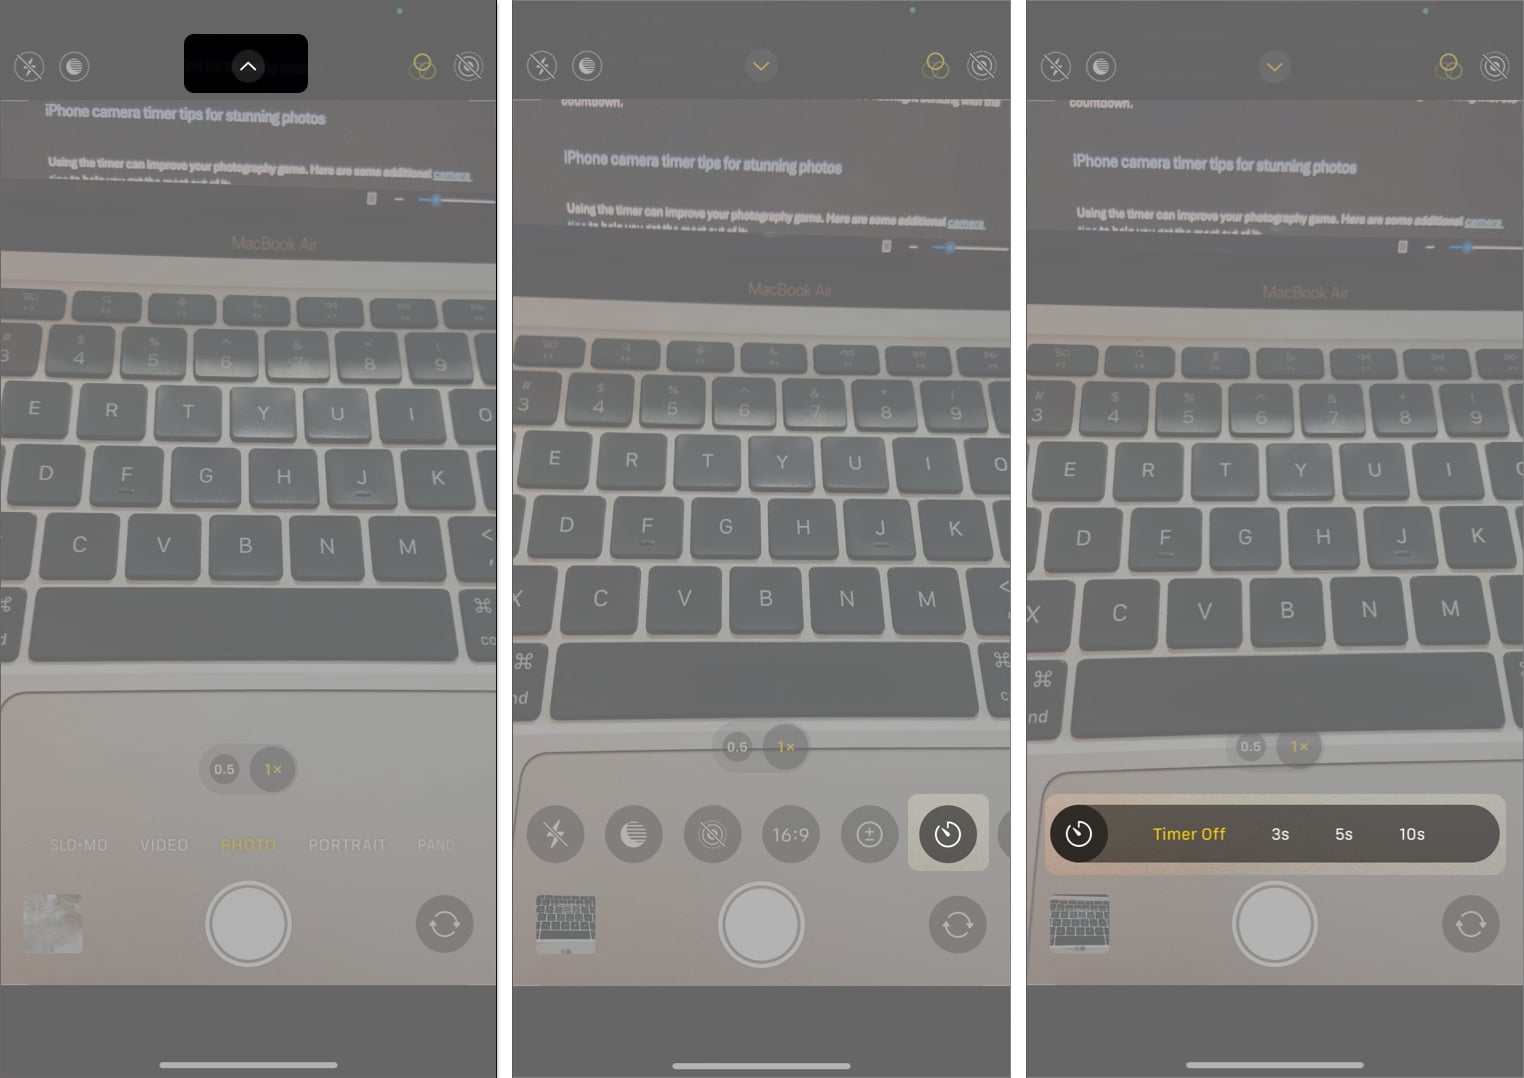
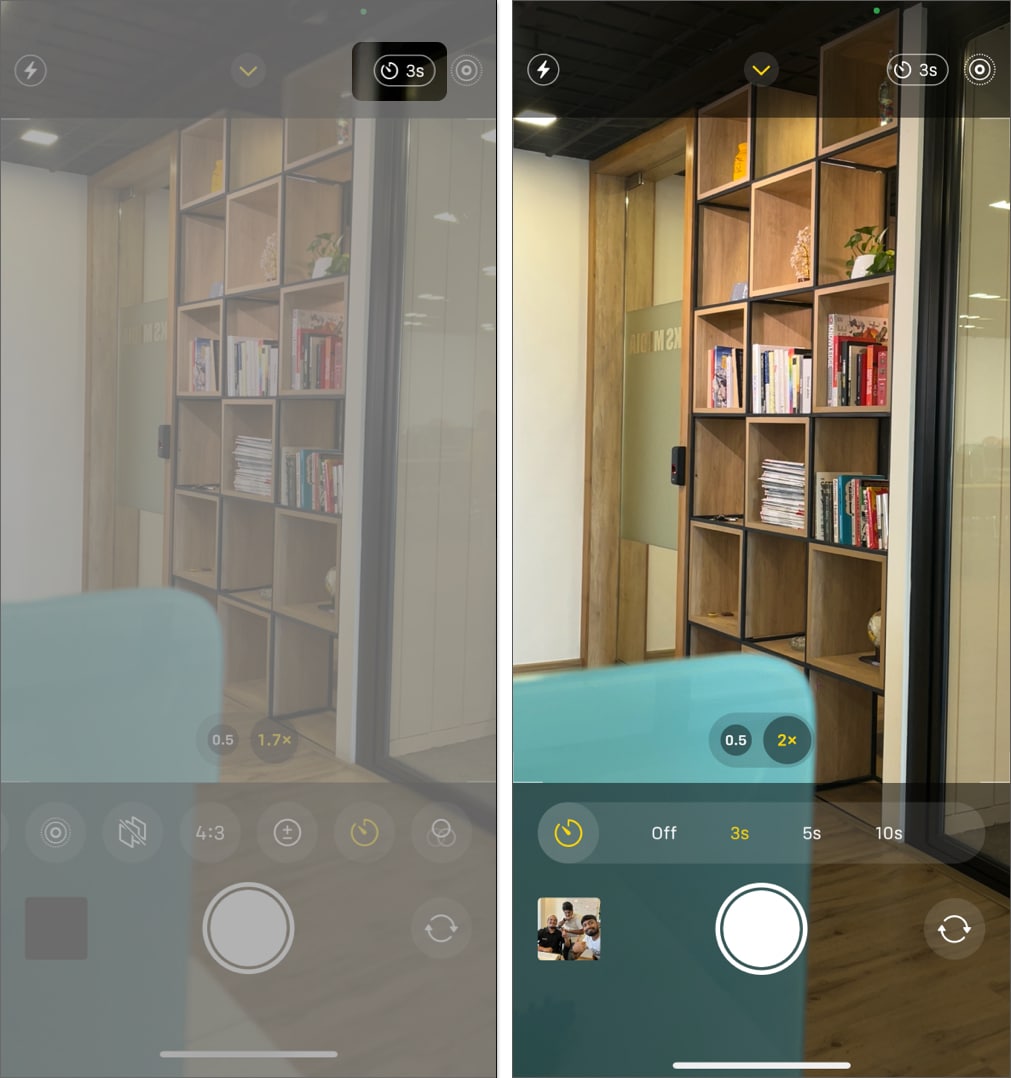
Apple keeps the timer feature hidden under the shortcuts menu bar in its Camera app. However, you can find and enable it is easily using these steps:
- Open the Camera app.
- Tap the upward-pointing arrow at the top to access the shortcuts menu.
- Select the timer icon.
- Now, choose your preferred delay duration. Options include 3-second, 5-second, and 10-second.
- Tap the Shutter button.
Now, you’ll see a countdown on your screen. Your photo is clicked once this countdown reaches 1.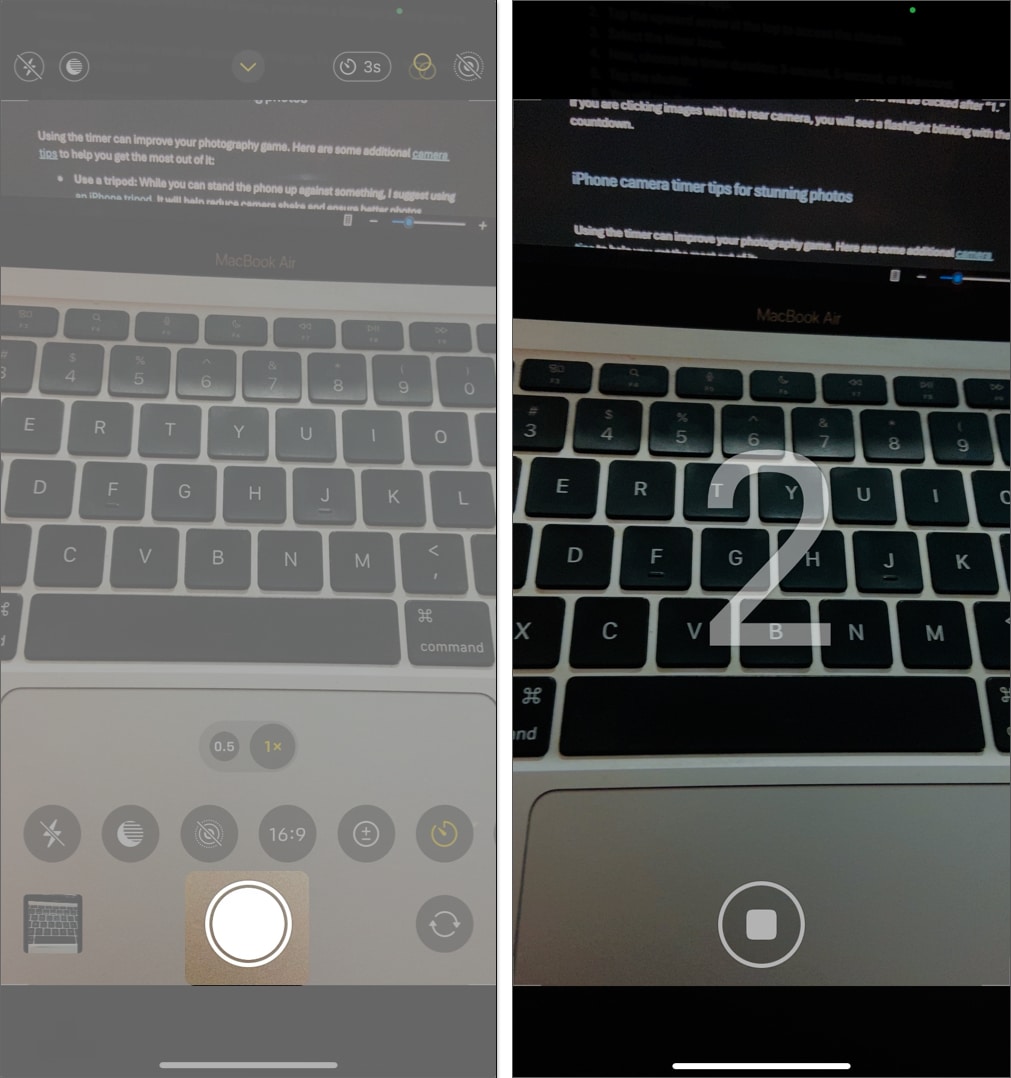
If you’re clicking images with the rear camera, you’ll see a flashlight blinking with the countdown.
When the timer is enabled, you’ll see its icon in the top-right corner of the screen. To stop the timer, tap the timer icon again and select Off.
How to view Burst mode pictures in Photos app on iPhone
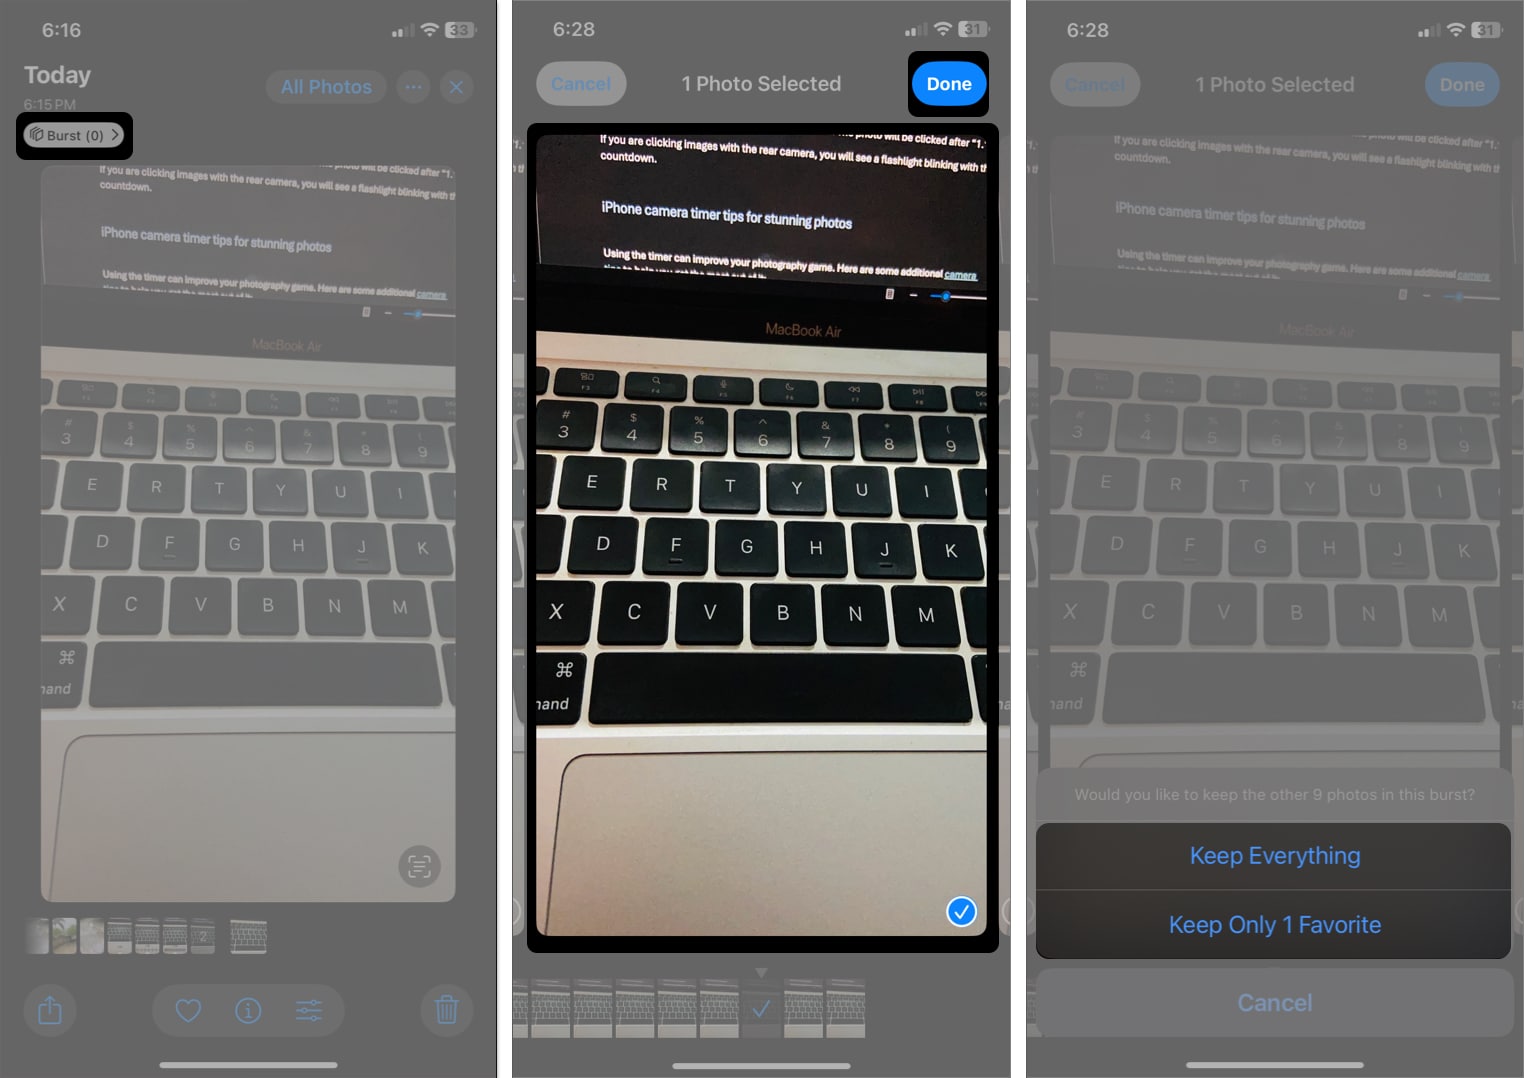
When you set the timer, your iPhone will take pictures in Burst mode, i.e., multiple shots in quick succession. However, if you head into the Photos app to view them, you’ll only see one shot (of the entire lot) chosen by the app. If you want to view the rest or choose favorites, you can do so using these steps:
- Open the Photos app.
- Tap the picture taken in burst mode.
- Tap Burst in top-left corner.
- Scroll and select the best shots.
- After selecting the required pictures, tap Done.
- Finally, tap Keep Everything or Keep Only [N] Favorites, depending on your preference.
If you’re using iOS 17, open the picture and hit Select. Swipe and select the shots and hit Done.
How to turn off Burst mode while using self-timer on iPhone
Since Burst mode captures multiple pictures in one go, it will fill up your iPhone’s storage space pretty quickly. While you delete the pictures you don’t need manually, a better way to deal with this situation is to turn off Burst mode while using the timer.
Unfortunately, Apple doesn’t allow you to do this, so we need to use a workaround. Here’s what that looks like:
- Open the Camera app on your iPhone.
- Tap the Live Photos button in the top-right corner to toggle it on.
Once you’ve enabled the Live Photos mode, it will turn off Burst mode. Alternatively, you can also enable Night Mode to prevent your iPhone from capturing burst shots while using the timer.
Tips to improve shots when using timer on iPhone camera
Using the timer can improve your photography game. Here are some additional camera settings tips to help you get the most out of it:
- Use a tripod: While you can stand the phone up against something, I suggest using an iPhone tripod. It will help reduce camera shake and ensure better photos.
- Adjust lighting: Proper lighting is essential to get crisp images. Natural light is best, but if you’re indoors, ensure the room is well-lit.
- Angles and composition: Experiment with different angles and compositions. Use the grid feature in your camera settings to help with alignment.
- Make use of the default Burst mode: When you take a photo with the timer on your iPhone, Burst mode is enabled by default. This feature takes 10 photos each time the shutter goes, so you may choose the best shot later. You need to have Live Photos turned off to use this feature.
Signing off…
Using the timer on your iPhone camera is an excellent way to take better photos, especially group photos or selfies! By following these simple steps and tips, you’ll be able to capture stunning shots with ease. Remember, practice makes perfect, so don’t hesitate to experiment with different settings and techniques.
FAQs
Unfortunately, the native Camera app on iPhone doesn’t support a timer for video. However, you can use third-party self-timer camera apps for iPhone.
Yes, you can use your Apple Watch to control your iPhone Camera! Open the Camera Remote app on your Apple Watch. Tap the Shutter button on your watch to take a photo. It’s great for group shots or when you need to position yourself far from the phone.
If your timer isn’t working, you may force close the Camera app and relaunch it to clear glitches. Sometimes, a simple restart can also fix minor camera issues. Moreover, ensure your iPhone is running the latest version of iOS. If nothing helps, you must contact Apple Support.
Read more:

