If you spend much time in front of your Mac screen, you must track and limit your usage time. So, to help you maintain your well-being, Mac offers a great feature called Screen Time. In this guide, I will show how to set up and use Screen Time on your Mac running macOS Sonoma, including setting app limits, changing content & privacy restrictions, and much more.

What is Screen Time on Mac?
The time a person spends on the device’s screen is rising alarmingly. That’s why Apple introduced the Screen Time feature to keep track of your device usage and monitor your daily app activities. Additionally, it provides immense benefits like:
- You can view detailed device usage reports categorized by days to take control of your daily activities accordingly. Also, you can build a habit of not overusing your device.
- It allows you to set limits on multiple apps. Thus, you can avoid distractions by social media, games, or other time-wasting apps and increase your productivity and efficiency.
- Screen Time helps parents to control their children’s screen usage. They can set limits on apps and block certain inappropriate websites or categories.
Overall, the Screen Time feature helps you manage screen usage and promote responsible digital habits for personal use and parental control. Now, let’s learn how to turn on Screen Time on your Mac.
How to turn on Screen Time on Mac
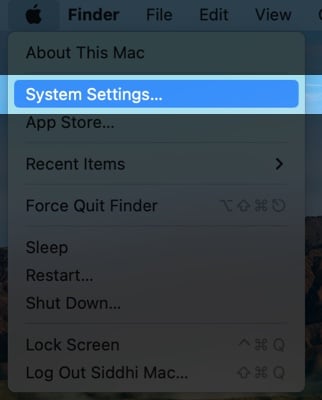
- Go to the Apple logo () → Launch System Settings.
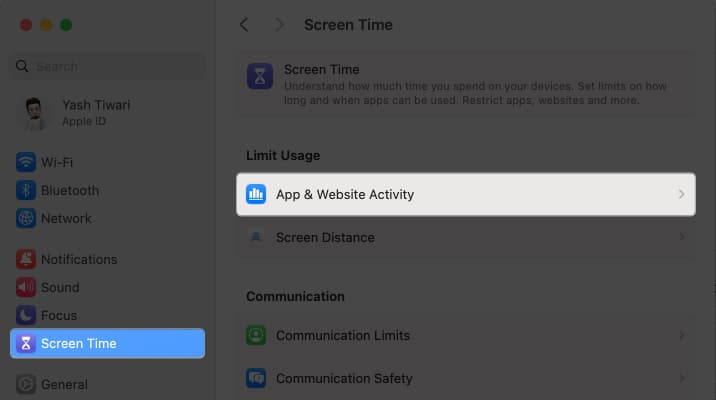
- Navigate to Screen Time.
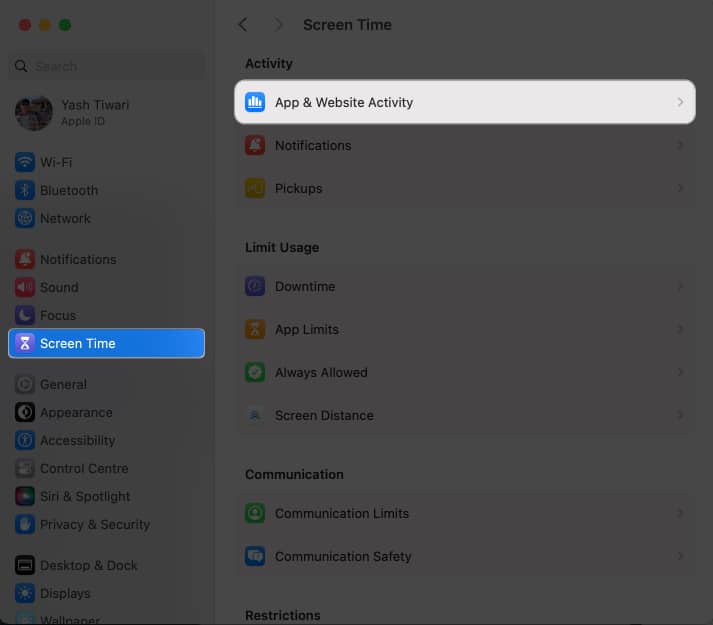
- Click App & Website Activity.
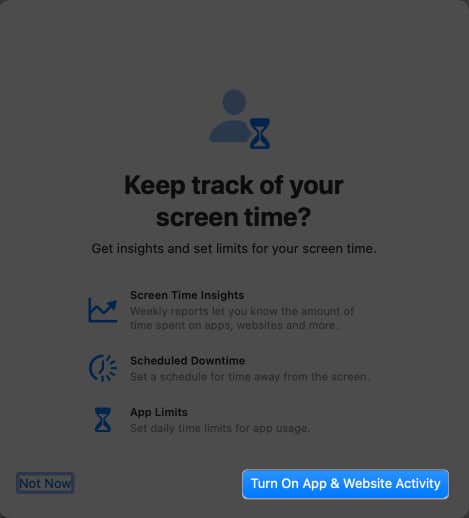
- Hit Turn on App & Website Activity to enable Screen Time on your Mac.
How to use Screen Time on Mac
Now that you’ve enabled Screen Time on Mac, many features should be available to play with. Let’s explore every function of Screen Time and understand their true potential.
Set a Screen Time Passcode
If you’re wary of your privacy, setting a passcode for your Screen Time is viable. This step ensures that only you can make changes within Screen Time.
- Click the Apple logo () → System Settings.
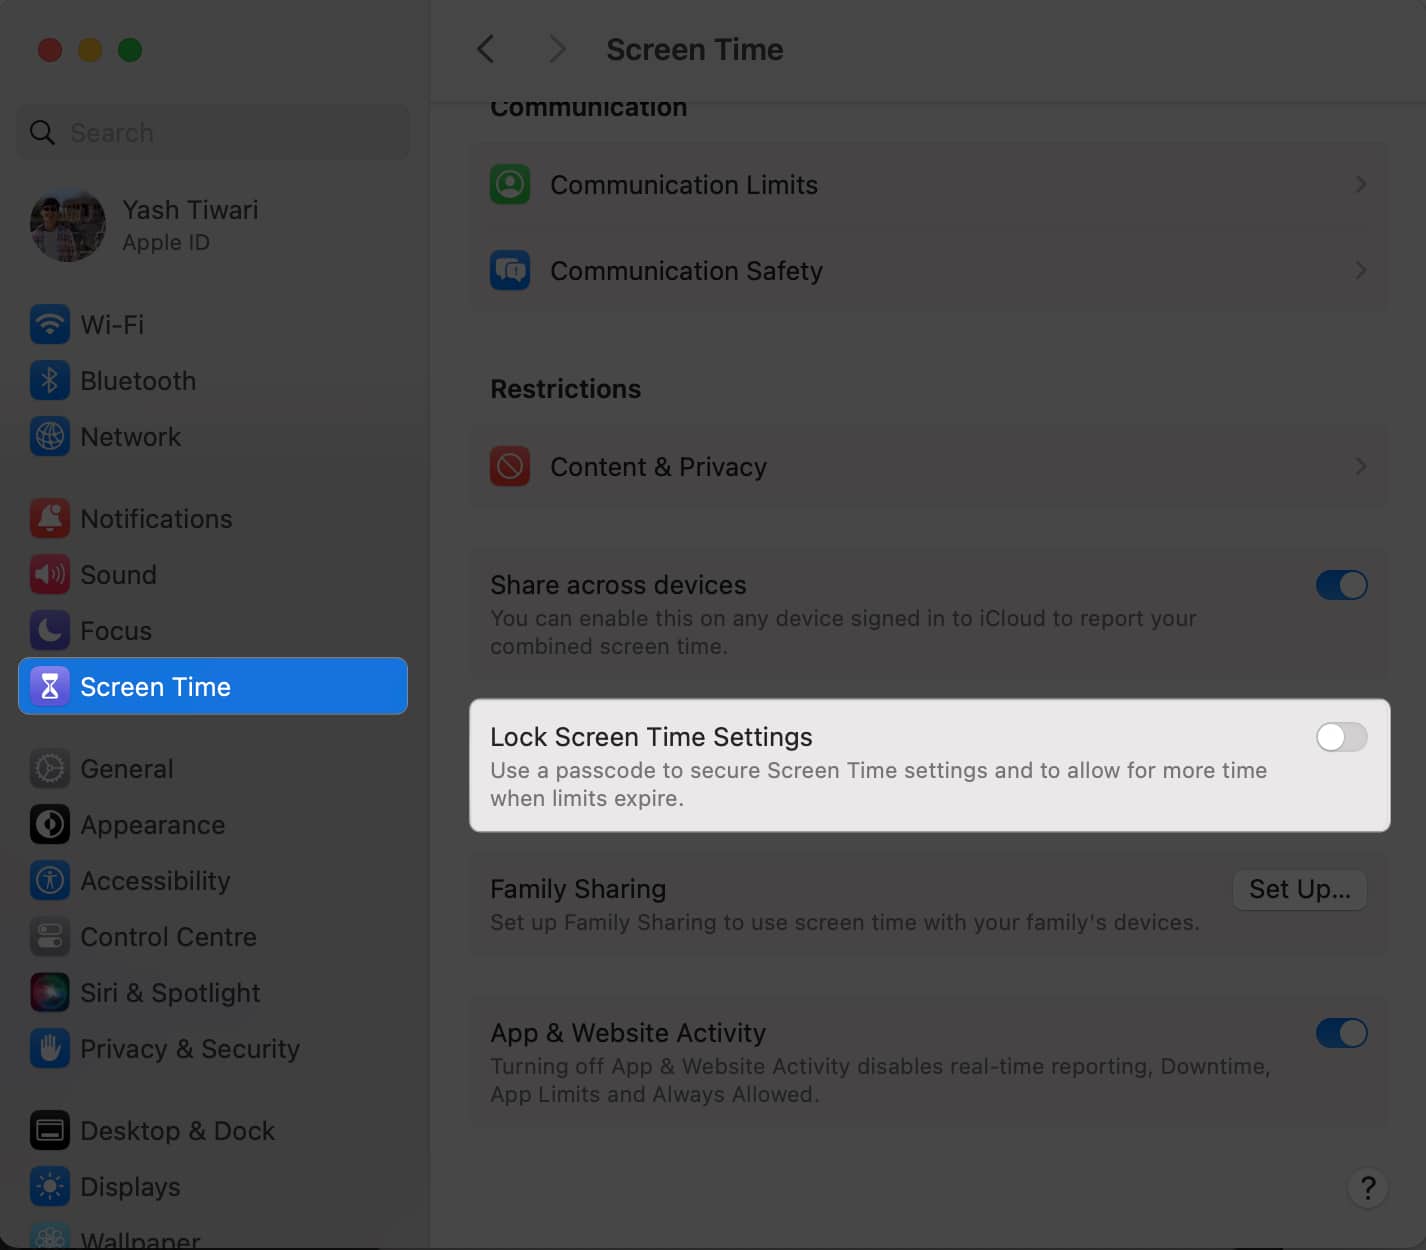
- Choose Screen Time → Toggle on Lock Screen Time Settings.
- Enter the Password of your device and press Modify Configuration.
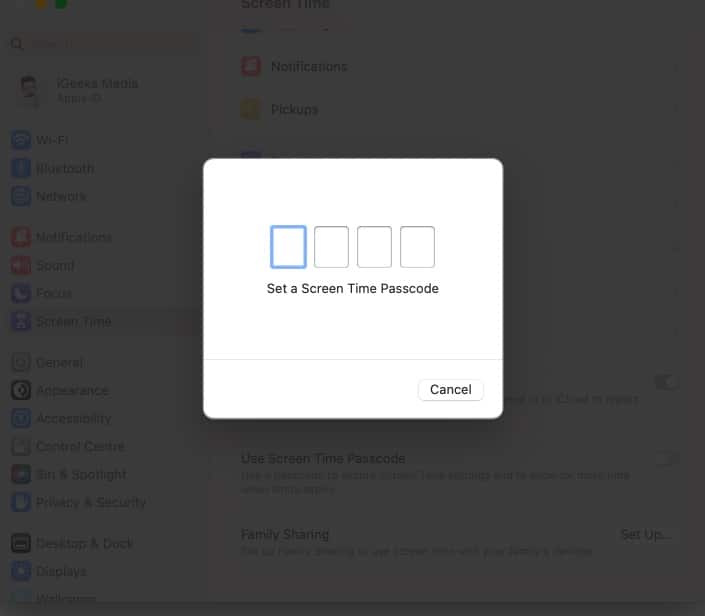
- Set a Screen Time Passcode of four digits and verify the same.
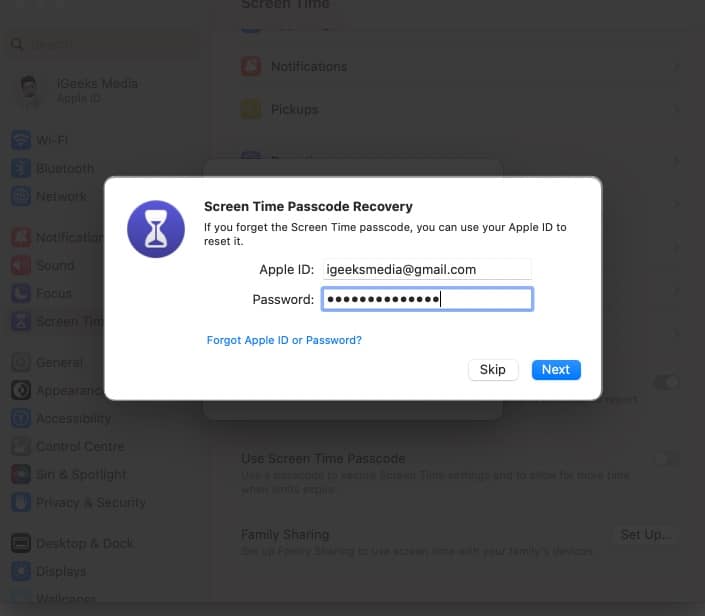
- Upon verification, use your Apple ID and Password to set up Screen Time Passcode Recovery and press Next.
You’ve now successfully set up a new Passcode for the Screen Time feature on your Mac.
Sync your Screen Time across all your Apple devices
Apple offers the Screen Time feature on every device to help you control your device’s usage. But wouldn’t it be nice if you could manage your screen activities on all devices altogether? Let’s see how to achieve that:
- Select Screen Time from System Settings.
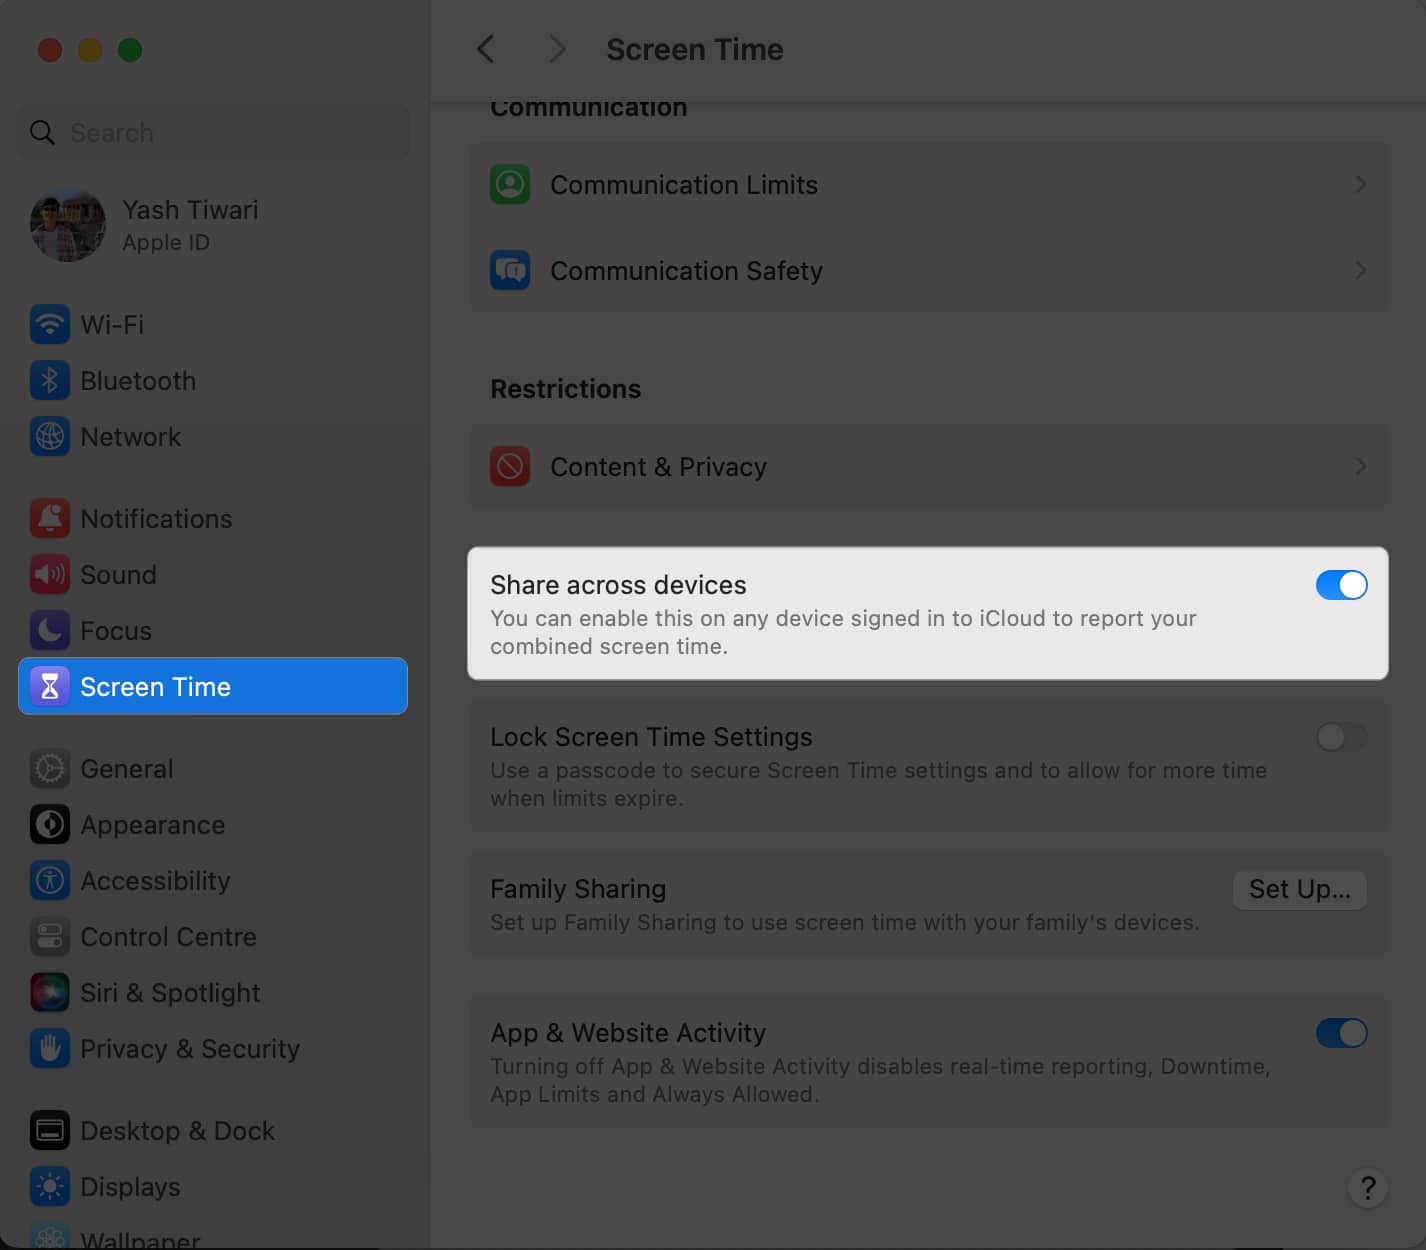
- Toggle on Share across devices and enter the Screen Time Passcode.
This feature will better understand your screen time activities on devices with the same Apple ID. However, note that the Screen Time passcode will automatically disable as you turn on device sync on your Mac.
Viewing app usage on Mac
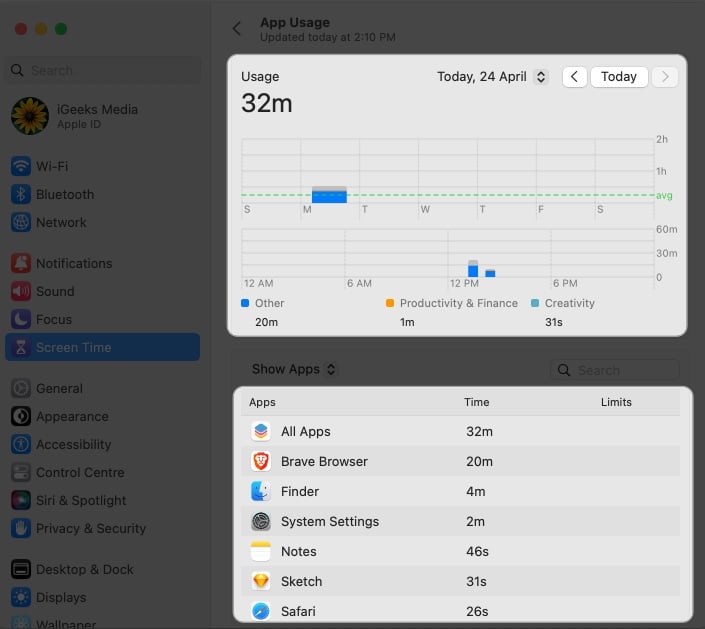
The Screen Time feature lets you track your corresponding app usage and monitor your activity in a detailed format. Let’s look at how to view Screen Time reports on Mac and break down the information you can expect.
- Access Screen Time and choose App & Website Activity.
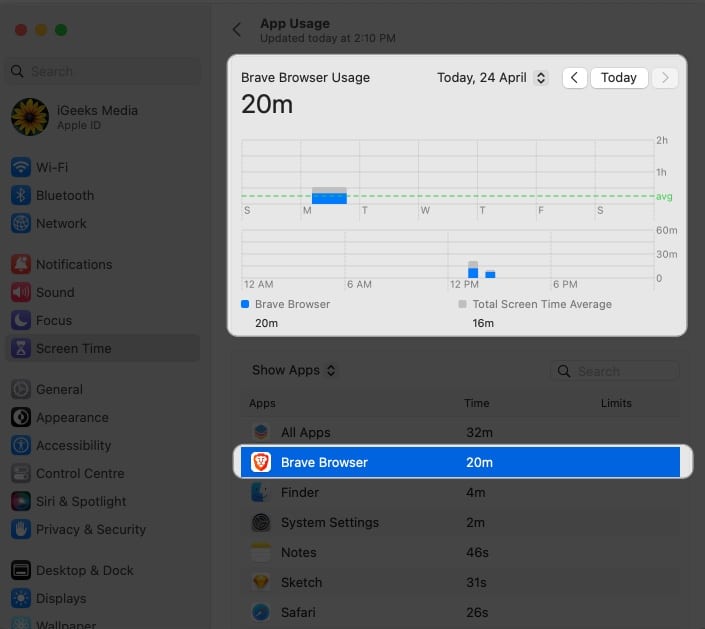
- Now, you’ll see an overview of your device usage, including the apps you have used, websites visited, and time spent on each activity.
- Select an app or website to get more information about your usage, including how much time you spend on it each day and what times of day you use it most.
Apart from taking note of your device usage, you can also access the reports of other users connected with your Apple ID on your Mac. This feature is mainly meant for parents or guardians who desire to monitor their children’s screen usage.
Managing App Limits on Mac
By reviewing your Screen Time reports, you can identify patterns and make necessary adjustments to your device usage habits. For instance, if you spend too much time on social media platforms, you can set a runtime limit for the app.
Let’s take a closer look and learn to set up App Limit on Mac:
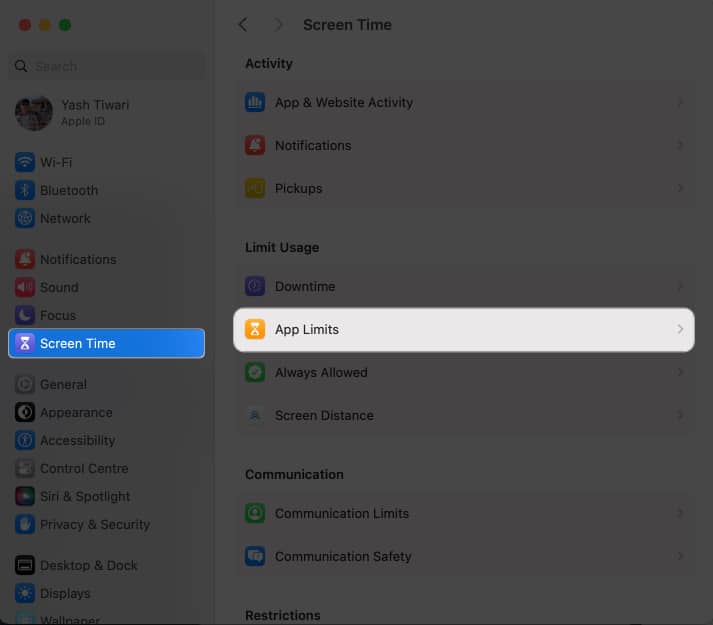
- Select App Limits from the Screen Time feature.
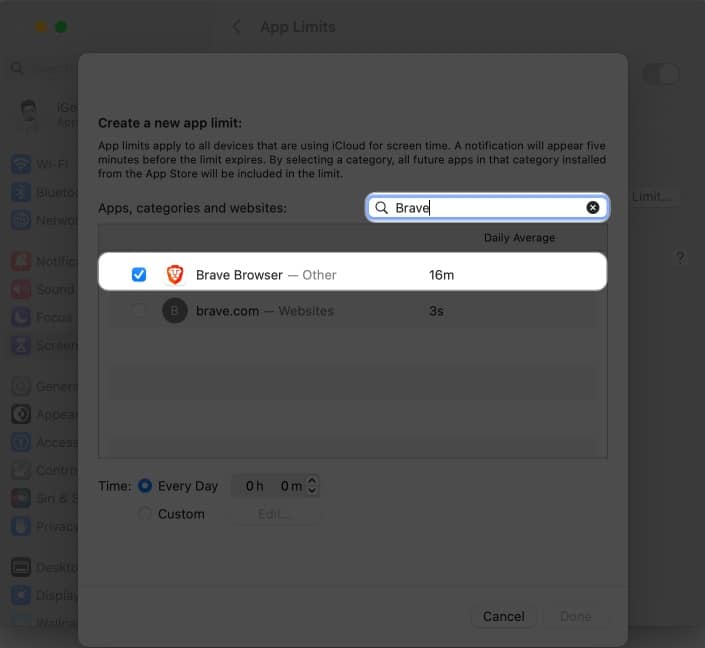
- Search for the app or category as per your preference.
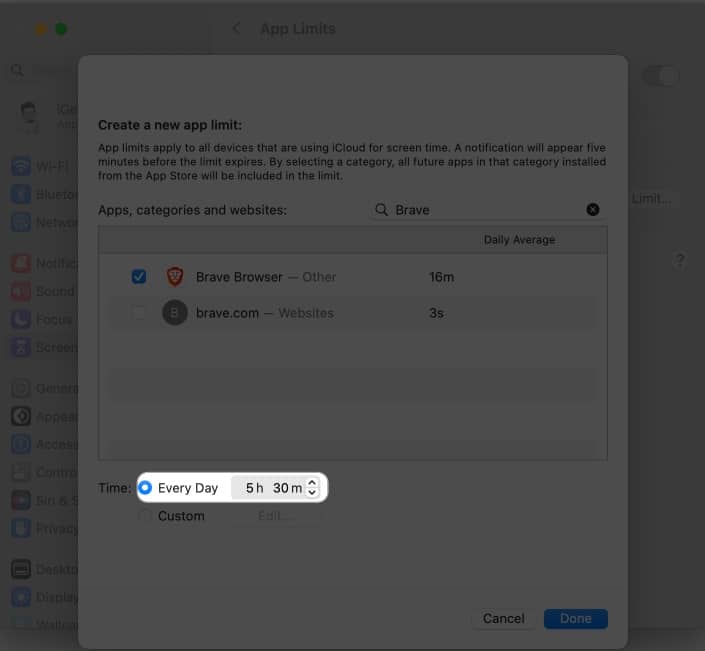
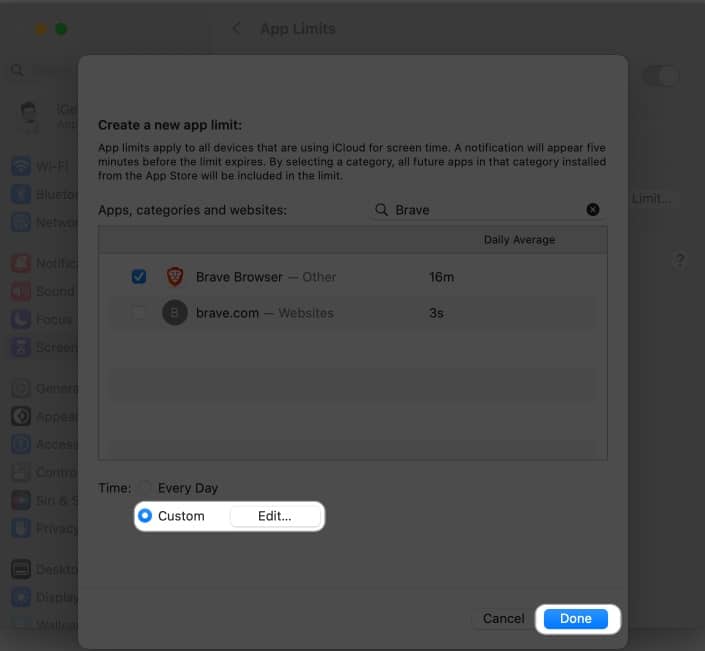
I have demonstrated the process via an application. - Now, set a daily timer or personalize a custom runtime duration for the respective application.
- Upon customization, click Done.
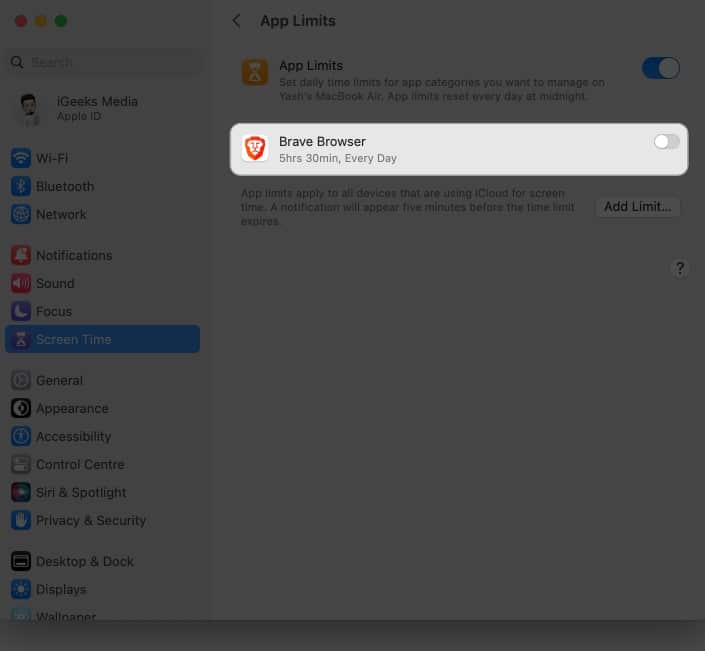
- To disable the App Limit, access App Limits and toggle off the app you modified.
In addition to setting app limits, you can also impose limits on categories of apps, such as social networking or games, following steps 2-4. This is useful to reduce your overall screen time or avoid getting distracted by a particular category of apps.
Enable Downtime on Mac
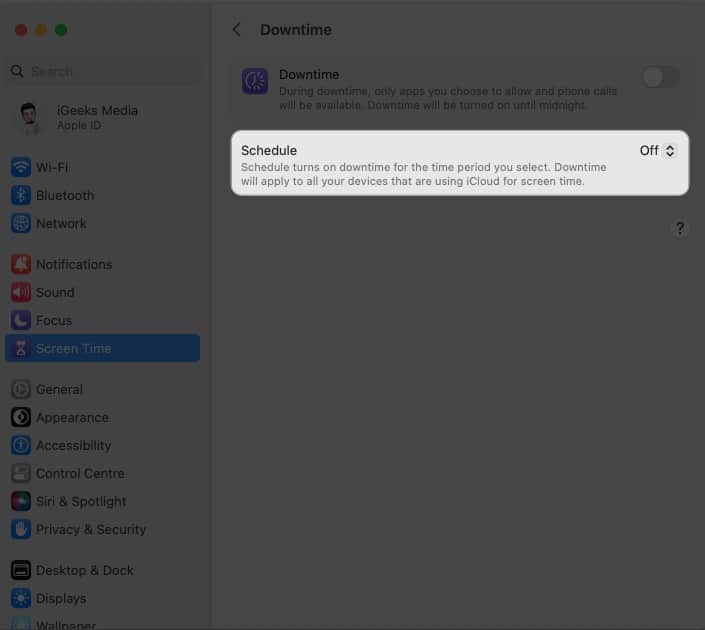
Downtime is the ultimate approach to automatically disable activities on your Mac at a pre-determined time. Only incoming calls and the apps you choose to allow will remain active, whereas the rest of the Mac’s functions will be inaccessible.
By default, this feature is set to function at midnight, but you can set it to your preference.
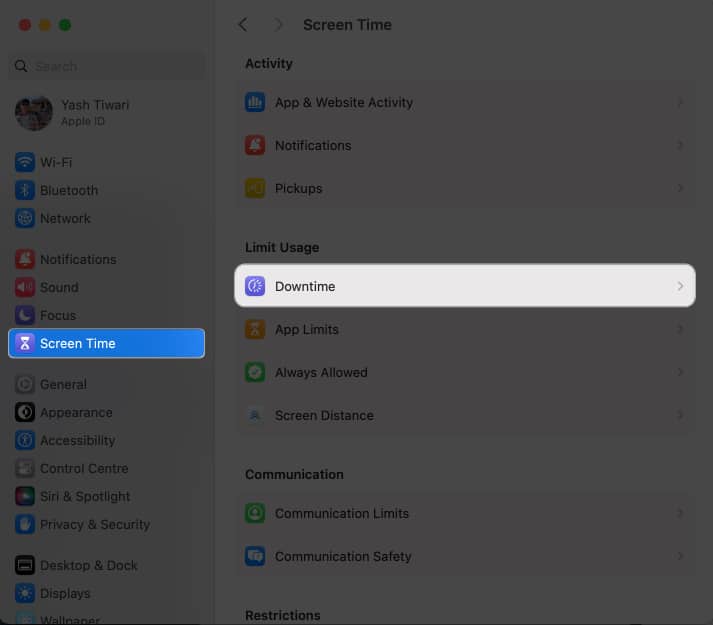
- Select Downtime upon navigating to the Screen Time feature.
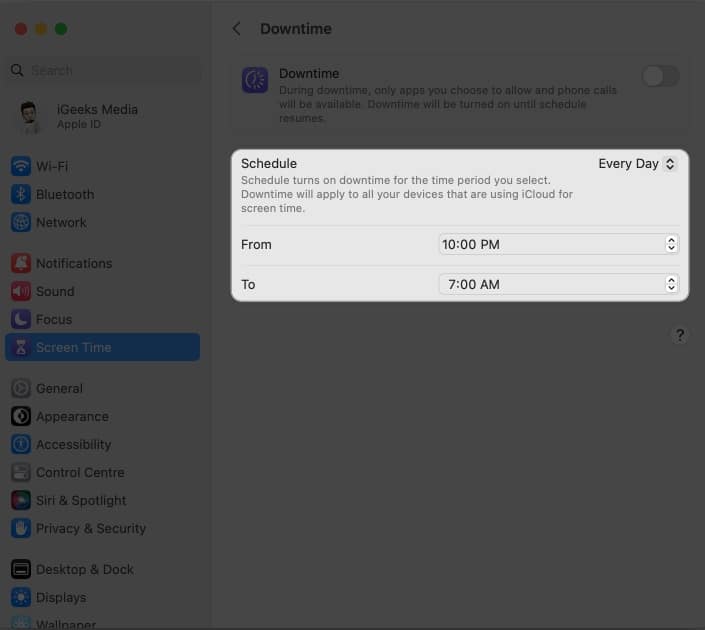
- Access the drop-down menu next to the Schedule option.
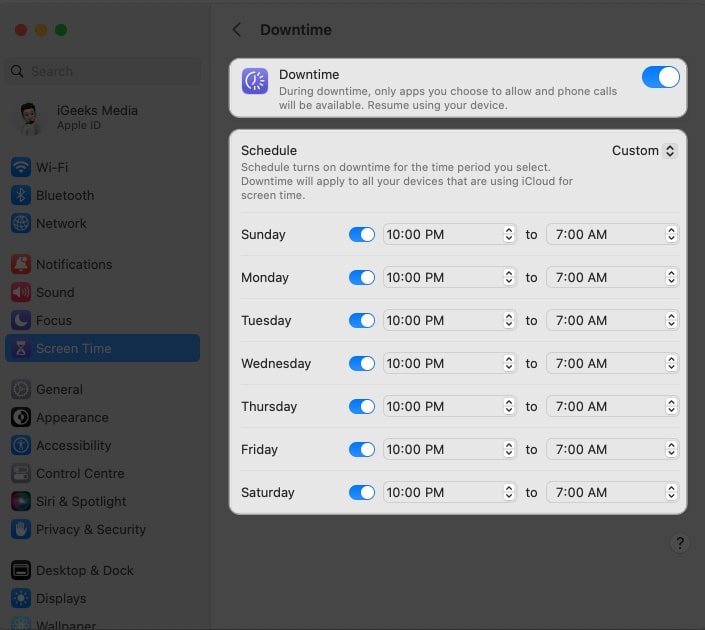
- Now, set a designated time for every day or customize it for the week accordingly.
- Once the settings are as per your preference, toggle on Downtime.
Now, your Mac will be deactivated at the specified time, following the cycle you’ve set. This feature can be helpful if you’re prone to overworking yourself and cannot keep track of time.
Set Always Allowed content on Mac
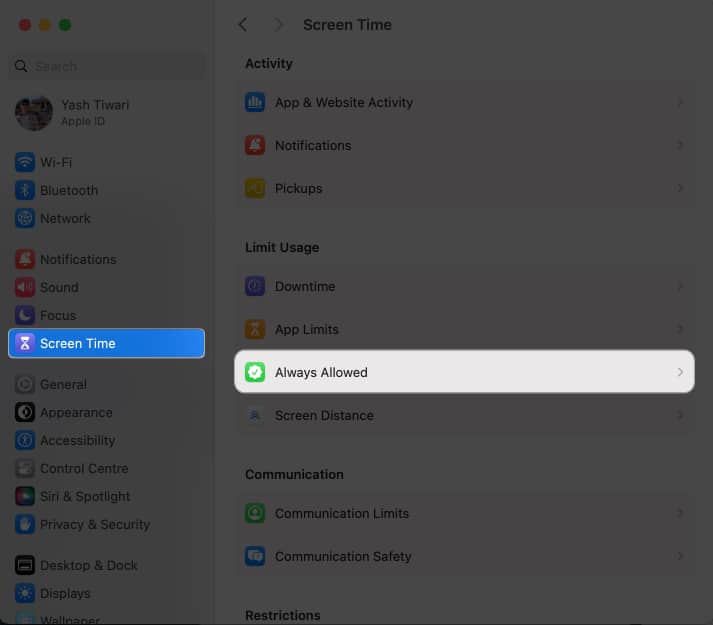
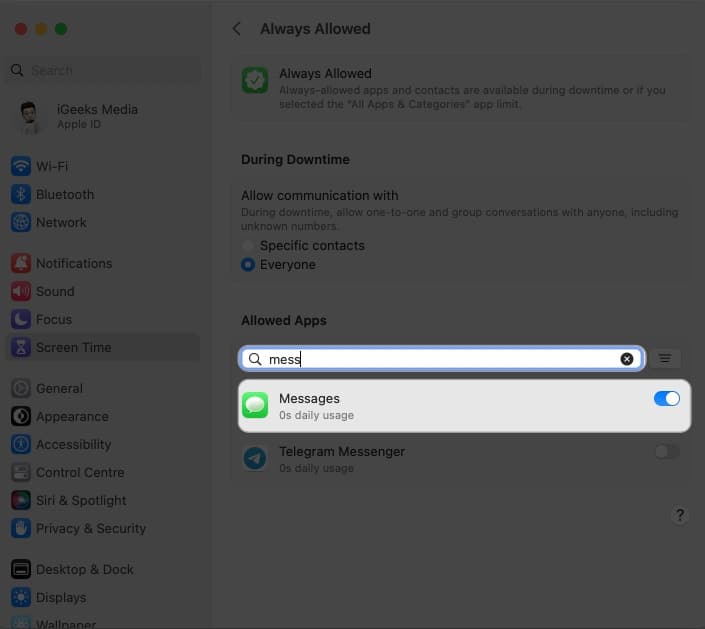
Preceding the system customization made via Screen Time on Mac, you can allow a series of applications to run even when Downtime is enabled. To do this:
- Select the Always Allowed option from the Screen Time settings.
- Search and toggle on the apps you seek to keep active.
The selected apps will be operational regardless of the restrictions you’ve set up or whenever Downtime is triggered on your device.
Set Communication Limits on Mac
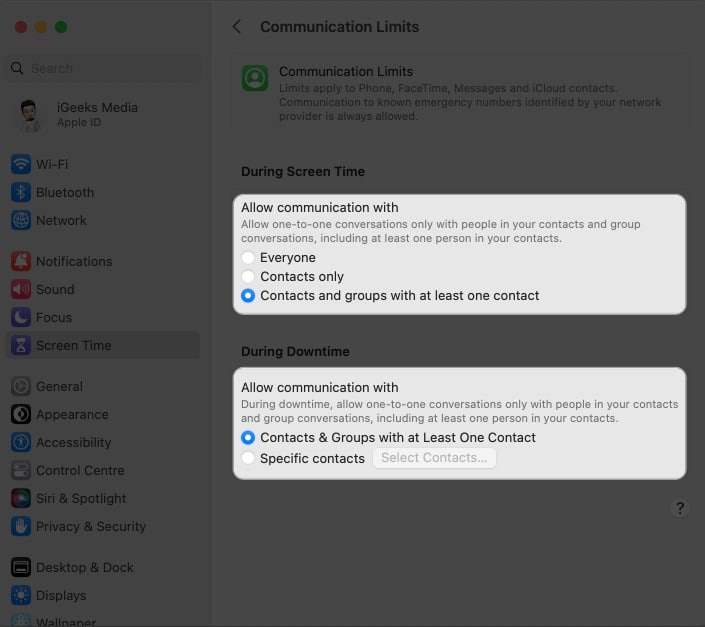
Moving ahead, using the Screen Time feature on Mac, you can set communication in one-on-one or group conversations, including unknown numbers. The following steps will enlighten you about the setup process of the same.
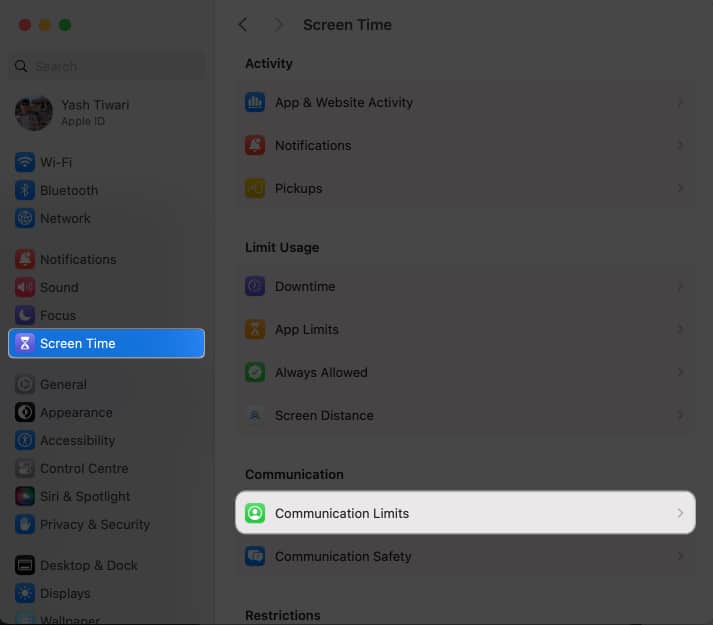
- Select Communication Limits from the Screen Time feature.
- You can allow communication with selected contacts or every user when your device has Screen time enabled.
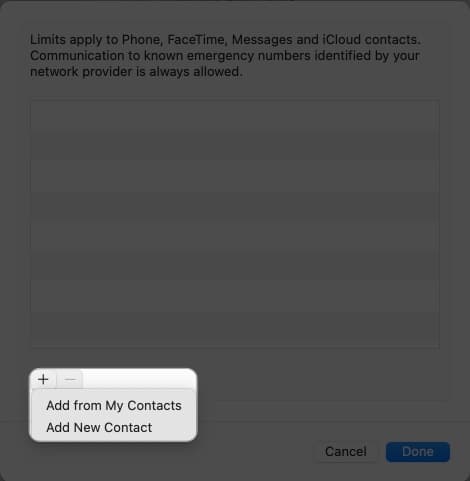
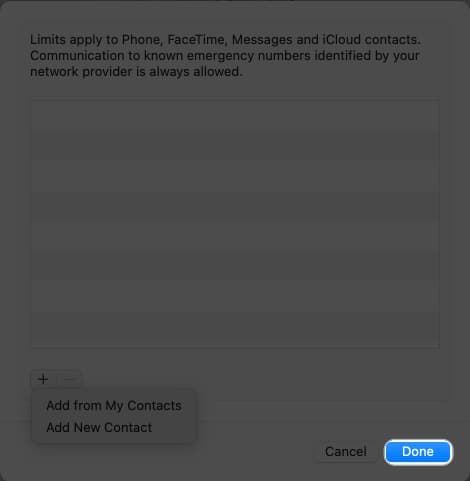
- Alternatively, during Downtime, you can add Specific Contacts by clicking the (+) icon.
- Then select Add from My Contacts or Add New Contact as your preference.
- Click Done to conclude the process.
Note: Set the communication restrictions in a way that you never miss any important messages or calls.
Changing Content & Privacy Restrictions
Last but not least, Screen Time also offers a feature to parents or guardians to control what their children can access on their devices.
The Content & Privacy Restrictions allow the organizer to restrict access to certain apps, websites, and features, ensuring the child’s safety and well-being.
If you’ve enabled Family Sharing on your Mac, let’s take a closer look and understand the process of turning on Content & Privacy Restrictions:
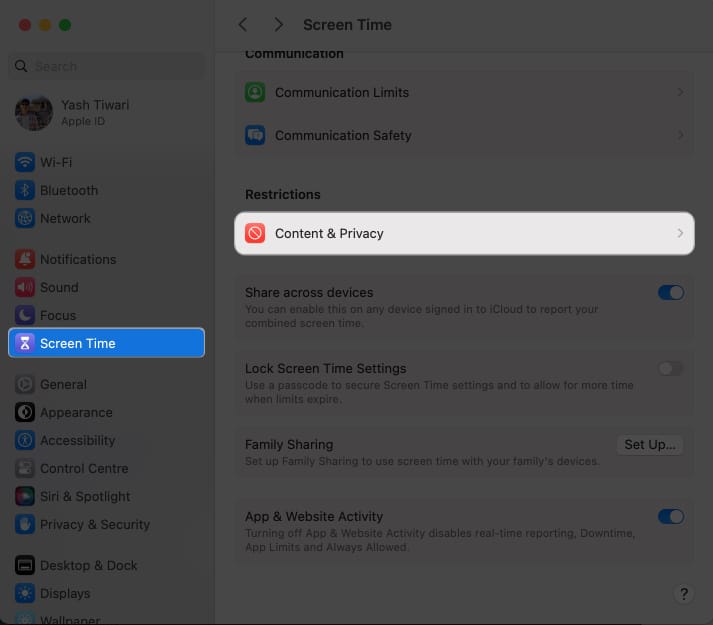
- Go to Content & Privacy Restrictions from Screen Time.
- Toggle on Content & Privacy Restrictions to access all available options.
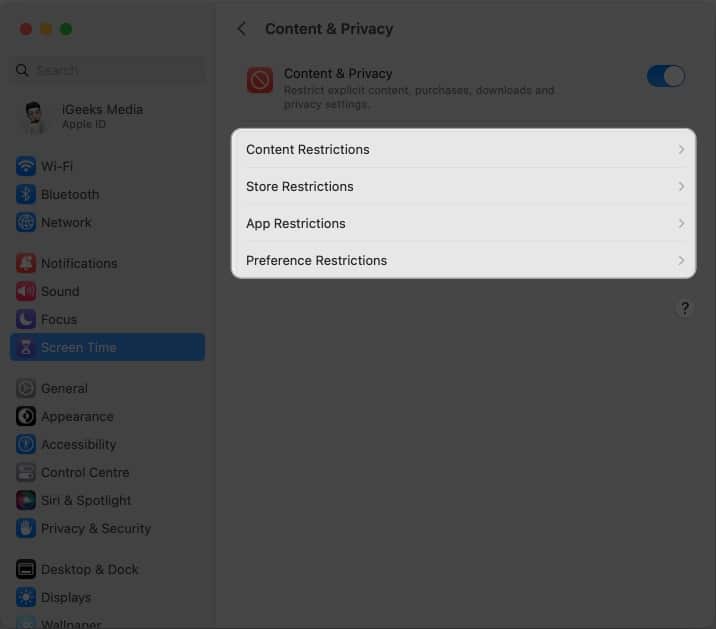
- Apply Content, Store, App, and Preference Restrictions as you desire for the selected user.
- Click Done when the restrictions are set up to your preference.
Let’s dig deeper into these features and learn more about their functionalities:
Content Restrictions
- Web Content: This allows you to filter the quality of content you access online.
- Siri: It enables you to take control of the language you use to converse with Siri and manage the intensity of the content during web searches.
- Music & TV: Organizers can allow or defy the ability to access movies and music for a user profile.
- Game Centre: Followed by the ability to make changes while playing games, the Game Centre acts as a source of various gaming accessibilities.
- Multiplayer Games: This menu allows the owner to make necessary changes in online multiplayer games.
Store Restrictions
- Allowed Content: Designate the rating of the content in every entertainment domain.
- Allowed on iOS: Choose the permissions you want your device to follow.
- Password & Security: Set a time limit to prompt for a password while making purchases of any kind.
App Restrictions
- Allowed: Ensure what features your device should be allowed to access.
- Allowed on iOS: Take an overview of the features you wish to use on iPhone.
Preference Restrictions
- Allow Changes: Set the preferences for the user ID as you desire.
Note: Upon setting up Control & Privacy Restrictions for a user, the respective profile will only be able to access the designated apps, websites, and features the organizer allows.
Get most out of Screen Time feature on Mac
Screen Time can help you regain your focus and improve your productivity exponentially, but a few tips and tricks can do wonders. Let’s have a look:
- Don’t get carried away while setting up restrictions in Screen Time. For instance, if you set your limit too low, it may not be as beneficial as expected. Conversely, if you set your limits too high, it may be impossible for you to use your Mac.
- Use the Downtime feature to your advantage by setting it up for your least productive hours or when you are distracted from work.
- Customize your communication limits to fit your specific needs. For example, you may want to restrict access to social media apps during work hours but allow access during your leisure time.
- If you’re a parent, set up Parental Controls on your child’s account to help manage their device usage. This will allow you to monitor usage reports to ensure your child uses their devices safely and responsibly.
- Whether you want to be alerted when you reach a specific limit or have been using a particular app for too long, you can customize your notifications to match your preferences.
Yes, you can customize your app limits for each day of the week in Screen Time on Mac. This allows you to set different limits for workdays versus weekends or according to your weekly schedule.
You can set limits for individual apps and use app categories to group your apps for easier management.
No, Screen Time won’t automatically log you out of apps when your time limit is up. It will prevent you from accessing the app until your time limit resets. However, you can receive a notification when your time is up to remind you to take a break.
Prevent and preserve!
So go ahead and allow Screen Time to manage your digital life with greater control and transparency. With detailed reports and accurate analysis, you can make informed decisions and pivot your habits accordingly. So, implement this simple yet effective tool on Mac and see the magic in maximizing your potential.
Thank you for reading. Don’t hesitate to drop your thoughts below.
Read more:

