How to Use Photographic Styles on iPhone
This guide explains how to enable and use Photographic Styles on iPhone to give your photos a unique look.

Apple introduced Photographic Styles to give users more control over how their iPhone processes photos. Instead of applying filters after capturing an image, Photographic Styles adjust tone and color preferences directly within the camera’s processing pipeline. You can also edit photos later in the Photos app to fine-tune lighting, colors, and other details after capturing the shot. The feature debuted with the iPhone 16 lineup and has since expanded to other supported models, bringing improved customization and editing capabilities.
Keep reading to learn how to use Photographic Styles on your iPhone, customize them, and edit them after capturing photos.
What are the Photographic Styles on iPhone?
Photographic Styles on the iPhone allow you to personalize the tone and color of your photos without losing natural elements like skin tones. They essentially offer you a way to create a consistent aesthetic, much like professional photographers do with their editing workflows.
Think of Photographic Styles as a more flexible alternative to filters. Filters apply a fixed look to a photo, but with Photographic Styles, you can adjust parameters like warmth and contrast, which gives you far more control over your photos. As a result, unlike traditional filters, which can sometimes look artificial, Photographic Styles are designed to blend seamlessly with your original image, enhancing its natural beauty.
Which iPhones Support Photographic Styles?
Photographic Styles is available on modern iPhones that use Apple’s advanced computational photography system.
Supported devices include:
- iPhone SE (3rd Gen)
- iPhone 13, 13 mini, 13 Pro, and 13 Pro Max
- iPhone 14 series
- iPhone 15 series
- iPhone 16 series
- iPhone 17 series
- iPhone Air
Types of Photographic Styles Available
With the iPhone, Apple offers a variety of Photographic Styles designed to fit different moods, aesthetics, and photography types. Let’s check them out.
- Bright: Increases overall exposure and highlights to make photos look lighter and more vibrant, which works well for well-lit scenes and daylight shots.
- Cool Rose: Adds a subtle, cool tint with a slight rose hue, perfect for making cooler landscapes or portraits feel dreamy without looking cold.
- Neutral: A balanced, natural look that enhances the photo’s original colors without making them too bright or too dark.
- Rose Gold: Infuses a soft, warm glow into your shots, ideal for adding a touch of romance or nostalgia to your photos.
- Gold: Warmer than Rose Gold, this style gives your images a more luxurious golden glow, which is perfect for portraits and nature shots during the golden hour.
- Amber: It deepens the warmth, making sunsets, cozy indoor scenes, and even food photos more inviting and vivid.
- Standard (No Edits): This is the baseline option where no tweaks are applied. It preserves the original colors and lighting and is perfect for those who want the camera’s default look.
- Vibrant: Adds extra saturation and punch to your colors without overwhelming the image, and is great for bringing out the vibrancy of nature and cityscapes.
- Natural: Keeps the photo looking as close to the real scene as possible, which makes it perfect for those who like unedited, raw photos.
- Luminous: A dreamy, ethereal style that brightens the image, giving a soft, glowing look. It’s excellent for portraits or scenes where you want a magical feel.
- Dramatic: Heightens contrast, darkens shadows, and pulls out details to add a cinematic touch to your images, perfect for urban photography or landscapes with strong textures.
- Quiet: Subdued and gentle, this style tones down colors, creating a peaceful and introspective feel. It’s ideal for soft lighting or minimalist photography.
- Cozy: Infuses warmth and comfort into your shots, making them feel more intimate. Think of it as a way to bring out the feeling of home in your images.
- Ethereal: A light, airy style that softens shadows and cools down colors, ideal for portraits or landscapes with a delicate, fairy-tale-like atmosphere.
- Muted Black and White: Softens contrasts while keeping things monochromatic, giving your black-and-white shots a more muted, relaxed feel.
- Stark Black and White: This one is all about drama—deep shadows and bright highlights for high-impact black-and-white photography that demands attention.
How to Use Photographic Styles on iPhone
Now that you have a good idea of what Photographic Styles on iPhone 16 Series are, here’s how you can use them:
Apply a Photographic Style While Taking Photos
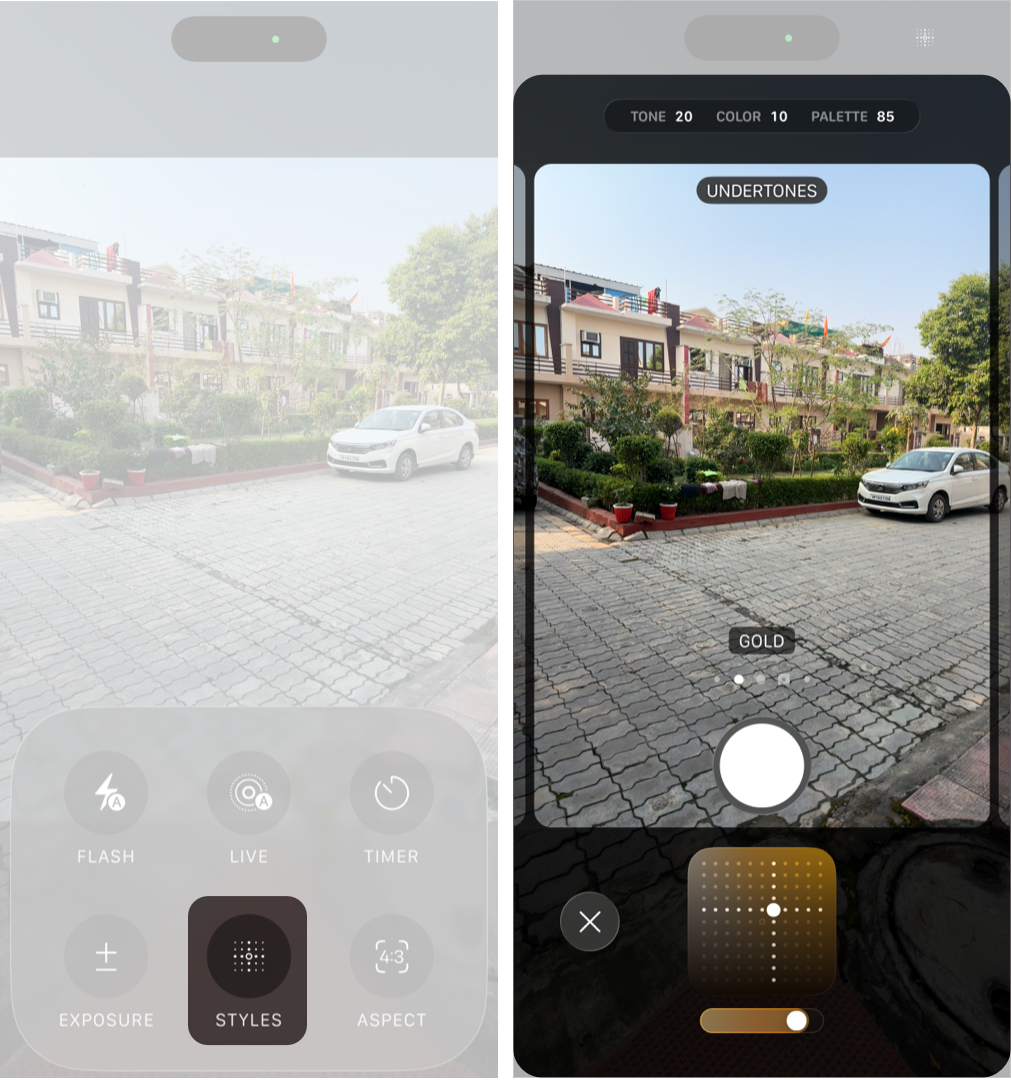
- Open the Camera app on your iPhone.
- Swipe up near the Capture button to bring up the camera toolbar.
- Tap Styles.
- Swipe through the available styles and select the style you want to use.
- Tap the Capture button to capture a photo using the chosen photographic style.

Customize Photographic Styles
You can fine-tune Photographic Styles using tone and warmth controls.
- In the Camera app, select the Photographic Style you want to use.
- Drag the slider to adjust the tone and color.
These adjustments let you personalize the style to your photography preferences.
Set a Default Photographic Style
In addition to customizing a Photographic Style, you can also choose a style that the camera will use automatically.
- Go to Settings → Camera.
- Here, tap Photographic Styles under App Settings.
- Now, choose a style and tap the “Style” button to confirm.
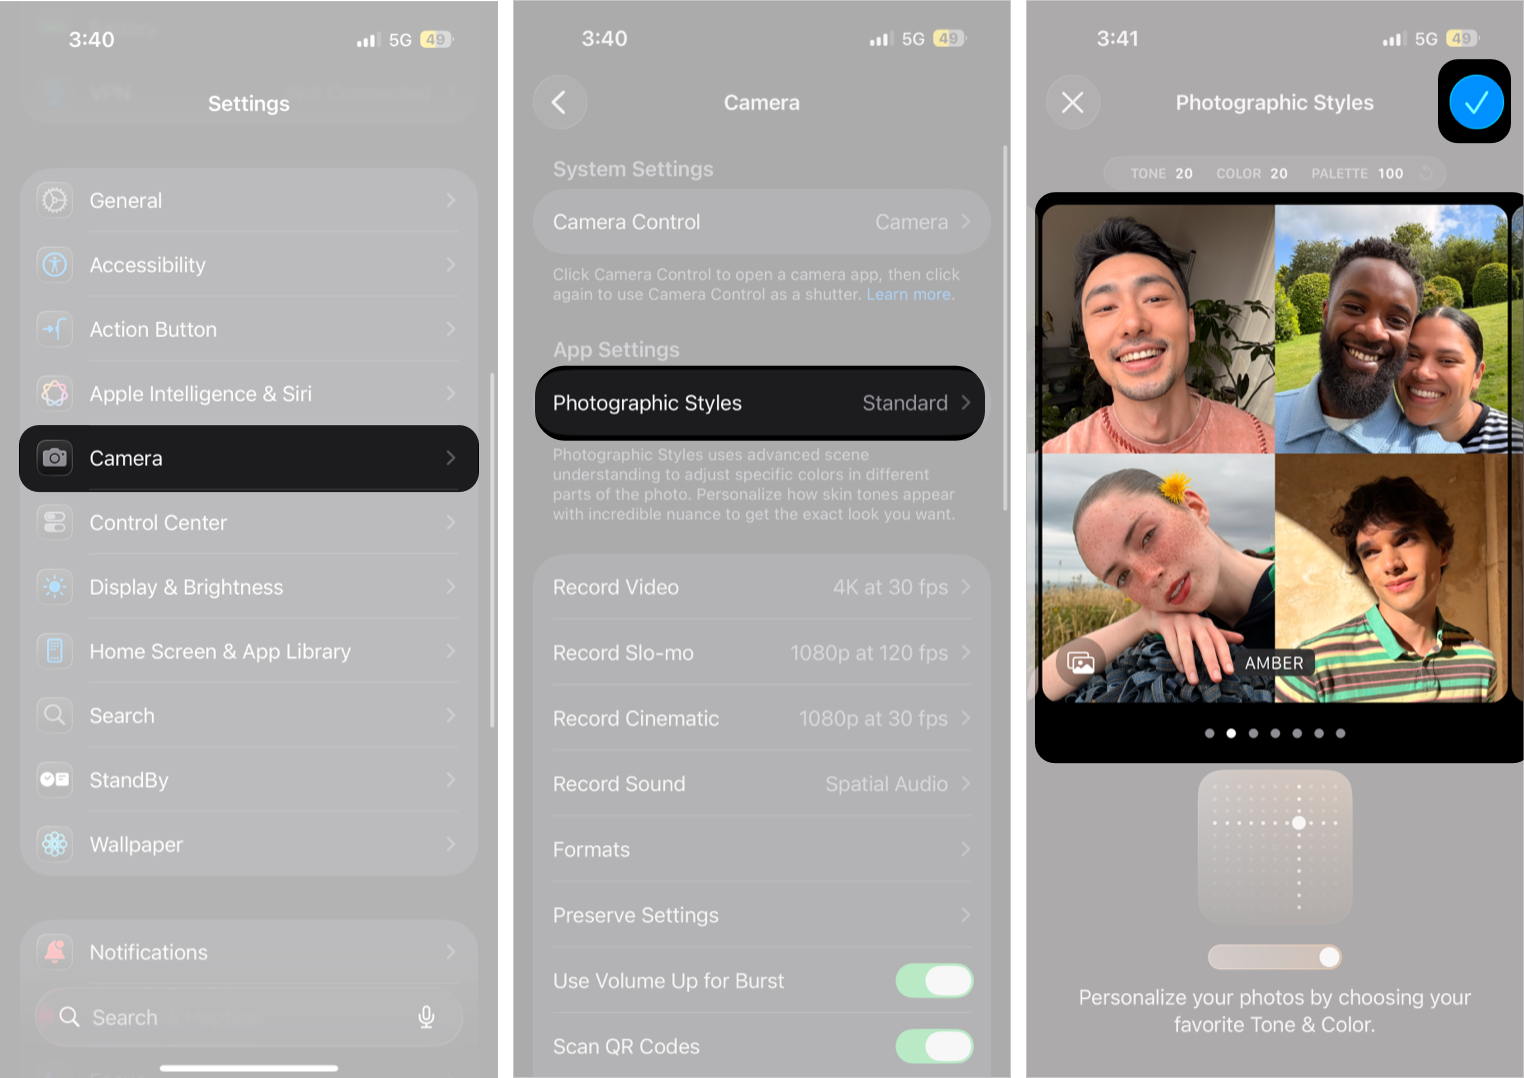

Additionally, you can tap the Customize button to customize the chosen style.
Reset or Remove Photographic Styles
In case you don’t like Photographic Styles, you can easily reset it using the steps below:
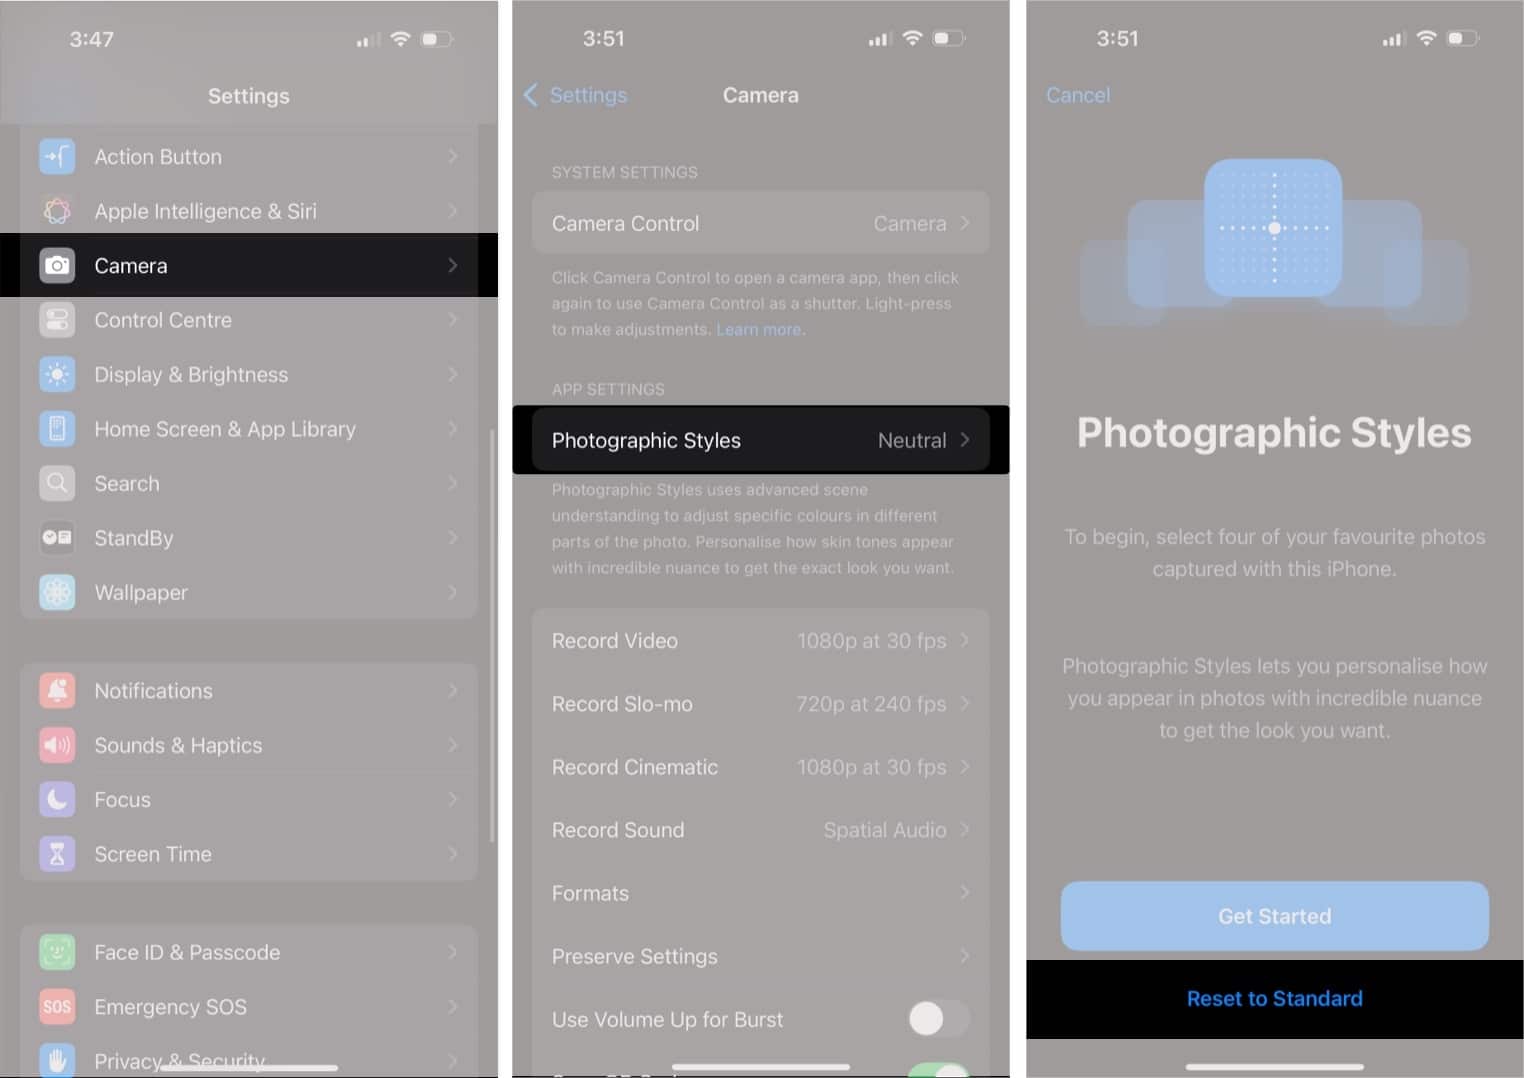
- Navigate to Settings > Camera > Photographic Styles.
- Here, tap Reset to Standard. This will remove the current Photographic Style.
- Once done, you can then tap Get Started to choose a new Photographic Style as the default.

How to Edit Photographic Styles After Taking a Photo
If you are not happy with the Photographic Style applied to a photo, you can customize or change it even after capturing the image. Here is how:
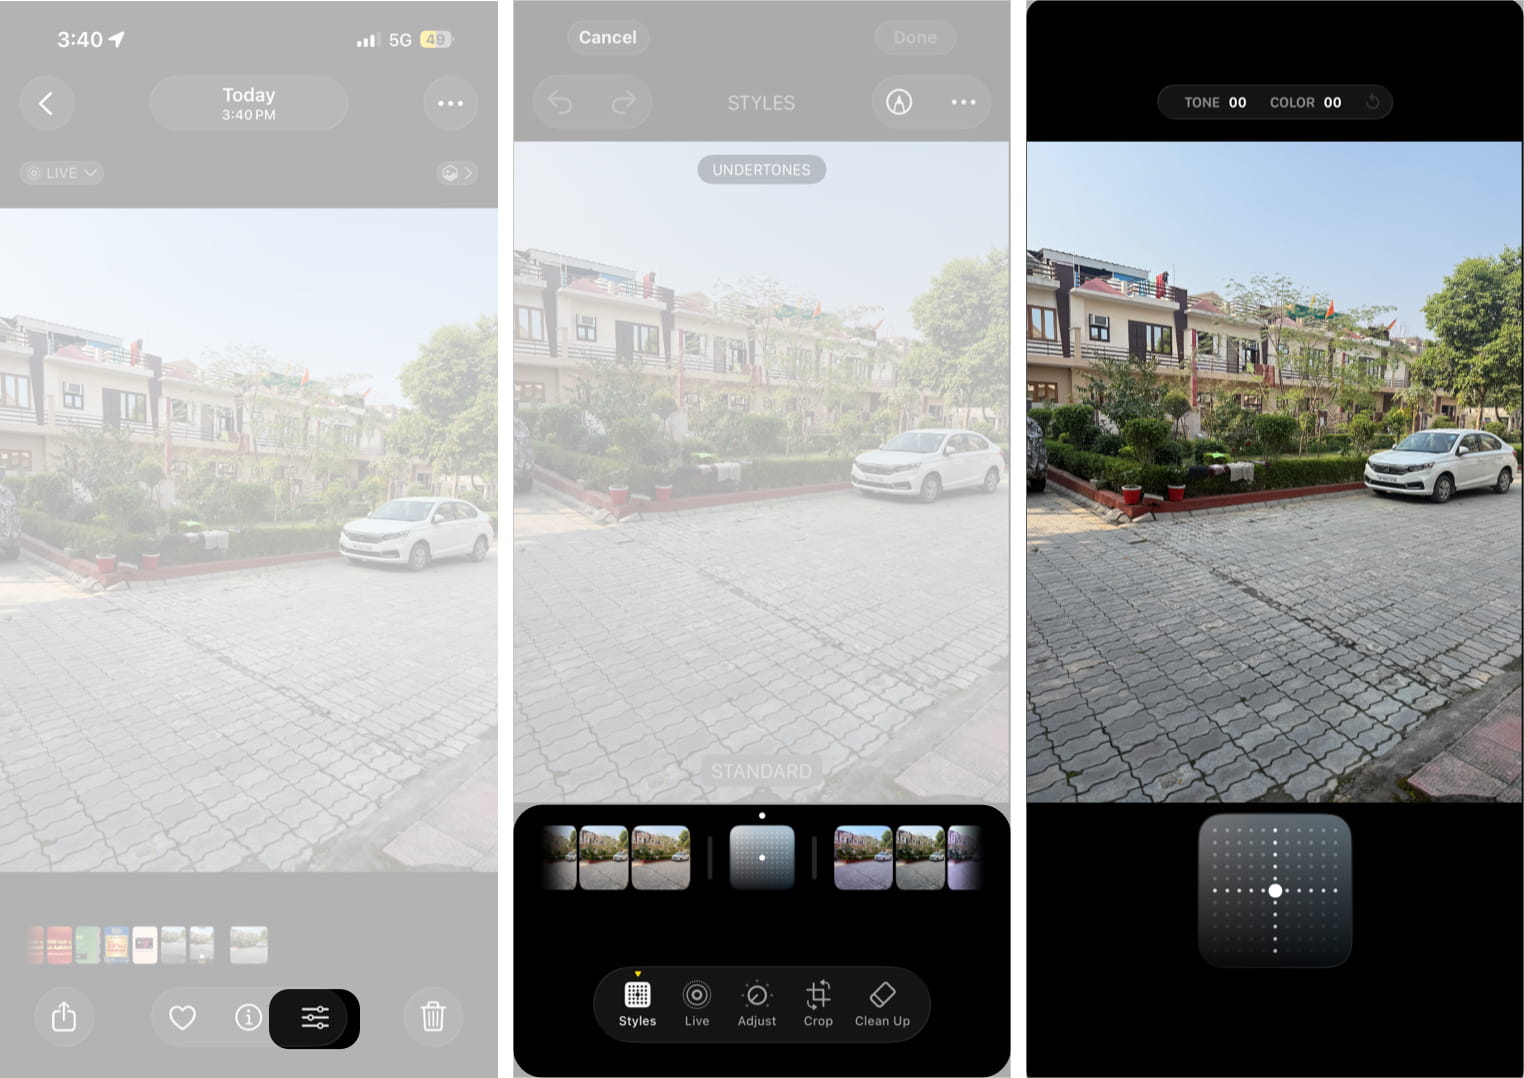
- In the Photos app, open the photo you want to edit.
- Tap the Edit button in the bottom center.
- Swipe through the style options and choose a different style.
- You can also adjust the Tone and Color by dragging the sliders into the Photographic Styles panel.

When to Use Photographic Styles
Different scenes and subjects call for different photographic moods, and that’s where Photographic Styles really shine. Let’s break down when and where each style works best.
1. Portrait Photography
- Rich Contrast: If you want a bold, dramatic portrait, it’s a great choice. It deepens shadows and increases contrast, which adds more definition and intensity to facial features.
- Warm: Works well for soft, natural-looking portraits. It adds gentle golden tones that create a cozy and inviting feel, making it ideal for family photos or candid moments.
2. Landscape Photography
- Vibrant: When capturing landscapes filled with colorful skies, flowers, or greenery, Vibrant enhances saturation, so the colors appear richer and more eye-catching while maintaining detail.
- Cool: Works well in calm environments such as snowy landscapes, water scenes, or early-morning cityscapes. It reduces warm tones and introduces a subtle bluish hue, creating a more tranquil mood.
3. Street Photography
- Standard: The image remains neutral and balanced. It is a good option for street photography where you want to capture scenes naturally without heavy stylistic changes.
- Rich Contrast: Urban environments often contain strong light and shadow. Rich Contrast emphasizes these elements, adding depth and drama to street scenes.
4. Event Photography
- Vibrant: For parties, festivals, and sports events, Vibrant boosts colors and energy in the frame, helping the scene feel livelier and more dynamic.
5. Food Photography
- Warm: It enhances golden tones and highlights textures, making dishes appear more appetizing and visually appealing.
How Do Photographic Styles Differ From Traditional Filters?
Unlike traditional filters, Photographic Styles are designed to blend seamlessly with your original image, enhancing its natural beauty rather than drastically altering its appearance.
They are also more customizable, allowing you to adjust their intensity to your liking. And while Android phone cameras do have customizable filters where one can control the intensity, Apple’s implementation allows one to customize the Photographic Styles with multiple values, making it better suited for a variety of different skin colors.
Signing off…
Photographic Styles give iPhone users greater control over how their photos look right out of the camera. By adjusting tone and color preferences during image processing, the feature creates photos that match your personal style without relying on heavy editing later. Once you start experimenting with different styles and customization options, you can make your iPhone photos look more consistent and visually appealing.
Which Photographic Style works best for your photos? Tell us in the comments below.
Frequently Asked Questions

Written by
VikhyatVikhyat has a bachelor's degree in Electronic and Communication Engineering and over five years of writing experience. His passion for technology and Apple products led him to the tech writing space, where he specializes in writing App features, How-to guides, and troubleshooting guides for fellow Apple users. When not typing away on his MacBook Pro, he loves exploring the real world.
View all posts →More from How-to

How to Use Front and Back Cameras at the Same Time on iPhone
Want to record yourself and what’s in front of you at the same time? Here’s how to use both the front and rear cameras on your iPhone simultaneously.

How to Share Screen on WhatsApp (iPhone, Android, and Desktop)
Sharing your screen on WhatsApp makes it easier to explain things visually. Here’s how to use screen sharing on iPhone, Android, and desktop devices.

How to Turn Off Location on Snapchat (Step-by-Step Guide)
Want to stop sharing your location on Snapchat? This guide explains how Snapchat location sharing works and shows simple ways to turn off your location using Ghost Mode or phone settings. Stay in control of your privacy in just a few steps.