Are you looking to deepen your connections within your social circle? Say hello to Threads, an Instagram app by Meta designed to keep you closer to your friends and loved ones through seamless conversations.
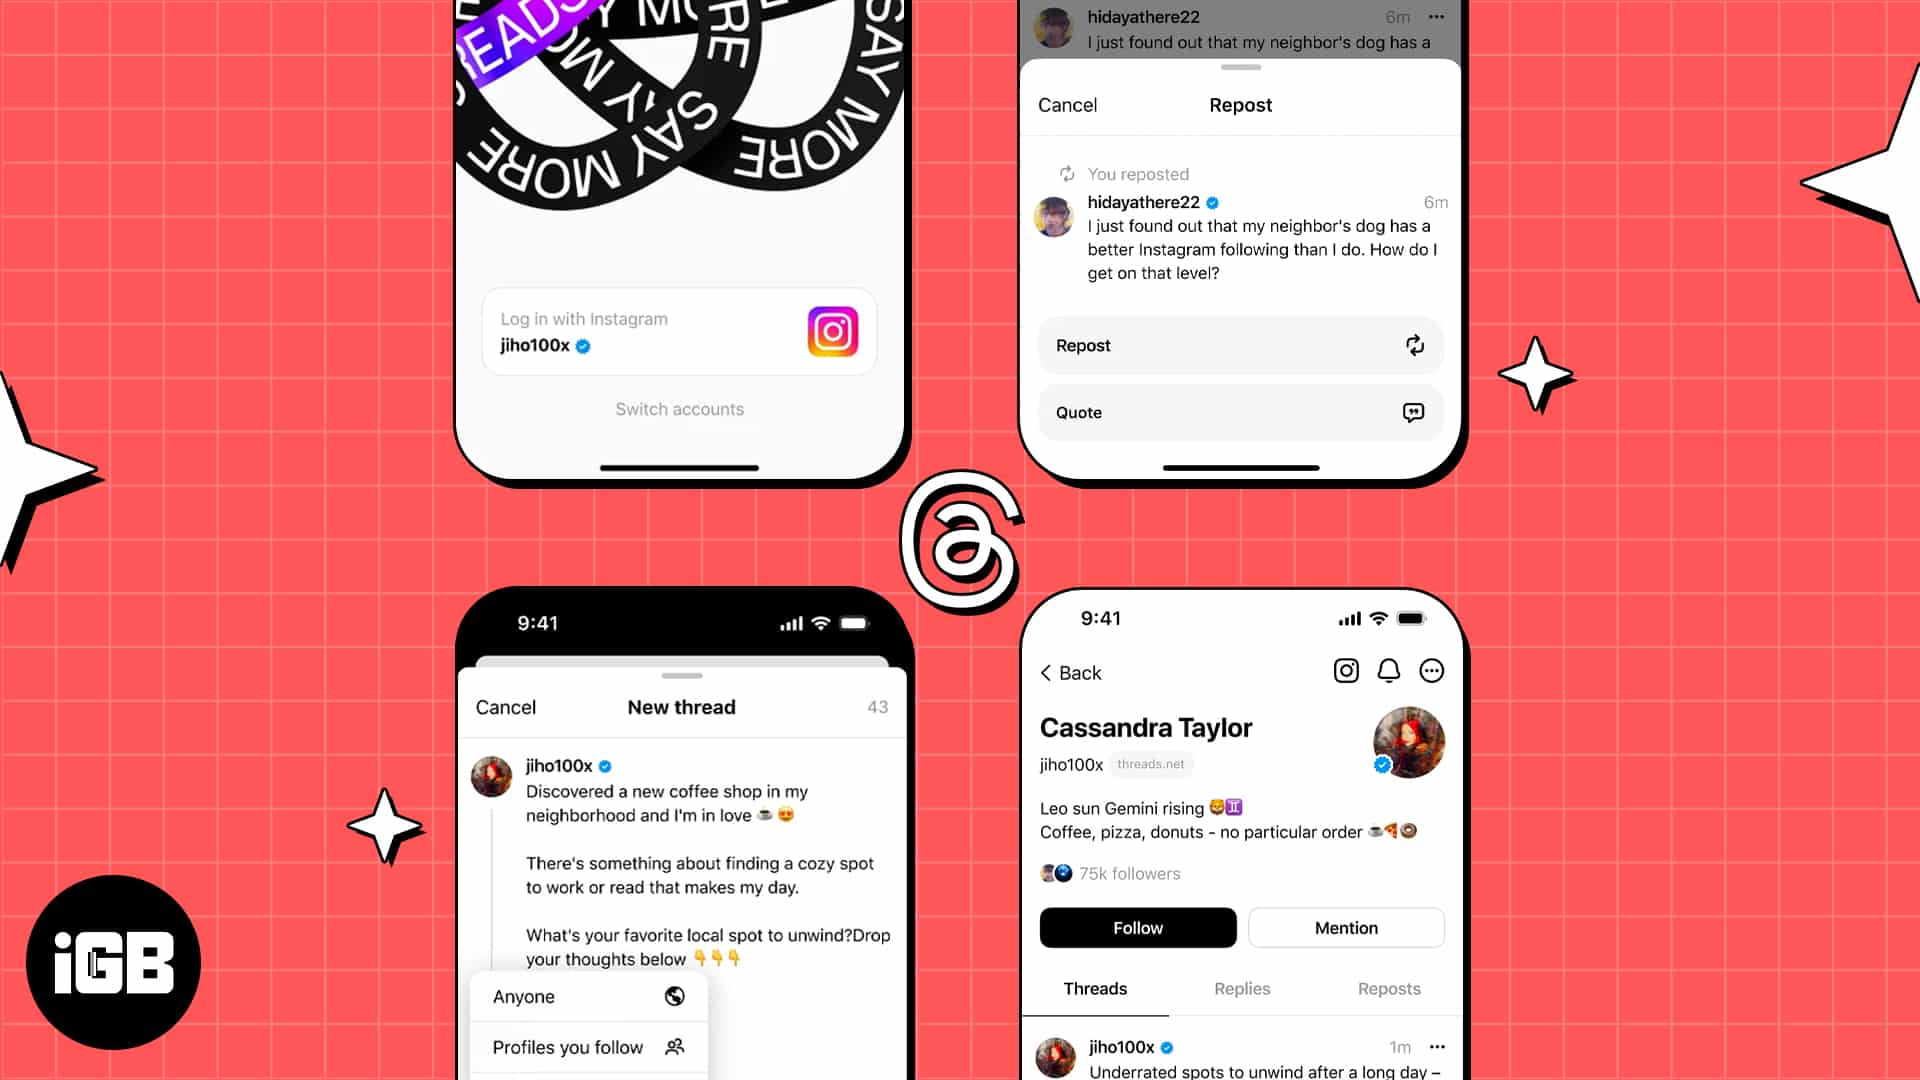
While often compared to Twitter, Threads is built to enhance your social media experience in a unique way. So, why wait? Let’s dive into the Threads app on iPhone and explore its features!
What is Threads?
Threads is a social media app designed for seamless and intimate communication with friends. With its simple and user-friendly interface, Threads makes it easy to connect with your chosen group.
Integrated with Instagram, the app offers several benefits, including effortless sharing of Threads on Instagram Stories and Feeds and real-time updates for followers. It also features quick photo and video sharing, enhancing the user experience.
Privacy remains a top priority—only approved friends can access shared content. With its innovative approach, Threads is transforming online interactions, making it an essential tool for those who prefer text-driven conversations in today’s fast-paced social media world.
15+ Threads app tips and tricks every iPhone user should know
Here are some tips I’ve personally used to unlock the full potential of the Threads app on my iPhone.
1. Create a Threads
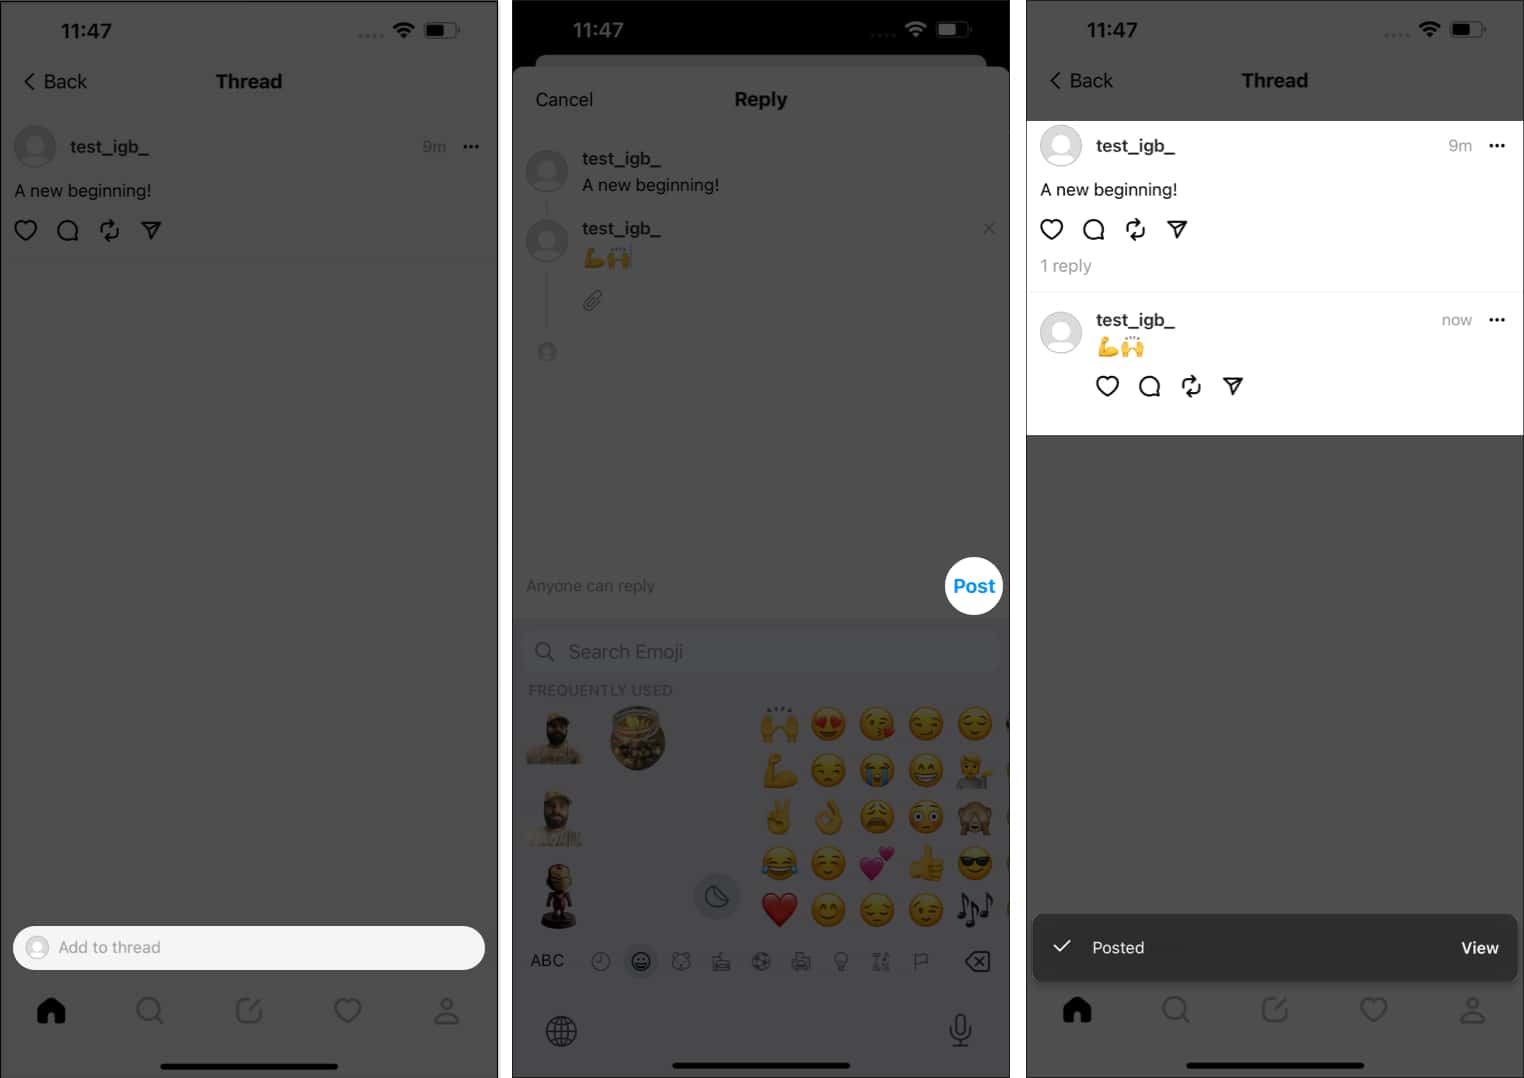
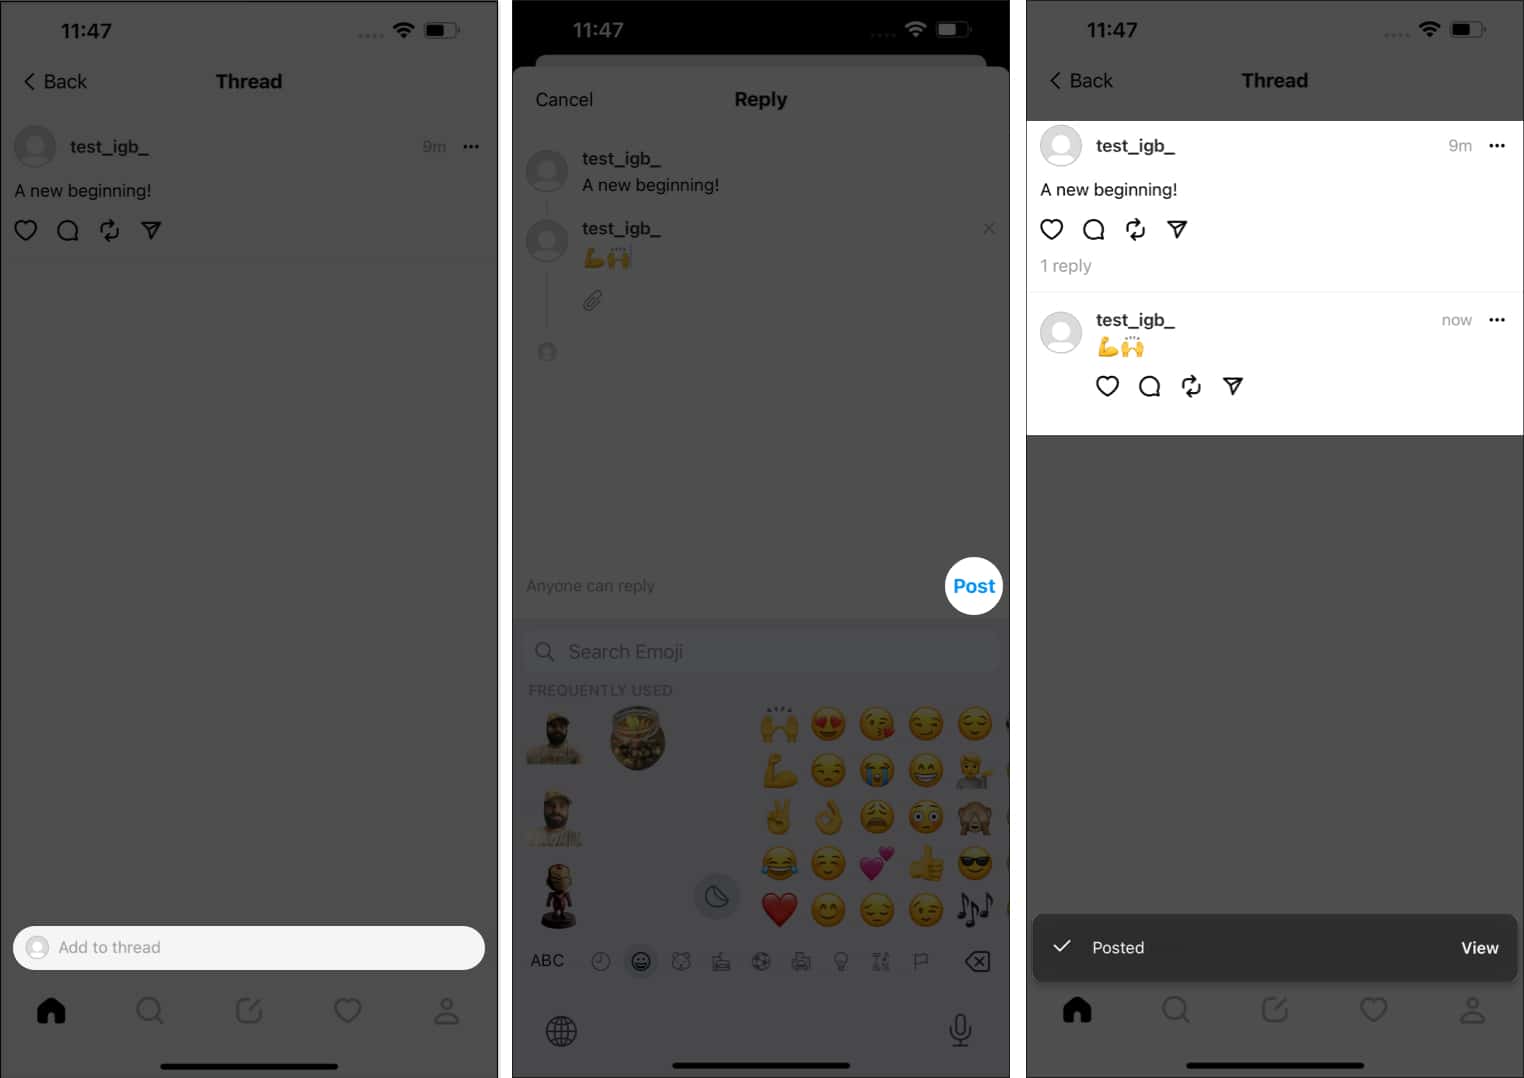
If you ever feel like adding more to the thread you’ve just posted, the process is simple. You can include pictures, videos, or any additional text to the existing thread, allowing you to expand upon your original post more flexibly and easily.
- Simply access the thread and tap Add to thread option.
- Follow the traditional method of posting a thread.
- It’ll act as a string to the main thread.
2. Share a thread in your Instagram Stories
Threads by Instagram enriches with amazing cross-platform support.
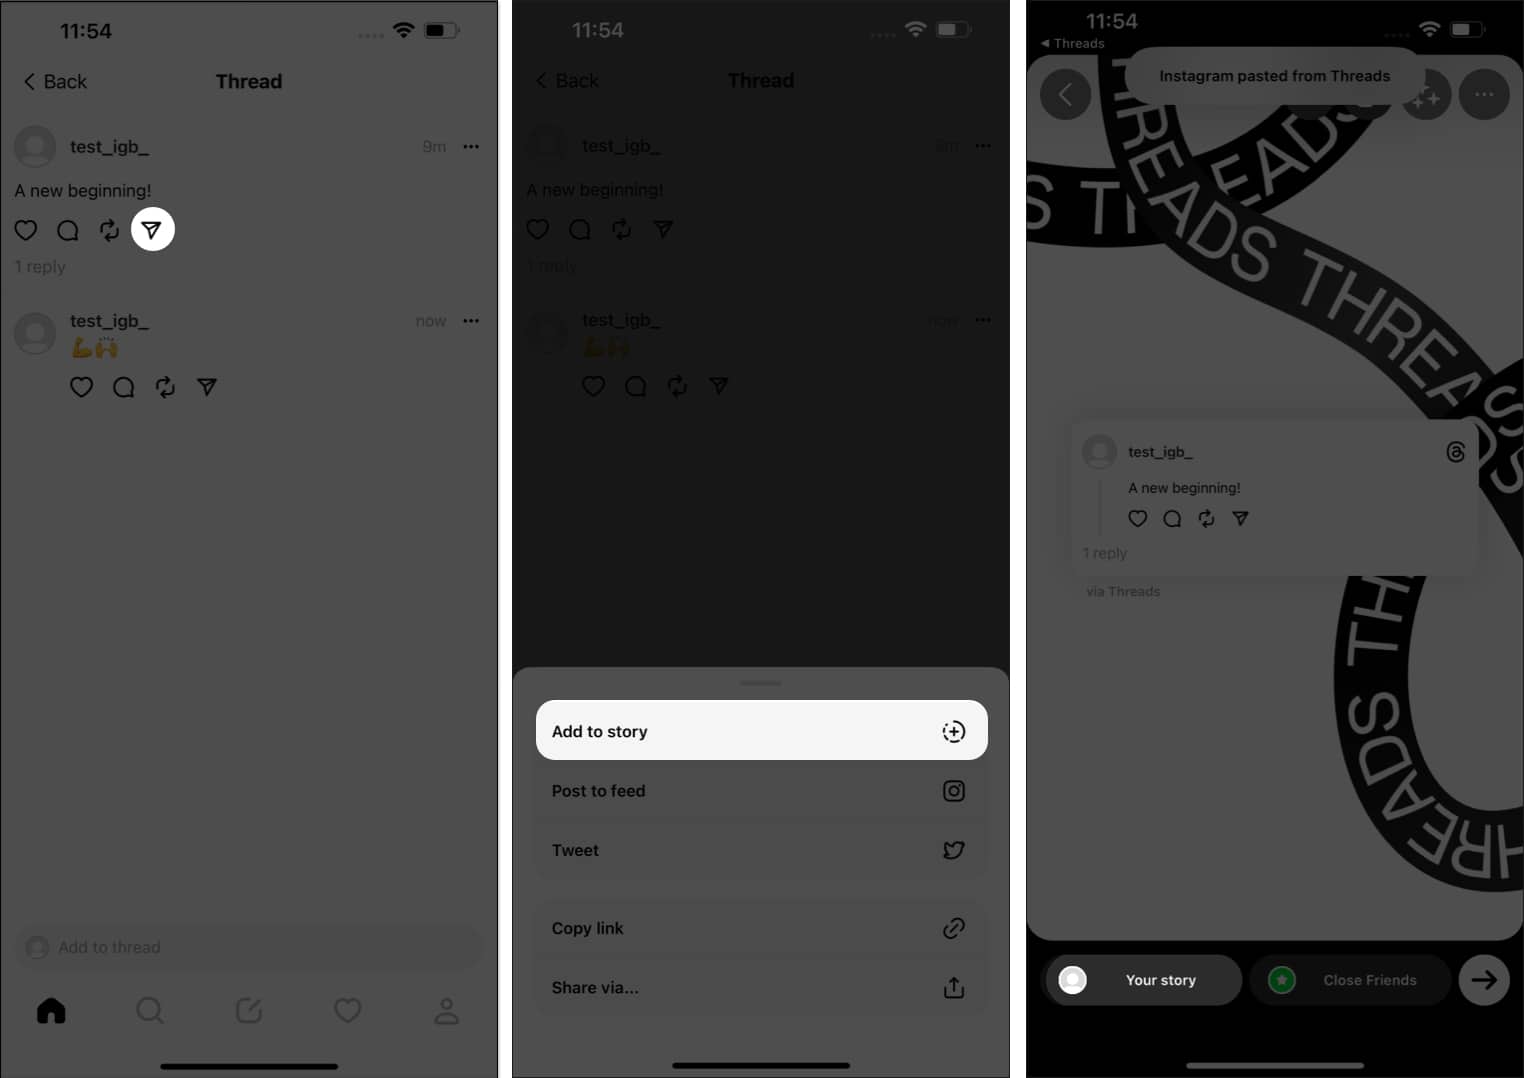
- Tap the Share icon.
- Now, tap the Add to Story button, and you’ll be redirected to your Instagram stories section.
- Select Your Story option to conclude the process.
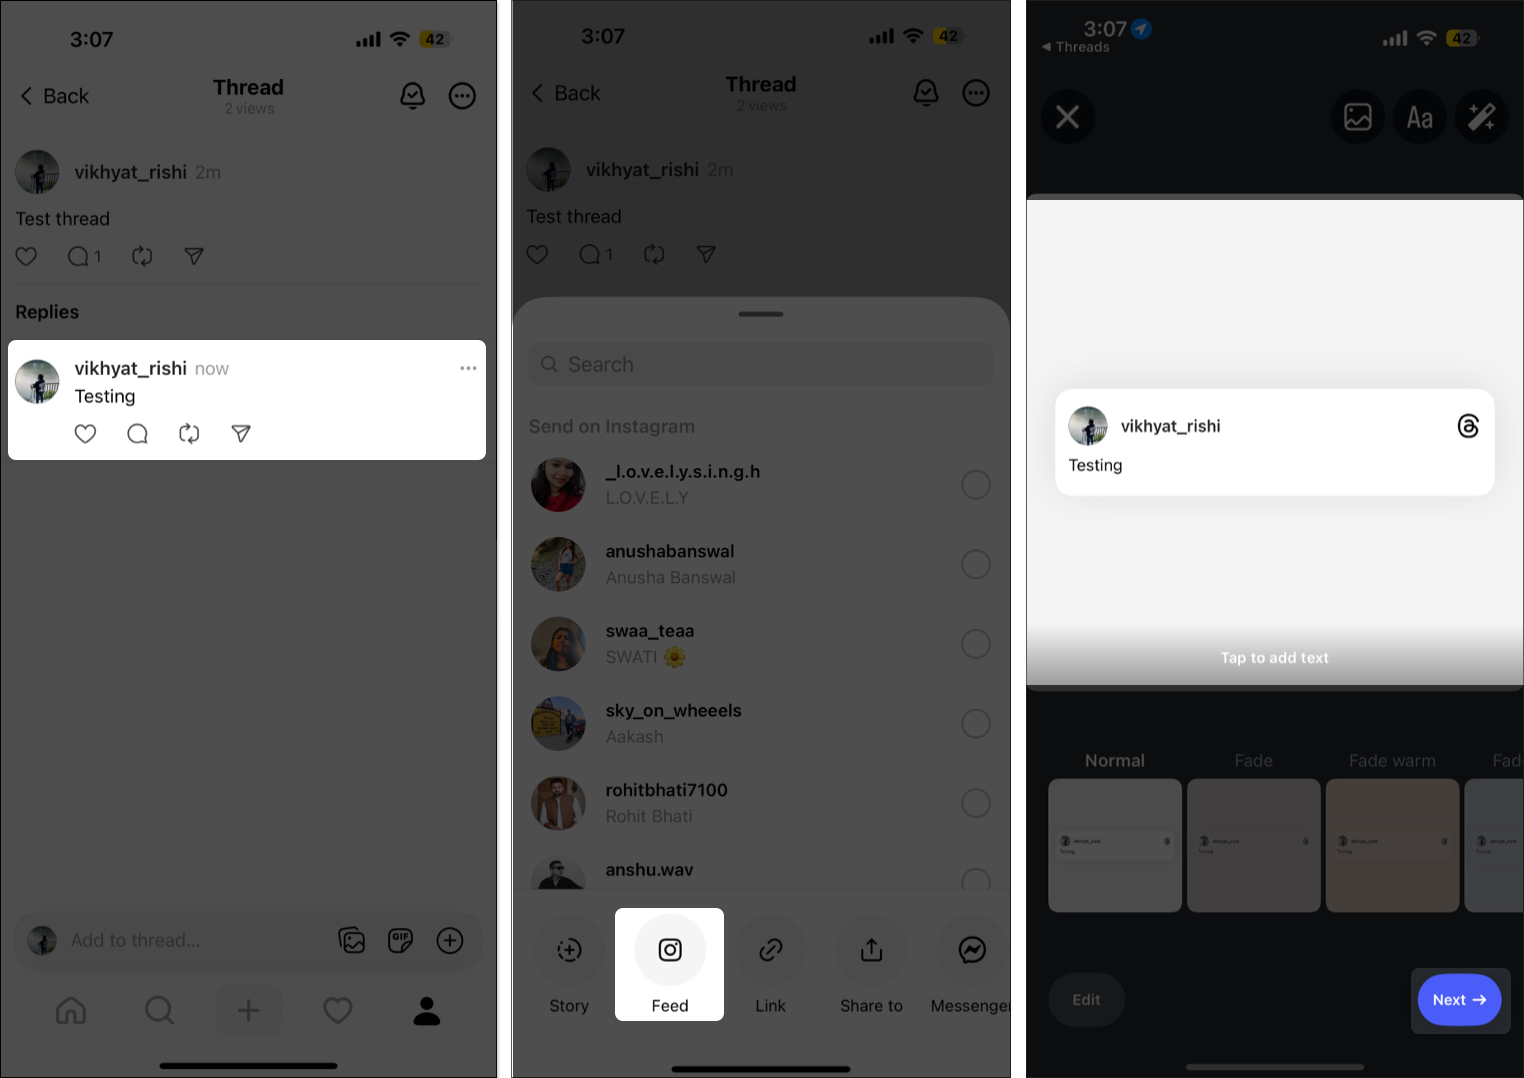
3. Share a thread in your Instagram feed
If you seek to share the feed in your Instagram feed:
- Tap the Share button under the Thread.
- Here, tap the Feed button.
- Your screen will now display the Instagram post feed interface.
- Tap Next and follow the regular method of posting on Instagram.
4. Mute unwanted accounts
With Threads, individuals can present themselves in a completely new form. However, a few people have a lot of free time, and constant pings from such individuals can often be quite bothersome.
But you cannot simply block someone for being too enthusiastic. It’s rude. So why not mute them instead?
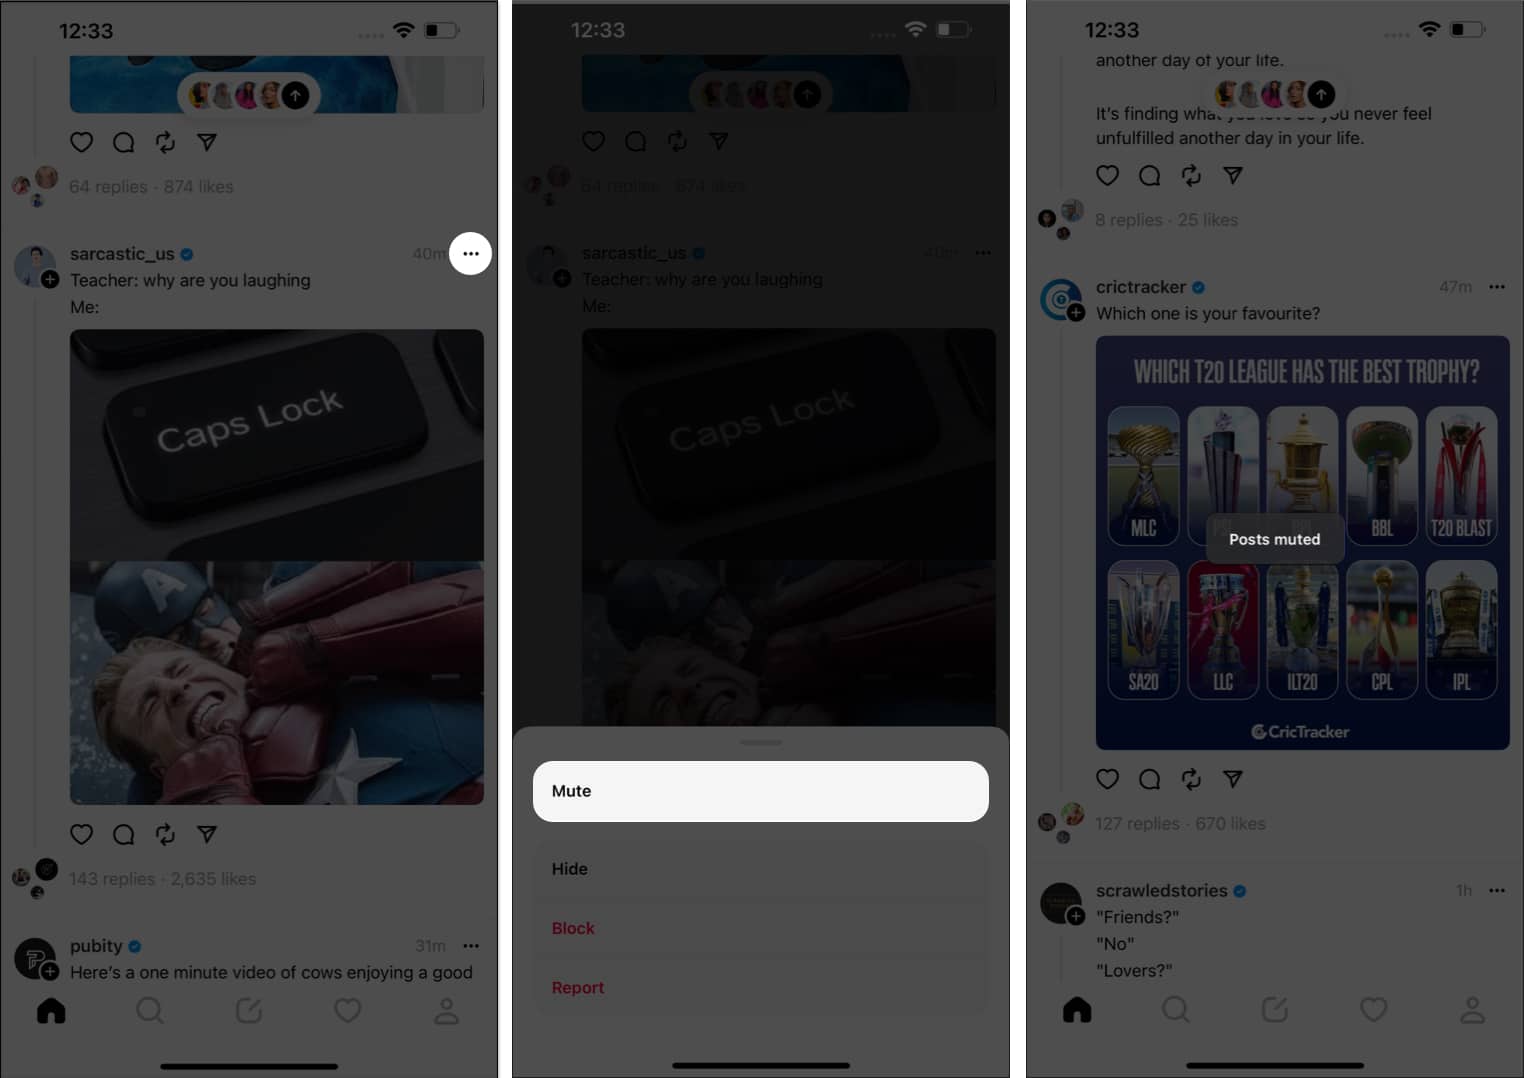
- Tap the three-dot icon on a thread of the user in question.
- Select Mute when prompted.
That’s it!
Moreover, by muting certain accounts, you can customize your experience on the platform by focusing solely on the content that interests you. This is especially useful if you follow numerous accounts or brands but only want to view updates from selected ones.
Access all muted accounts
If you think you went too far in muting the accounts you follow, there is a way to access all of them at once.
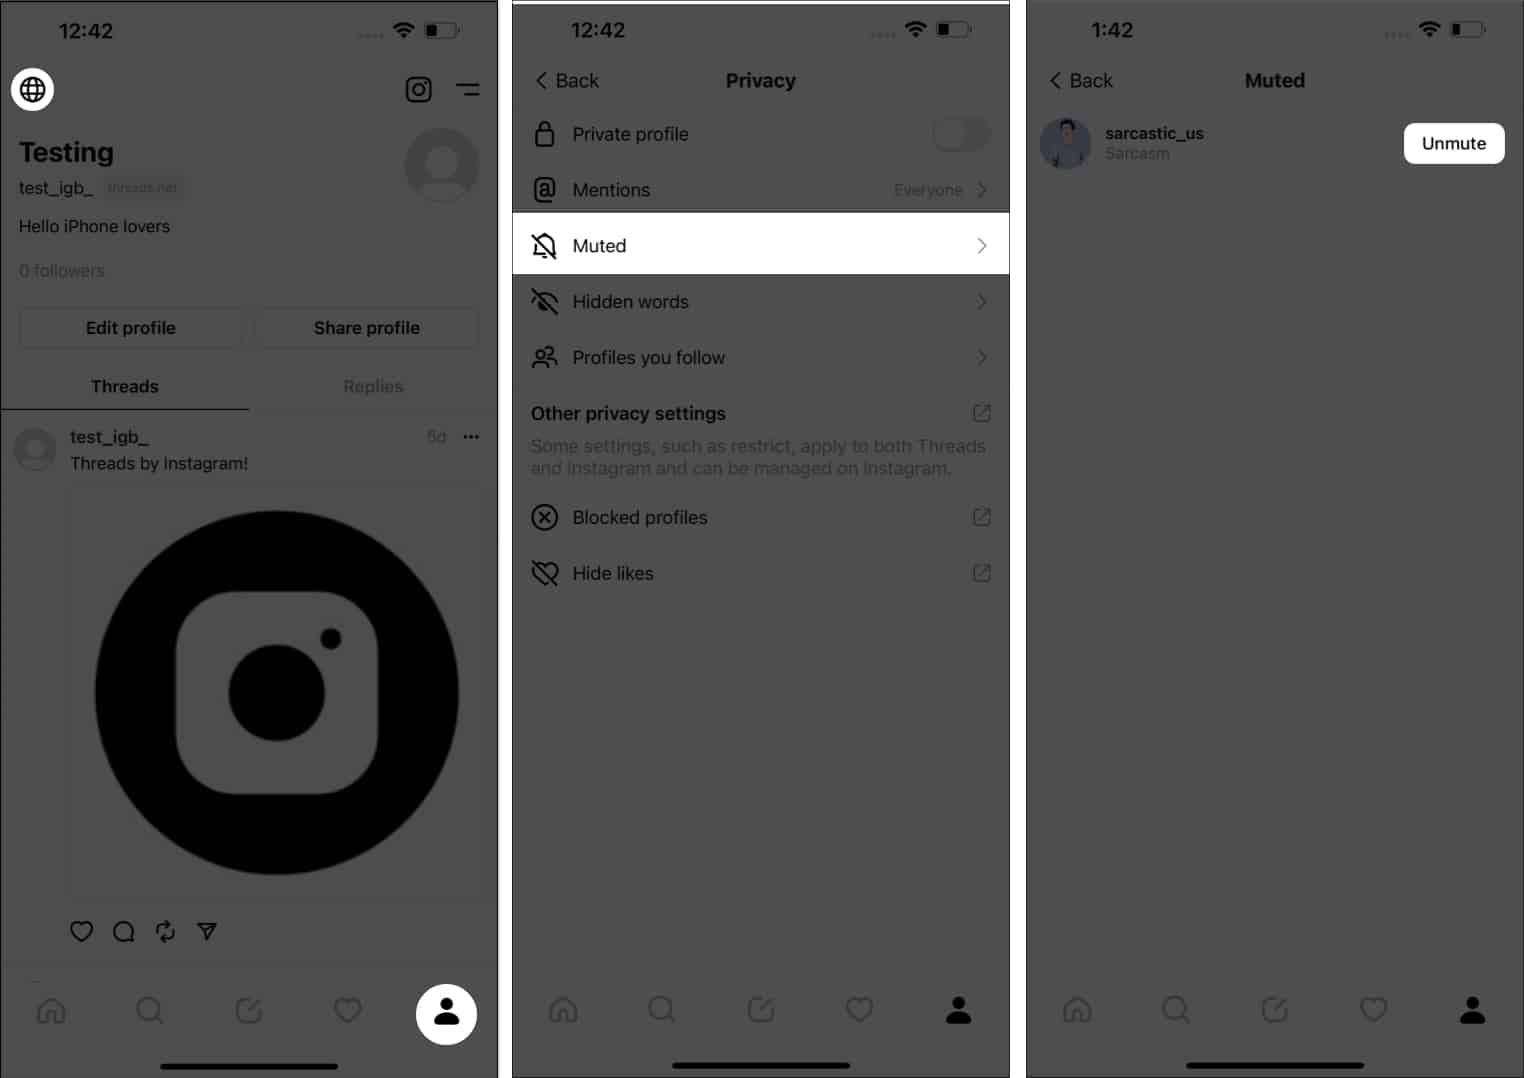
- Access your profile page in Threads.
- Tap the globe icon present at the top-left corner.
- Select Muted to proceed.
- Here, you’ll find all accounts you’ve muted so far.
- Tap Unmute to revert your actions.
5. Limit your Thread
Threads by Instagram further allow you to decide who can engage with your post. This basically means that you can choose whether to post publicly or discreetly.
By exercising this control, you can ensure that your content is seen only by those intended, giving you greater peace of mind and a more tailored social media experience.
Before posting a thread:
- Start creating a new thread.
- Right before posting it, simply tap Anyone can reply option and change it the way you desire.
Anyone: Open for everybody on the platform.
Profiles you follow: Individuals you follow back.
Mentioned only: Only the ones you’ve tagged in the thread. - After making a choice, tap Post.
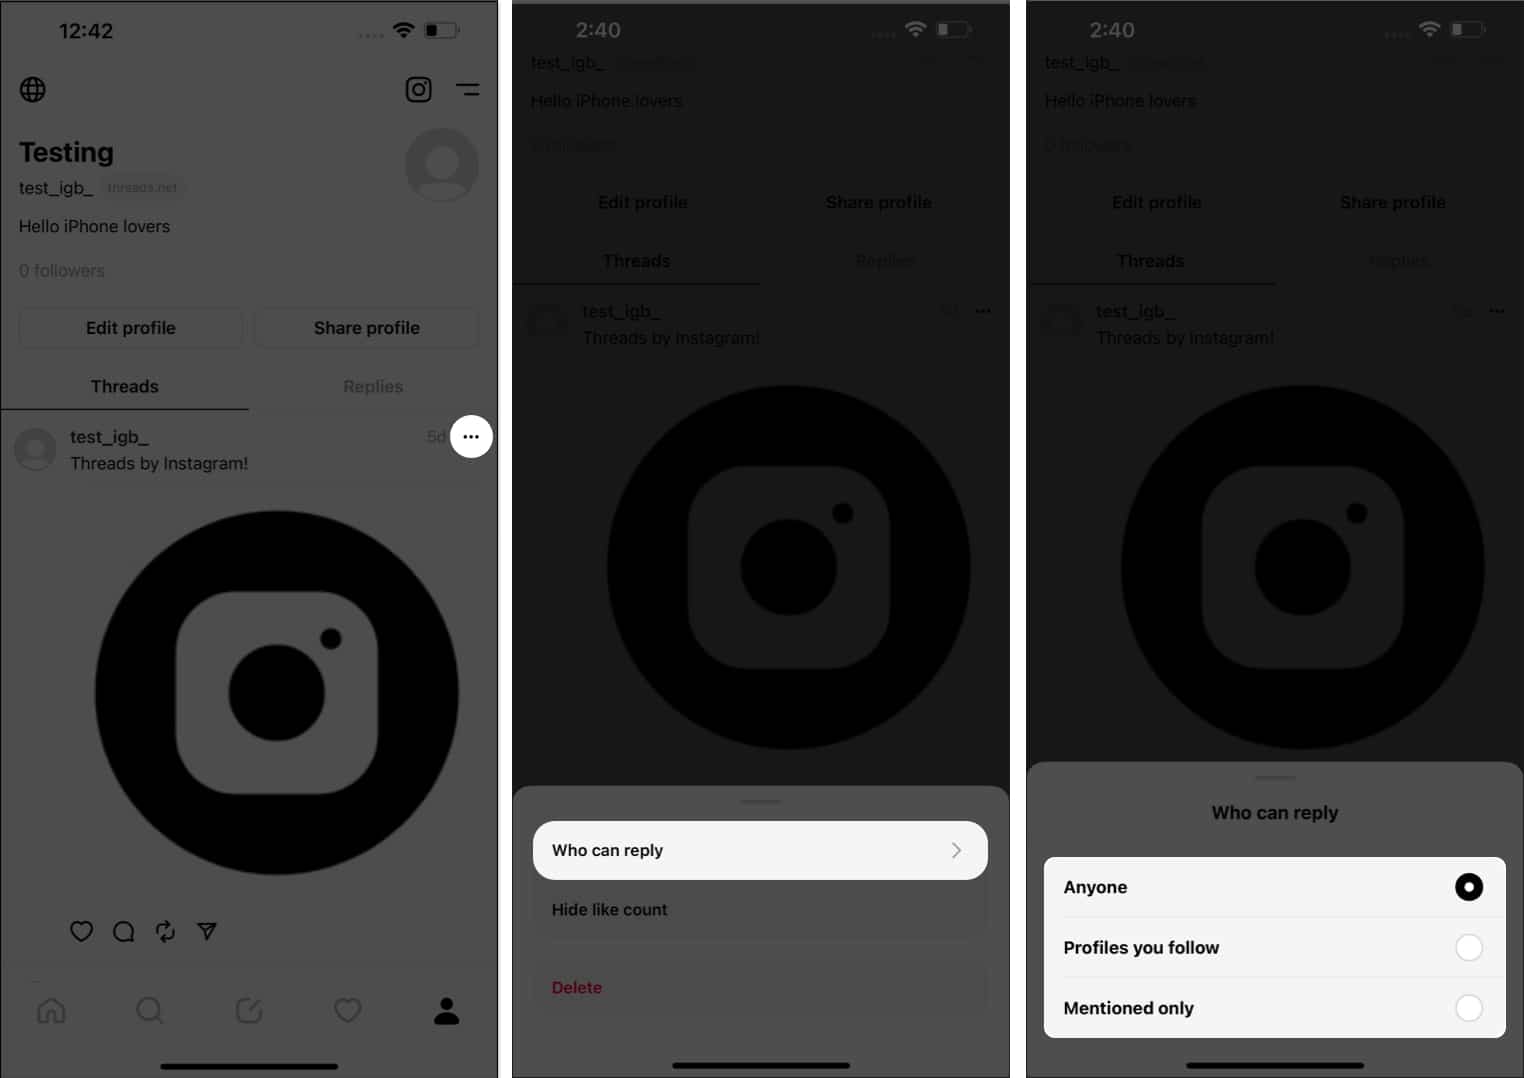
After posting a thread:
- Tap the three-dot icon next to the live thread.
- Tap Who can reply when prompted.
- Make your choice accordingly.
It’s that simple.
6. Change your profile picture
When it comes to utilizing Instagram Threads like a pro, you cannot miss out on the most important aspect – the profile picture. Your profile picture is essentially your virtual face of the platform and establishes your digital presence. So, give your best:
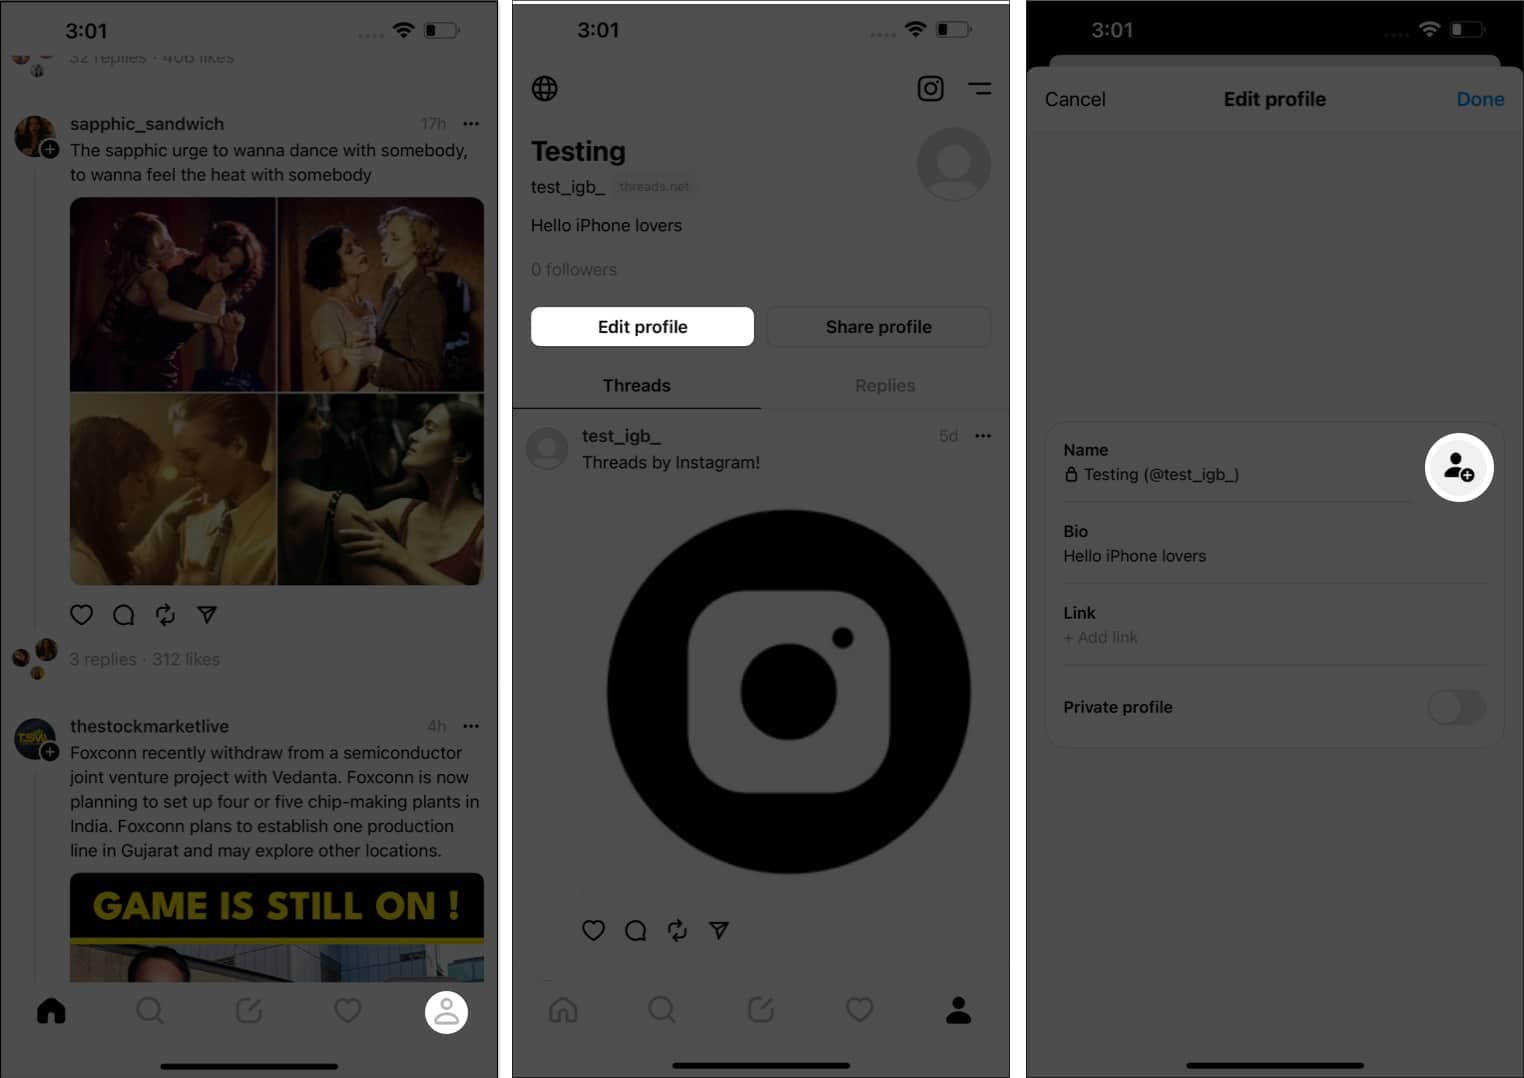
- Launch Threads on your iPhone → Go to your profile page.
- Tap the Edit Profile option.
- Choose the profile picture icon adjacent to your name.
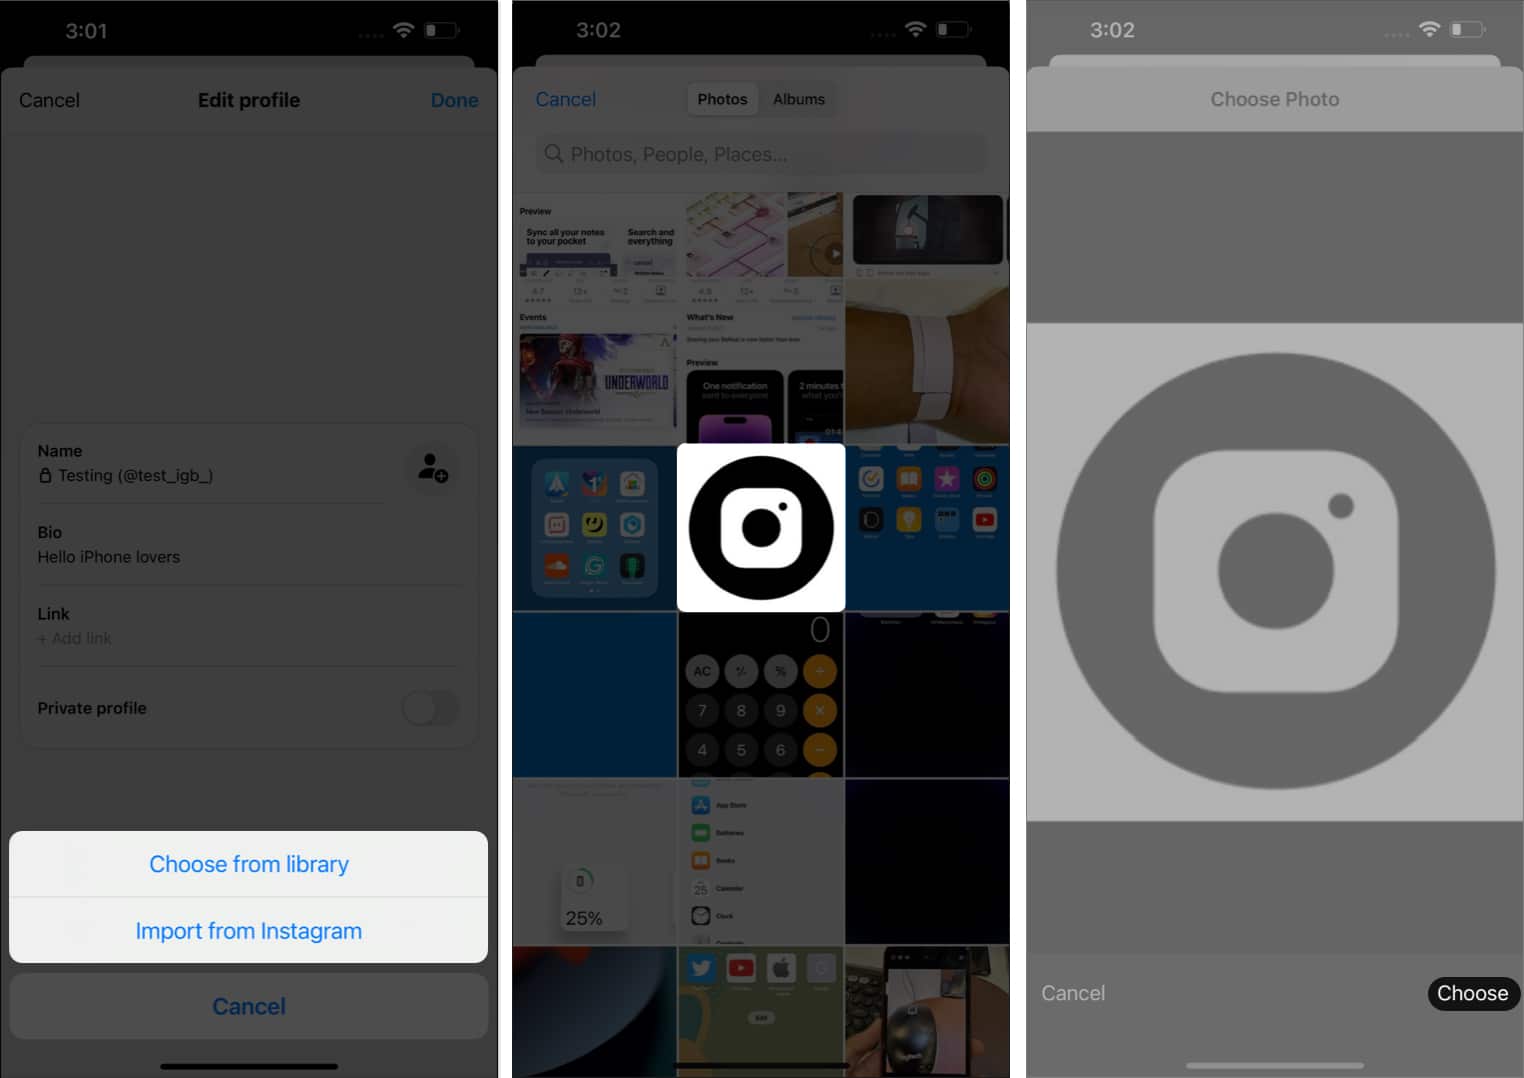
- Now, you can opt for either of the following:
- Choose from the library: Select a completely different picture available on your device.
- Import from Instagram: Replicate the same profile photo from your Instagram account.
- Now, you can opt for either of the following:
- For this demonstration, I’ll be choosing a picture from the library.
- Hit Choose to finalize your selection.
- Tap Done to conclude the process.
7. Customize notifications
By personalizing notification settings on Instagram Threads, professionals can effectively streamline their communication and maintain better focus on relevant threads while avoiding unnecessary disruptions.
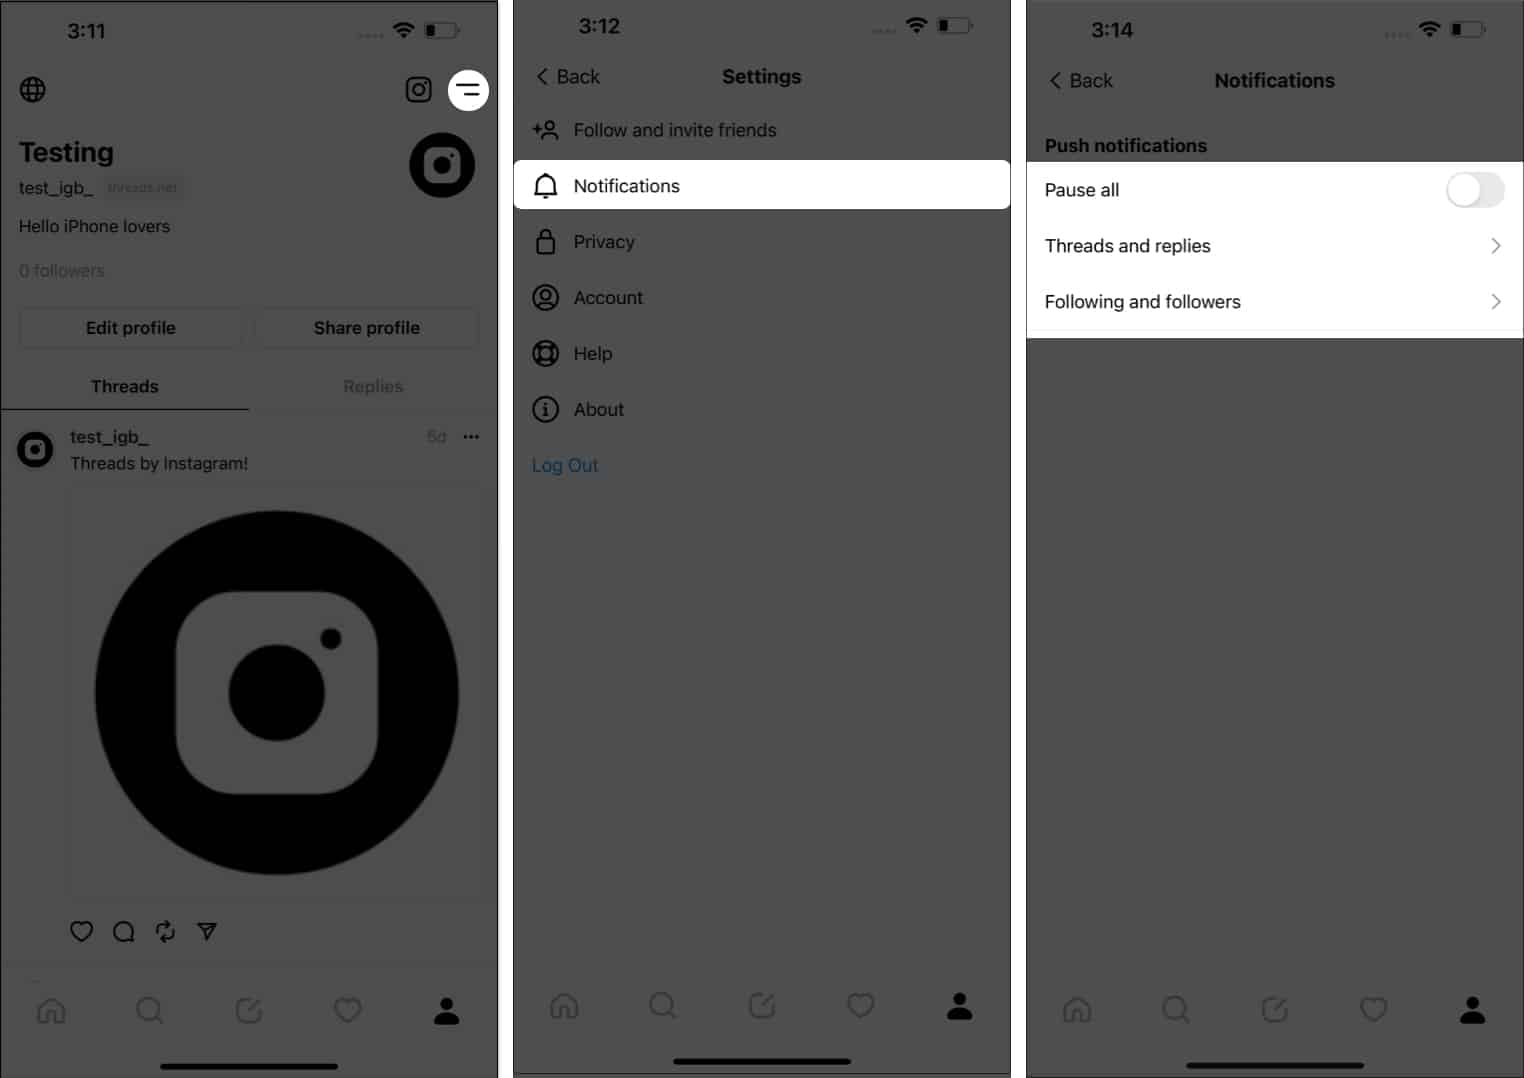
- Access your profile in Threads → Select the menu icon (two lines).
- Choose the Notifications option.
- This entire section is dedicated to Push Notifications.
- Hereby, you can alter the following:
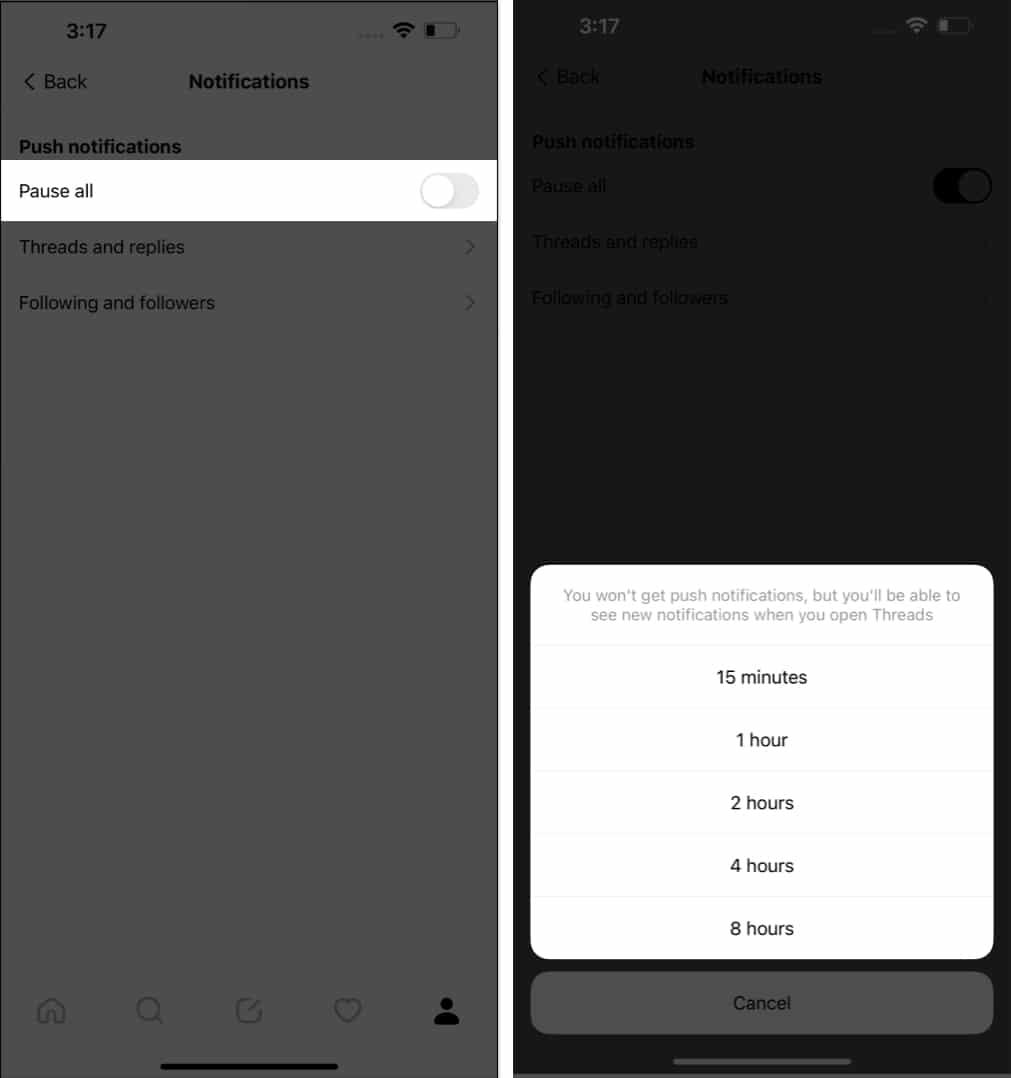
Pause all:
- Toggle on Pause all → Choose a period of your preference.
- For the chosen period, you’ll receive no push notifications on your iPhone.
- You can disable the same anytime you like.
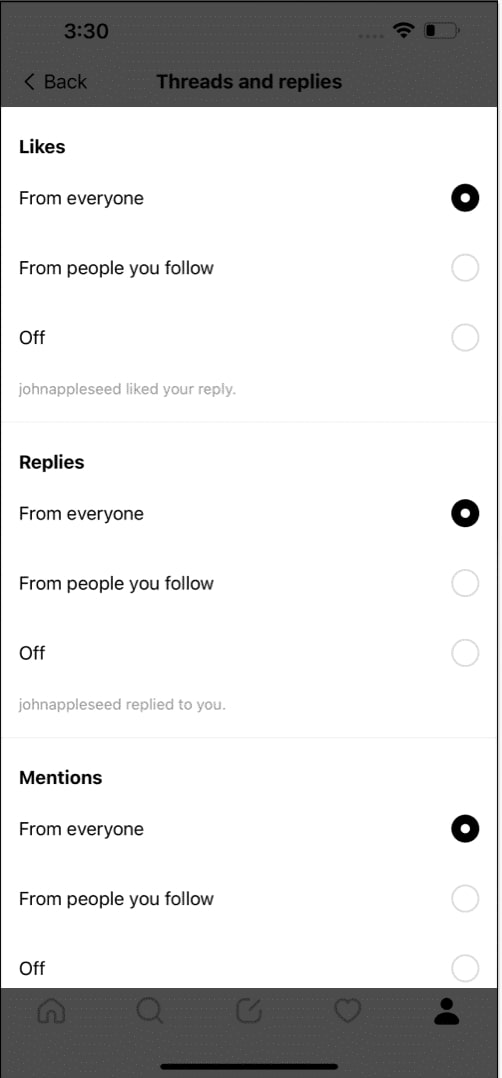
Threads and replies:
Now, let’s go to the Threads and replies option.
- Here, you can change the preferences for Likes, Replies, Mentions, Reposts, Quotes, and First threads.
- You can alter these sections based on the following parameters:
From everyone: Allow all notifications from Threads.
From people you follow: You’ll be only notified of the accounts you follow.
Off: Disable the push notifications for the respective feature.
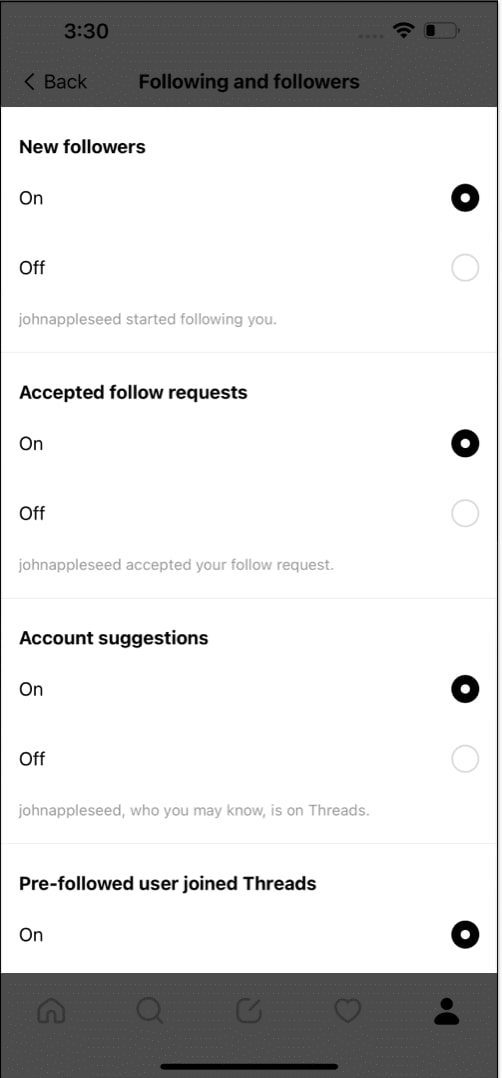
Following and followers:
Finally, let me take you through Following and followers.
- In this instance, you can either allow or deny the push notifications from New followers, Accepted follow requests, Account suggestions, and Pre-followed users who joined Threads.
- Select either On or Off for the above criteria.
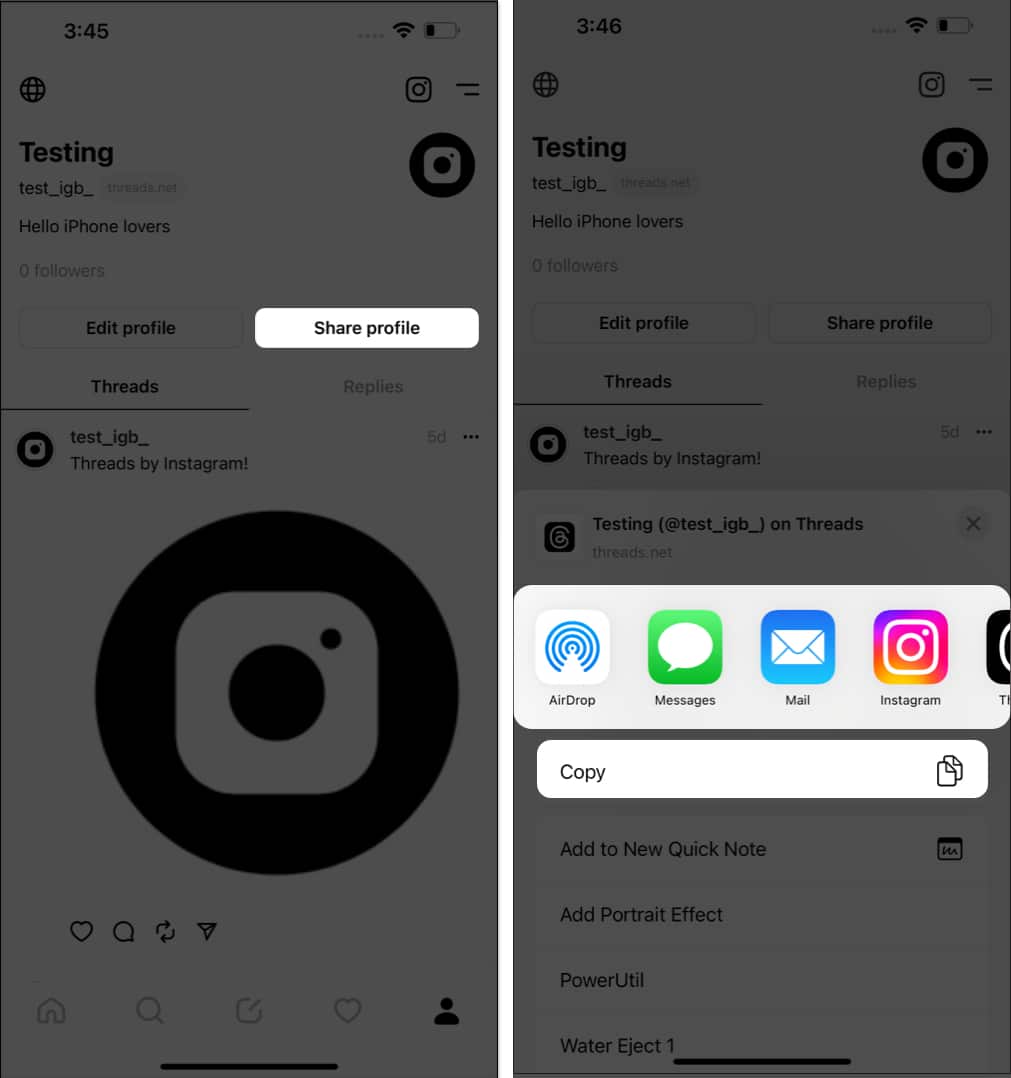
8. Share your profile
Sharing is caring. Yes, you should not let your friends and families miss out on this new realm of engagement. Share your Threads profile via any feasible medium and showcase your imagination prowess.
- Access the Profile menu in Threads.
- Tap the Share profile option.
- Now, you can either copy the link of your profile or directly share it across any medium of your preference.
9. Take a break
While Threads is fun to use, spending excessive time on the platform may have a negative impact on your productivity and mental well-being. As a result, it’s wise to take a break or deactivate your Threads account for a significant period.
This practice will allow you to maintain a healthy life balance. You can utilize Instagram Threads like an expert while safeguarding overall well-being and fostering meaningful connections online.
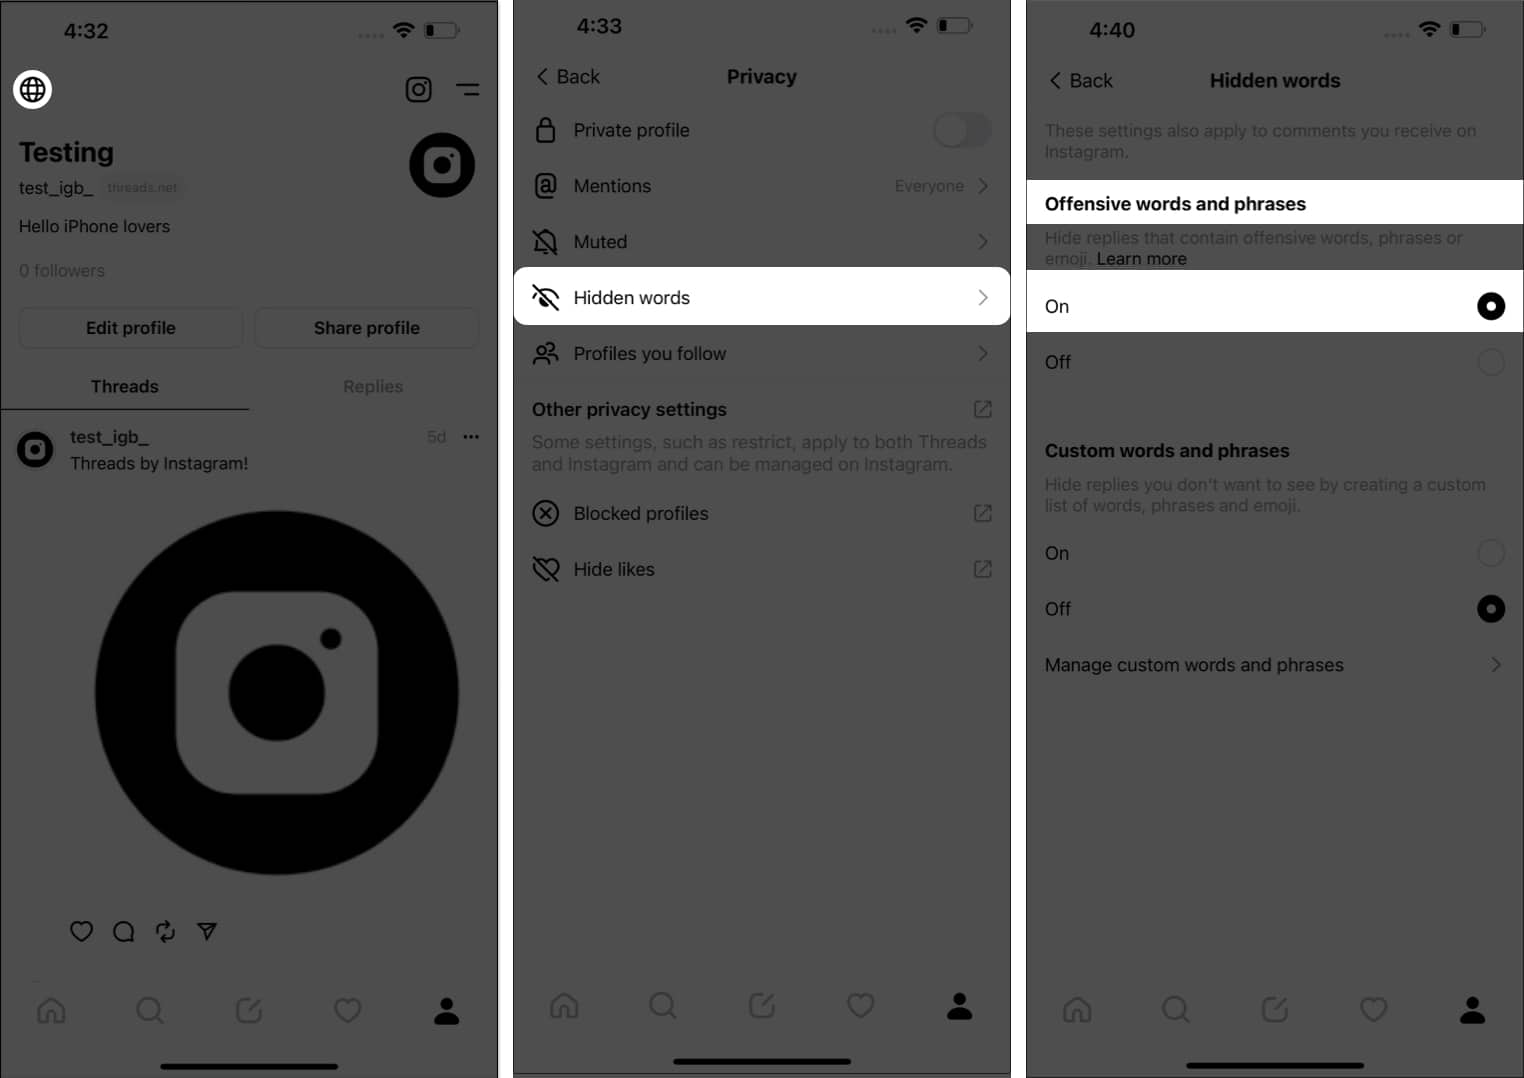
10. Hide words and phrases
One valuable tip for utilizing Instagram Threads like a pro and enhancing your privacy is to hide certain words and phrases from appearing in your chats. This feature not only helps maintain confidentiality but also filters out unwanted content.
One valuable tip for using Threads with caution is to ban a series of words and phrases from appearing in your posts. If you’re wary of the language that enters your virtual space in Threads, follow the steps outlined below:
- Launch Threads and access your profile page.
- Tap the globe icon located in the top-left corner of the page.
- Select Hidden words to proceed.
In this instance, I’ll demonstrate how you can manage the settings for the comments section of live threads. - You can hide replies that contain offensive words, phrases or emojis by choosing the On option under Offensive words and phrases.
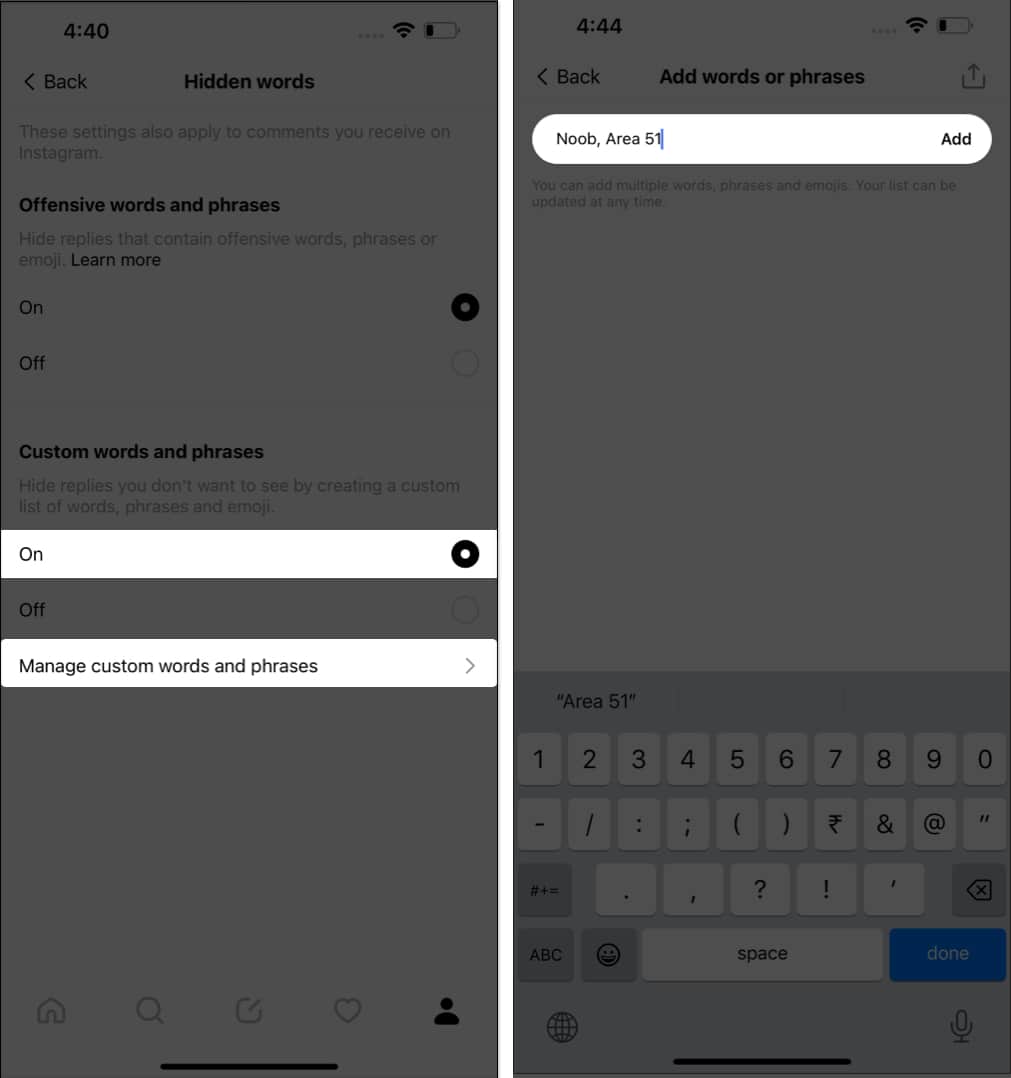
- Similarly, you can customize this process for particular words that you want to appear.
- Choose On option under Custom words and phrases.
- Now, tap Manage custom words and phrases.
- Type the word that you want to prohibit from your thread comment section.
- If there are multiple words, make sure that they are separated by commas.
- Hit Add to save your preferences.
Following this process, you can create a list of restricted words or expressions that will automatically be concealed once detected in any conversation.
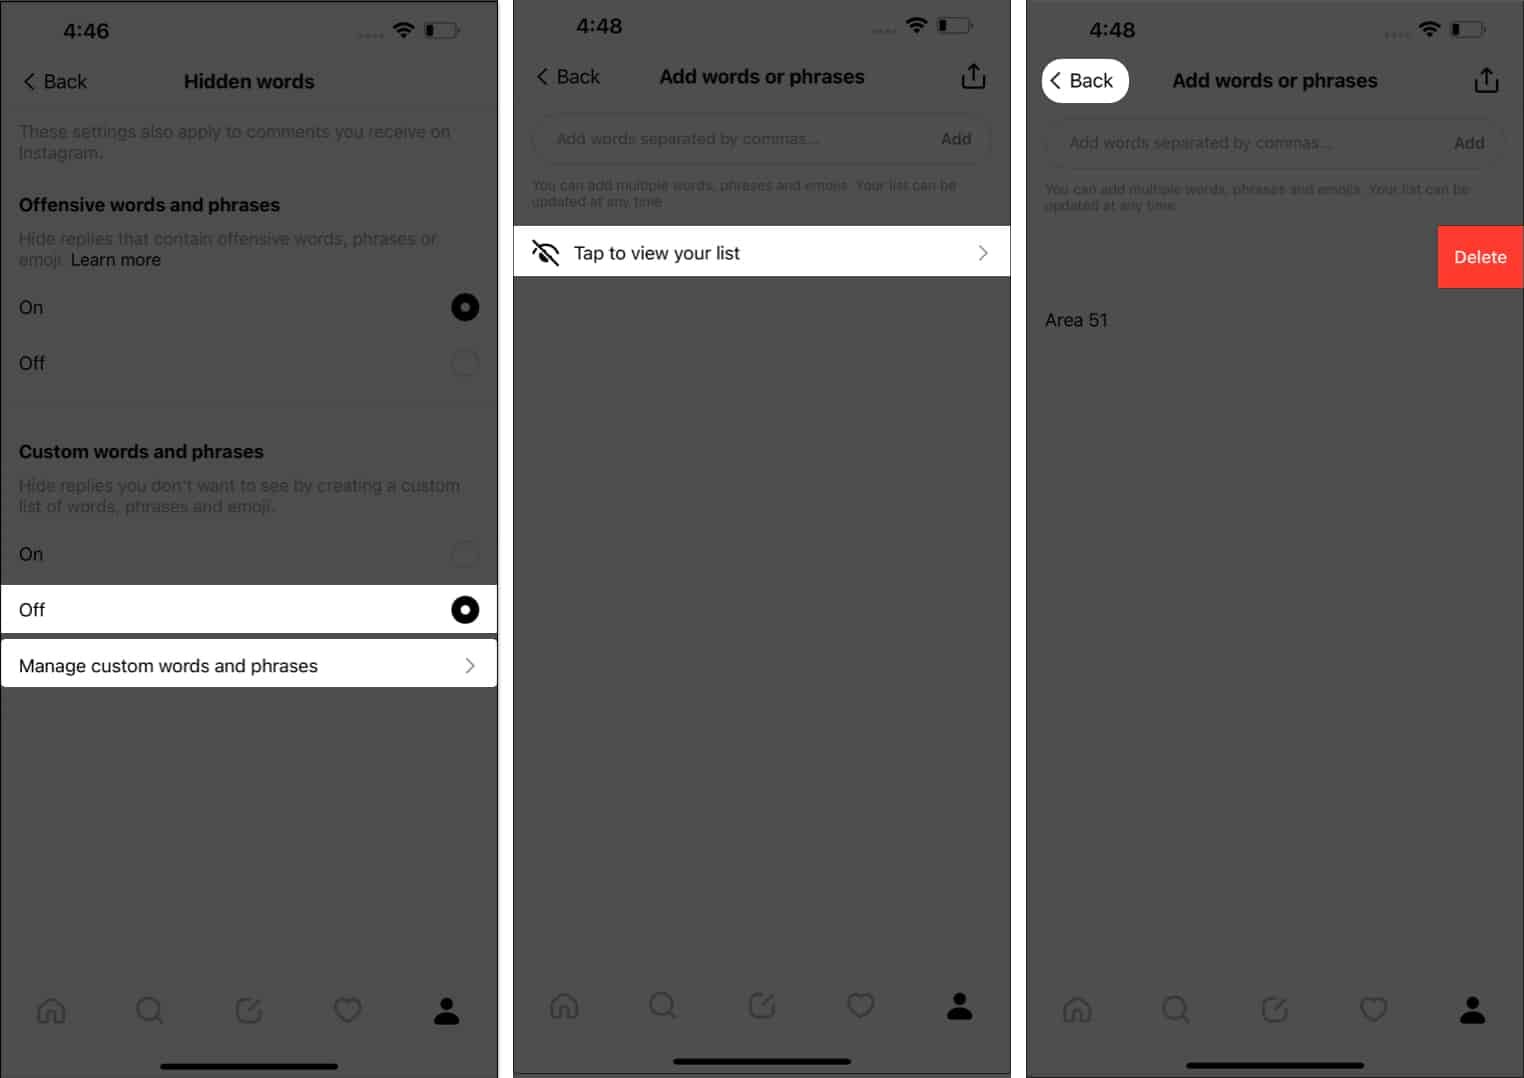
Delete custom made words and phrases:
- Access the Custom words and phrases section as discussed above.
- If you don’t want to use this feature, simply select the Off option.
- Alternatively, tap Manage custom words and phrases for those seeking to remove a particular word.
- Choose Tap to view your list option.
- Swipe left the respective word and hit Delete when prompted.
- Tap Back to conclude the process.
This tool proves useful for steering clear of unsolicited messages or conversations containing offensive language.
11. Enable private profile
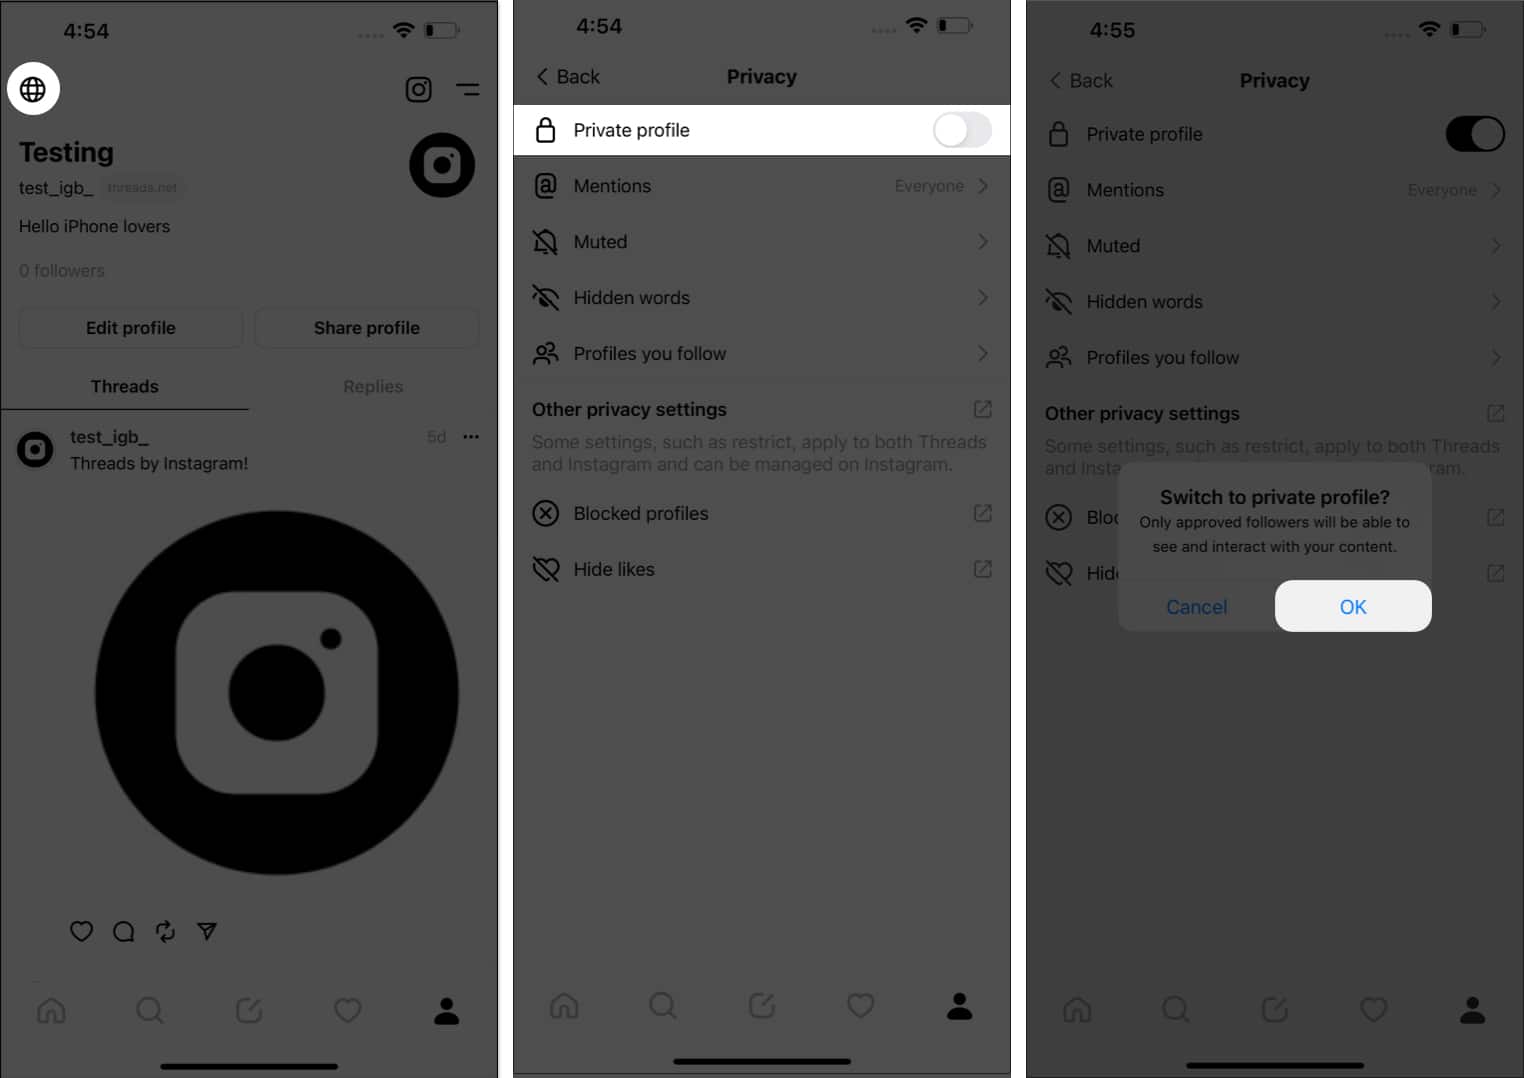
If you’re a private person and do not feel comfortable sharing your posts with the world right away, threads will fulfill your wish like a charm. While in threads, you can turn your profile Private. Conclusively, only the accounts approved by you can view and interact with your posts. Let’s see how:
- Navigate to your profile page in Threads.
- Tap the globe icon.
- Toggle on Private profile → Hit Ok when prompted.
Note: This process will turn the globe icon in your profile into a lock icon.
Enabling a private profile also allows you to curate a more intimate and targeted audience, perfect for professionals seeking to showcase their work to select contacts or colleagues.
12. Switch profiles
One of Threads’ most useful features is the ability to switch between profiles easily, making it a breeze to manage multiple accounts. To utilize this function like a professional, start by ensuring that you have added all relevant profiles to your Instagram app.
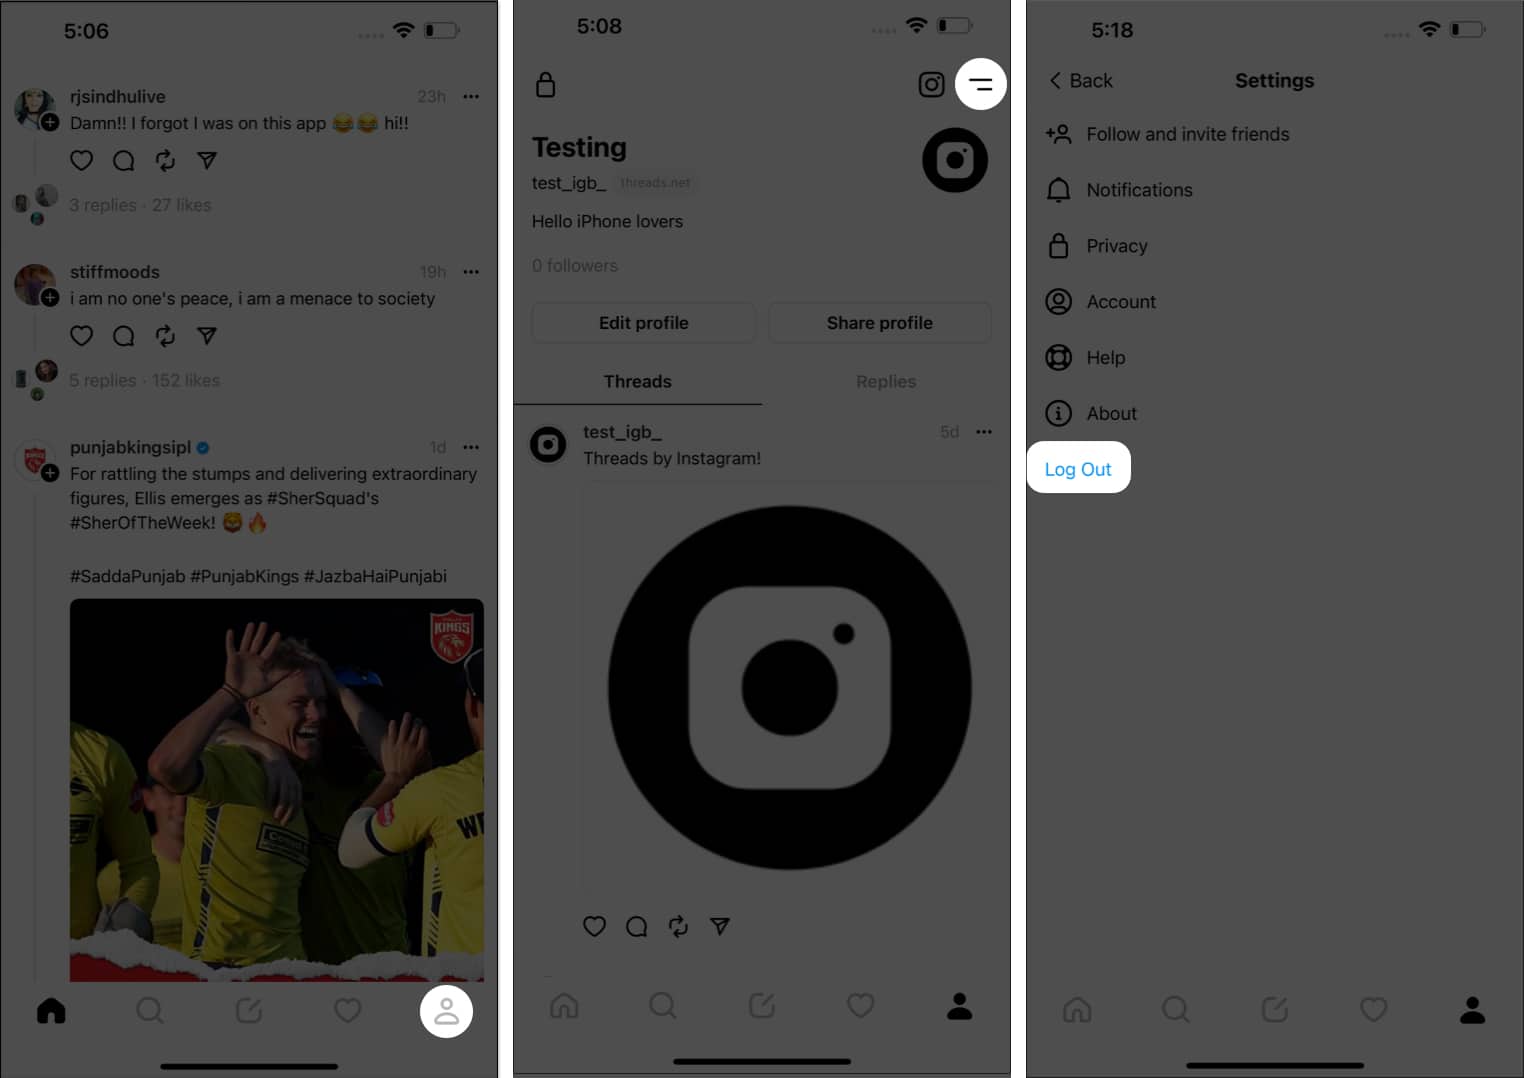
- Tap your profile in the Threads app.
- Select the menu icon (two lines) from the top-right corner.
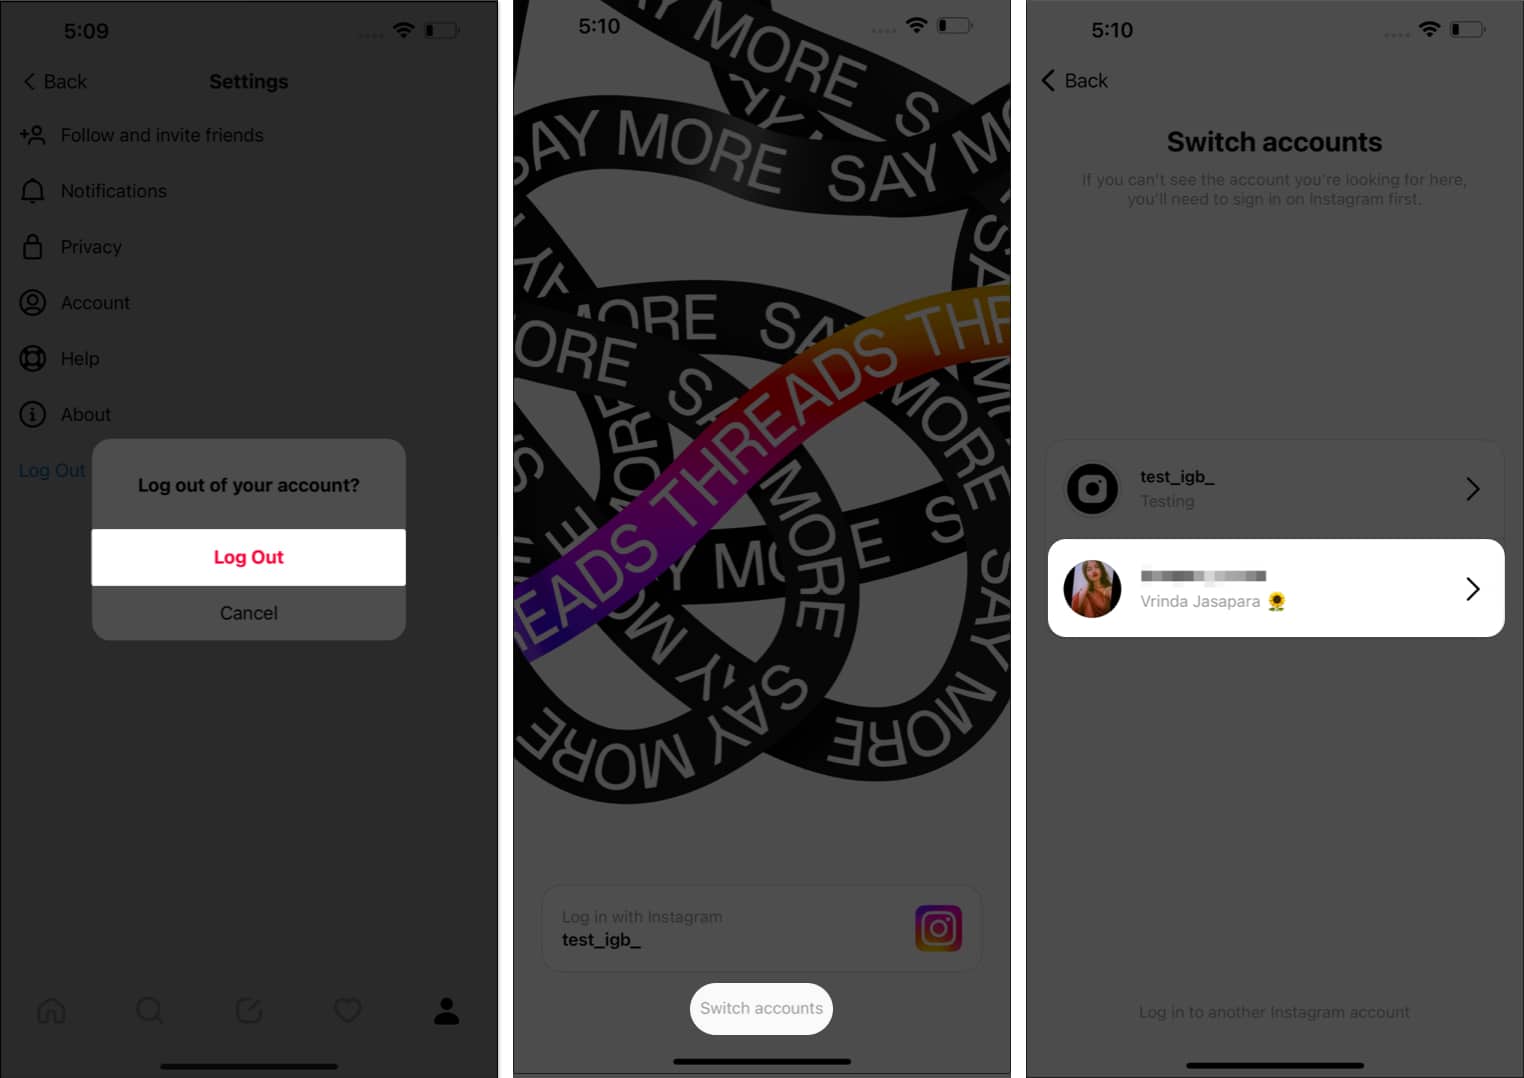
- Tap Log Out → Log Out to proceed.
- As you’re prompted with the login page in Threads, select Switch accounts.
- Choose the alternate profile you wish to proceed with.
- And voila!
Nonetheless, keep in mind that managing multiple accounts requires careful organization and timely content sharing. As a result, it’s viable to keep social media management tools at your disposal so that you’re not lost in the wilderness of these platforms.
13. Hide likes count
Likes are one of the flashiest ways of flaunting one’s popularity. However, if you wish, you can conceal this metric for your account. This procedure allows the users to focus on creating and sharing their content without fixating on the validation of likes.
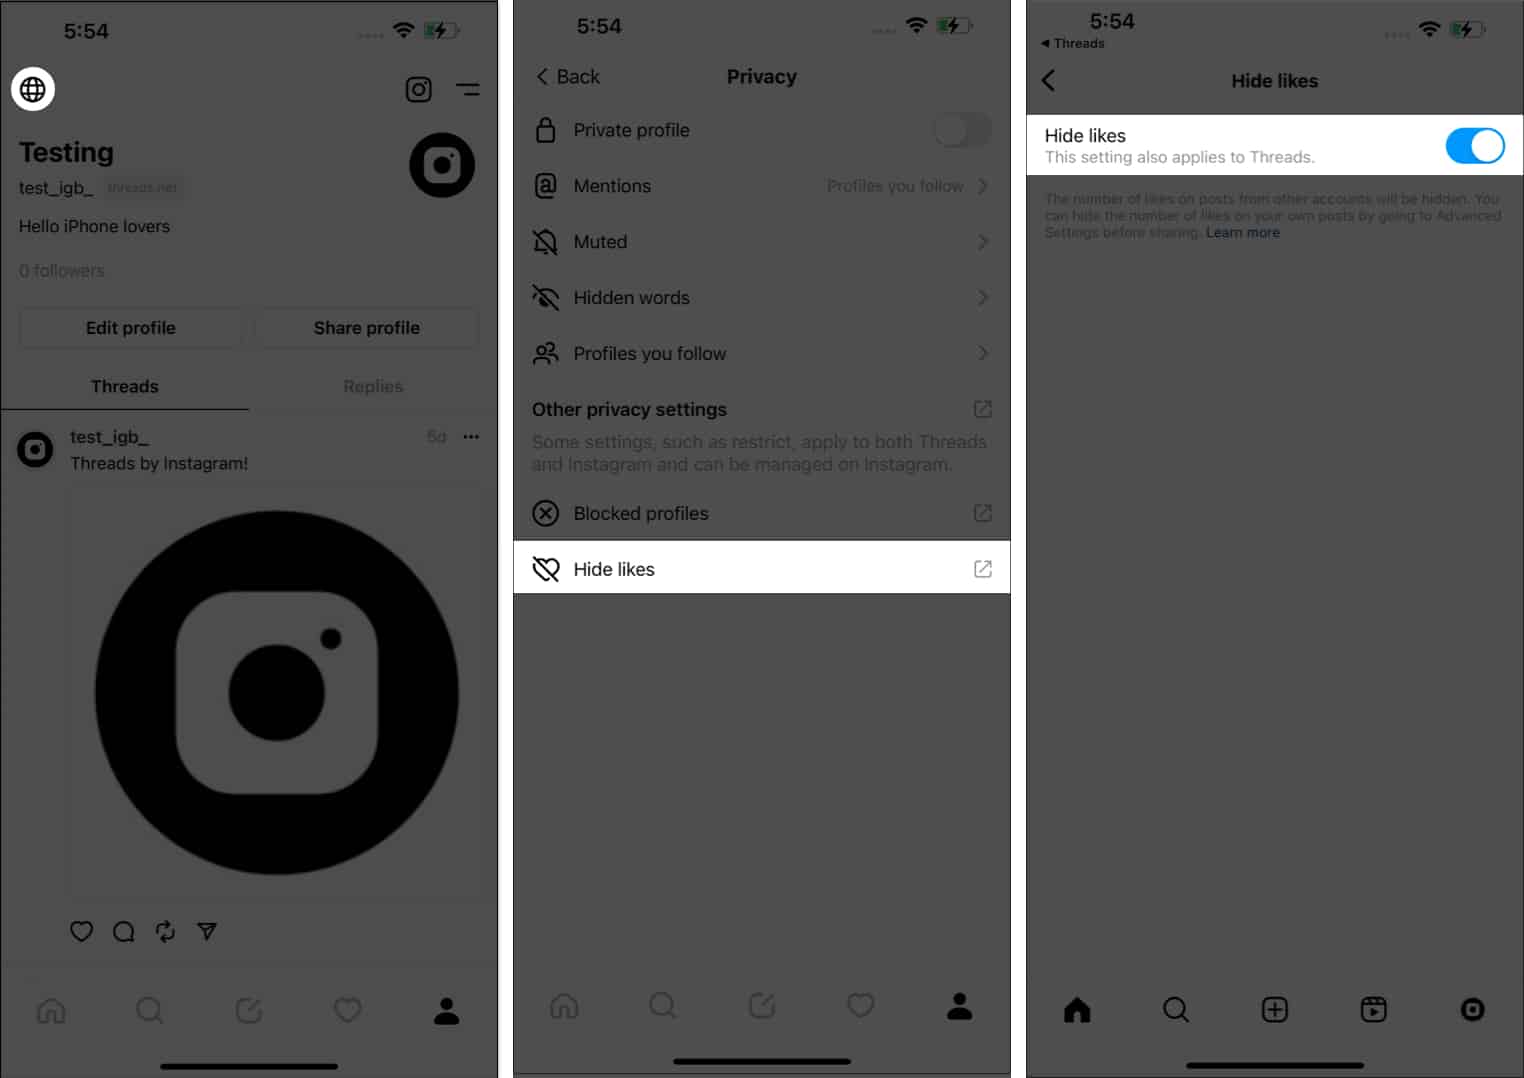
- Launch the Threads app → Access your profile.
- Tap the globe icon → Select Hide likes option.
- In this instance, you’ll be redirected to the Hide likes menu of Instagram.
- Toggle on Hide likes.
Note: This feature is controlled by Instagram yet is effective for Threads.
It not only allows individuals to maintain a sense of privacy, but it also promotes mental well-being by reducing the pressure to constantly seek approval from others.
14. Allow or disallow Mentions
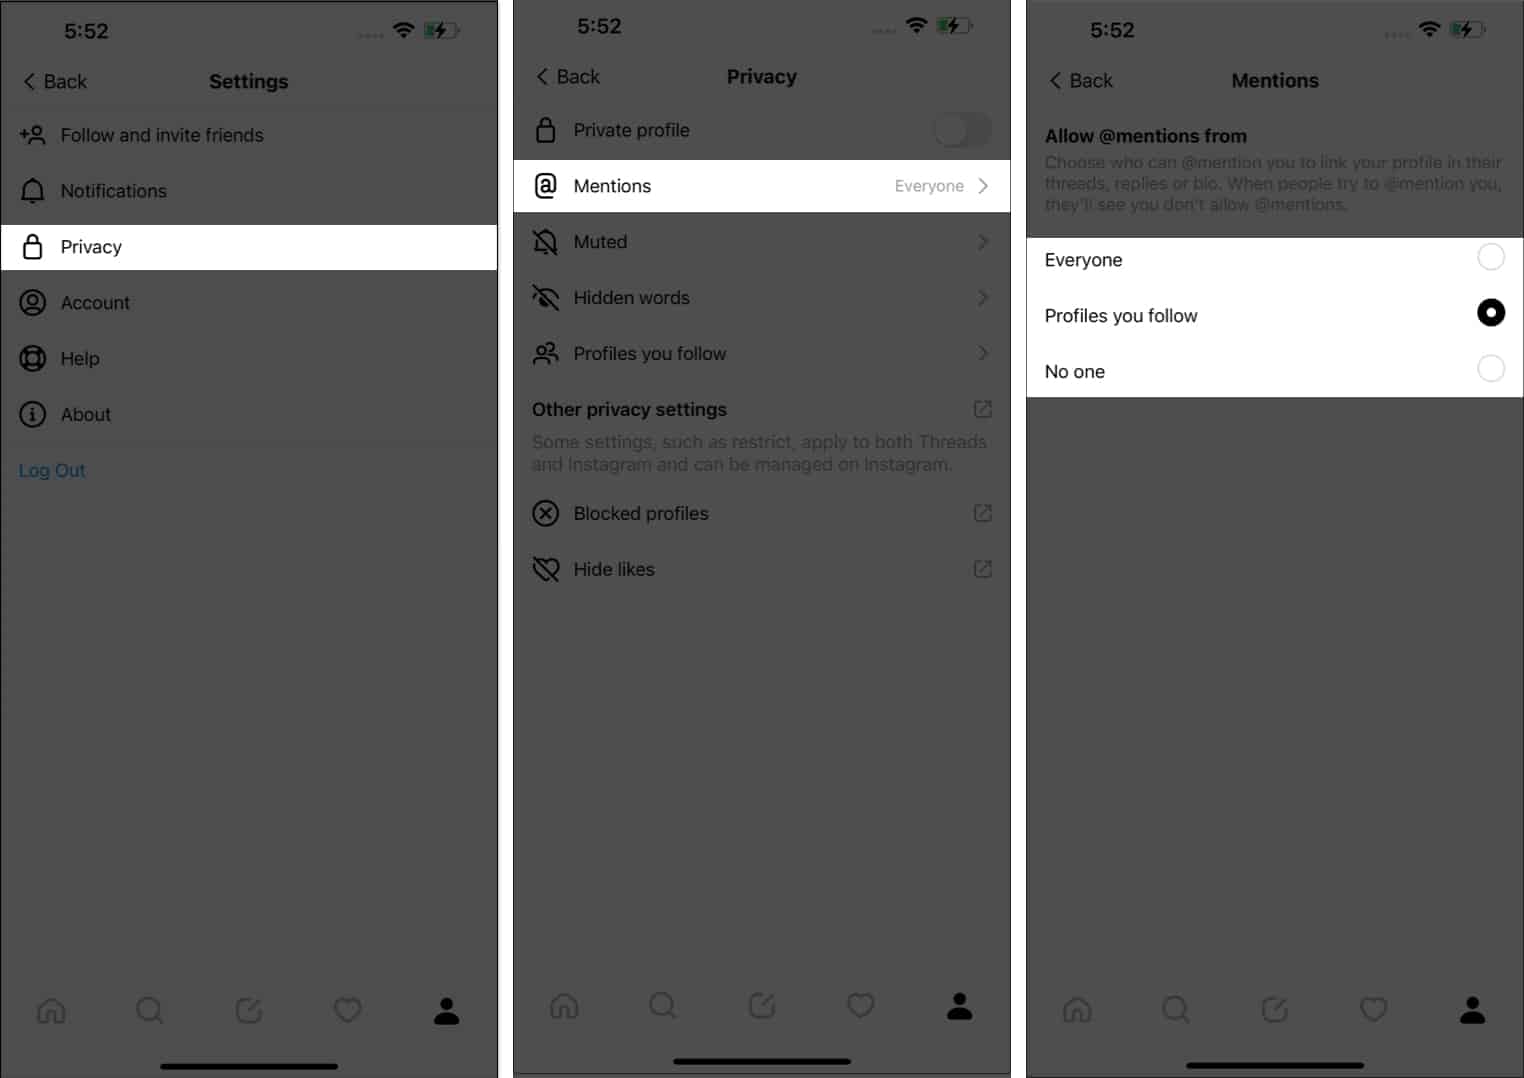
When it comes to maintaining solitude in Threads by Instagram, the ability to allow or disallow mentions from other accounts plays a very important role. If you’re someone who relies on efficient and organized exchanges with colleagues, clients, or business partners, follow the steps described below:
- Navigate to your profile in Threads → Access the menu icon (two lines) from the top-right corner.
- Tap Privacy → Mentions to proceed.
- Here, you can choose among the following:
Everyone: Open for all accounts in Threads.
Profiles you allow: No account can mention you in their posts without your approval.
No one: Mentions will not be allowed on your account.
This idea is dedicated to users who wish to control every string of communication and collaboration within the platform.
15. Block someone on Threads app
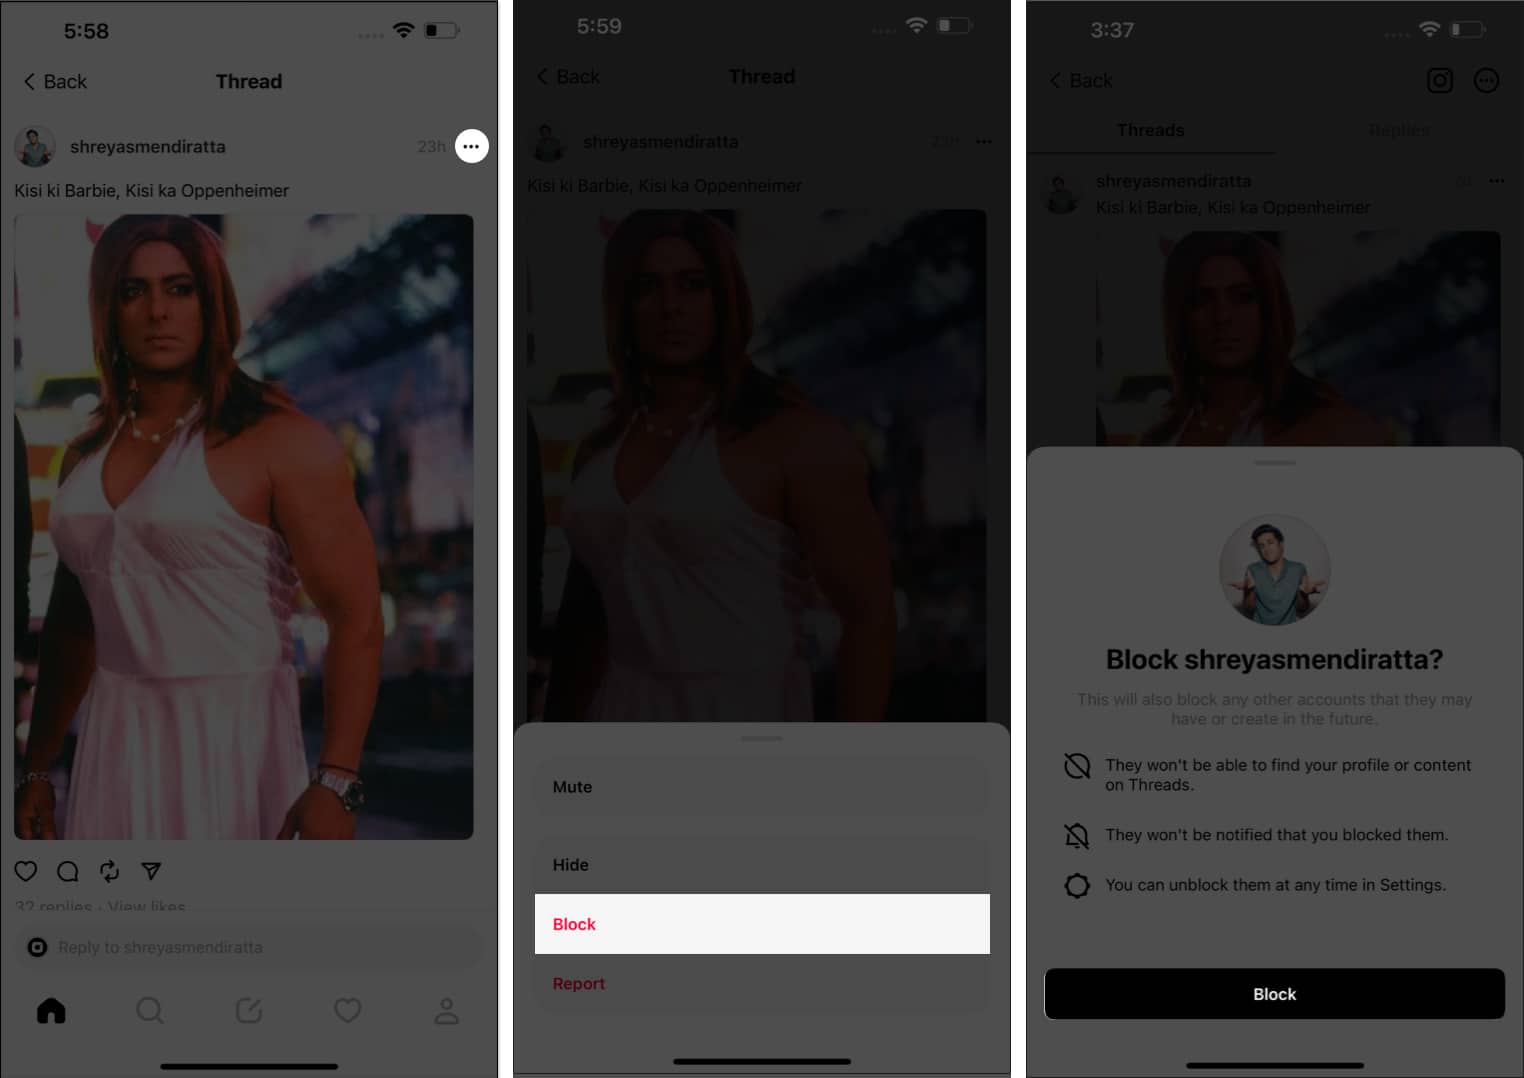
Using Threads like a professional entails the ability to block a user as pleased. As the saying goes, precaution is better than cure. So, let’s comply with the saying by following a few simple steps:
- Access the thread or account of the respective individual.
- Tap the three-dot icon present in the top-right corner.
I have demonstrated the process with a thread. - Tap Block → Block when prompted.
Now, your feed will steer clear of this account.
View blocked profiles:
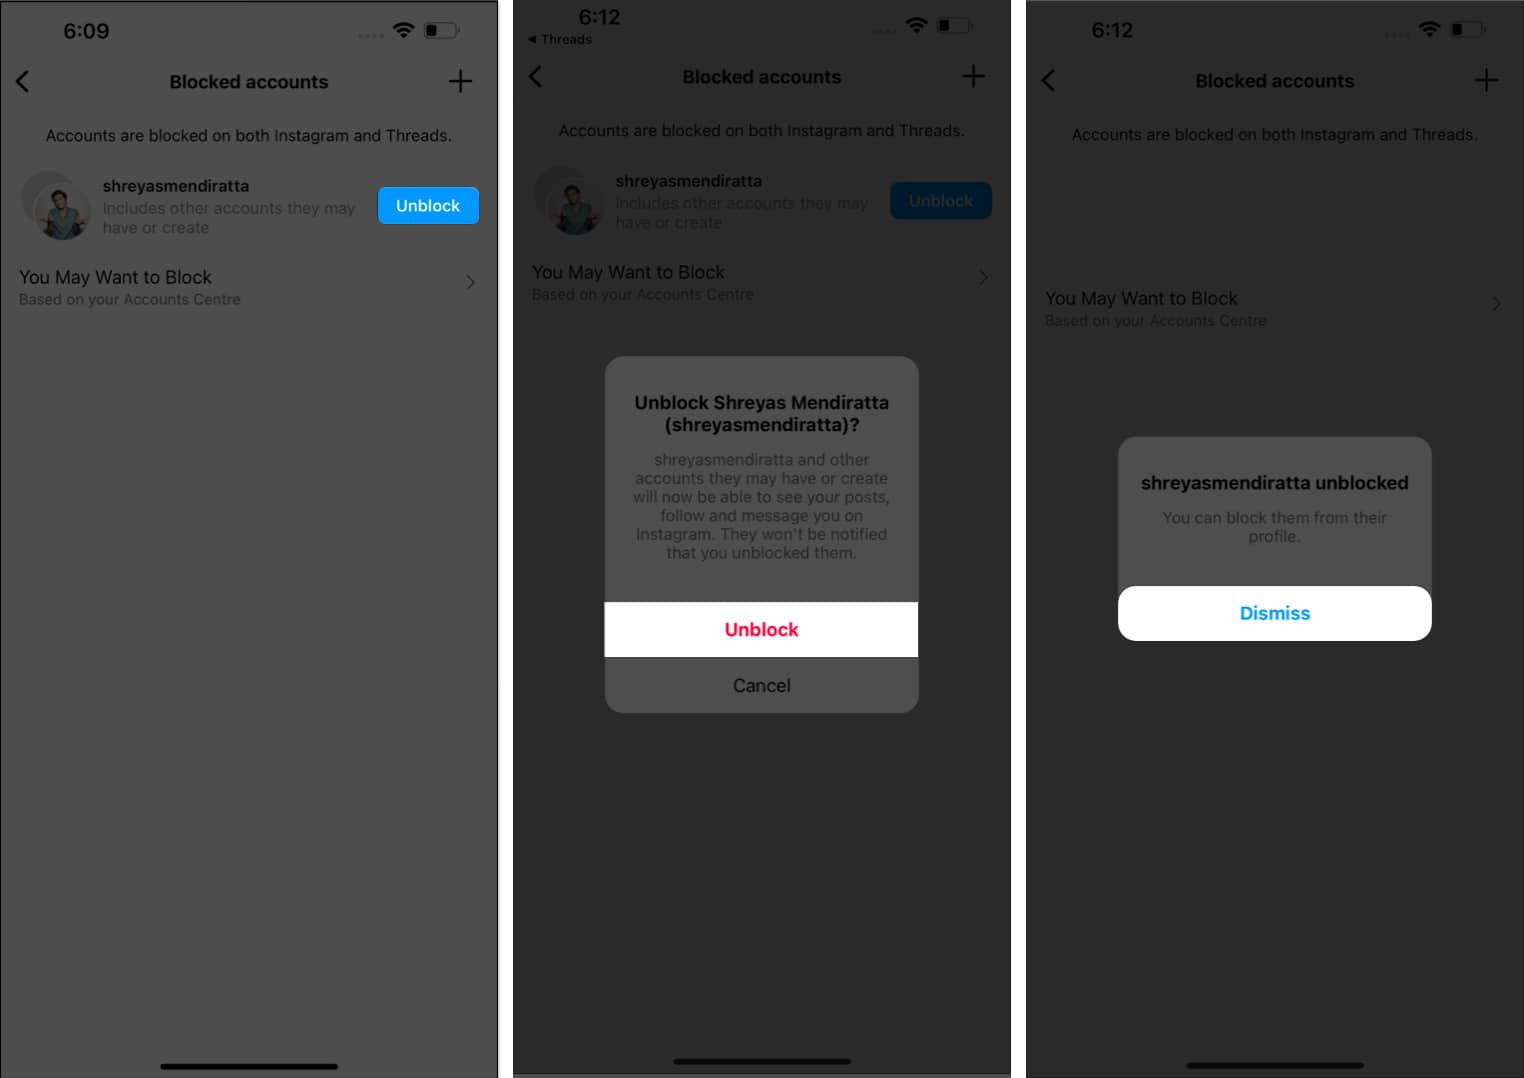
Let’s just say, one fine morning, you woke up gracefully and decided to forgive everybody. You must have a list of every person you’ve blocked to date. You can access the same diligently by following these steps:
- Go to your profile in Threads → tap the menu icon (two lines) → Privacy.
- Select the Blocked profiles menu.
- Now, you’ll be redirected to your Instagram account.
- Here, you can access every account you’ve blocked in Threads.
- Tap Unblock → Unblock accordingly.
- Press Dismiss to conclude the process.
16. Change Threads app language
Whether you wish to communicate with an international audience or simply seek to explore various cultures through linguistic immersion, Threads has got you covered. It allows you to navigate seamlessly across the platform in the language of your choice. Let’s see how you can tailor Threads to your convenience.
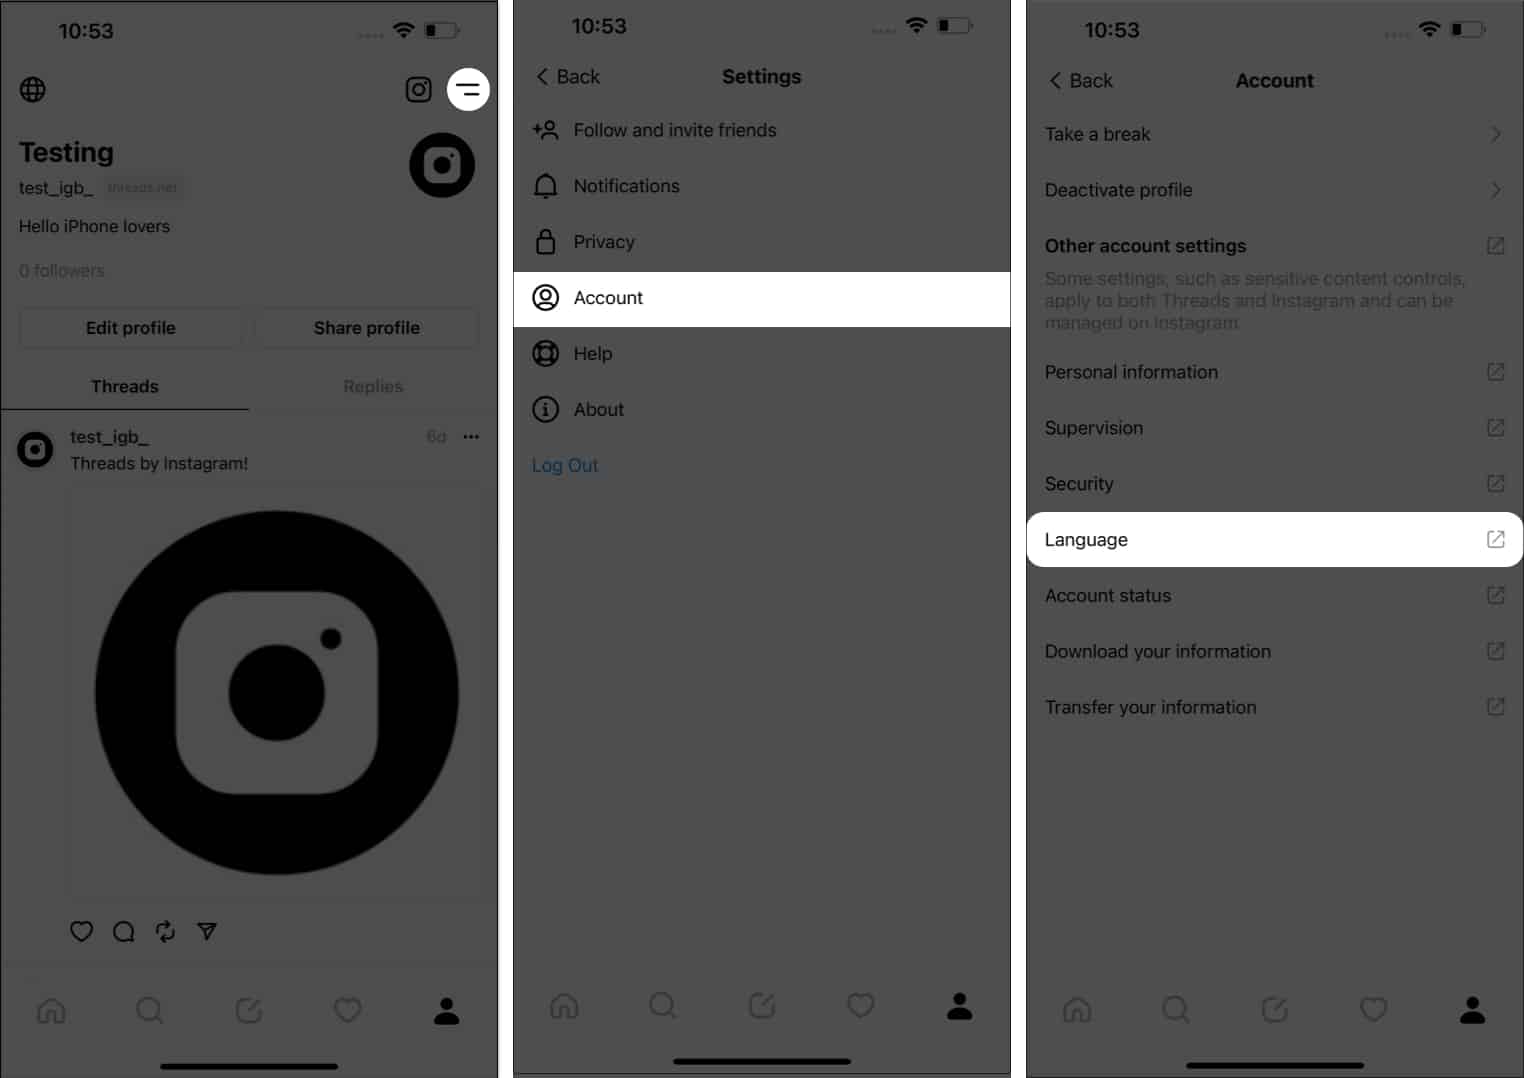
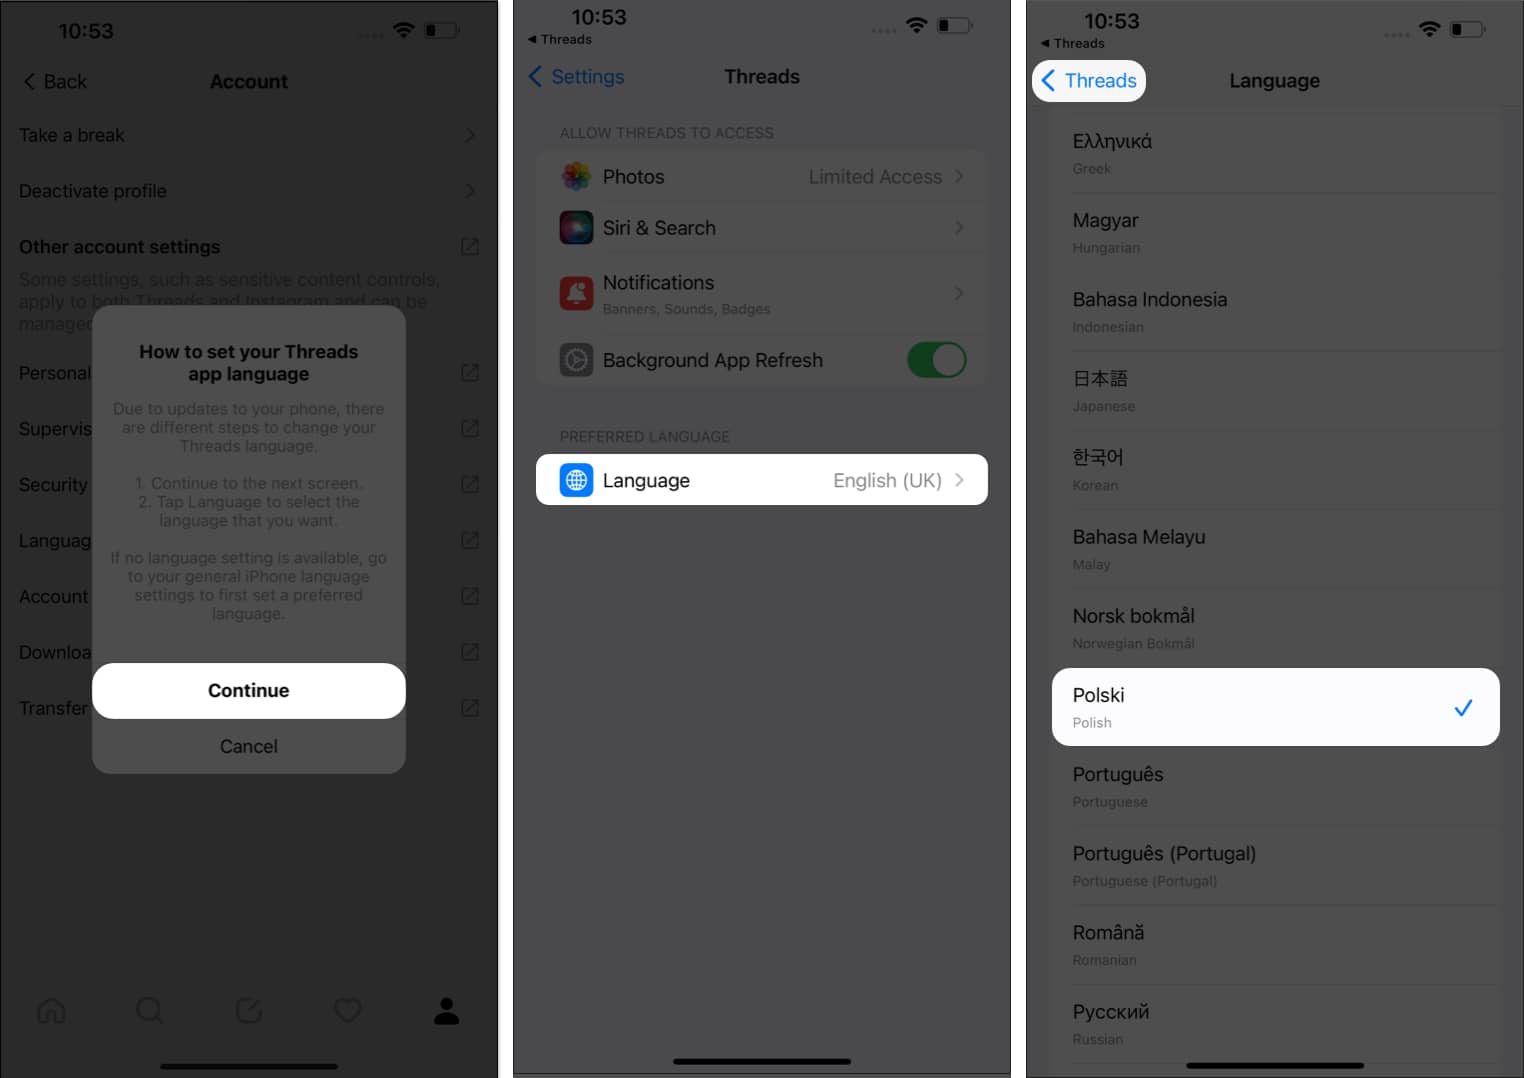
To change the language within Threads:
- Go to your profile.
- Select the menu icon (two lines) → Account.
- Choose Language to proceed.
- Hit Continue when prompted.
- Now you’ll be redirected to the on-device language settings of Threads.
- Tap Language.
- Scroll down to the OTHER LANGUAGES menu and decide accordingly.
- Simply select a language and hit Threads to go back.
You will now see the same changes in the Threads app as you just made.
17. Report a problem on the Threads app
Like any other tool or app, Threads is also prone to errors and glitches. Hence, it’s crucial to equip yourself with the necessary knowledge to mitigate the app crashing problem when necessary.
To report an issue that is bothering your overall Threads experience, you must first fully understand the problem and identify its root cause.
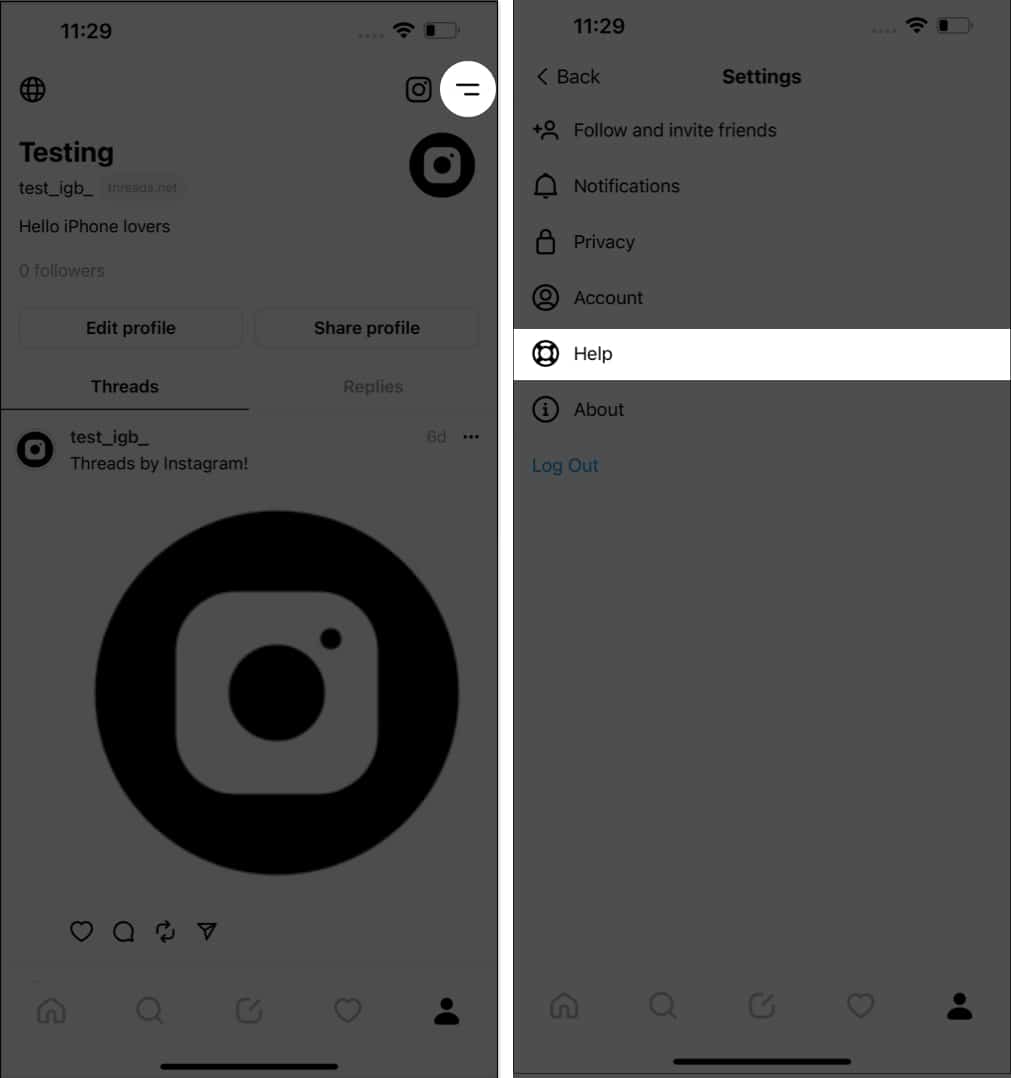
- Launch Threads on your iPhone.
- Go to your profile → menu icon (two lines) → Help.
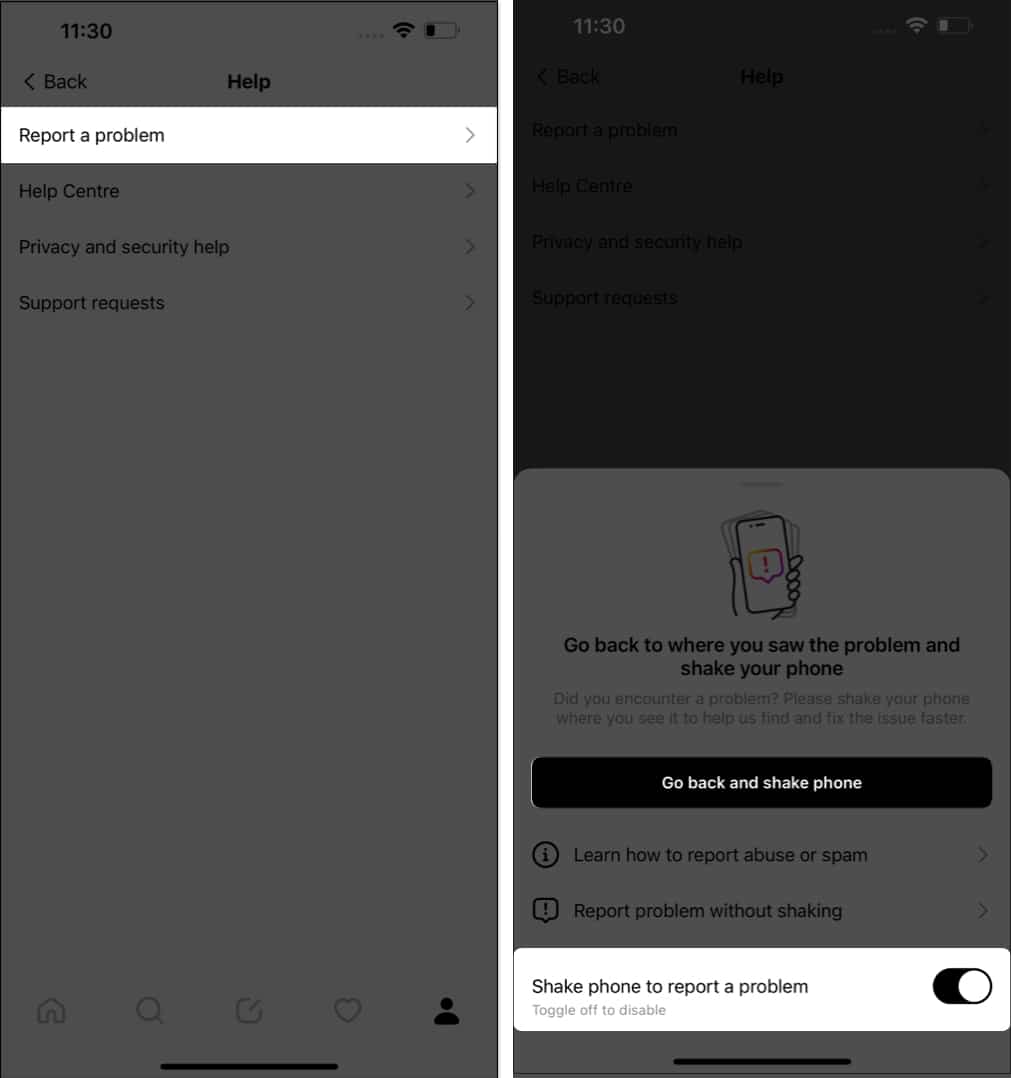
- Select Report a Problem to proceed.
- Toggle on Shake phone to report a problem.
- Now, tap Go back and shake phone.
- Locate the interface where the issue occurred.
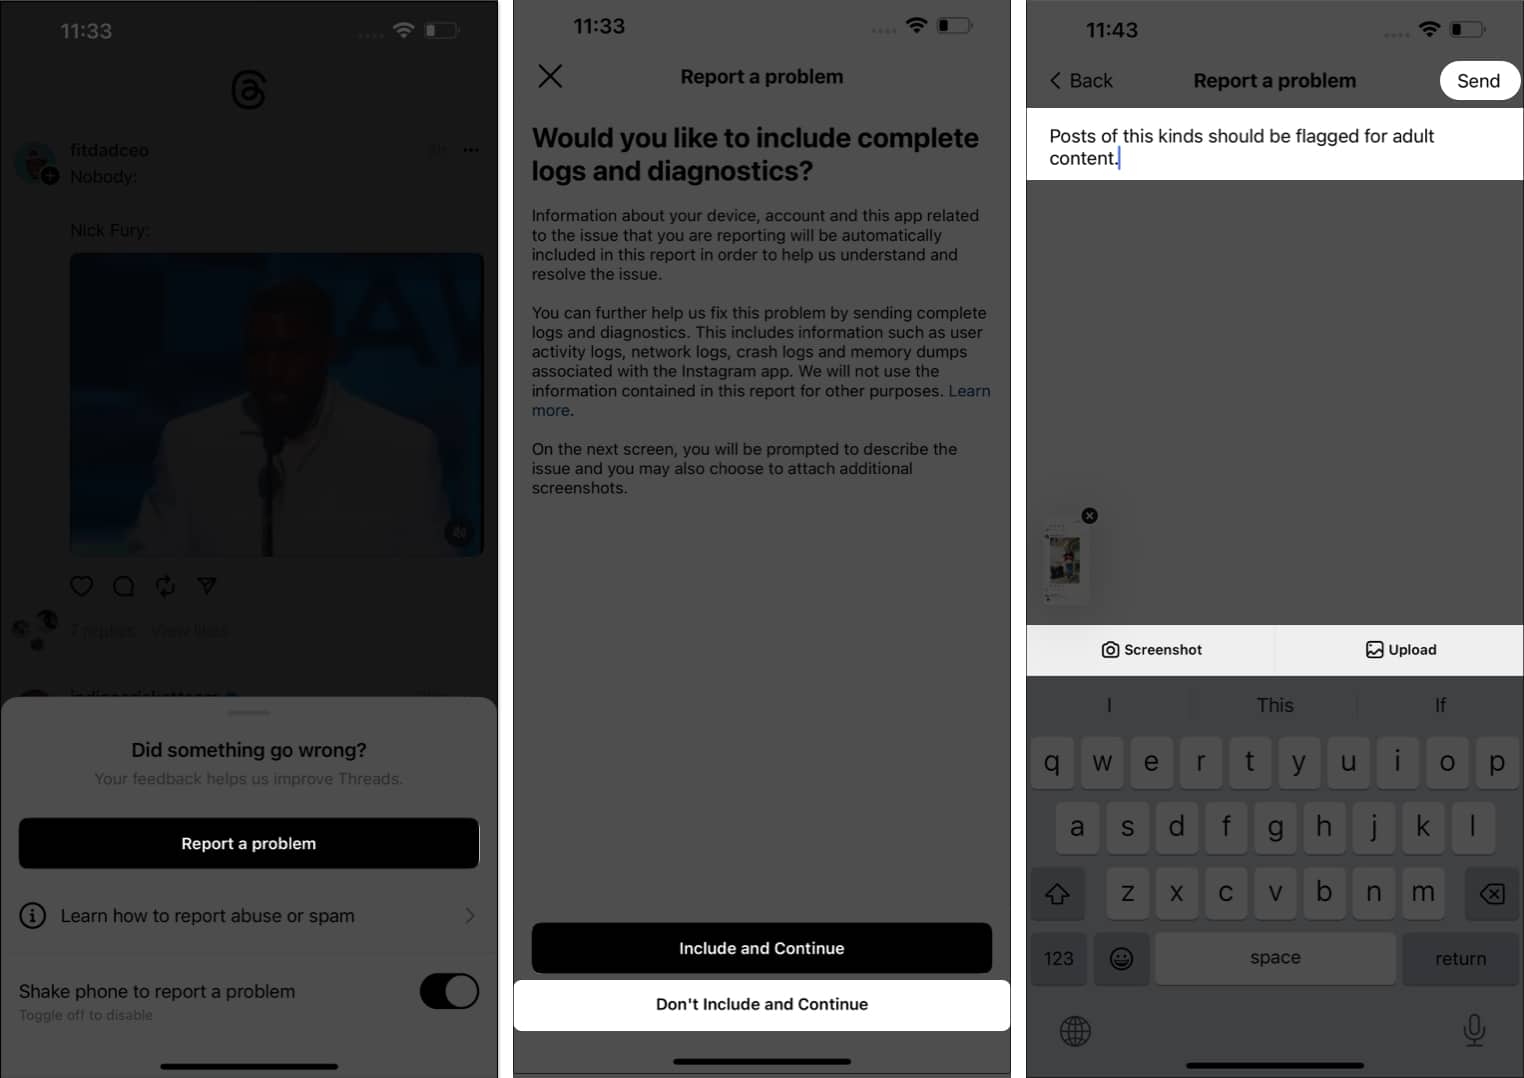
- In this instance, you must shake your phone to summon the complaint assistant.
- Tap Report a problem to further elaborate on the issue.
- Select Include and Continue to provide complete logs and diagnostics report for a better understanding of the problem.
- If you don’t feel comfortable complying with these rules, simply select Don’t Include and Continue.
- Provide detailed information about the problem, including screenshots or videos that illustrate the issue effectively.
- Ensure that you’ve included relevant steps that might have triggered or exacerbated the problem.
- Once you’re confident, hit Send to file a report.
Building meaningful connections is just a thread away!
Voila! This comprehensive guide is all you need to master the Threads app like a pro. From creating personalized groups to sharing exclusive moments, Instagram Threads empowers you to connect with friends, family, and followers like never before. So, go ahead—explore its features and unleash your creativity!
Thank you for reading. If you have any thoughts, feel free to share them in the comments below.
Read more:

