Microsoft has announced an update for the Phone Link app, which will now allow iPhone users to access iMessage on a Windows computer. Yes, you heard it right! You can now link your iPhone to your Windows computer and access iMessage. Read along to learn how to use iMessage on Windows 11 using the Microsoft Phone Link app.

Apart from iMessage, the app also allows you to make and receive calls. Moreover, you can view your iPhone notifications on your Windows computer. However, as of writing this article, the app is in its beta phase, and certain features might not work as intended. Nonetheless, if you’ve been yearning to use iMessage on your Windows 11, you’re in for a treat.
Requirements to use iMessage on Windows 11
As mentioned earlier, the Microsoft Phone Link app is in its beta phase and is only available to select users who are a part of the Windows 11 Insider Program.
Follow the steps mentioned below to join the Windows Insider Program:
- Head into Settings on your Windows computer.
- Select the Windows Update option at the bottom left of your screen.
- Click Windows Insider Program located under the More Options menu.
- Click the Get Started button.
- Now, follow the onscreen instructions, and choose from any one of the three insider channels available on your device.
In order to use iMessage on your Windows computer, the Microsoft Phone Link app should be running on version 1.23012.169.0 or higher.
Note: This feature is only available to users running a licensed version of Windows 11 on their computer. Moreover, Microsoft has promised to increase the feature’s availability to more users over time based on the feedback they receive.
How to use iMessage on Windows 11 using Microsoft Phone Link
- Install the Microsoft Phone Link app on your Windows PC.
- Install the Link to Windows app from the App Store on your iPhone.
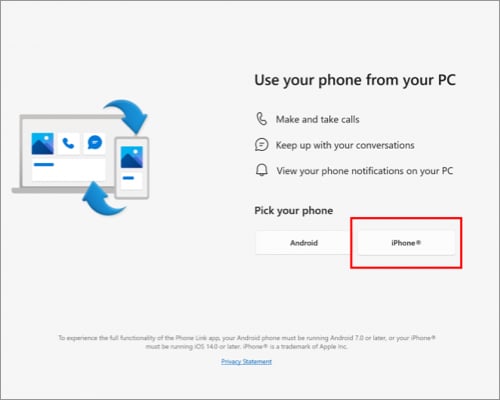
- Open the Microsoft Phone Link app on your Windows computer.
- Click the iPhone option under Pick your phone.
If you can’t see the iPhone option or if it is grayed out, you are not a part of the Beta testing yet. - Sign in with your Microsoft account on your Windows 11 computer and iPhone.
- Open the Link to Windows app on your iPhone and scan the QR code shown on your Windows 11 computer.
- Grant the Link to Windows app access to Bluetooth when prompted.
Allow other permissions so the Link to Windows app can access your iPhone.
That’s it! Now, your iPhone is successfully linked to your Windows 11 computer.
Please note that these steps would also work for the stable rollout of the Microsoft Phone Link with support for iPhone.
Is Windows Phone Link a work in progress?
Pairing an iPhone with a Windows computer will make things easier for several people. Some of us prefer using an iPhone as our daily driver and have to use a Windows computer for work. Personally, I use an iPhone as the primary daily driver and a Windows computer for work and gaming for the simple reason that gaming on Mac is not yet at par with Windows.
When you’re in such a situation, you have to compromise on the connectivity because, trust me, nothing is as convenient as using an iPhone alongside a Mac. However, the Windows Phone Link app saves the day and makes things easier for users like us. It might not be the best, but it gets the job done.
Current limitations of Phone Link app
- To begin with, you cannot send images or any other form of media in iMessage through the Phone Link app.
- Additionally, the Phone Link app cannot access iMessage chat history and will only display real-time conversations.
- You can only respond to the messages you receive when your iPhone is paired with your Windows computer through Bluetooth.
A step in the right direction!
Although not perfect, this initiative by Microsoft is sure to impress a lot of tech geeks out there. How excited are you to use iMessage on Windows? Do let me know in the comments.
Read more:


