Whether you’re planning a weekend getaway or a lengthy vacation, you likely want to find places to visit while you’re there. Using Guides in Apple Maps, you can not only collect the locations you want to see but also have the details at your fingertips when you arrive.
- What are Guides in Apple Maps?
- How to create a new Guide in Apple Maps
- Add locations to a Guide in Maps
- How to edit your Guide in Apple Maps
- How to share a My Guide in Apple Maps
- How to delete a Guide in Apple Map
What are Guides in Apple Maps?
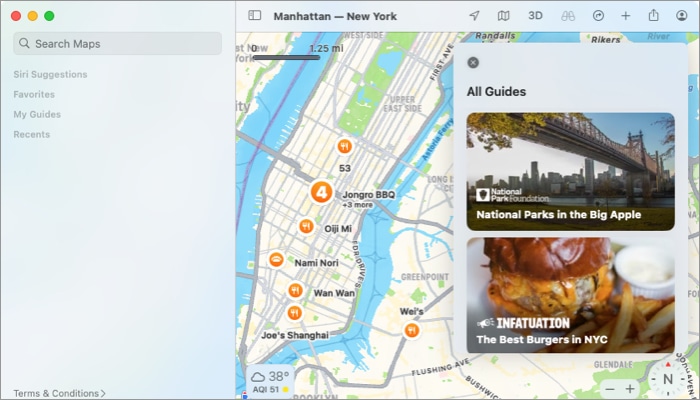
Guides in the Apple Maps app are similar to physical or online guides you’ll find for cities or regions you want to visit. A guide normally includes locations such as landmarks, attractions, restaurants, theme parks, activities, and other places of interest in the area.
In Maps, you can find curated Guides for places you plan to travel that provide lists of recommended or popular spots. You can then choose a location to get additional details for your visit.
While the premade Guides in Maps are handy for finding new places, you may want to create a Guide of your own for your next trip. This is another great feature of Guides in Apple Maps.
How to create a new Guide in Apple Maps
If you’re ready to assemble a collection of locations you want to visit on your next getaway, road trip, or a family vacation, here’s how to create a Guide of your own in Maps.
On iPhone and iPad
- Launch the Maps app on your iPhone or iPad.
- Swipe the pop-up from the bottom of your screen.
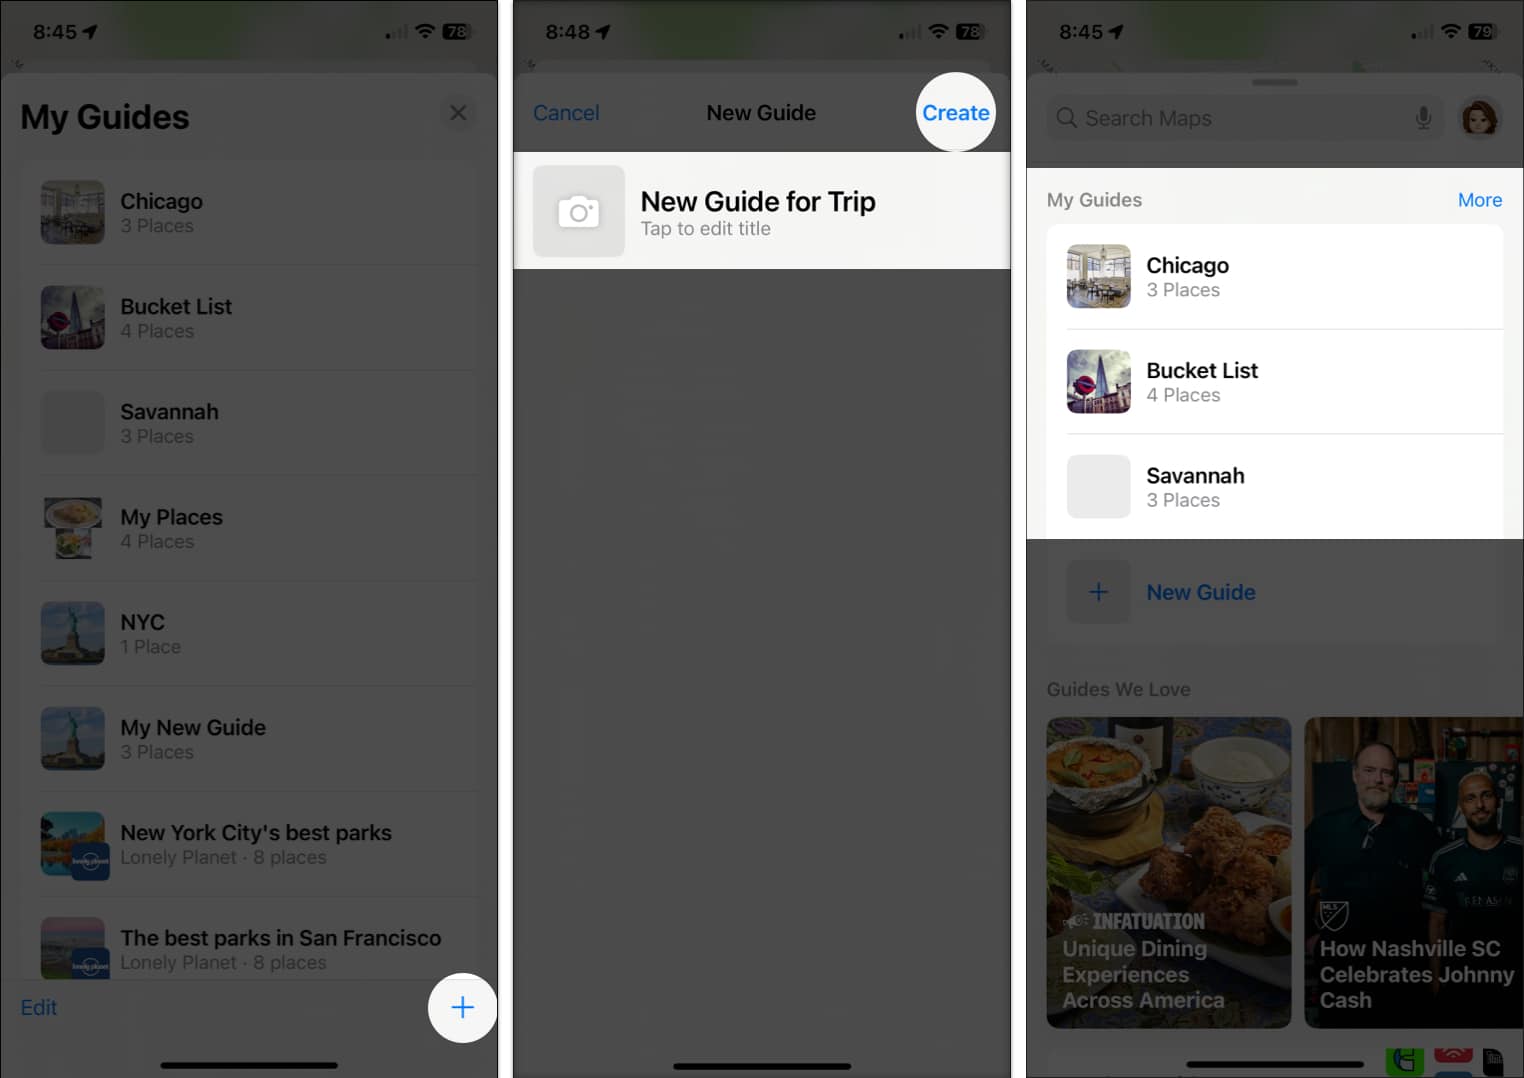
- Scroll down to My Guides → tap (+) New Guide.
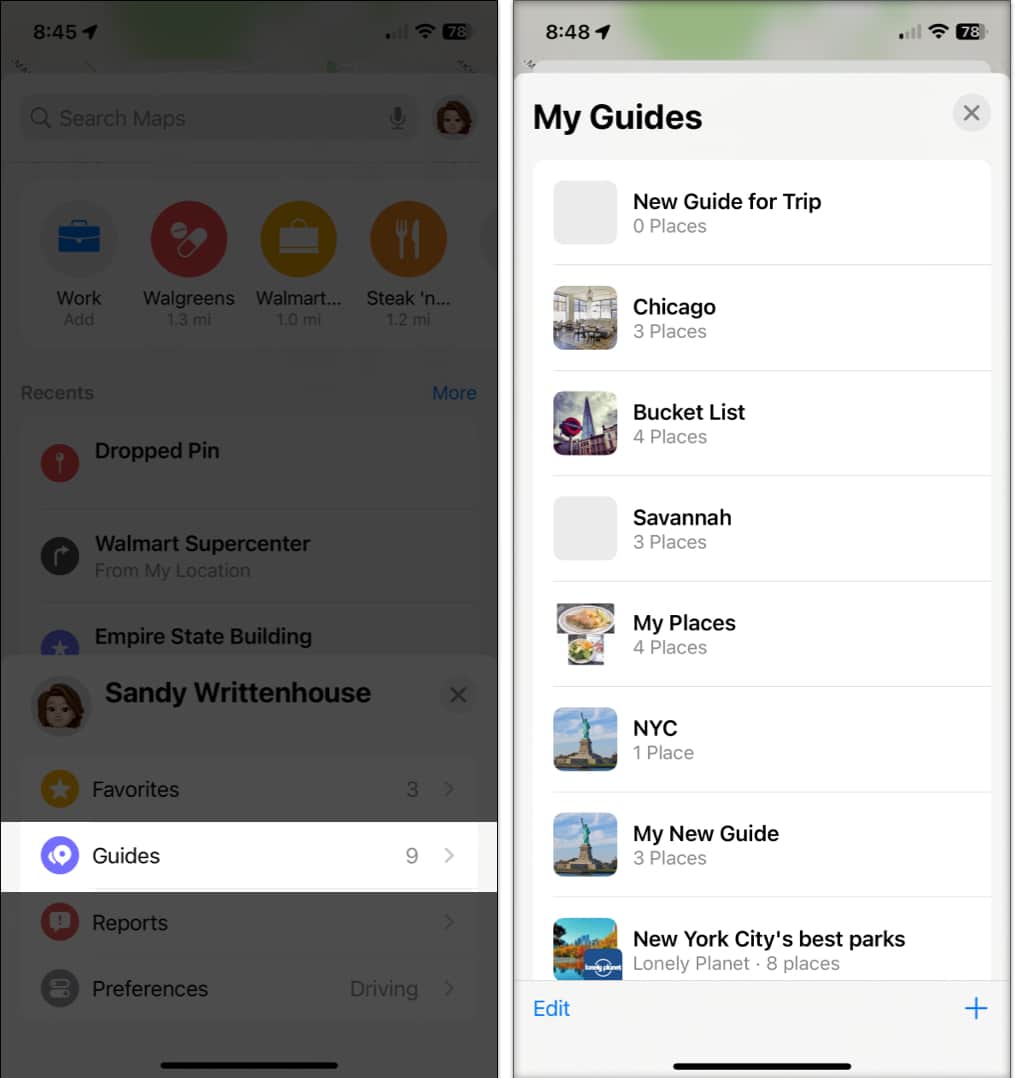
Alternatively, select your profile icon, choose Guides, and tap the plus sign on the bottom right. - Enter a name for your Guide and optionally tap the camera icon to add a key photo.
If you don’t select a picture, you’ll see the main photo display as a location you add to your guide. - Tap Create on the top right to save your new Guide.
- You’ll then see your Guide in the My Guides list.
To access it later, select it from the My Guides list at the bottom of the screen or in the Guides section of your profile. You can then pick a spot you’ve added to see it along with its details on the map.
On Mac
- Open the Maps app on Mac.
- Click the plus sign in the toolbar at the top and pick Create New Guide.
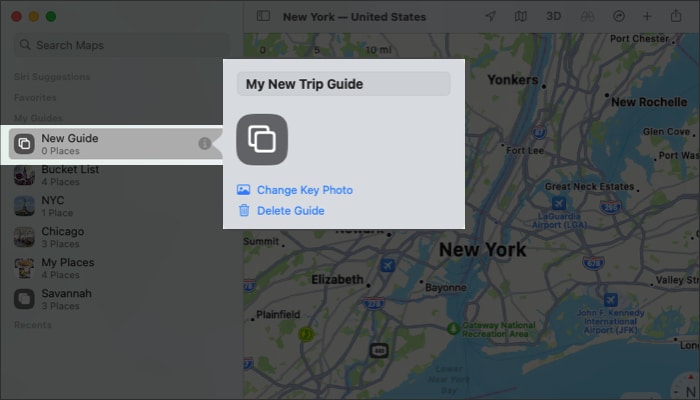
Alternatively, click the plus sign next to My Guides in the left-hand sidebar. - Type a name for your Guide and press return.
- Optionally, select Change Key Photo to choose a picture from your photos or albums via the Photos app.
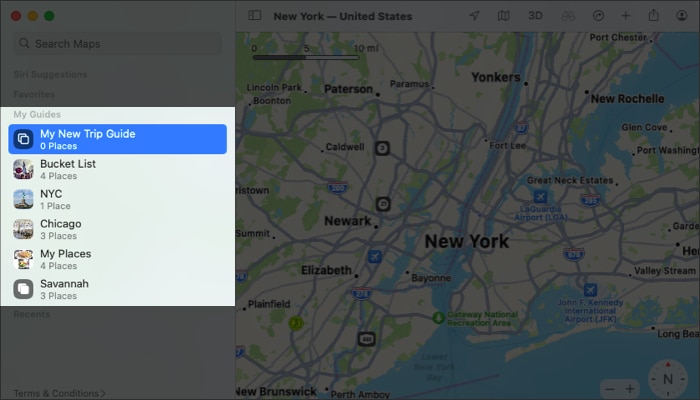
- You can then access your new Guide in the My Guides section of the sidebar on the left. Select it and pick a location you’ve added to see the spot on the map with its details.
Add locations to a Guide in Maps
You can start from scratch by adding locations to your Guide or including one you already see on the map.
On iPhone and iPad
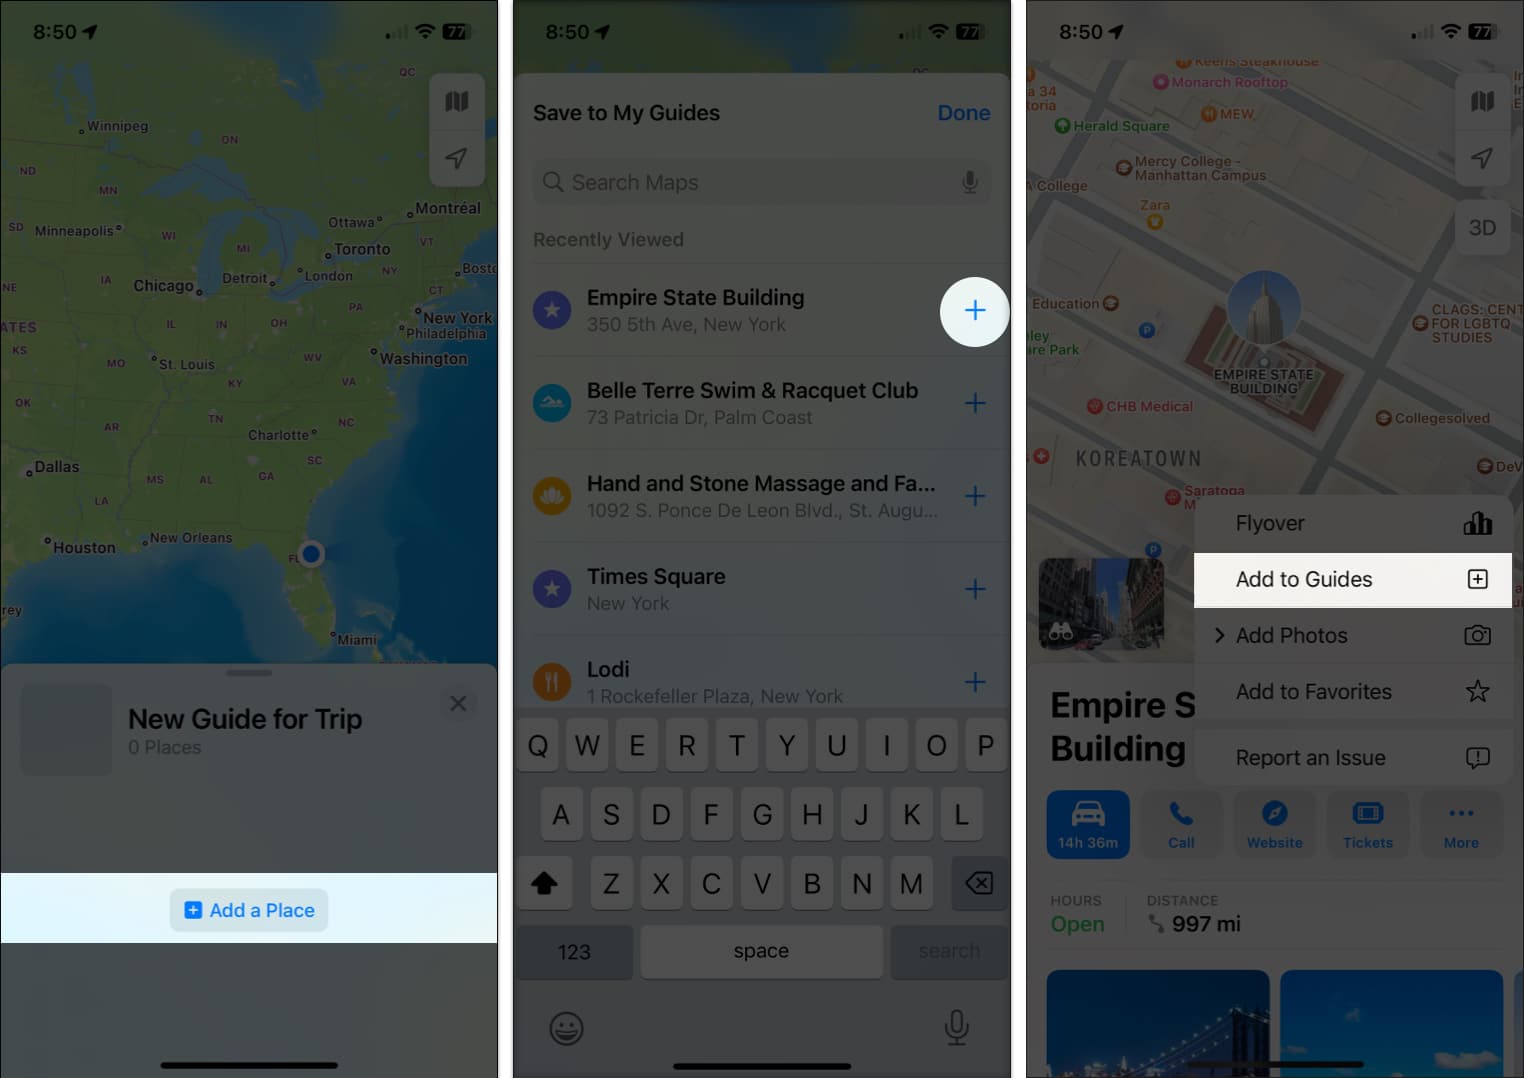
- To find a location to add, open your Guide and tap Add a Place.
- Enter a search term for the location at the top and then tap the plus sign next to it in the results.
You can also tap on the name of the location to add it directly. - Name the location → tap Save.
- Repeat the process to add locations, and then tap Done to complete creating the list.
On Mac
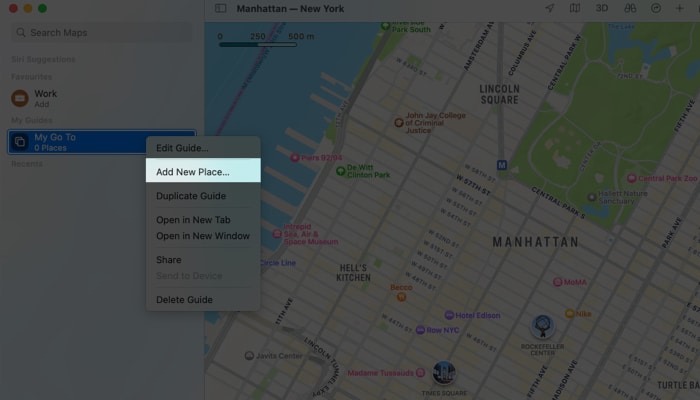
- Right-click your Guide and pick Add New Place.
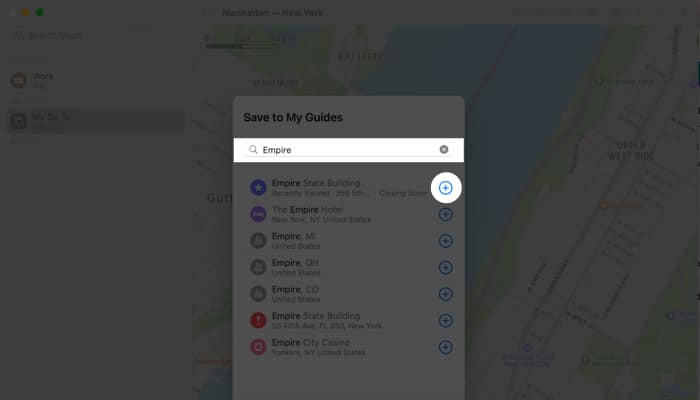
- Search for a location to add.
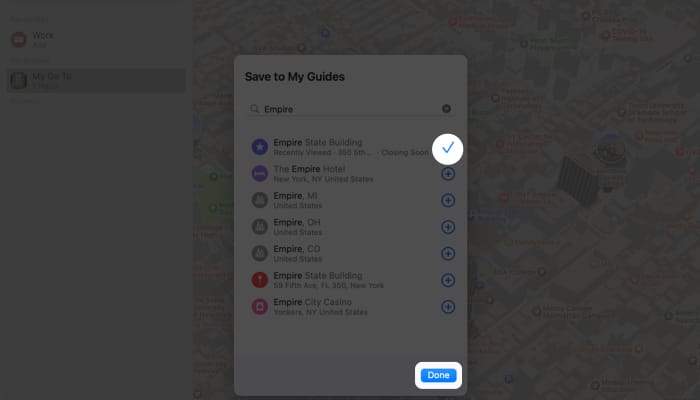
- Enter the search term at the top, and when you see the location in the results, click the plus sign.
- Tap Done after adding all locations.
To add a location you see on the map, open its details. Select the plus sign in the pop-up window and pick your Guide in the list. Alternatively, you can drag the location from the map to your Guide in the sidebar.
How to edit your Guide in Apple Maps
After you create a Guide, you may want to rename it, remove places from it, or change the sort order for its locations. You can also delete a Guide you no longer want.
On iPhone and iPad
Open the Guide and swipe up to view the details to organize places in My Guides in Maps on iPhone and iPad.
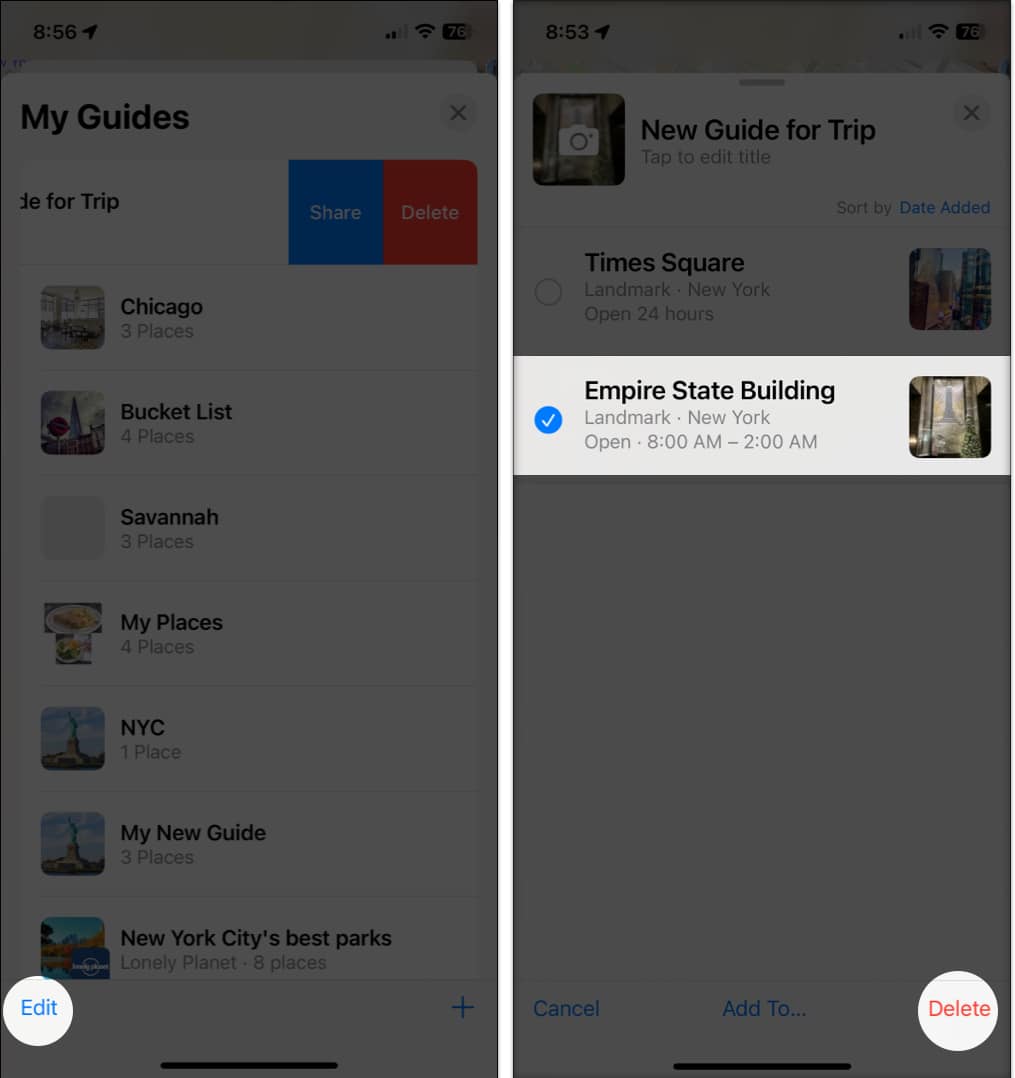
- To remove a location, swipe the location from right to left and pick Delete.
- To remove several locations at once, tap Edit on the bottom left. Then, choose Select All or mark specific locations and pick Delete.
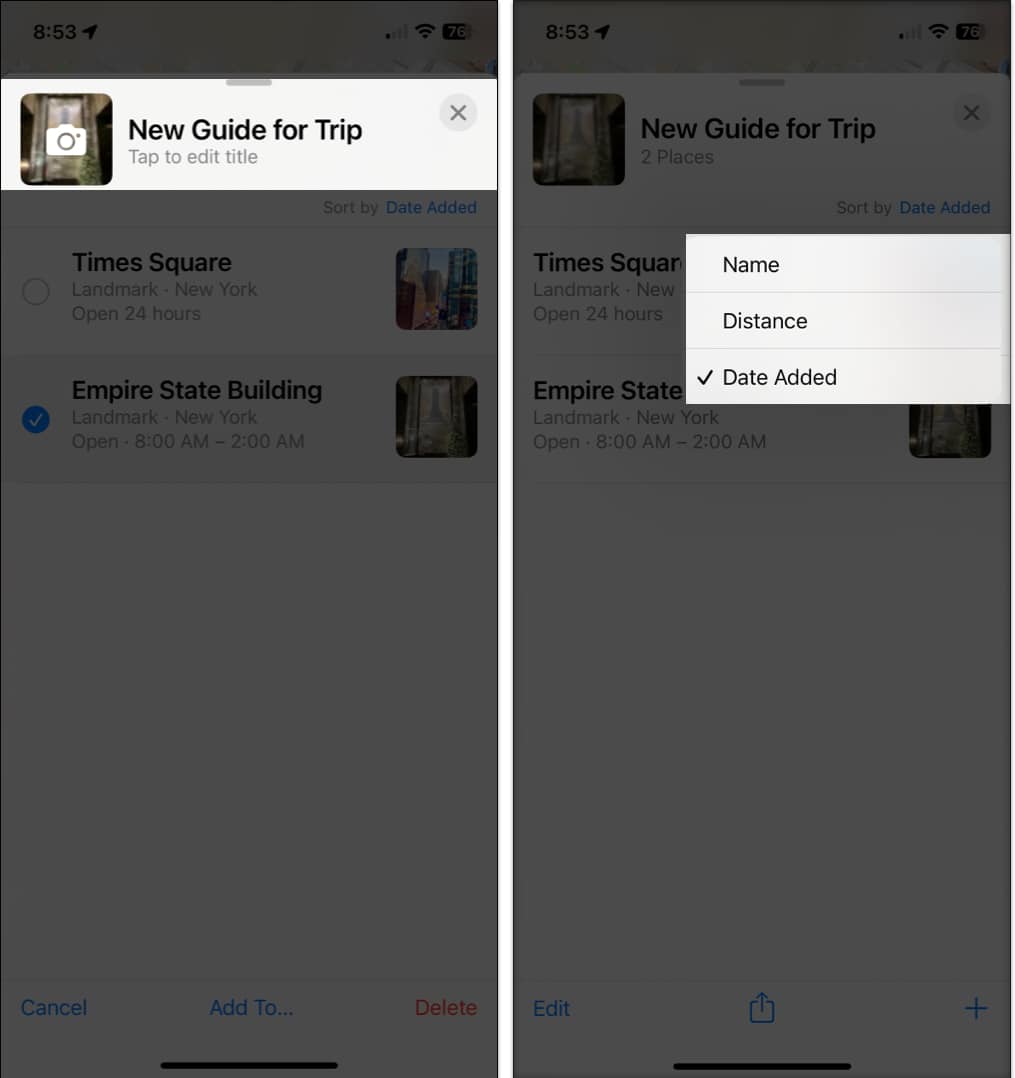
- To rename the Guide or change the key photo, tap Edit → type the new name at the top → tap the current photo to pick a new one.
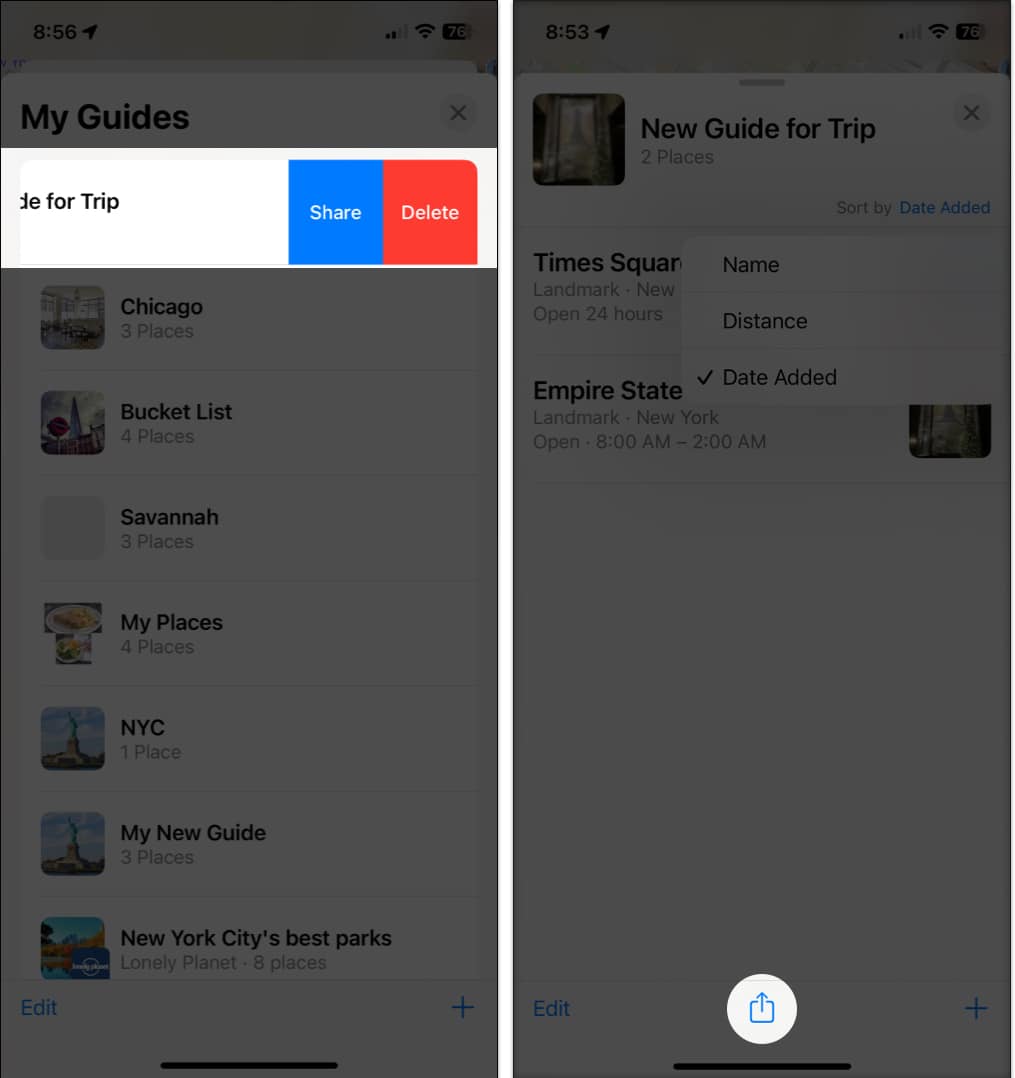
- To change the sort order for the locations in your Guide, tap the current selection next to Sort By near the top. Then, pick Name, Distance, or Date Added.
When you finish, tap the X on the top right to close the Guide.
On Mac
Select the Guide in the sidebar and expand it to view the locations.
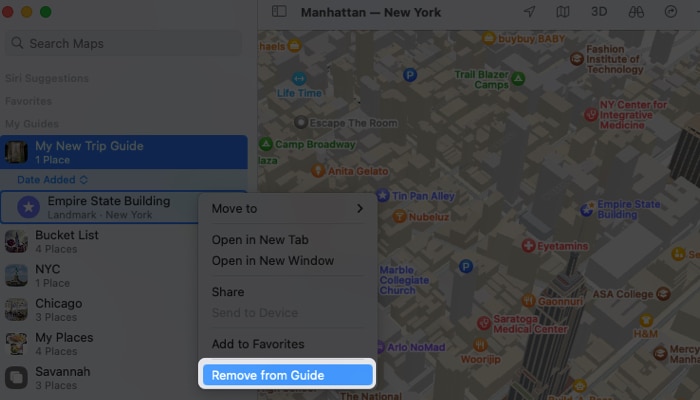
- To remove a location, right-click it and pick Remove From Guide.
- To rename the Guide or change the key photo, click the Info icon (small letter “i”) to the right of its name. Type the new name and press Return, or click the current photo to choose a new one.
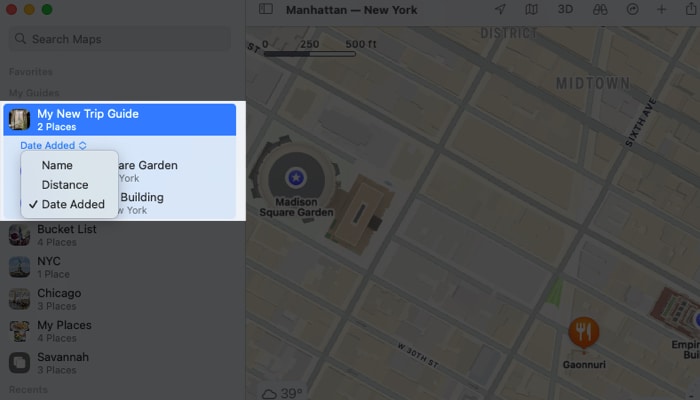
- To change the sort order for the locations, expand the Guide in the sidebar and click the current order. Then, choose Name, Distance, or Date Added.
How to share a My Guide in Apple Maps
If you’re planning a trip with others, you can share your Guide so others can see where you’ll all be visiting. Your recipient can open the Guide in Apple Maps on their own device.
On iPhone and iPad
You can share a Guide in Maps on iPhone and iPad using your share sheet.
- Swipe up from the bottom of the main Maps page to the My Guides section.
- Swipe the Guide from right to left and pick Share.
Alternatively, you can open the Guide and tap the Share button at the bottom. - Then, choose an option like Messages, Mail, or a different method in your share sheet.
On Mac
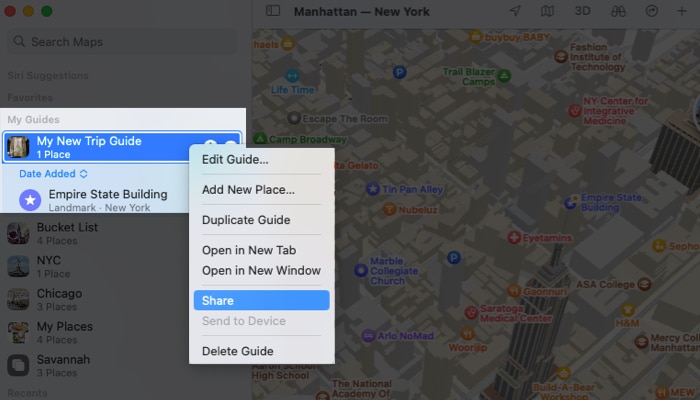
You can share a Guide in Maps using your Mac’s share menu.
- Select the Guide in the sidebar and click the Share icon in the toolbar at the top or right-click the Guide and pick Share.
- You can then send a link to the Guide via Messages, Mail, AirDrop, or another option in your share menu.
How to delete a Guide in Apple Map
Deleting a Guide is as simple as setting it up.
On iPhone and iPad
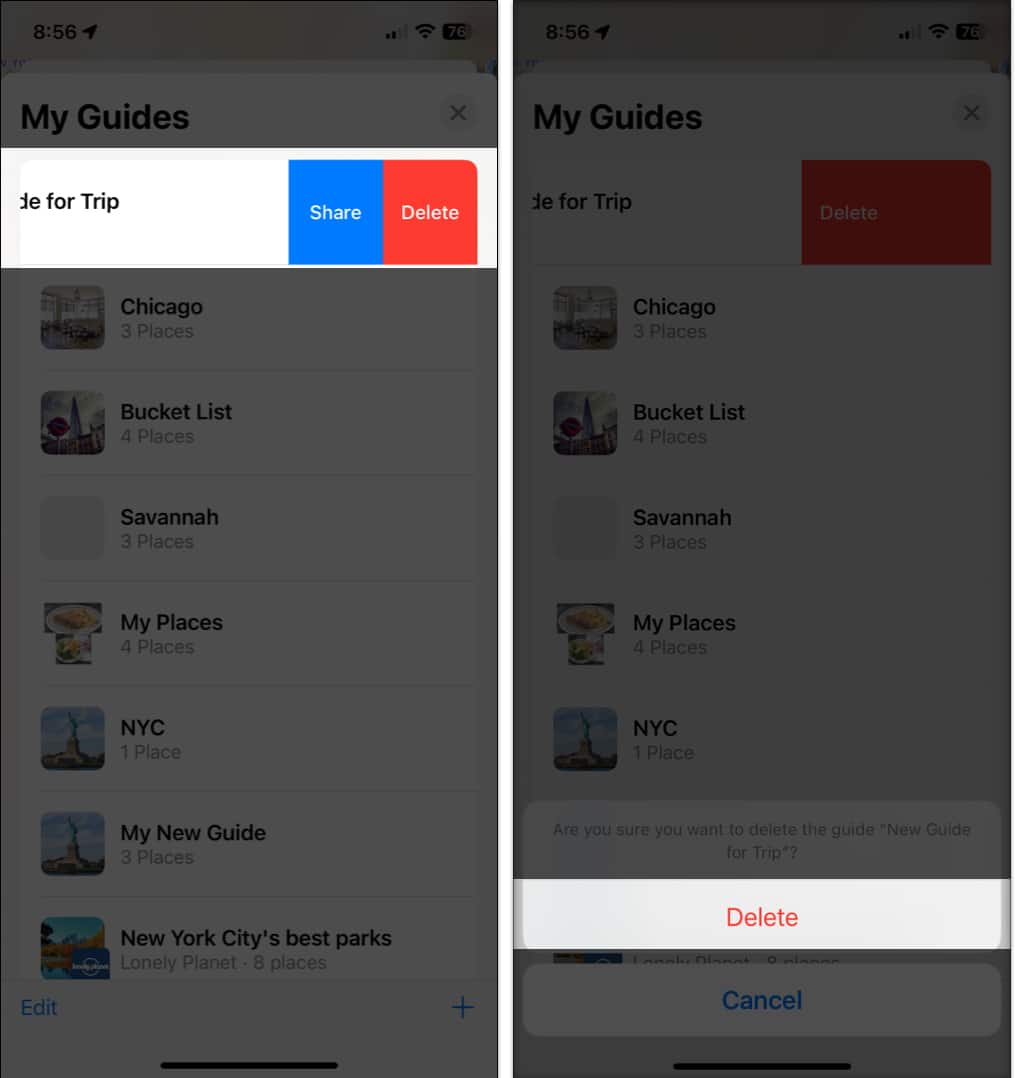
- Swipe the Guide name from right to left and pick Delete.
- Confirm that you want to remove it by choosing Delete in the pop-up window.
On Mac
- To delete a Guide and its contents, right-click the Guide name in the sidebar and pick Delete Guide.
- Then, confirm by choosing Delete in the pop-up window.
Use My Guides on Apple Maps!
When you’re planning a trip, whether long or short, for business or pleasure, Guides in the Maps app helps you keep track of the places you want to visit. For more, look at how to create a route in Apple Maps for your next road journey.
Read more:

