It’s advisable to use Face ID on your iPhone and iPad Pro because it’s a smart, fast, and highly secure way of unlocking your device. According to Apple, there is only a one in a million chance of someone else being able to unlock your Face ID. Moreover, it can also ease a few other tasks, such as paying for purchases and automatically filling up passwords. The best part is that all these settings are customizable to your needs, so let’s learn about it.
Apple Face ID Supported iPhone and iPad
Before we take a ride through the nooks and crooks of Face ID on iPhone and iPad Pro, it’s important that you’re equipped with any one of the devices listed below:
iPhone
- iPhone 16e
- iPhone 16 Series
- iPhone 15 Series
- iPhone 14 Series
- iPhone 13 Series
- iPhone 12 Series
- iPhone 11 Series
- iPhone X Series
iPad Pro
- iPad Pro 12.9-inch (6th generation)
- iPad Pro 12.9-inch (5th generation)
- iPad Pro 12.9-inch (4th generation)
- iPad Pro 12.9-inch (3rd generation)
- iPad Pro 11-inch (4th generation)
- iPad Pro 11-inch (3rd generation)
- iPad Pro 11-inch (2nd generation)
- iPad Pro 11-inch
How to set up Face ID on iPhone and iPad
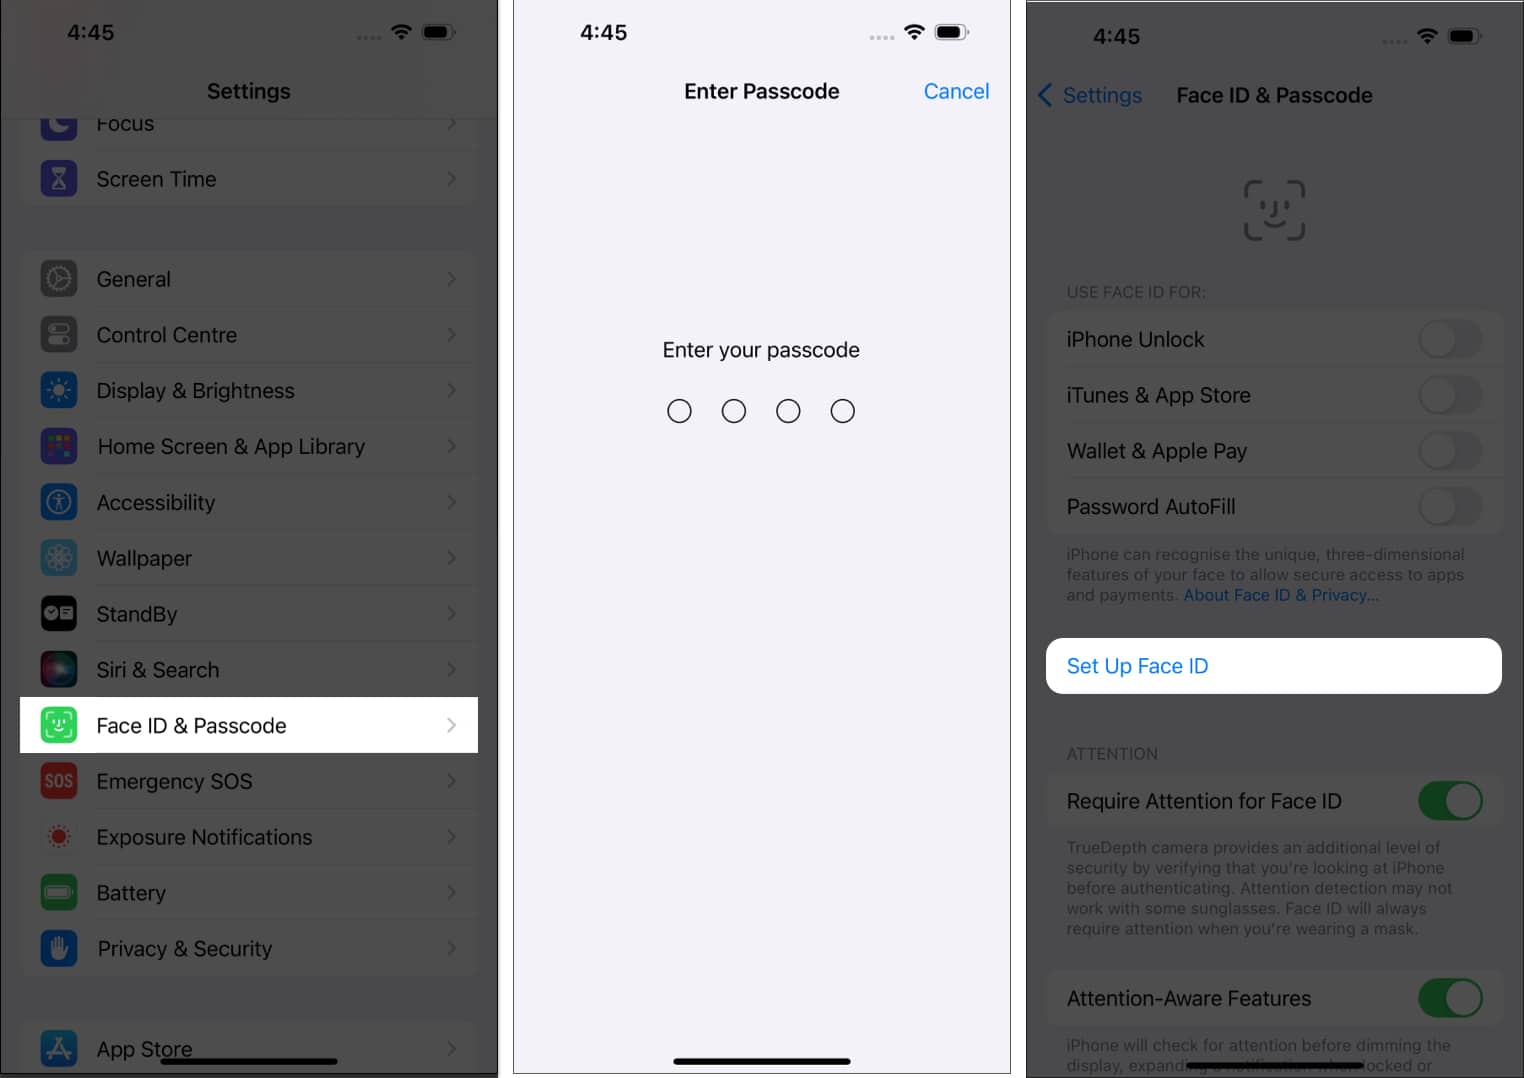
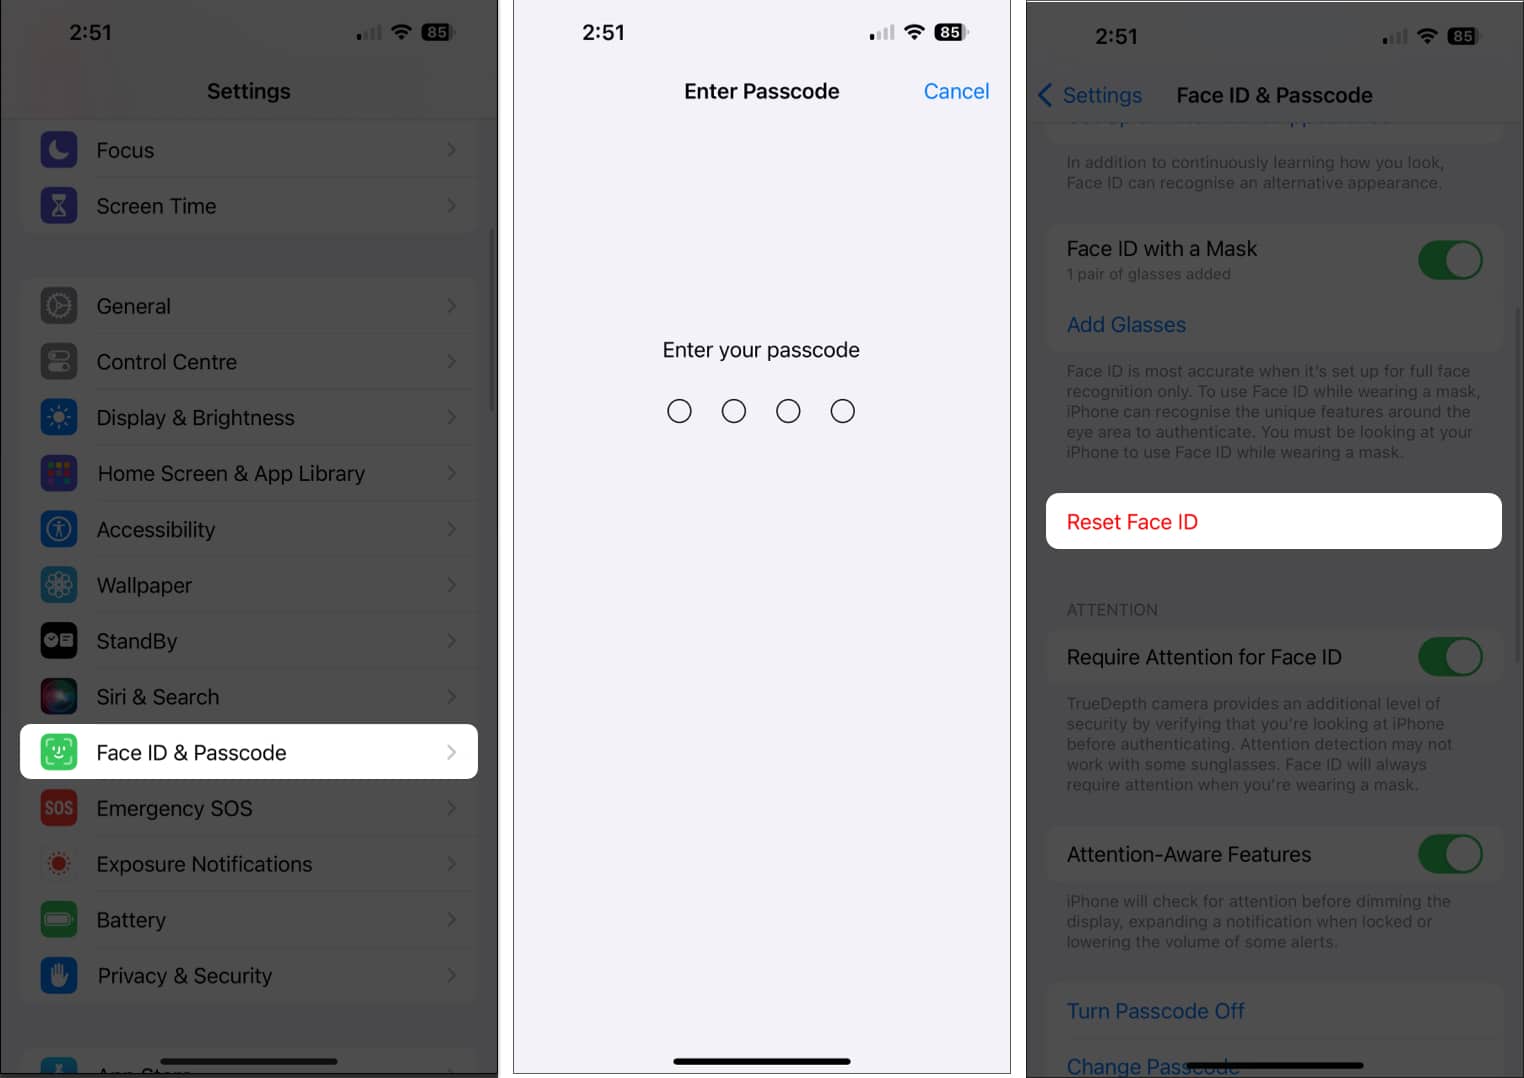
- Launch Settings → Select Face ID & Passcode.
- Enter the device Passcode to proceed.
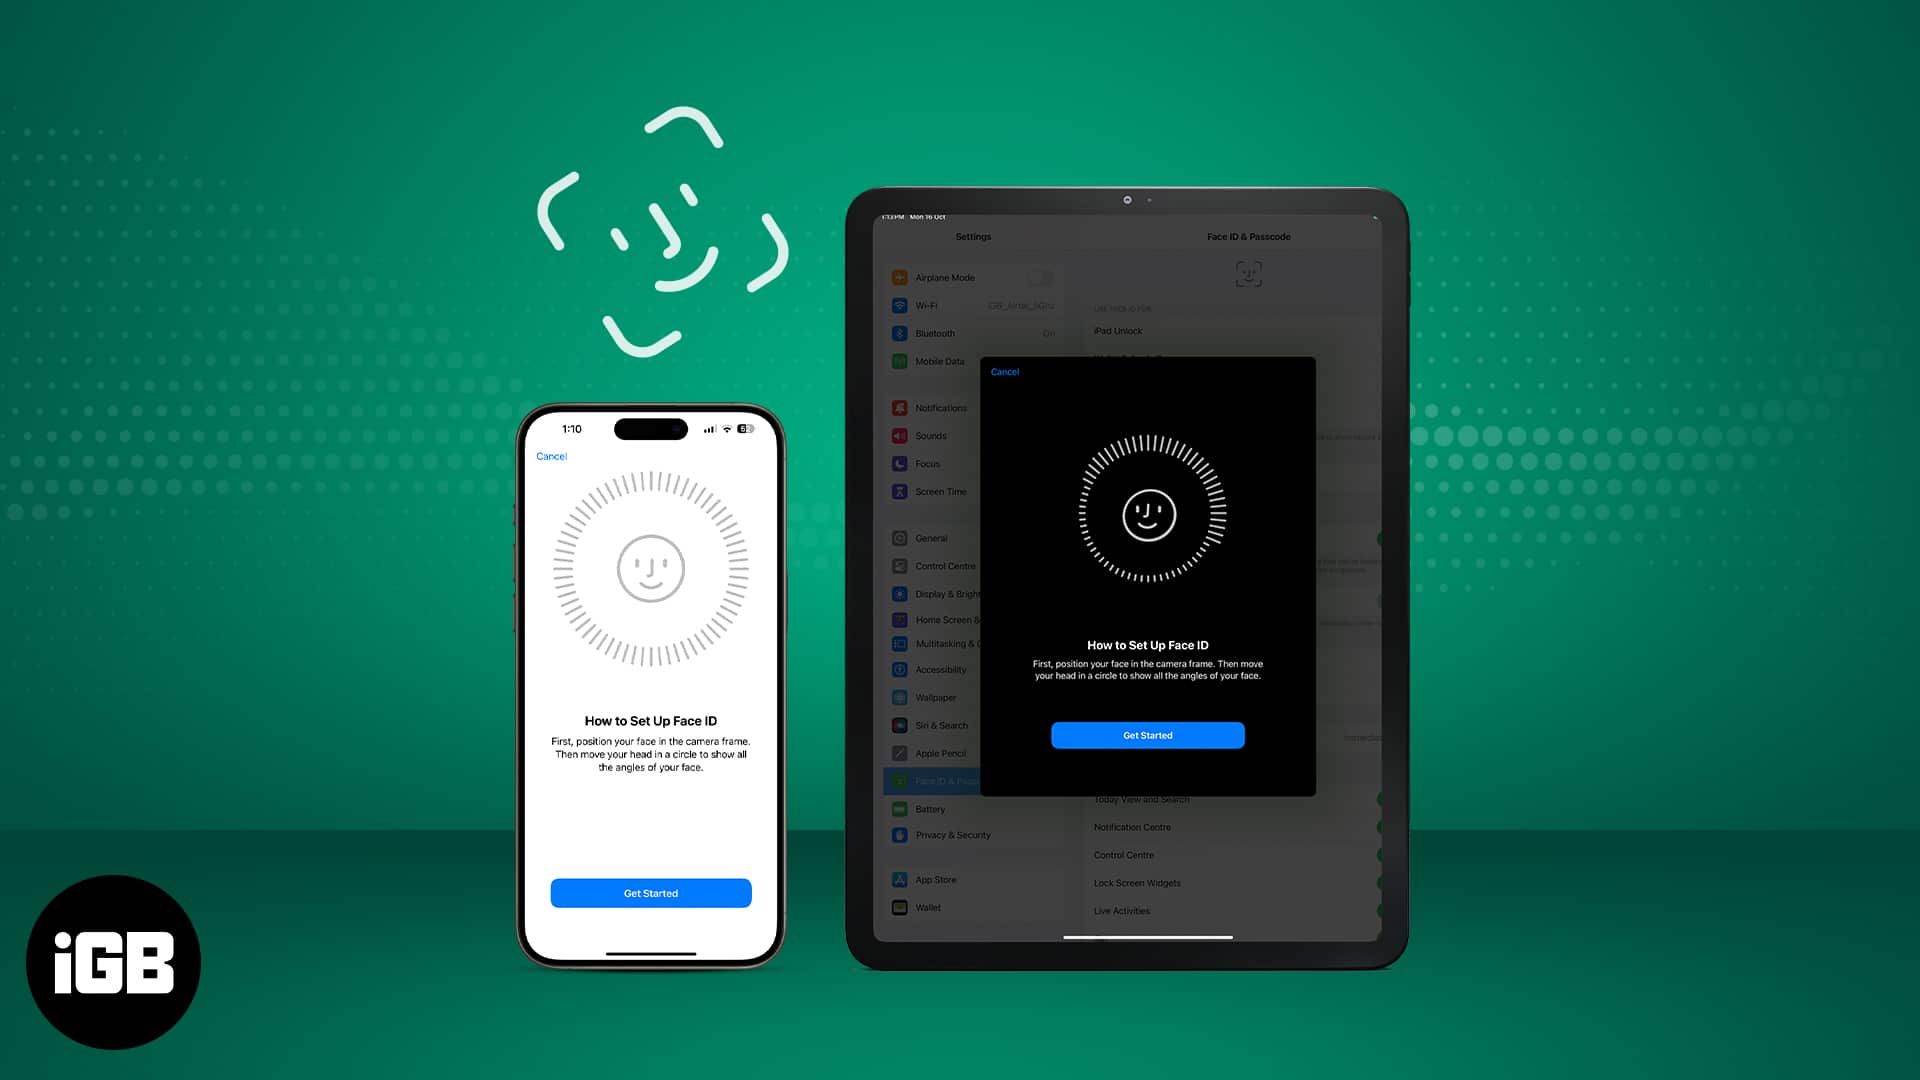
- Now, tap Set Up Face ID to begin.
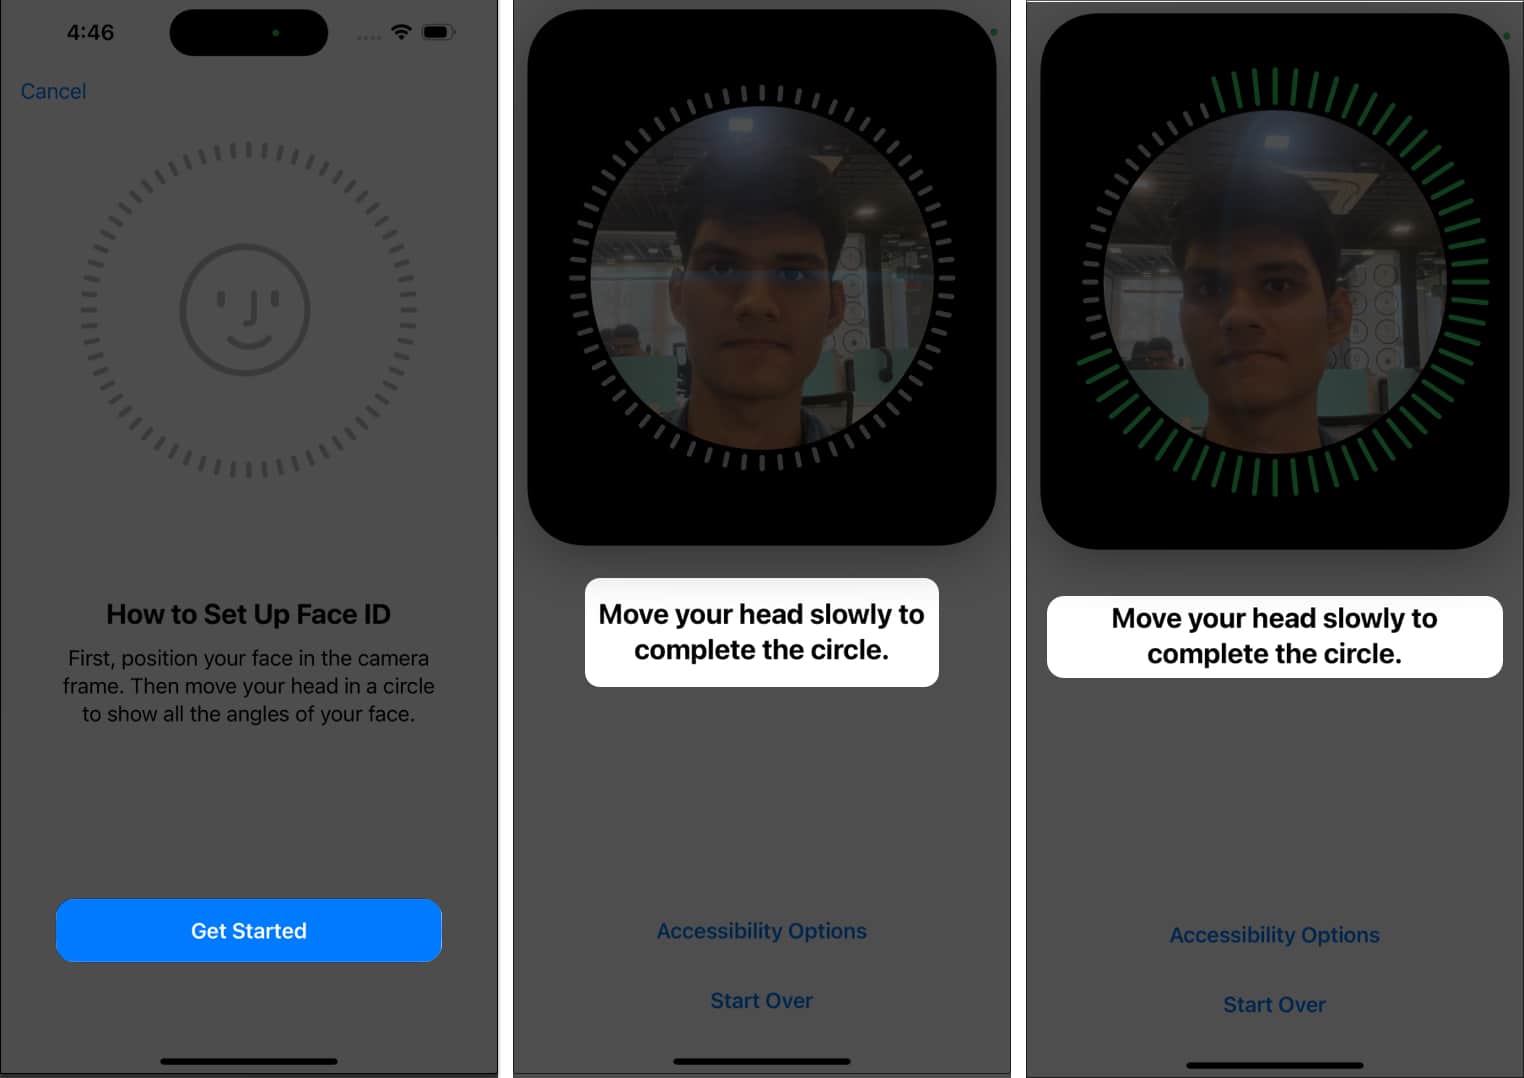
if you’ve already set up Face ID, you’ll see the Reset Face ID option. - Tap Get Started when prompted.
- You must now slowly move your head around to complete the circle.
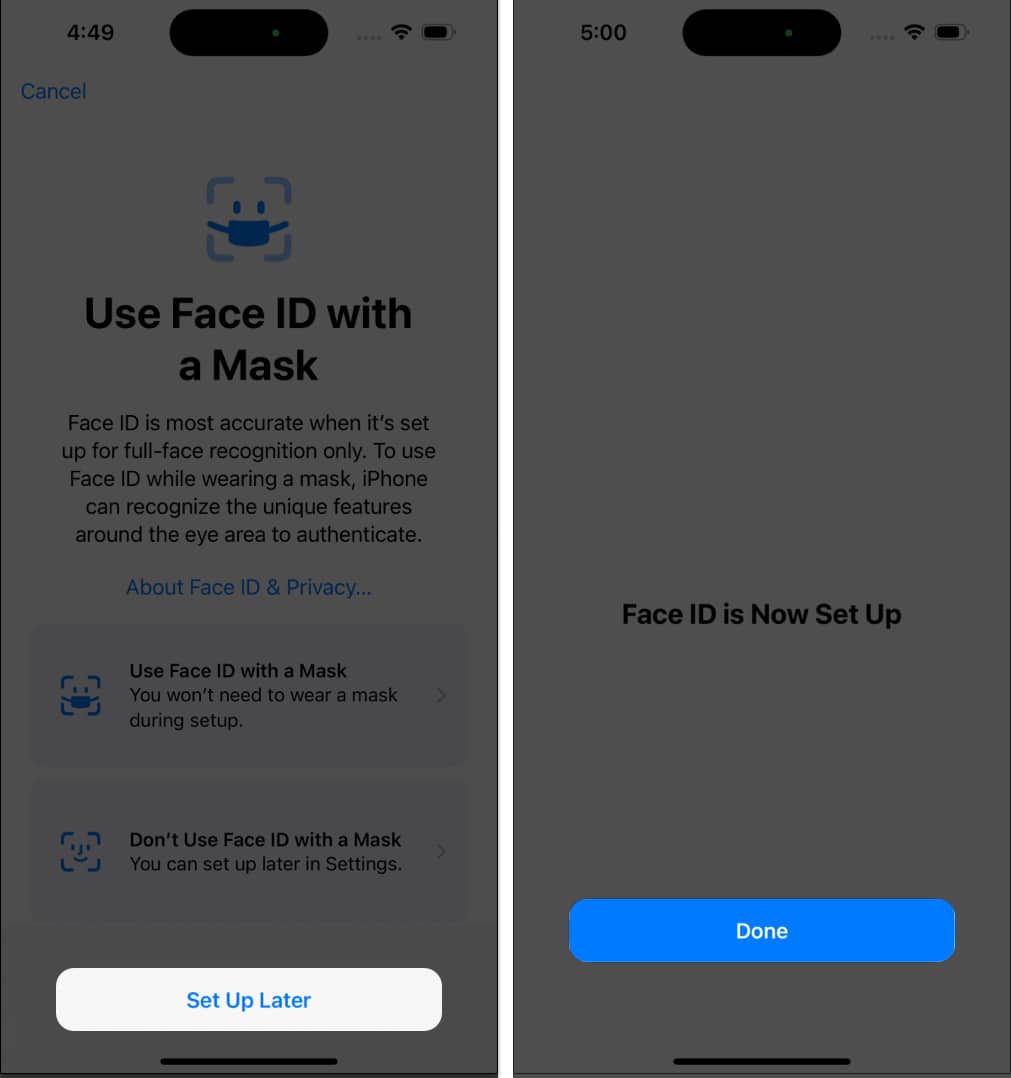
- Once the scan is complete, you can select either of the following:
- Use Face ID with a Mask
- Don’t Use Face ID with a Mask
- For now, press Set Up Later → Done to conclude the basic Face ID setup.
This process provides seamless protection for the following factors:
- Unlock device: Wake your iPhone or iPad as Face ID only starts to scan the face when the lock screen is lit. Your device automatically unlocks after a successful Face ID recognition.
- iTunes & App Store: You can use Face ID to download free apps for the first time or buy apps, media, etc., on your iPhone or iPad Pro. Thus, only your biometric information will authorize the purchase.
- Wallet & Apple Pay: Face ID protection prevents unauthorized access from meddling with bank details in payment apps. So, you can pay securely using Apple Pay and authenticate the payment conveniently.
- Password AutoFill: If you have set up iCloud Keychain on your iPhone, you can autofill usernames and passwords with Face ID. Therefore, no other user can access your saved passwords without your Face ID.
If any of these features seem unnecessary, you can always turn them off later. But trust me, you need this layer of protection for your digital safety.
How to set up Face ID with a mask on iPhone
Face ID adapts! It recognizes changes in your appearance, including glasses, hats, and facial hair. You can update your face recognition in the device settings if there are significant changes.
Besides, if your face is covered with a. mask, the Face ID doesn’t work. It’s because Face ID authentication needs full face recognition. Therefore, you must set up a Face ID with a mask to swiftly use the biometric,
Add Glasses in Face ID
Even though Face ID can detect your smile under all circumstances, it doesn’t go well with glasses. Simply put, if you wear spectacles most of the time, you must add your face recognition with that.
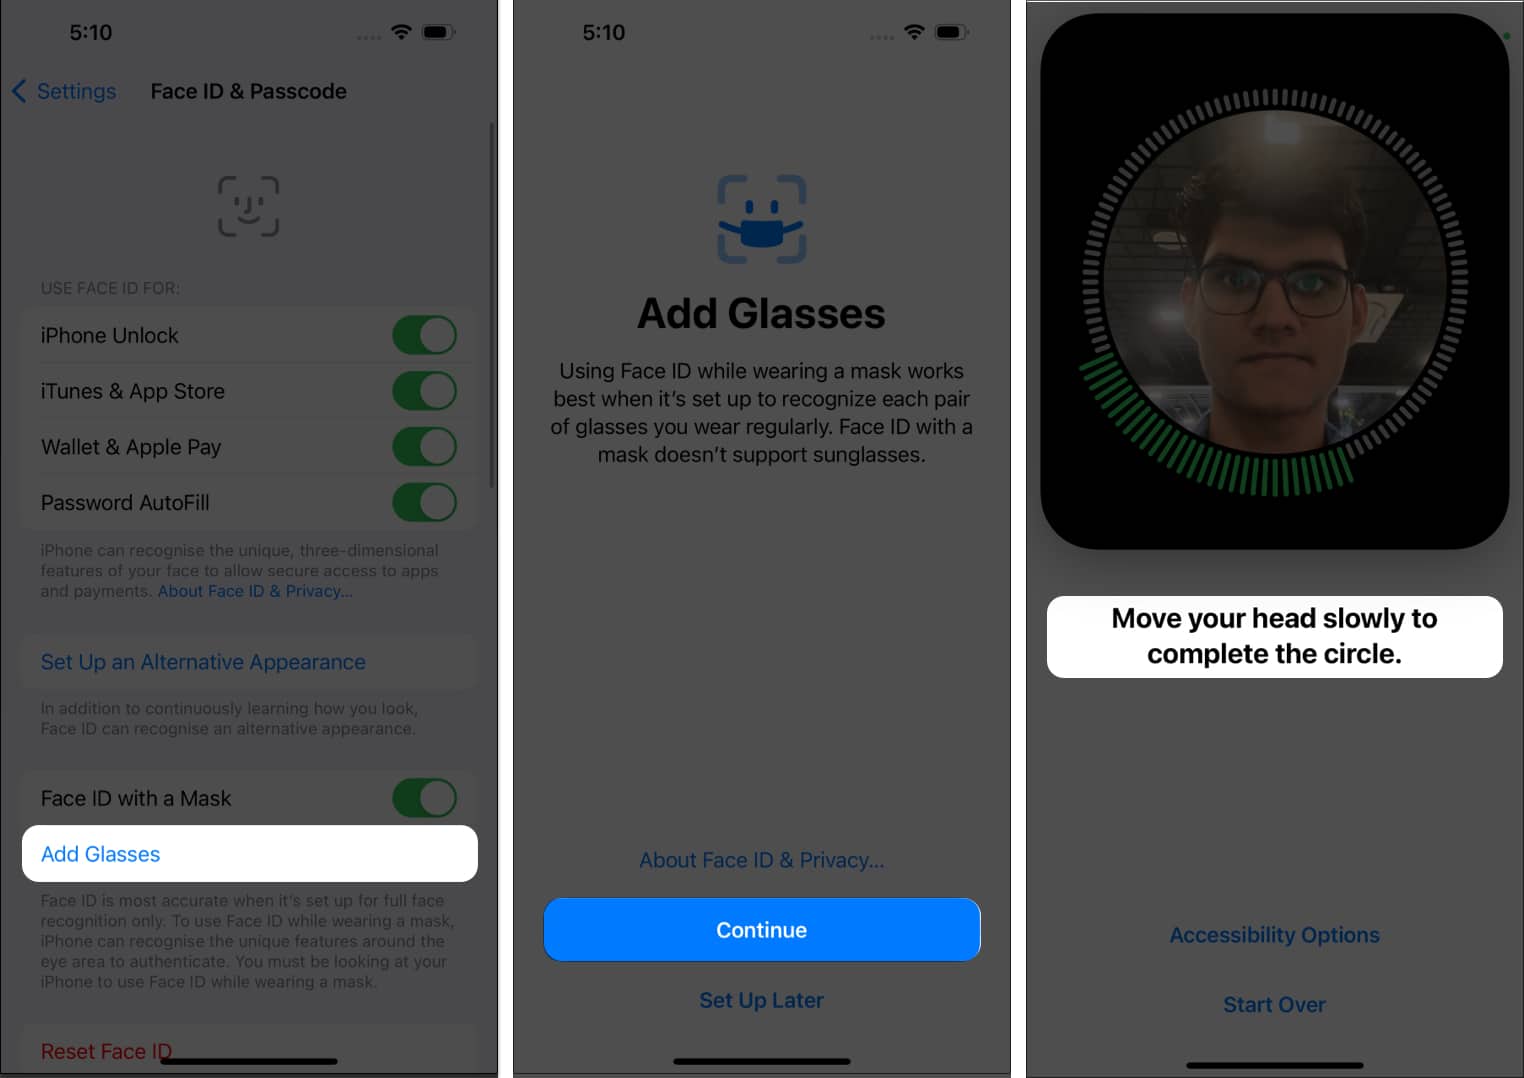
- Head to the Face ID & Passcode settings as discussed above.
- Select Add Glasses.
This option is only available when you set up the Face ID with a Mask feature. - Hit Continue.
- Now save your look for Face ID to remember.
- Once the scan is complete, tap Done.
As far as your spec-tacular look is concerned, you’re good to go!
How to enable Face ID lock for apps on iPhone
One of the best additions to Face ID is the ability to integrate the saved biometrics with many other third-party apps. It ensures complete protection on the device, regardless of the use case.
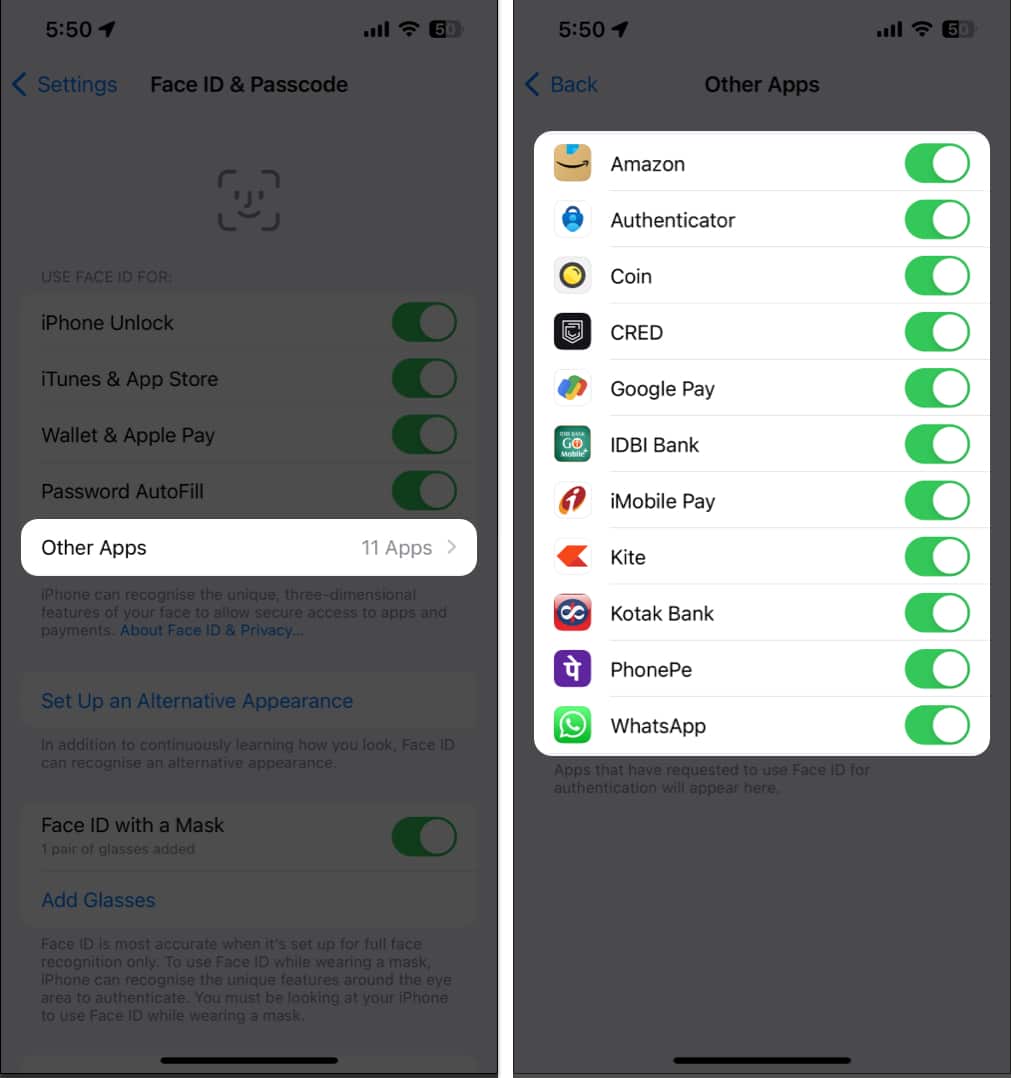
- Navigate to Face ID & Passcode settings on your iPhone or iPad Pro.
- Tap Other Apps.
Here, you can locate all apps on your device that support Face ID authentication. - Toggle on the apps you want to use with Face ID.
You can further enable Face ID authentication for apps like WhatsApp, LinkedIn, Twitter, and others via in-app settings.
How to set up an alternative appearance on Face ID on iPhone
If you carry multiple looks around or wish to save another person’s face recognition for your device, you do so. Save your new look or another face for your device’s lock by setting up an alternative appearance on Face ID. Remember that Face ID gives access to all your sensitive information. So, only add trusted person face recognition on your iPhone.
If you own an Apple device, you may have noticed that it is highly responsive. However, your device may sometimes unlock without your consent, which can be frustrating. To prevent accidental unlocks, you can enable Attention Aware features on your iPhone.
Unlock your iPhone with Apple Watch
If equipped with an Apple Watch, you can experience a new level of convenience. For those who tend to wear masks daily, you can unlock your iPhone or iPad Pro with your Apple Watch as well.
This small add-on makes it simpler for Apple ecosystem users to ensure they are always protected without adjusting their attire according to the authentication data.
How to reset Face ID on iPhone and iPad Pro
If I promise an ultimate guide I’ll give you one. Lastly, let’s look at how to reset Face ID on iPhones and iPads to complete this journal. Simply,
- Go to Settings → Face ID & Passcode.
- Enter the Passcode of your device.
- Scroll and tap Reset Face ID.
Stay secure and tech-savvy!
This is how you can set up and use Face ID on your compatible iPhone or iPad. But that is not all. Face ID has more tricks up its sleeves. For example, you can add a second person’s face to Face ID. The second person can be your wife, parents, or somebody close whom you trust. You can also unlock Face ID when wearing a mask. Finally, if you decide that Face ID is not for you, it is easy to turn it off or reset Face ID to reconfigure it.
What do you think about this amazing technology? Let us know in the comments below.
FAQs
Yes, it can! Face ID uses infrared technology to recognize your face, which works in low-light and dark environments. However, extreme darkness might still pose a challenge.
If Face ID fails, enter your passcode to unlock your device. Face ID adapts and learns from these experiences, improving its recognition.
If Face ID on your Apple device gives you a hard time, simply hover through our detailed guide on Face ID not working on iPhone to resolve this issue quickly.
Read more:

