Thanks to Apple’s introduction of the eSIM in iPhone XR upward and iOS 12.1 and later, you can have an extra SIM card on your iPhone. Setting up an eSIM has many benefits, as you can support your tangible nano-SIM card with a virtual one.
Another benefit is that you can port an existing SIM card to your iPhone’s eSIM service. You’ve come to the right place if you want to learn how to set up an eSIM on your iPhone. Keep reading to get one up and running in no time.
- What is an eSIM?
- Can your iPhone use an eSIM?
- How to activate and install an eSIM on the iPhone
- How to use an eSIM on iPhone
- Can you transfer your eSIM to another phone?
- How to erase your eSIM
- Can you use two eSIM on your iPhone?
- Why can’t I set up an eSIM on my iPhone?
What is an eSIM?
An eSIM is a virtual SIM hosted by your network provider. It’s a flip away from the conventional SIM cards or chips, as you don’t need a tangible card. As a result, you can use it with an existing SIM card to turn your iPhone into a dual SIM device.
Besides, you can use an eSIM as a physical SIM card; you can recharge it, subscribe for data plans, receive SMSes, and browse the internet with it. After setting up an eSIM, you’ll see its network bars at the top-right corner of your iPhone’s screen. If you’ve paired it with a physical SIM card, you’ll see two network bars instead.
In most cases, you must scan the QR code on a SIM pamphlet, another phone, or a computer. However, while some countries allow people to set up an eSIM by themselves, you must visit your network provider’s office to set it up in some regions.
Can your iPhone use an eSIM?
Unfortunately, not all iPhones and regions support the use of eSIM. Apple says that iPhone versions starting with the iPhone XR can use an eSIM. So if you’re using an iPhone XR or earlier, the only obstacle is if your region or network carrier supports it.
It’s hard to tell which countries support eSIM since other smartphone companies like Samsung allow the use of eSIM with some of its versions. However, I’m aware this service is available in countries like the US, Austria, Spain, Canada, Croatia, Germany, UK, India, Hungary, and some African regions like Nigeria and South Africa.
Once you confirm that your iPhone supports it, the availability of eSIM depends on the network provider and region rather than Apple itself. So you might want to ensure that your network provider offers the service before proceeding to set it up.
If you’ve set up an eSIM, but it still doesn’t work, or your phone gives an invalid SIM error, you might want to see how to fix that with this SIM failure solution.
What do you need to use eSIM on your iPhone?
According to Apple, all you need to set up an eSIM is an iPhone XR or later and a network provider that supports it. If you’re not sure about eSIM support in your region, contacting your network’s customer support center will help, as they’re in the best position to give you clarification.
Which networks support eSIM?
As mentioned, it’s hard to categorize which mobile network carrier supports eSIM. But in the US, network providers, including AT&T, T-Mobile, Truphone, Visible, Ubigi, and Verizon, support eSIM.
You might want to look at this Apple support page to check specifically for the network carriers that support eSIM in your country. But as said earlier, the best way to find out is to contact your network carrier.
How to activate and install an eSIM on iPhone
The process for activating an eSIM varies, depending on the network provider. However, Apple provides a general thumb rule to set it up. So, whether you’re doing it yourself or it requires the help of the network carrier, Apple’s setup rules still apply.
1. If you have a QR code
The process is seamless if you already have a QR code for the eSIM. You can get a QR code by visiting your network provider’s office or your carrier app. I also recommend that you call your network provider’s customer support to learn how you can get a QR code.
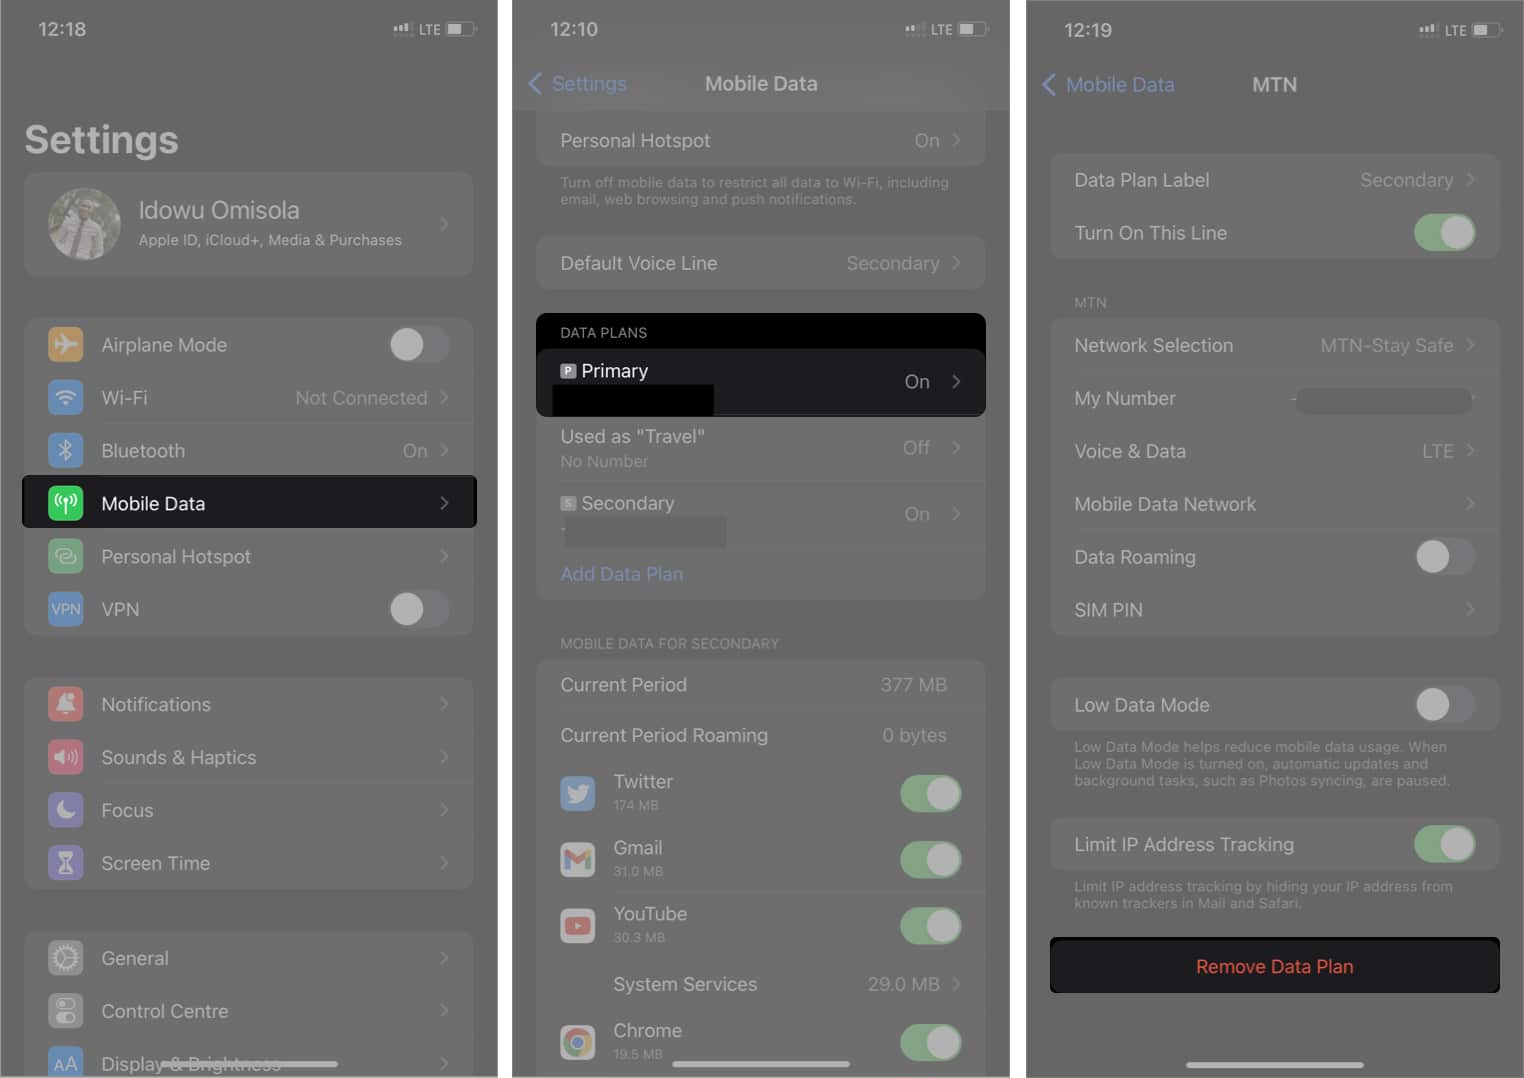
- Go to your iPhone Settings → Mobile Data.
- Tap Add Data Plan.
- Scan the provided QR code provided and follow the on-screen instructions.


2. If you use a carrier’s app
The process for setting up an eSIM may vary from carrier to carrier. But you first need to install the carrier’s app on your iPhone from the App Store or as stipulated by your network provider.
Once installed:
- Open the app and buy a cellular plan.
- Next, follow the on-screen instructions to set up an eSIM.
3. Enter eSIM information manually
You can also input your eSIM information manually. Keep in mind that you must have gotten these details from your network provider earlier:
- Open your iPhone Settings → Mobile Data → Add Data Plan.
- Tap Enter Detail Manually at the screen’s bottom.
- Provide the details given by your network carrier.
- Tap Next at the top-right and follow the on-screen instructions to complete the setup.
4. From an assigned cellular plan
Some network carriers also assign extra cellular plans. According to Apple, this is only available on iOS 13 and later. And, of course, its availability depends on your network carrier. Usually, you’ll get a notification to install a cellular plan if your network carrier supports such a service.
Follow the instructions if you get a notification, and you’ll get your eSIM ready to go in no time.
How to use an eSIM on iPhone
The mode of usage of an eSIM isn’t different from that of a physical SIM card. Remember that while you can install more than one eSIM on your iPhone, you can’t use two eSIMs simultaneously. You’ll have to switch to only one at a time on the same device.
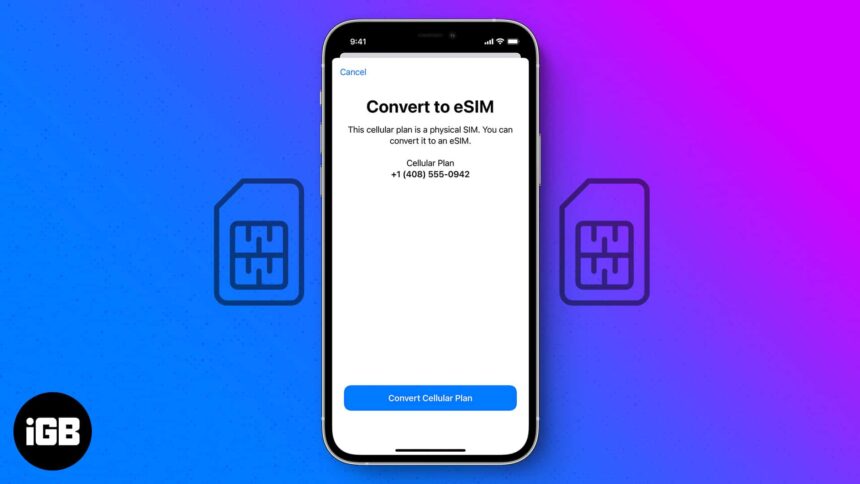
Also, if you convert your physical SIM card to an eSIM, your phone number doesn’t change. But the transfer renders your physical SIM card obsolete. You might have to deactivate your eSIM or visit your network carrier’s office to revert to a physical SIM card.
Label your SIM cards
Consider labeling your SIM cards if you’ve paired your eSIM with a physical one. Although your iPhone labels each as “Primary” and “Secondary” by default, naming them yourself helps differentiate them easily while making calls, sending an SMS, or activating internet data.
To label your dual SIMs on your iPhone:
- Go to your iPhone Settings → Mobile Data.
- Tap the SIM you want to label.
- Next, select Data Plan Label.
- Select an option.
- For a custom label:
- Tap the Type label here field under CUSTOM LABEL.
- Input a preferred name and tap done on your iPhone keyboard.
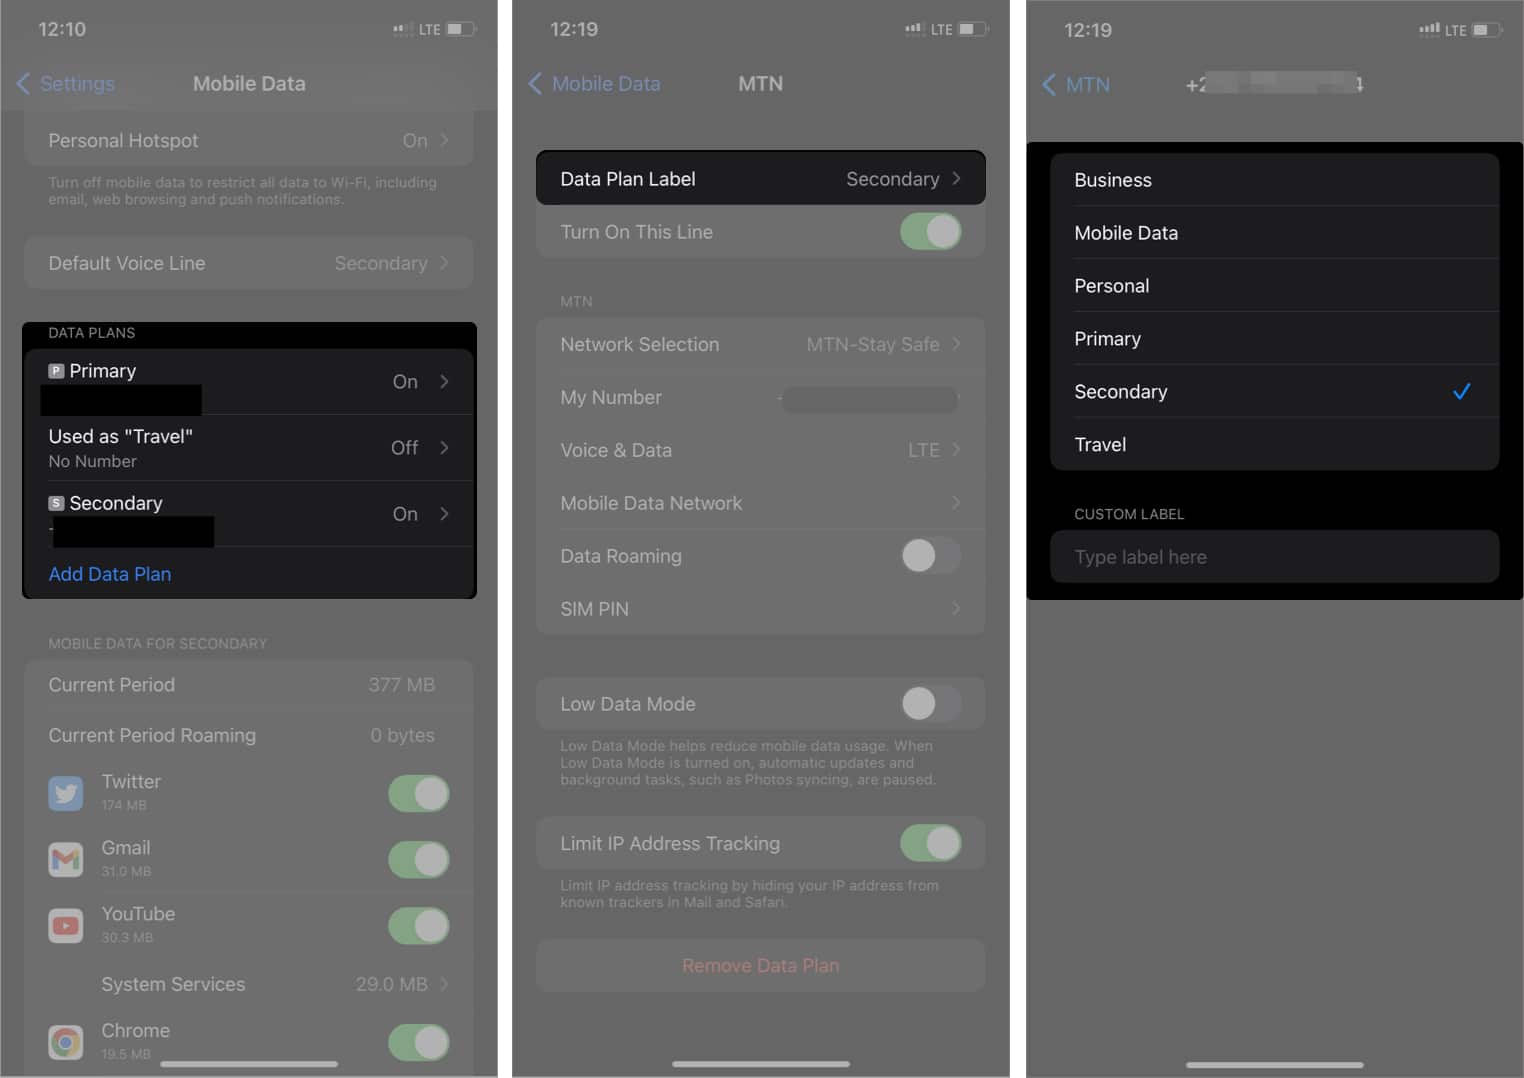
Repeat a similar process for both SIM cards to label them differently.
Can you transfer your eSIM to another phone?
Yes. You can transfer an eSIM from an old iPhone to a new one. However, the process might vary from one carrier to another. It can also be a bit technical since you can’t switch an eSIM like you would a tangible nano-SIM.
One way to swap an eSIM is to remove it from the previous iPhone and set it up again on the new one. Some users have reported that this works for them.
Once removed from an old iPhone, try setting it up freshly on your new iPhone by using the previous QR code or the information your network carrier gave.
If the process isn’t clear, the best way is to reach out to your network provider’s customer representative or contact Apple Support for clarification.
How to erase your eSIM from iPhone
- Go to Settings → Mobile Data.
- Select your eSIM.
- Tap Remove Data Plan at the bottom.
Can you use two eSIM on your iPhone?
While you can add more than one eSIM to your iPhone, you can’t use more than one at a time. Apple only allows you to switch eSIMs instead of using many at once. To switch eSIMs
- Open your iPhone Settings → Mobile Data.
- Select the eSIM you want to activate and toggle on Turn On This Line.
This will deactivate the previously active eSIM automatically and enable the selected one.

Why can’t I set up an eSIM on my iPhone?
You might not be able to use an eSIM on your iPhone due to the following reasons:
- Your iPhone is older than iPhone XR.
- Your iPhone is running iOS 12 or older.
- You live in a region that doesn’t support eSIM.
- Your network carrier doesn’t’ support eSIM.
FAQs
An eSIM comes with many benefits, as pointed out earlier. For instance, you don’t need to worry about losing your SIM card. Also, it covers your need for dual SIM support on the iPhone. One complaint I have about eSIM is that you can easily delete it, and the consequence might be to visit your network provider’s office to set it up again. This might not apply to you if your network provider allows you to set up yourself.
An eSIM works the same way a physical SIM card does. So, it doesn’t affect battery life. However, I can’t dispute that it might drain your iPhone’s battery when you use it for cellular data. But this also applies to physical nano-SIM. However, your battery life might reduce as dual SIMs tend to consume more power.
Before assessing the eSIM security, you need to know that it’s easier to track than tangible SIM cards, as you can’t remove or swap it easily except by removing it, which isn’t what most people want to do. On the other hand, they’re more secure than the physical nano-SIMs since people can’t access or steal them as easily as a SIM card. But even at that, threat actors can gain backdoor access and hack your line if there’s a breach in your provider’s network.
Yes! You can subscribe to cellular data plans with your eSIM, use it as your data SIM, and access any internet service.
The only difference between your physical SIM and an eSIM is that the latter is virtual. You can do what you’d do on a physical SIM card with your eSIM. These include making and receiving calls, sending and receiving an SMS, and many more.
To many people, the eSIM is one of Apple’s best gifts to iPhone users since they can have an extra SIM on their iPhone without inserting a SIM card physically. Do you use an eSIM on your iPhone? Share your experience in the comments section below.
Read more:
- SIM not supported on iPhone? Here are 5 fixes for you
- How to change SIM PIN on your iPhone
- eSIM not working on iPhone? 13 Ways fix it!
- 8 Reasons to use dual SIM iPhone
🗣️ Our site is supported by our readers like you. When you purchase through our links, we earn a small commission. Read Disclaimer.