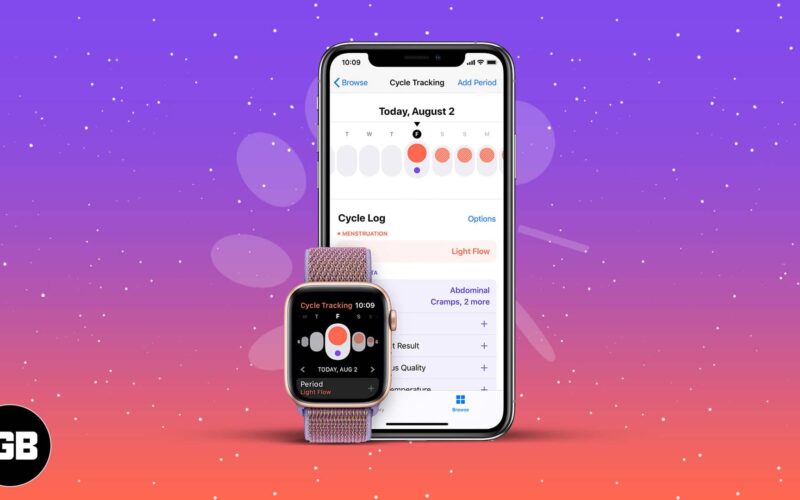
Period tracking apps have been around for several years now. But from iOS 13 and watchOS 6, you can use cycle tracking on Apple Watch and iPhone as a native feature.
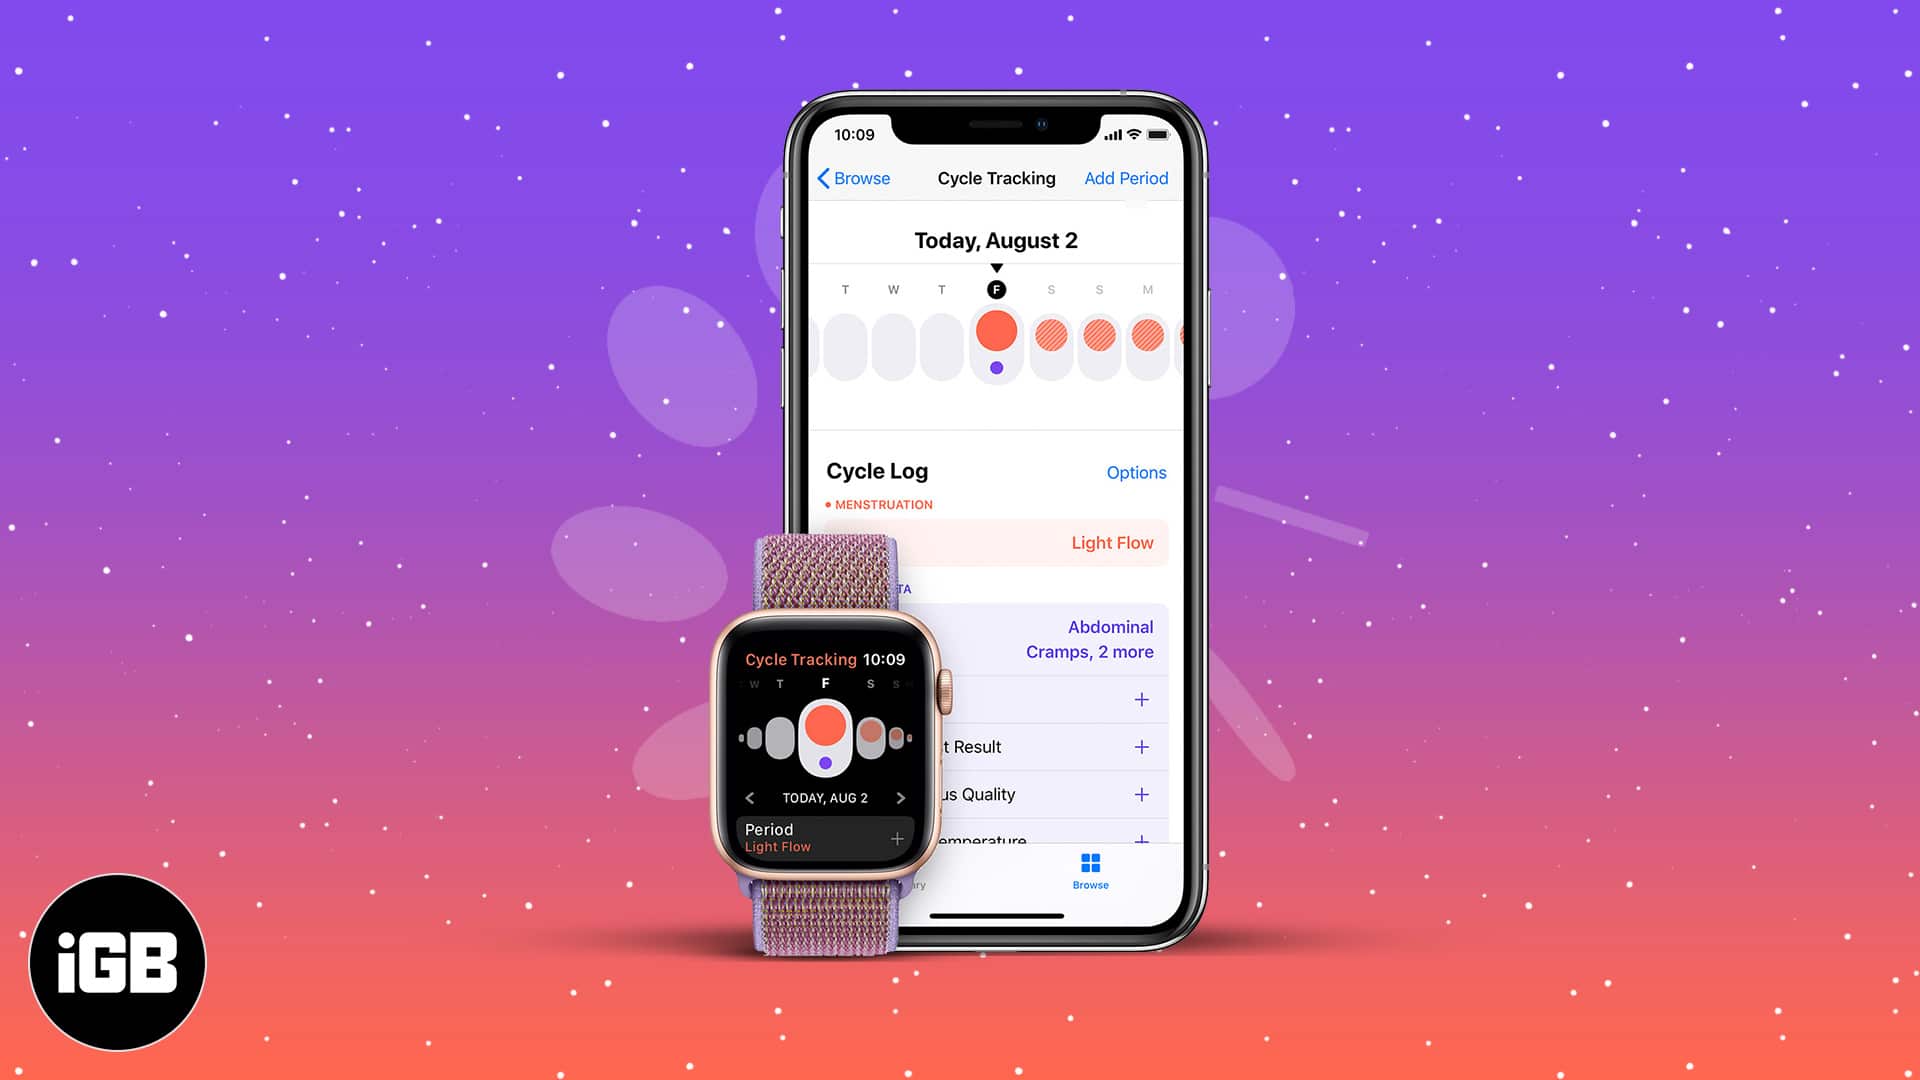
This lets you log your monthly period, menstrual symptoms, sexual activity, and more on the Health app on your iPhone and the accompanying Cycle Tracking app on your Apple Watch. It’s helpful for family planning and keeping tabs on your overall wellbeing.
To start using Cycle Tracking, you first have to set it up in the Health app on your iPhone. Then, you can log your data whenever you need to on your phone or Apple Watch. The app uses your data to predict and notify you about your next period, most fertile days, and more.
This guide will walk you through everything you should know about Cycle Tracking on your iPhone. But before starting, here are some points to keep in mind:
- Cycle tracking and fertility predictions cannot be used as a form of birth control. They are an approximation at best.
- You can never use data from the Health and Cycle Tracking app to diagnose a health condition. Consult a medical practitioner for any guidance about your health.
- You can also use Cycle Tracking with third-party apps such as Clue and Flo, which integrate with the Health app.
Now, let’s check out how to use Cycle Tracking on Apple Watch on iPhone.
To start using Cycle Tracking, you must first set it up in the Health app on your iPhone. Then, you can log your data whenever you need to on your phone or Apple Watch. The app uses your data to predict and notify you about your next period, most fertile days, and more.
- Set up Cycle Tracking on the Health app
- How to customize Cycle Tracking on iPhone
- Track ovulation using temperature sensors on Apple Watch
- Be notified of possible cycle deviations
- Get period predictions and notifications on iPhone
- How to get fertility predictions and notifications on iPhone
- Manage cycle factors in iPhone’s Health app
- How to track your period with Cycle Tracker
- How to log symptoms in Cycle Tracking
- Log sexual activity on iPhone and Apple Watch
- How to view your cycle history and statistics in the Health app
- Add Cycle Tracking to your Favorites in iPhone’s Health app
- How to delete Cycle Tracking data in the Health app on iPhone
- How to delete the Cycle Tracking app from your Apple Watch
- How to keep your Cycle Tracking data private
How to set up Cycle Tracking on the Health app
To start using Cycle Tracking, you must first set it up in the Health app on your iPhone. This lets you log your data whenever you need to on your iPhone or Apple Watch. The app uses your data to predict and notify you about your next period, most fertile days, and more.
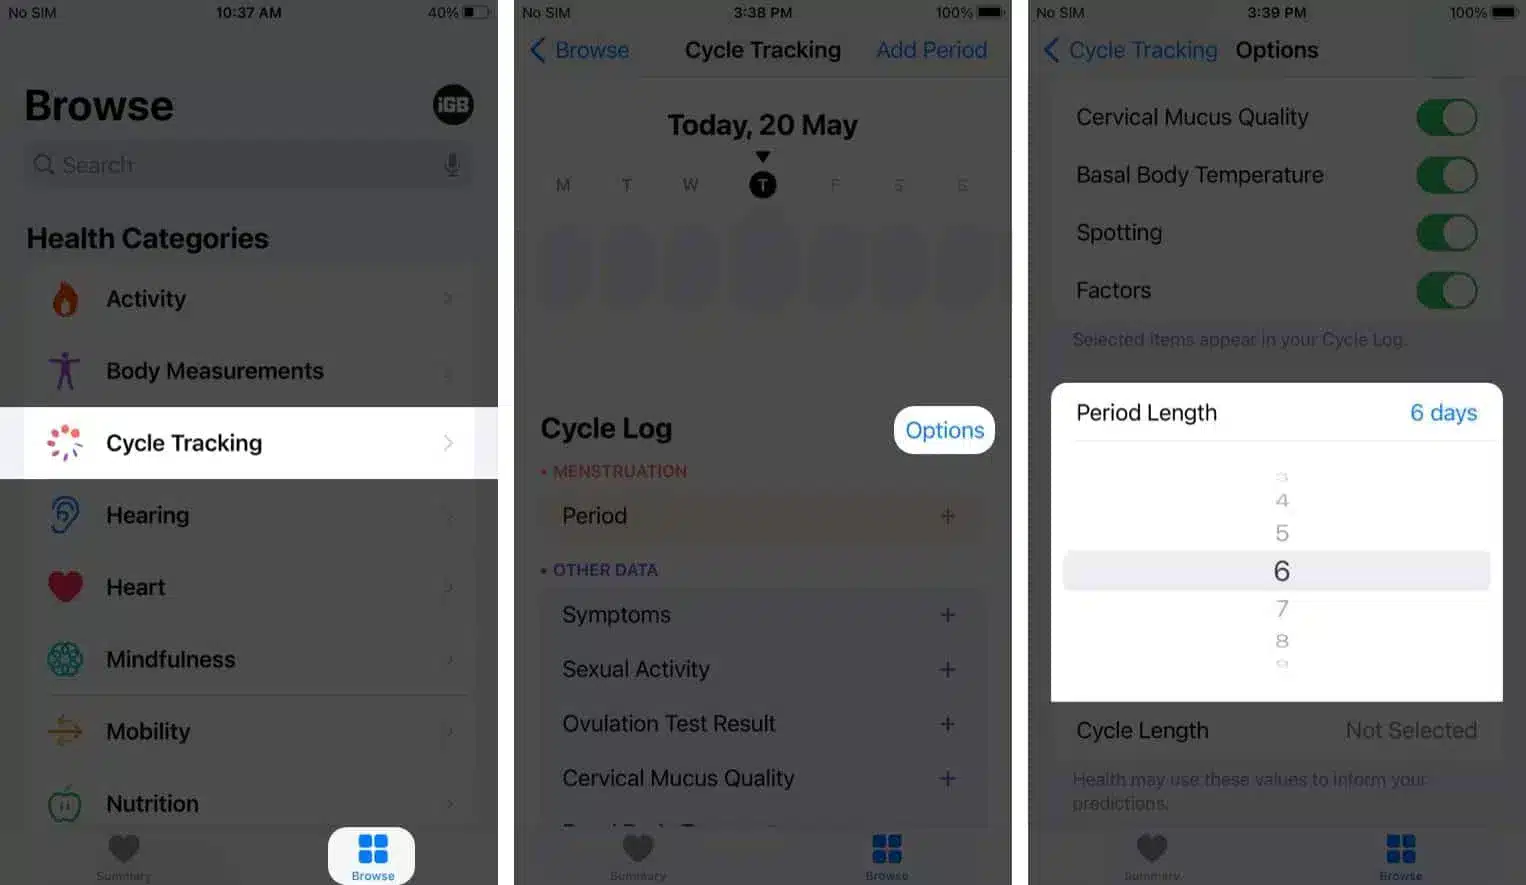
- Open the Health app and go to the Browse tab.
- Tap Cycle Tracking.
- Tap Options next to Cycle Log.
- Scroll down and select Period Length to enter your approximate period length.
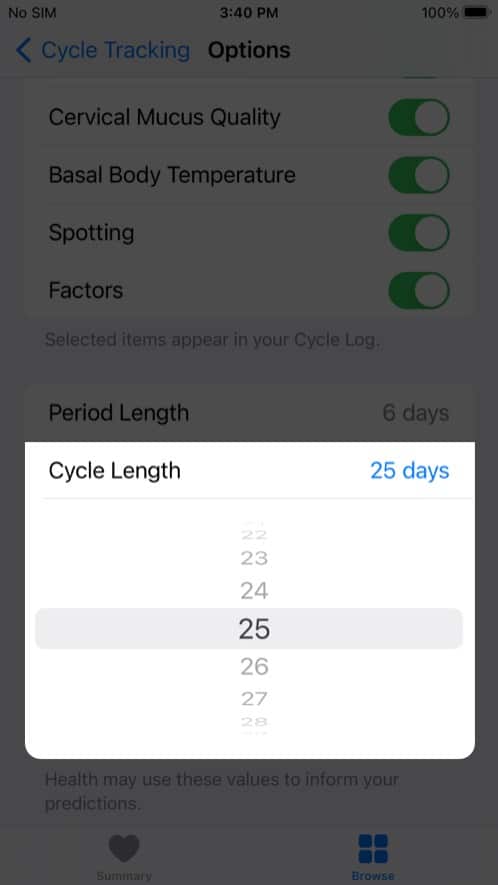
- Next, tap Cycle Length and enter the amount of time, on average, you have between periods.
This information helps the Health app create your period prediction and fertility calendar.
How to customize Cycle Tracking on iPhone
The Health app lets you select which aspects of your cycle you want to log each day, week, and month. You can use it to track when your next period is due or for more detailed insights into your pre and post-menstrual symptoms. If you’re trying to conceive, it’s a good idea to log all options, as this can help your doctor guide you.
- Open the Health app and go to the Browse tab.
- Tap Cycle Tracking
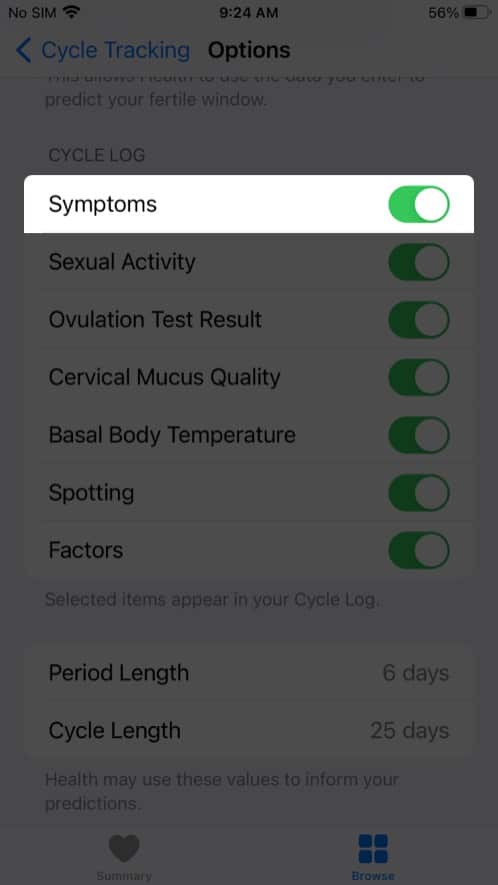
- Tap Options next to the Cycle Log.
- Toggle on Symptoms.
This will let you log a range of symptoms connected to your menstrual cycle, such as abdominal cramps, acne, bloating, headache, lower back pain, mood changes, etc.
Along with symptoms, you can also choose to toggle on other factors you want to log, namely:
- Sexual activity
- Ovulation test results
- Cervical mucus quality
- Basal body temperature
- Spotting
Track ovulation using temperature sensors on Apple Watch
Basal body temperature (BBT) has been one of the most used methods for family planning. It relies on the changes in a person’s body temperature, specifically the biphasic shift, which is related to the hormonal fluctuations associated with ovulation.
Apple Watch Series 8 and Apple Watch Ultra both come with an innovative two-sensor design. One is found on the back of the watch, closest to the skin, while the other is situated just under the display to take account of the outside environment and reduce bias.
It samples your body temperature every five seconds overnight and is able to detect changes as small as 0.1 degree Celsius. This is very useful for individuals who want to track temperature changes related to ovulation. It detects the biphasic shift and gives you new retrospective ovulation estimates.
To begin using this feature:
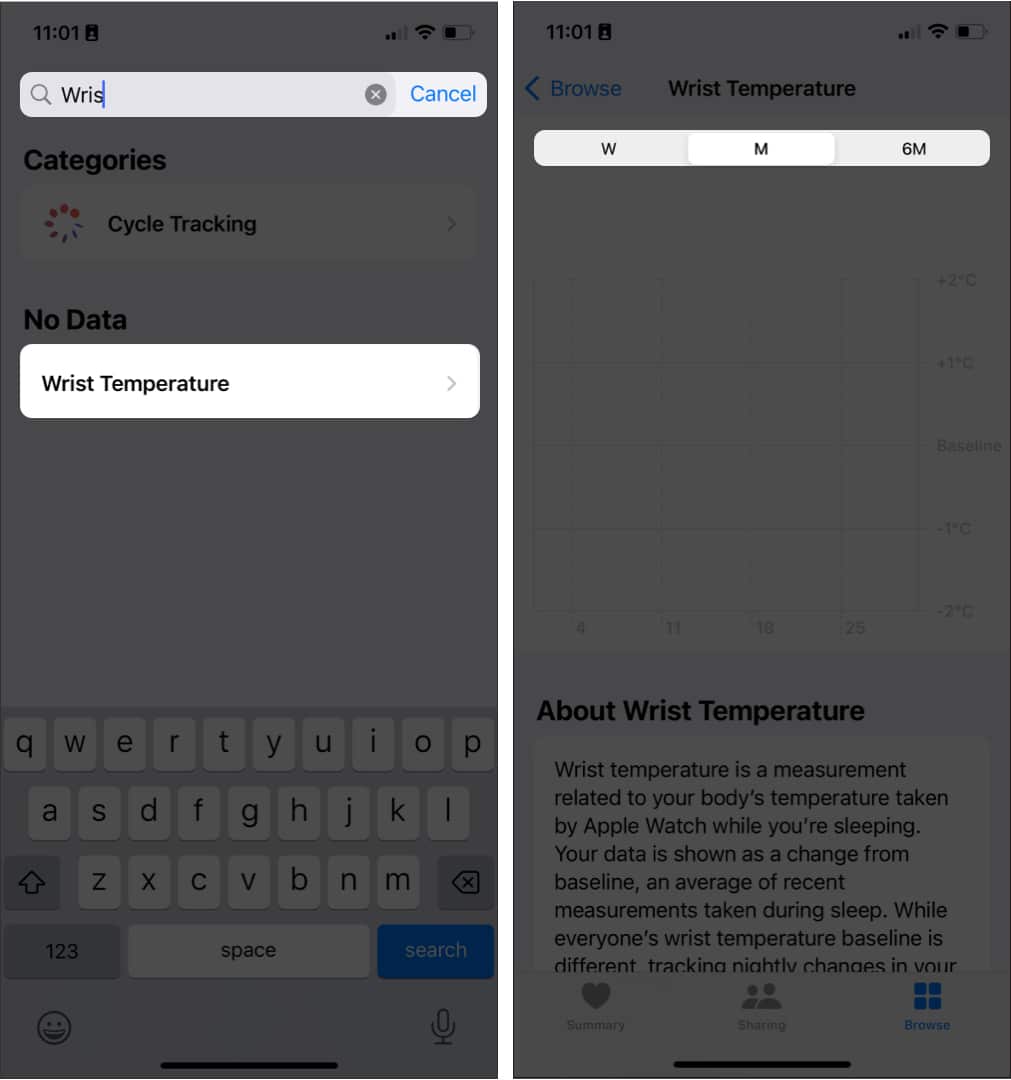
- Open the Health app.
- Just tap the Browse tab and search for Wrist Temperature. You can now see your data plotted in a chart.
- Click the W tab to view your data for the week, M to view data for the current month, and 6M to see the plotted data across six months.
Note that you’ll see Needs More Data on top of your chart as the device establishes your baseline. It may take about five nights of wearing the Apple Watch Ultra or Apple Watch Series 8 to see your data.
Knowing your body temperature isn’t only important for tracking your ovulation, though. It can also give you relevant insights about your health since your temperature is affected by things like jetlag, illness, and drinking alcohol.
Be notified of possible Cycle Deviations
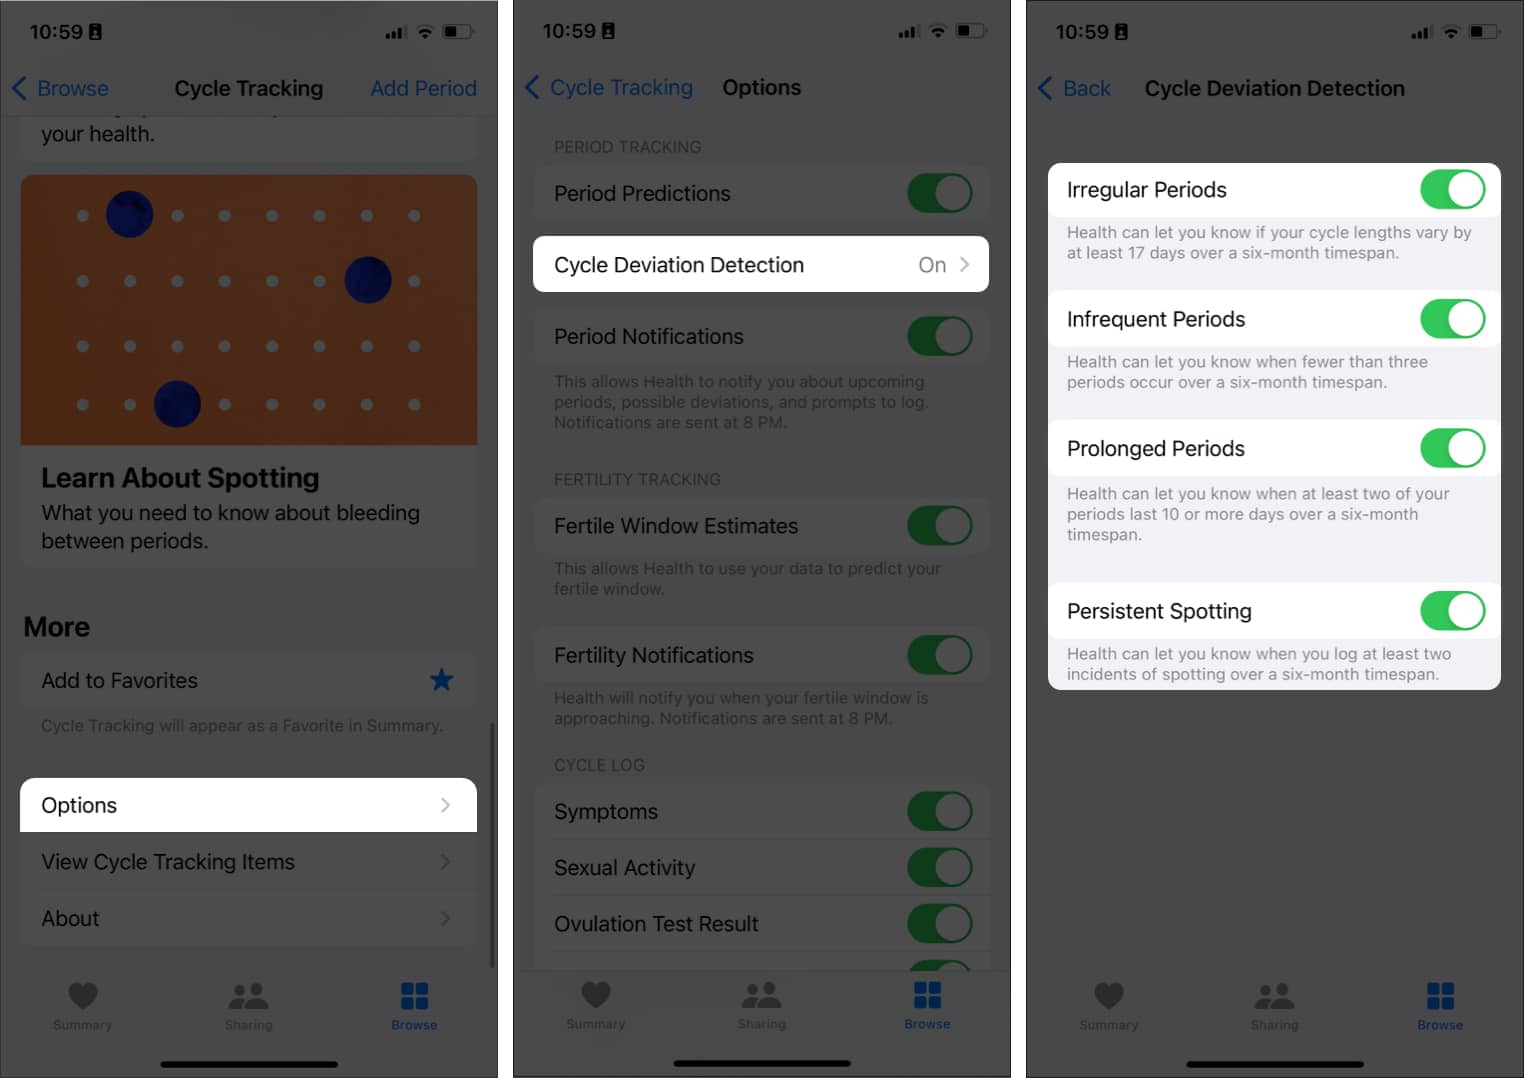
Another update that comes with iOS 16 and watchOS 9 is the notifications for cycle deviations. Your device will detect deviations and unexpected patterns from your current cycle history, which can be useful in identifying underlying conditions like PCOS and thyroid disorders.
By default, the feature is enabled in iOS 16. However, if you have accidentally turned it off, here’s how to enable it:
- Open the Health app → Cycle Tracking.
- Scroll at the bottom → Options.
- Tap Cycle Deviation Detection.
- Select which deviations you want your device to detect and toggle them on or off.
To view the cycle deviations, just head to Cycle Tracking in the app and tap Cycle Deviations under Your Cycles.
How to Get period predictions and notifications on iPhone
One feature of Cycle Tracking that has made my life a lot easier is period predictions. This shows you the approximate date of your next period, so you’re not caught unaware. You can also turn on notifications to alert you a week ahead of time before your predicted period.
Predictions are calculated using the data you enter about your period and cycle length. Predictions dynamically change over time to become more accurate as you enter more data.
Here’s how to set it up:
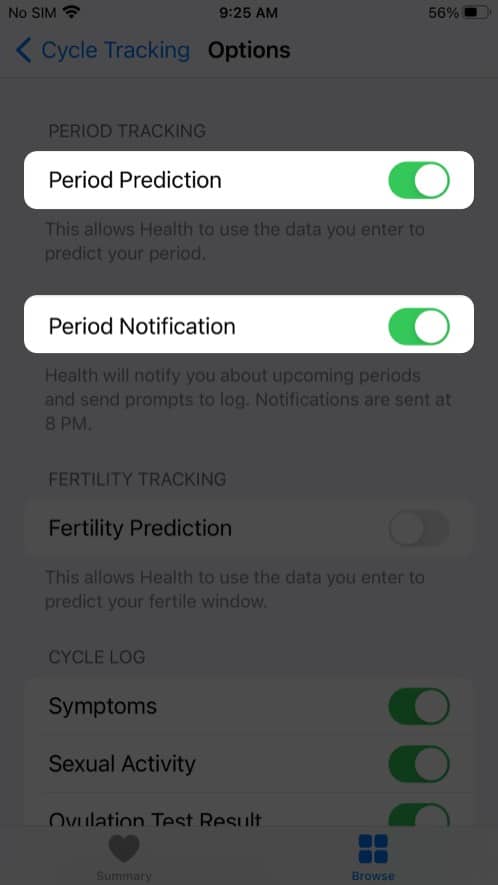
- Open the Health app and go to the Browse tab.
- Select Cycle Tracking.
- Tap Options next to Cycle Log.
- Toggle on Period Prediction. This will generate a two-month period prediction calendar.
- Toggle on Period Notification to get alerted about your upcoming period and reminders to log your daily data.
How to get fertility predictions and notifications on iPhone
Cycle Tracking can help you know your most fertile days each month if you’re trying to conceive. Like period predictions, fertility predictions are based on data you enter about your period or a positive ovulation test result.
Your fertile window is calculated by subtracting 13 days (the luteal phase) from the estimated start of your next cycle.
Let’s assume you enter a positive ovulation test result. The prediction will adjust to make the fifth day of your fertile window coincide with the first positive ovulation test result in a cycle. Here’s how to set up fertility predictions and notifications:
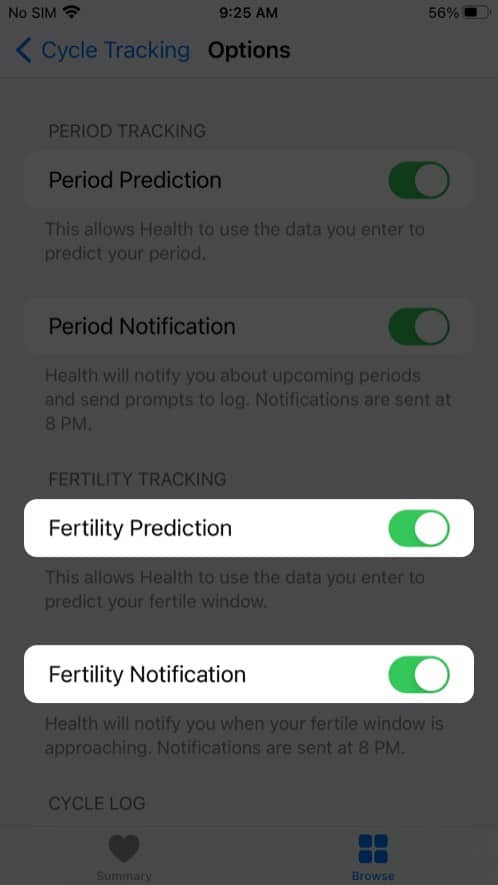
- Open the Health app and tap Browse.
- Select Cycle Tracking
- Tap Options next to Cycle Log.
- Toggle on Fertility Prediction to generate a three-week calendar of your next fertility window.
- Toggle on Fertility Notification to get alerts about your upcoming fertility window.
Meaning of the colors in the Health app
When you open the Health or Cycle Tracking app, you can view your period, symptoms, and fertile window at a glance, thanks to the colors and symbols. Here’s what they mean:
- A light blue oval shows your predicted fertile window.
- Red stripes on a circle indicate your predicted period.
- Solid red circles indicate your logged period days.
- Purple dots show the days when you logged information.
Manage cycle factors in iPhone’s Health app
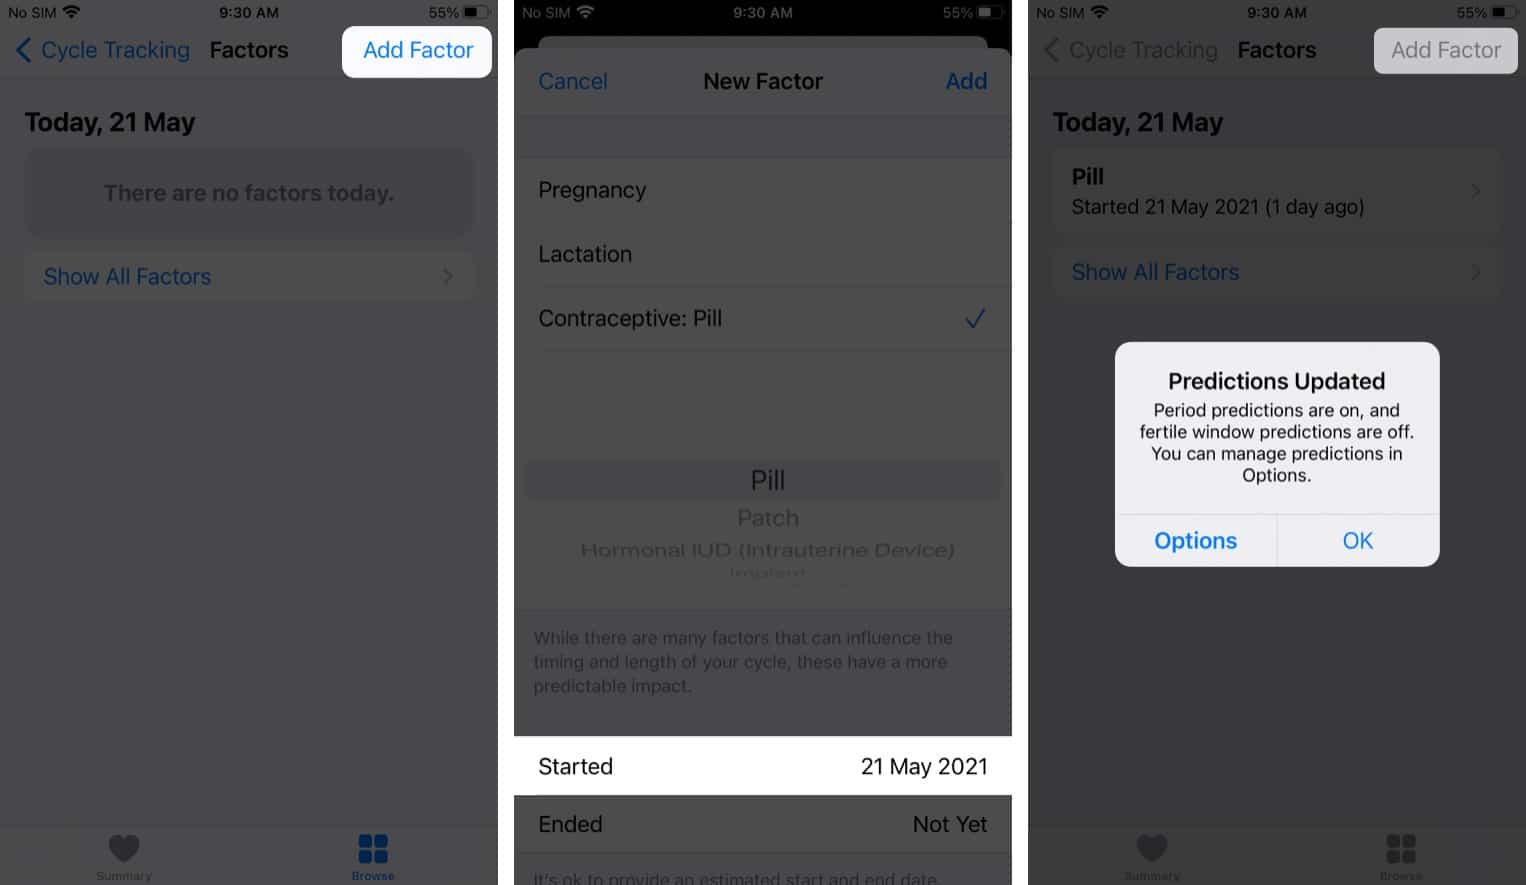
On iOS 14.3 and later, the Health app can adjust your cycle predictions according to the information you enter about pregnancy, lactation, and contraceptive use. Here’s how to set this up:
- In the Health app, tap Browse and select Cycle Tracking.
- Scroll down and tap Factors.
- Add a factor: Tap Add Factor, pick a factor, tap Started to set the start date, then tap Add.
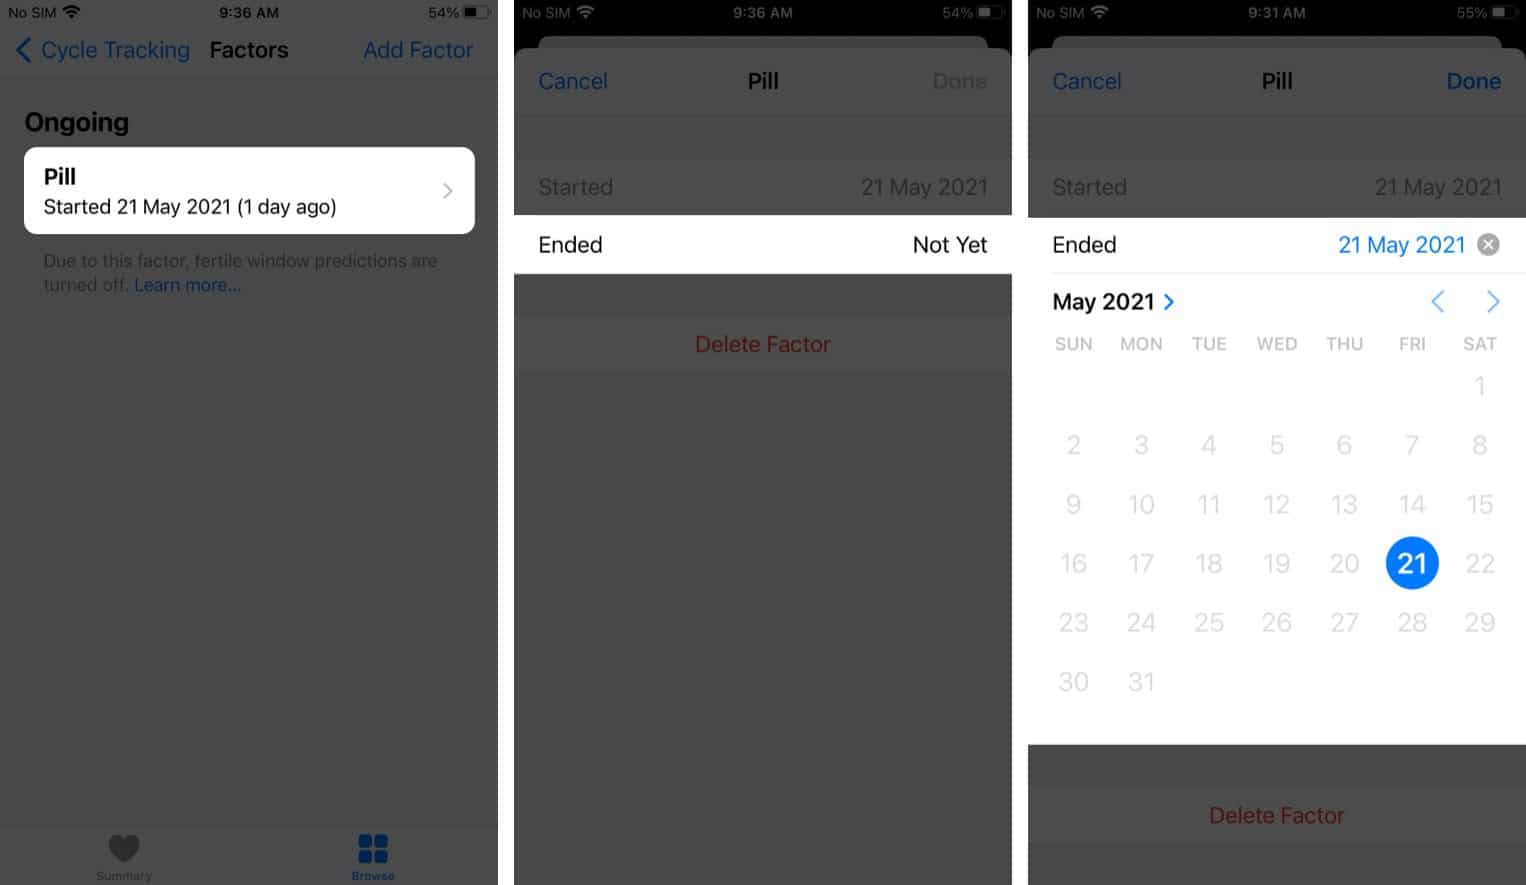
- Change the end date for a factor: Select the factor, tap Ended, select a date, then tap Done.
- Delete a current factor: Select the factor, then select Delete Factor.
- View previous factor information: Tap Show All Factors.
How to track your period with Cycle Tracker
After taking care of all the settings explained above, you’re ready to track your period with Cycle Tracker on your Apple Watch or iPhone. Here’s how:
On your iPhone
- Open the Health app and tap Browse.
- Select Cycle Tracking
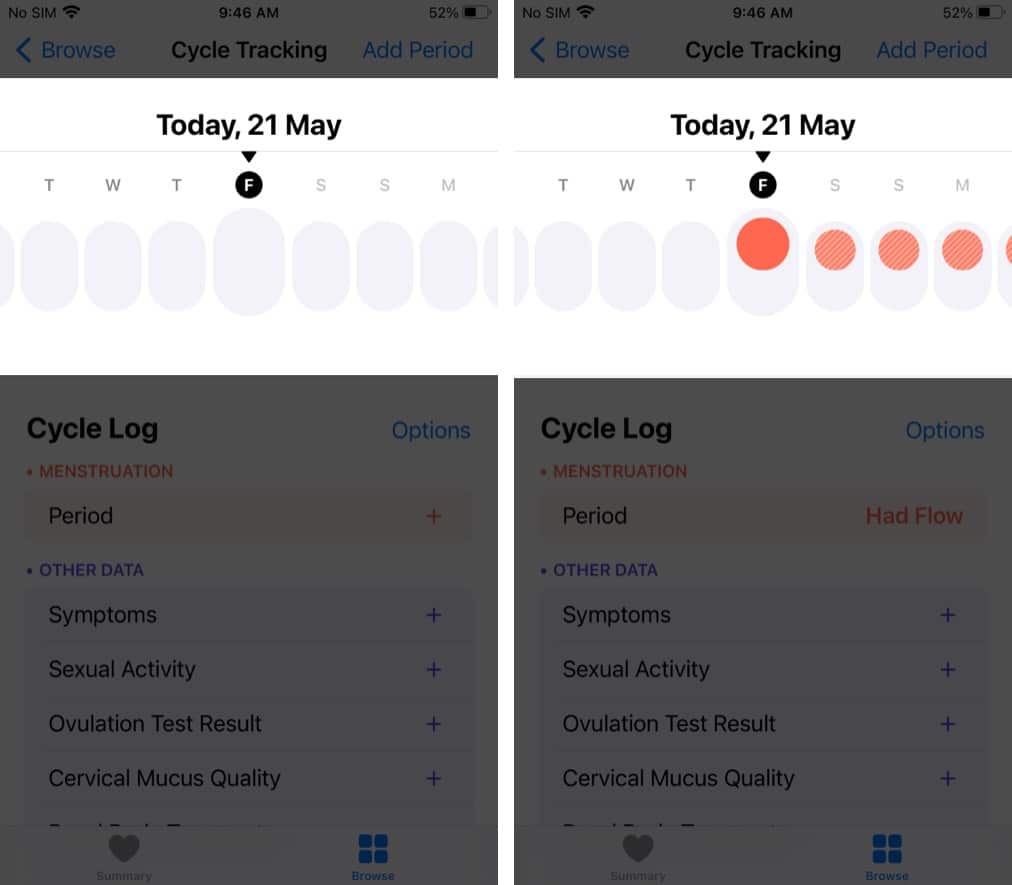
- In the tracker at the top, tap the day for which you want to enter period data.
A red circle will appear during the day to indicate flow. - Alternatively, you can also tap Add Period at the top right and select a date to enter period data.
- In the Menstruation section under Cycle Log, tap Period and select the kind of flow you had.
- Tap Done.
On Apple Watch
- Press the Digital Crown to see all apps.
- Open the Cycle Tracking app.
- Tap the Day in the tracker at the top.
- Under the Menstruation section, tap Period to log the day’s menstruation flow.
- Tap Done.
How to log symptoms in Cycle Tracking
Even when you’re not on your period, it’s a good idea to log other day-to-day symptoms like headache, nausea, etc. These can help you track your overall health pre- and post-menstruation. You can log your symptoms on either the Health app on your iPhone or the Cycle Tracking app on your Apple Watch. Here’s how:
On iPhone
- Open the Health app and tap Browse.
- Select Cycle Tracking.
- Tap Symptoms and select all the applicable symptoms from the list.
- Tap Done.
NOTE: On the Symptoms screen, you can swipe left or right to log other information such as your menstrual flow, sexual activity, ovulation test results, basal body temperature, cervical mucus quality, and spotting.
On Apple Watch
- Press the Digital Crown and open the Cycle Tracking app.
- Tap Symptoms.
- Select all the applicable symptoms from the list.
- Tap Done.
Log sexual activity on iPhone and Apple Watch
Tracking your sexual activity can be helpful for several reasons, particularly when trying to conceive. Your doctor might need this information to assess your reproductive health and chances of pregnancy. Here’s how to track sexual activity on iPhone and Apple Watch.
On iPhone
- Open the Health app and tap Browse.
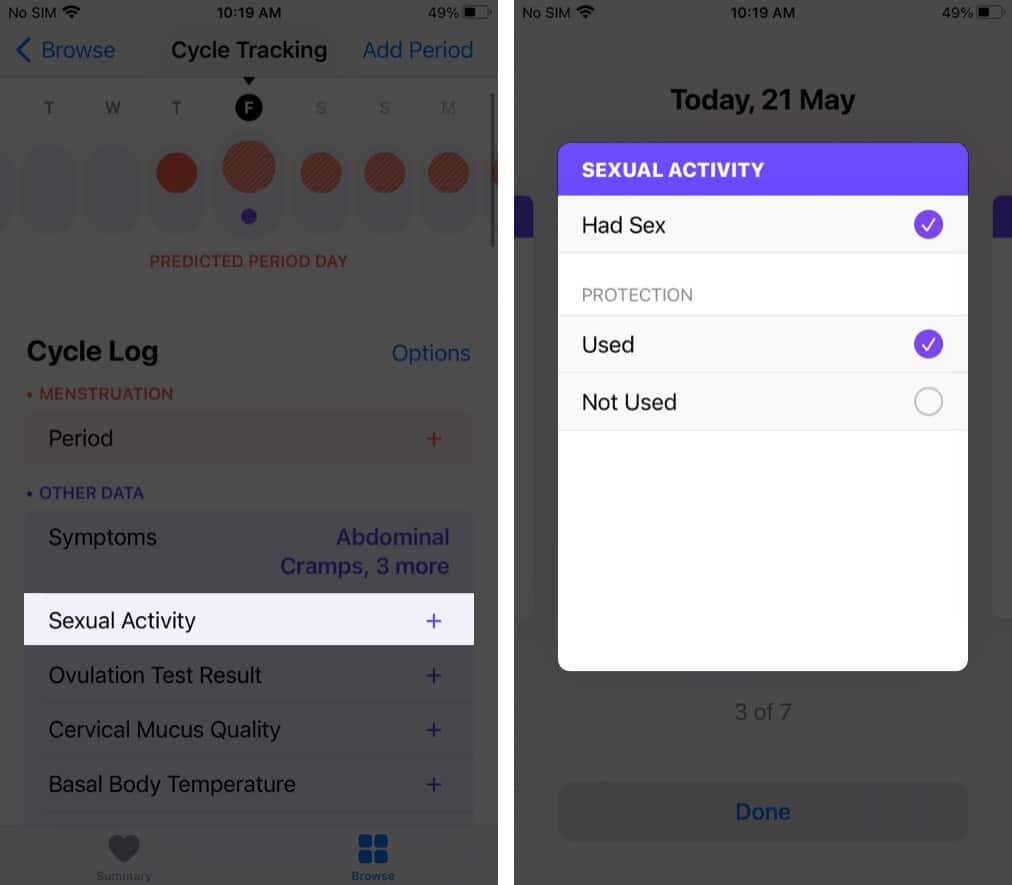
- Select Cycle Tracking and then tap Sexual Activity.
- Tap Had Sex if you had sex that day.
- Choose Used or Not Used to log whether you used protection.
- Tap Done.
Note: On the Sexual Activity screen, you can swipe left or right to log other information such as your menstrual flow, symptoms, ovulation test results, basal body temperature, cervical mucus quality, and spotting.
On Apple Watch
- Press the Digital Crown to see all apps. Open the Cycle Tracking app.
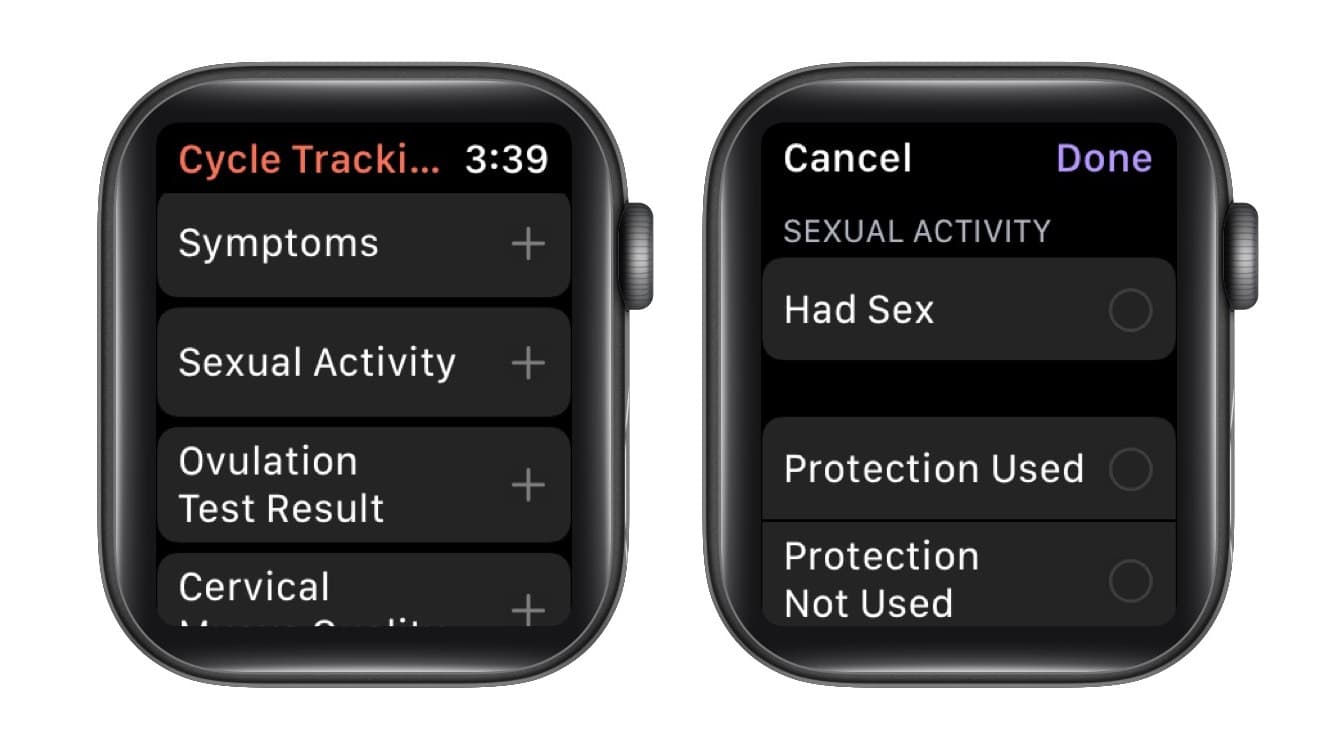
- Tap Sexual Activity.
- Choose Had Sex if you had sex that day.
- Select Used or Not Used to record if you used protection or not.
How to view your cycle history and statistics in the Health app
Once you’ve used the Cycle Tracking feature for a while, you can view your history and stats at any time in the Health app. Here’s how:
- Open the Health app and tap Browse.
- Select Cycle Tracking.
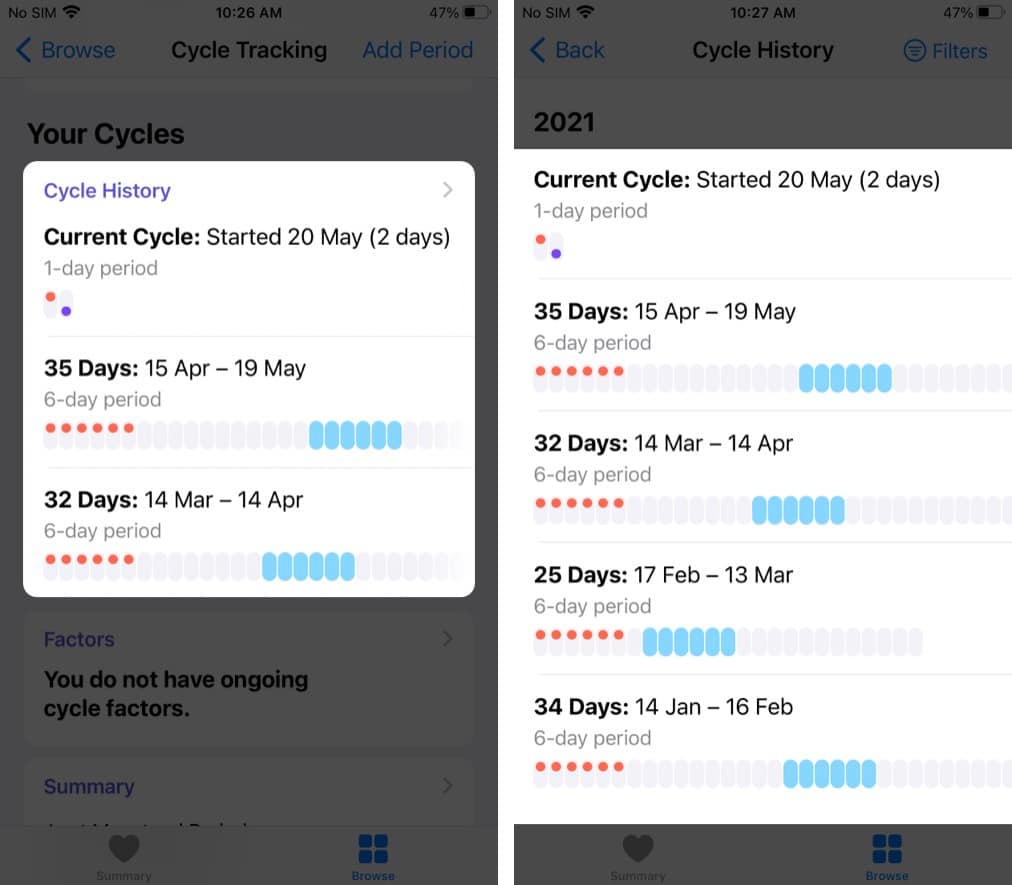
- Scroll down to see the history of your three most recent periods. Tap to see more details.
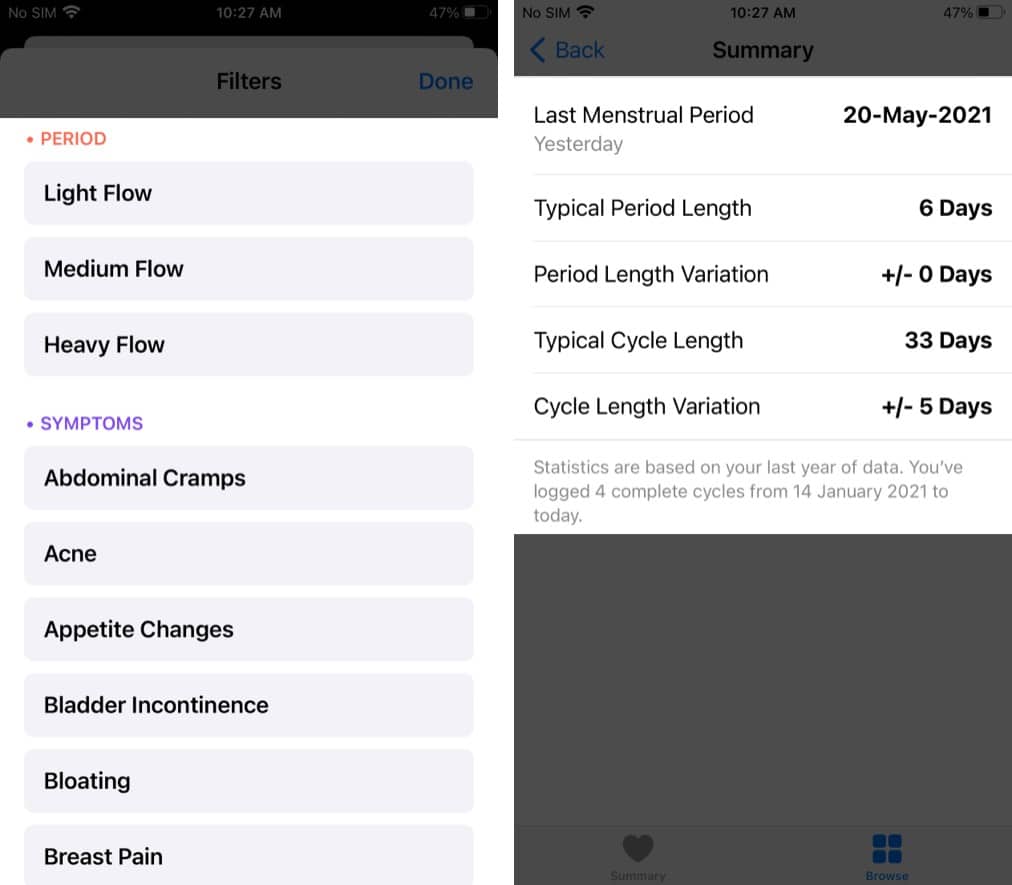
- In the detailed view, you can also find only the days that match a particular symptom or flow level. Select the Filters at the top right, choose your options, and tap Done.
- Optional: Tap Summary on the main Cycle Tracking screen to overview your period and cycle length.
Add Cycle Tracking to your favorites in the iPhone’s Health app
When you open the Health app on your iPhone, it displays a dashboard of your latest health stats. You can add your Cycle Tracking logs here by following the steps below:
- Open the Health app and tap the Summary tab.
- Tap Edit at the top next to Favorites.
- Select the star next to any Cycle Tracking logs you want to see in your Health dashboard.
- Tap Done.
How to delete Cycle Tracking data in the Health app on iPhone
You have the option to delete logs from the Health app. If you’re wondering about how to delete your menstrual cycle data from the Health app, along with other logs, here’s what you need to do:
- Go to Browse in the Health app and select Cycle Tracking.
- Scroll to the bottom and select View Cycle Tracking Items.
- Tap the Category Log you want to get rid of.
- Scroll down and select Show All Data.
- Tap Edit.
- Now, tap the red minus icon next to the data you want to remove.
- Tap Delete.
You can also choose Delete All at the top left. - Tap Done.
Repeat this for all logged data you want to delete from the Cycle Tracking.
How to delete the Cycle Tracking app from your Apple Watch
If you don’t want Cycle Tracking on your Apple Watch, you can get rid of it just like any other third-party app.
- Press the Digital Crown to see the Apps screen.
- If your apps are shown in
- List view: Swipe left on Cycle Tracking and tap the red trashcan.
- Grid view: Long-press the Cycle Tracking app until the icon jiggles. Next, tap the small x to delete it.
To get the app back, you can install Cycle Tracking on Apple Watch from the App Store like any other app.
How to keep your Cycle Tracking data private
Your Cycle Data is stored in HealthKit, the central repository containing all your health and fitness data on your iPhone. This database is encrypted and uses your iPhone’s passcode to decrypt it. This is why it’s very crucial to use a passcode on your iPhone or any of your biometrics (Face ID or Touch ID).
If your HealthKit is synced on the iCloud, it is also protected by end-to-end encryption, so even Apple can’t access it. Just be sure to enable two-factor authentication on your watchOS and iOS. You’ll need to provide explicit information before sharing your health data.
Conclusion
I hope this article answered all your questions about tracking your menstrual cycle in the Health app on your iPhone and the Cycle Tracking app on your Apple Watch. If there’s something more I can help you with, let me know in the comments below!
Read more:

