New to Apple Pages or simply looking for different things to do with the app on Mac? We’ll walk through several tips for using the app that’ll turn you into an Apple Pages Pro in no time!
What is Apple Pages?
Apple Pages is a word processing tool for macOS. It comes preinstalled when you purchase a Mac and is also available for free in the App Store.
Similar to Microsoft Word, you can create documents like articles, reports, and resumes, as well as brochures, newsletters, and flyers in Pages.
With the built-in features of Apple Pages, you can format text, insert media, use bullets and numbering for lists, add tables and charts, share documents, and much, much more.
Whether you’re new to Pages or have used it before, we’ll share some tips for making the most of the Apple Pages on Mac.
How to open Pages on Mac
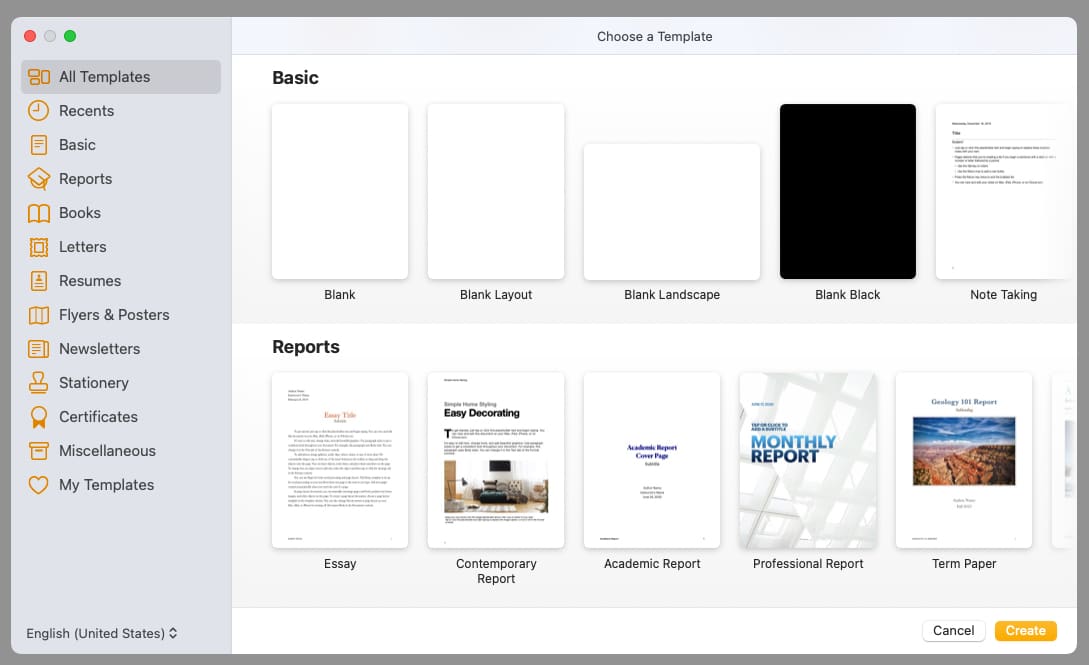
- To get started, open Pages from the Applications folder on your Mac. Select New Document.
- Then, pick a template for a quick start or the Blank option to start from scratch.
- Click Create and get ready to use Pages!
1. How to save documents in Pages
One feature you’ll almost always use is saving a Pages document. What makes the app even better is that you can save a document in a different file format or use the password-protection feature.
Save a document
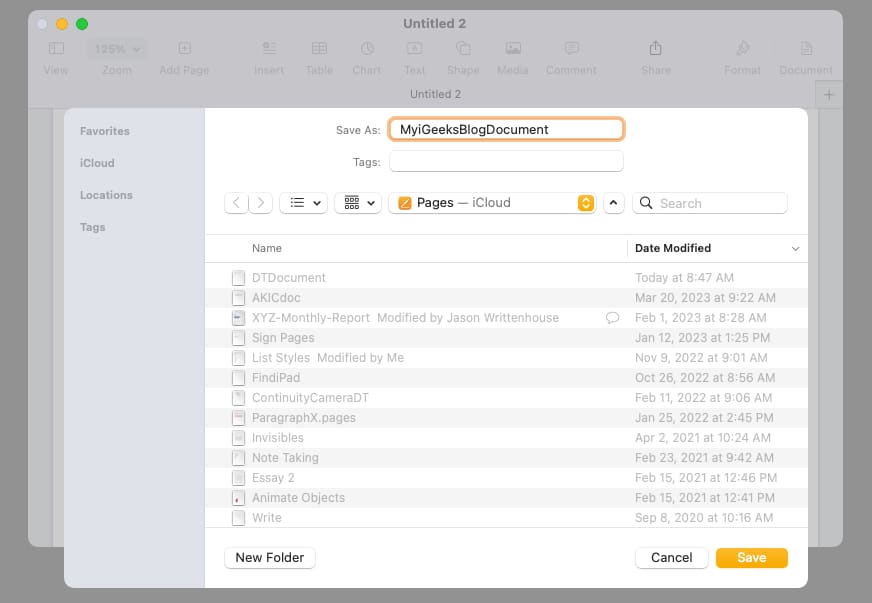
- To save a document, go to File → Save in the menu bar. The first time you save the file, you’ll be asked to provide a name.
- Next to Where, choose a location. Optionally, add tags → Click Save.
- After you save the first time, you can simply select File → Save to save with the same settings.
To save a document with a different file name, go to File in the menu bar, hold your Option key, and choose Save as. Then, enter the new name, pick a location, optionally add tags, and click Save.
Save as a different file type
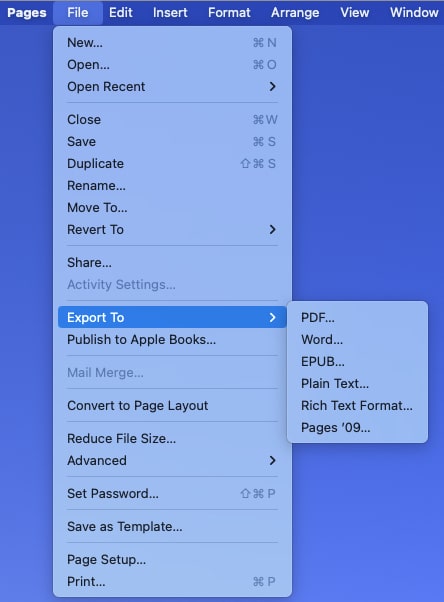
If you’d like to convert your Pages document to a different file type when you save it, this is easy to do. You can export it as a PDF, Word, Epub, plain text, or RTF document.
- Go to File in the menu bar → Choose Export to → Select a format in the pop-out menu.
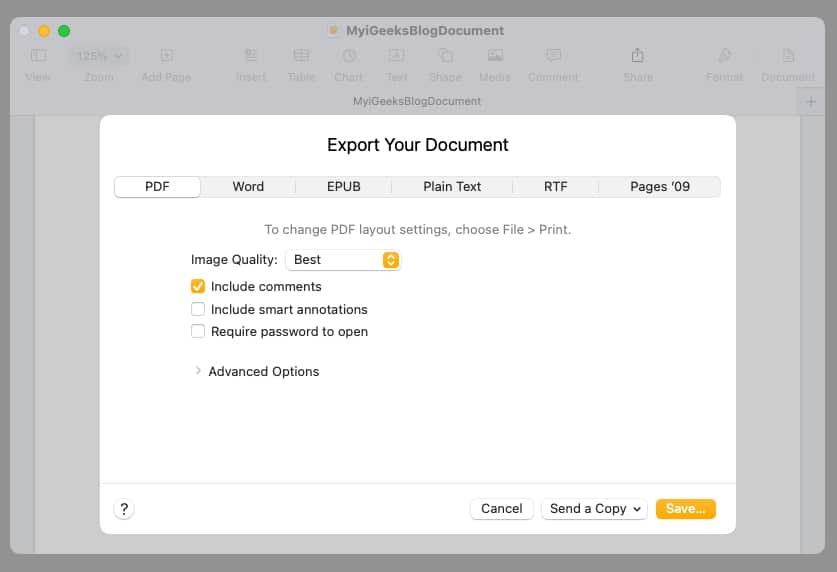
- When the Export Your Document box opens, confirm you’re on the correct tab for the file type you selected.
- Depending on the type you pick, you may see additional settings. For instance, you can choose the quality and include comments for a PDF file.
- When you’re ready, select Save.
- Then, name the file, optionally add tags, and pick the location to save it.
- Select Export, and you’re done.
Password-protect a Pages document
With the PDF and Word file formats, you can add a password when you export and save the Pages document.
- Follow the steps above to select either PDF or Word. In the Export Your Document box, check the option for Require password to open.
- Enter the password, verify it, and optionally include a hint.
- Select Save, and make sure to jot down the password in a safe spot.
2. Customize the toolbar in Pages
The nice thing about Pages, along with other macOS apps, is that you can customize the toolbar at the top. This allows you to include those actions you perform most and remove those you never use.
- Right–click the toolbar at the top of Pages and choose Customize Toolbar.
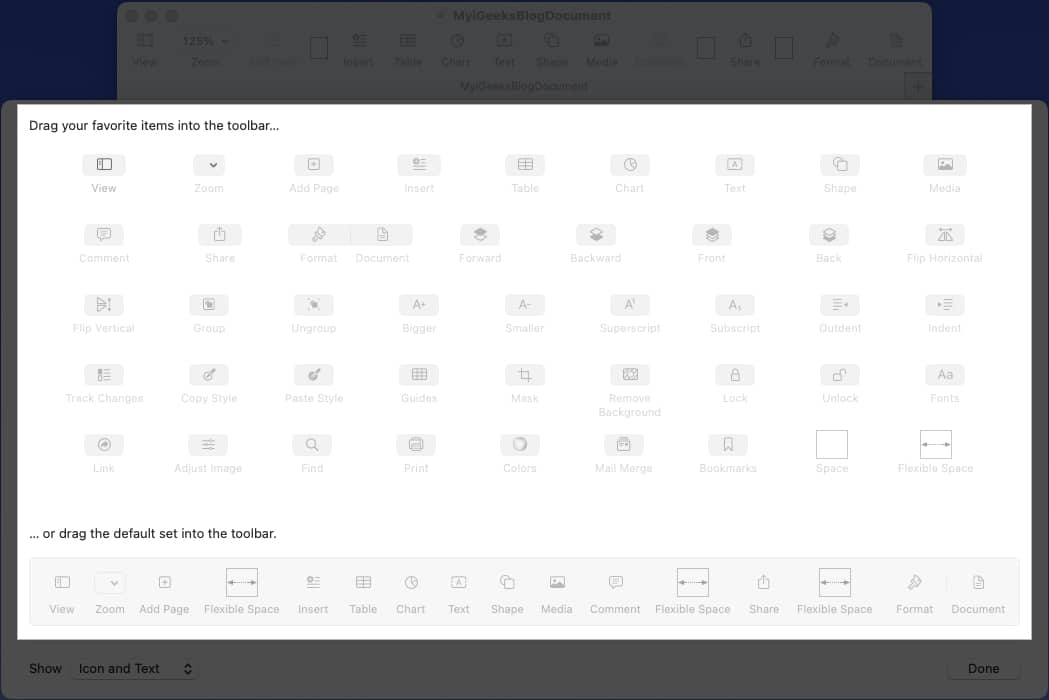
- When the toolbar window appears, you’ll see all of the items you can add. You can then do the following:
- To add an item, drag it from the window to the location you want it in the toolbar.
- To use the default set of items, drag that gray bar from the bottom onto the toolbar.
- To remove an item from the toolbar, drag it out and down to the window.
- To rearrange items in the toolbar, select and drag them where you want them.
- To choose from icons and text or only icons, select an option in the Show drop-down box on the bottom left.
- When you finish, click Done.
3. Adjust auto-correct settings in Pages
Auto-correct is a handy feature that anticipates what you want to type and corrects it if it’s misspelled. While you’re probably used to the feature in apps like Messages on iPhone, you can also use it in Pages on Mac. And luckily, you can customize how auto-correct works.
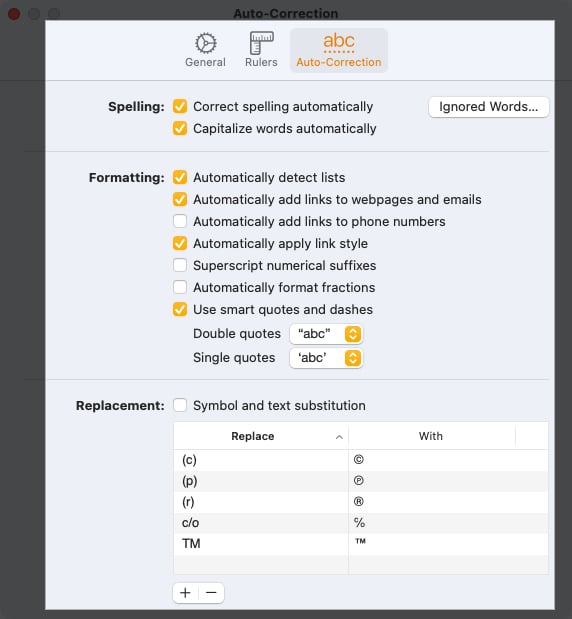
- Select Pages → Settings in the menu bar and pick the Auto-Correction tab in the box that appears.
- You’ll see sections for Spelling, Formatting, and Replacement.
- Spelling: Check the boxes to correct spelling and capitalize words automatically. For words you want Pages to ignore, select Ignored Words, add them to the list, and click OK.
- Formatting: Check the boxes for the formatting options you want to include and use the drop-down boxes to choose the Double and Single quotes formats.
- Replacement: Optionally check the box to use symbol and text substitutions. Then, review the text replacements and use the plus sign button to add one or the minus sign button to remove one.
- When you finish, close the box using the X on the top left.
4. How to track changes in Pages
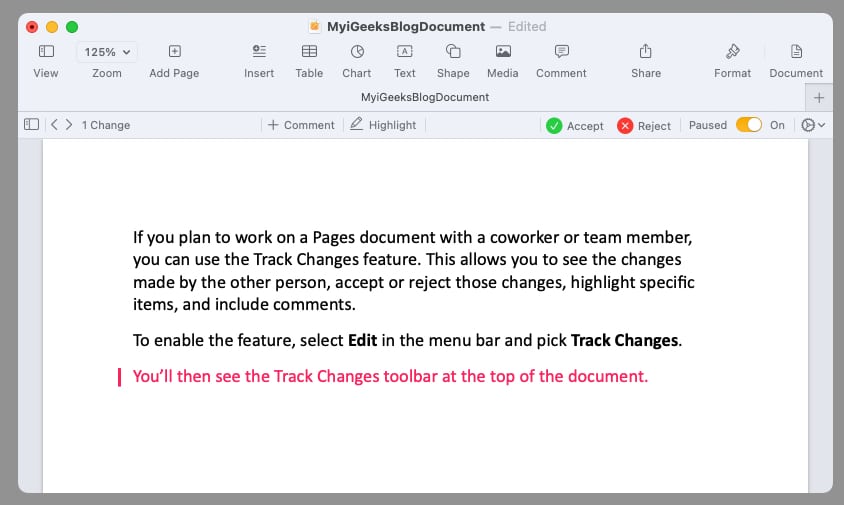
If you plan to work on a Pages document with a coworker or team member, you can use the Track Changes feature. This allows you to see the changes made by the other person, accept or reject those changes, highlight specific items, and include comments.
- To enable the feature, select Edit in the menu bar → Pick Track Changes.
- You’ll then see the Track Changes toolbar at the top of the document.
- Starting from the left, you can see the number of changes made, add a comment or highlight, accept or reject a change, and pause tracking.
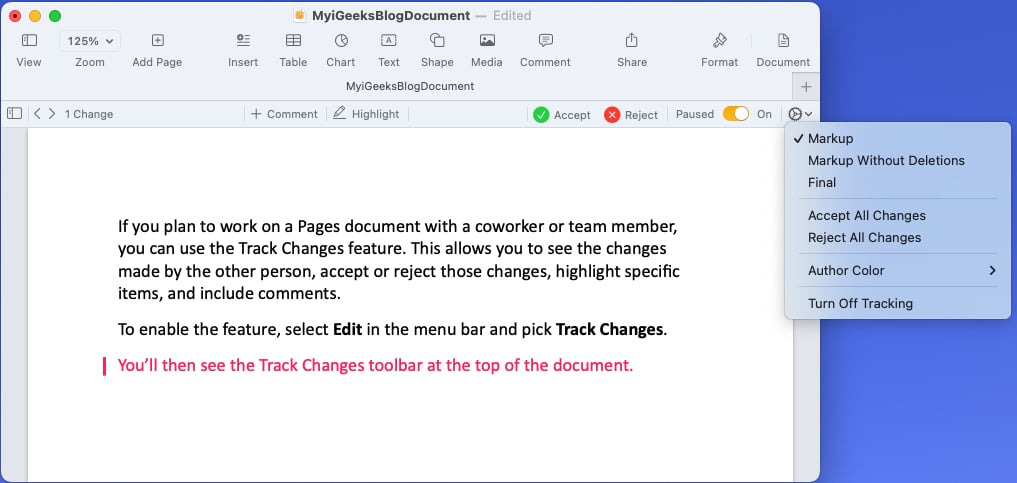
- On the far right, select the gear icon to adjust the settings for the tracking, including using markup or making the version final, accepting or rejecting all changes, and choosing your author color (to indicate changes you make).
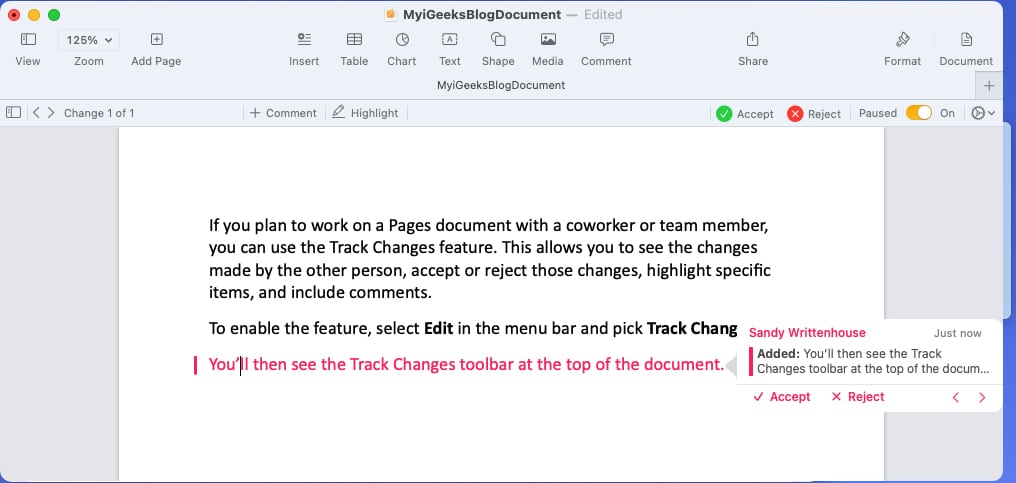
- As you and others add items or make changes, you’ll see them highlighted when you use Markup mode (above). You can then accept or reject changes by clicking Accept or Reject in the toolbar or in the pop-up window next to the edit.
- To stop tracking, select Edit in the menu bar or use the gear icon and pick Turn Off Track Changes. When you turn off tracking, you may be asked to accept or reject any changes you haven’t already.
- Starting from the left, you can see the number of changes made, add a comment or highlight, accept or reject a change, and pause tracking.
5. How to add objects in Pages
You may want to insert an object in your Pages, document like a table, chart, text box, or shape.
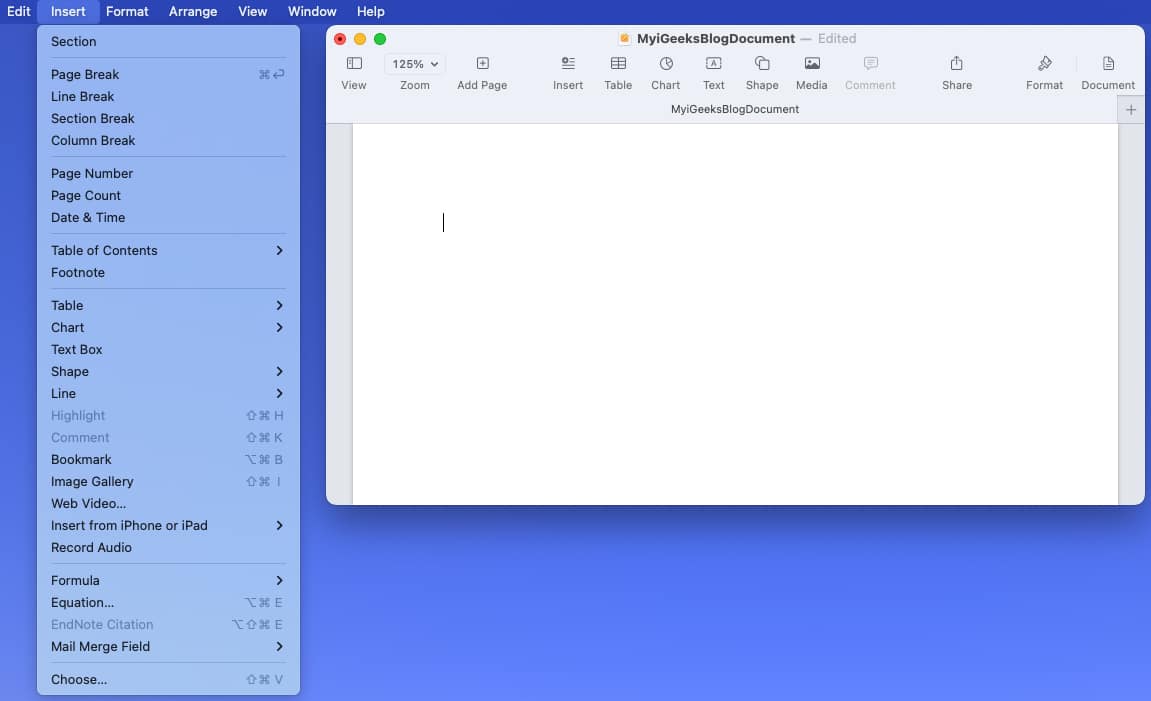
- To add an object, select it in the toolbar or open Insert in the menu bar and choose the item.
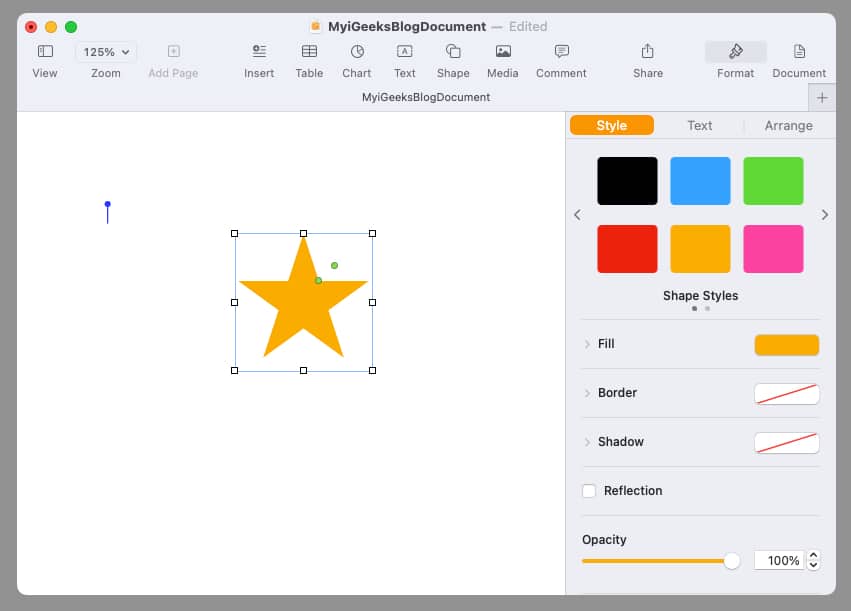
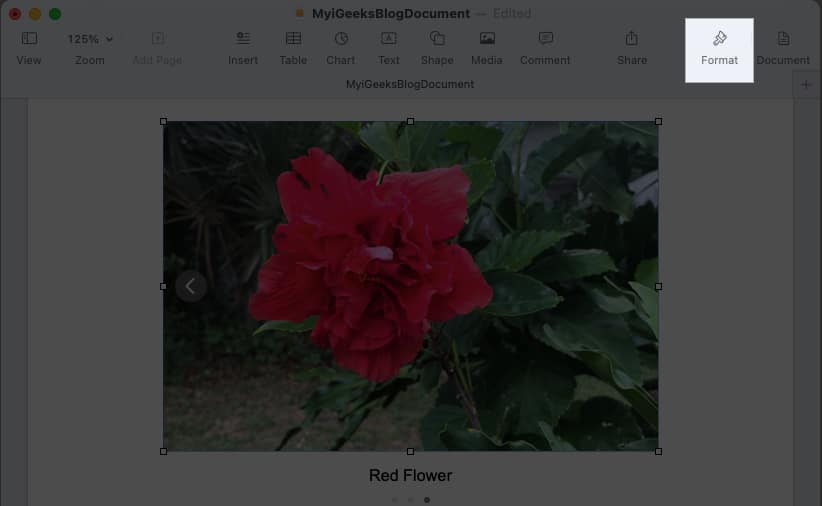
- Once you add your object, you can format it to your liking. Select the item and click Format on the top right to open the sidebar.
- Depending on the type of object you insert, you’ll have a variety of options. For example, if you add a shape, you can change its color, add a border, and toss in a shadow effect.
- Depending on the type of object you insert, you’ll have a variety of options. For example, if you add a shape, you can change its color, add a border, and toss in a shadow effect.
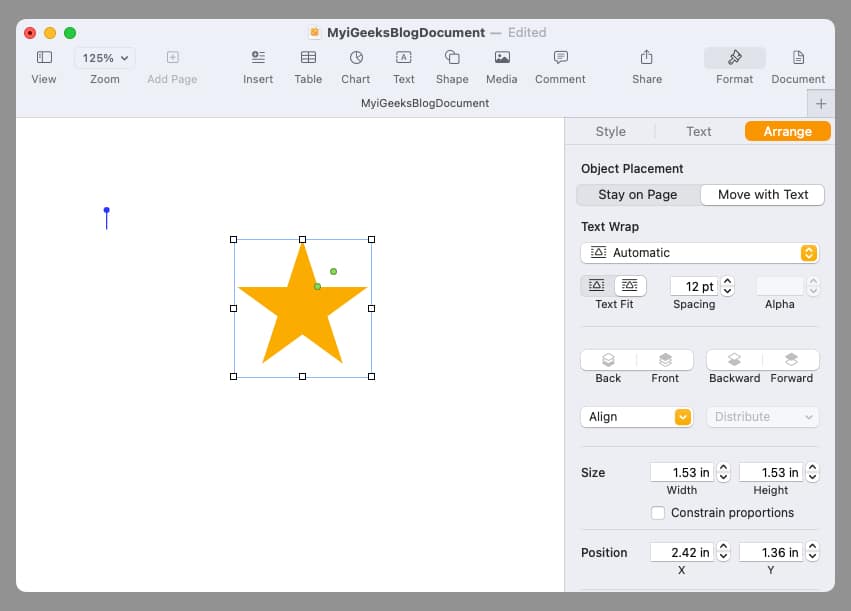
- Take advantage of the tabs in the sidebar per the object you add to format it, arrange it, or wrap the text around it.
6. How to insert images in Pages
For documents like brochures, flyers, school essays, or even a resume, you may want to add an image in Pages. You have various options for adding a photo, picture, or image from your Mac, iPhone, or iPad.
- Place your cursor in the document where you want the image.
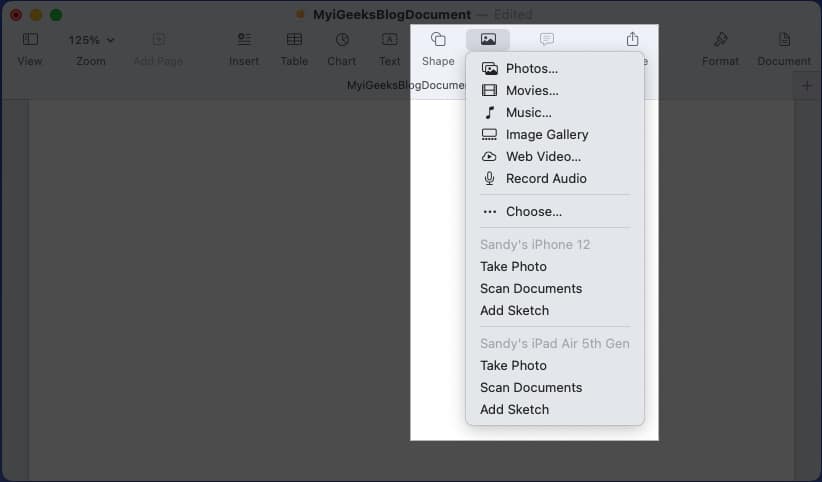
- Select the Media button in the toolbar. You can also use Insert in the menu bar. However, you have limited options.
- Then, pick one of the following:
- Photos: Choose a picture from the Photos app on Mac.
- Image Gallery: Insert a scrolling set of images. Click the image icon on the bottom right, select all of the images you want to add, and click Insert. You can then use the arrows on the gallery to move through the images.
- Choose: To insert an image from a location on your Mac, pick Choose and then browse for the picture.
- iPhone and iPad: If you have a connected iPhone or iPad, you’ll see options beneath that device to Take Photo, Scan Document, and Add Sketch. Pick one of these options and then follow the prompts on that device to snap a photo, sketch an illustration, or scan a document and insert it in Pages.
- Once you add your image to your document, you can click the Format button to open the sidebar for additional options depending on the type of image you add. For instance, if you simply insert a picture from Photos, you can adjust the exposure or remove the background.
7. Insert page numbers in Pages
If you have a document that requires page numbers or simply prefer to include them, you can easily add them to either the header or footer in your Pages document.
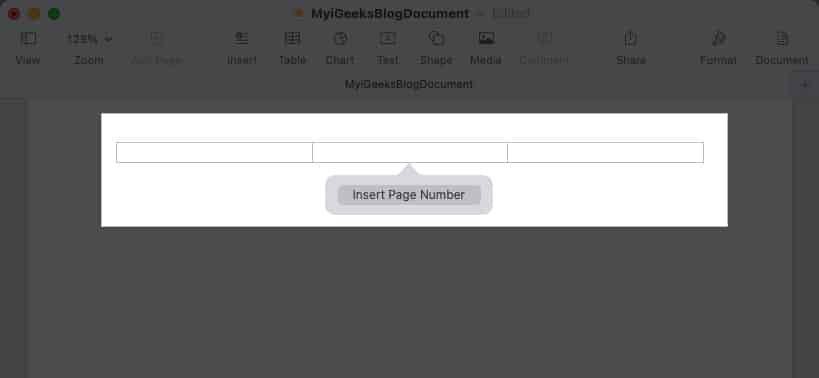
- Hover your cursor over the header or footer area to display the section.
- Click in one of the boxes that appear on the left, center, or right, and select Insert Page Number.
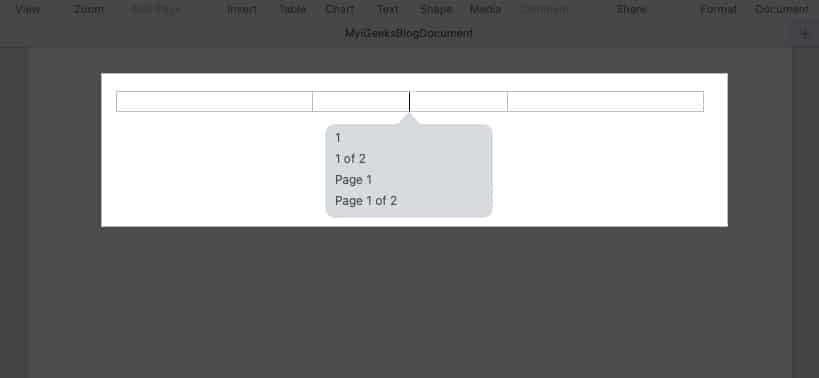
- Choose the format for the page numbers you want to use from the list that displays.
- You can then click another spot in your document to exit the header or footer.
Your page numbers automatically appear at the top or bottom of each page.
8. Change the background color in Pages
Maybe the document you’re creating needs a bit of pizzazz. You can change the background color of the document in just a few clicks.
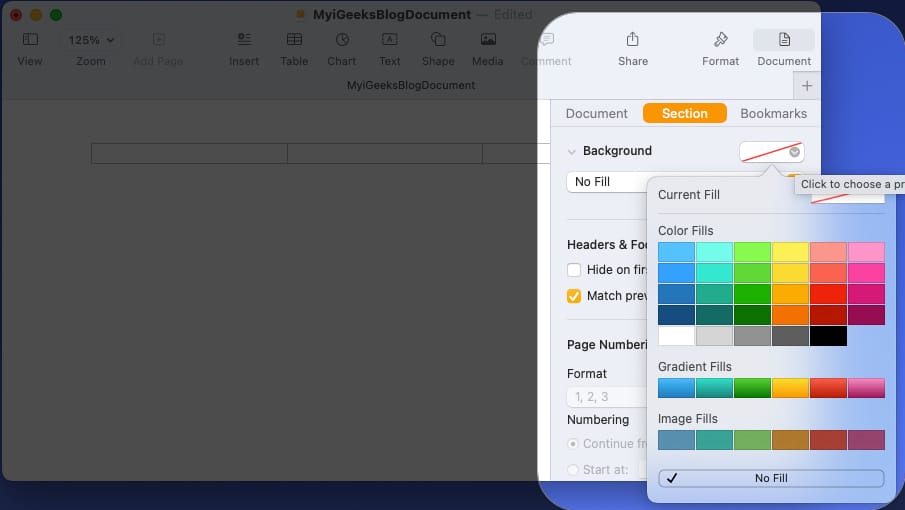
- Click the Document button on the top right to open the sidebar.
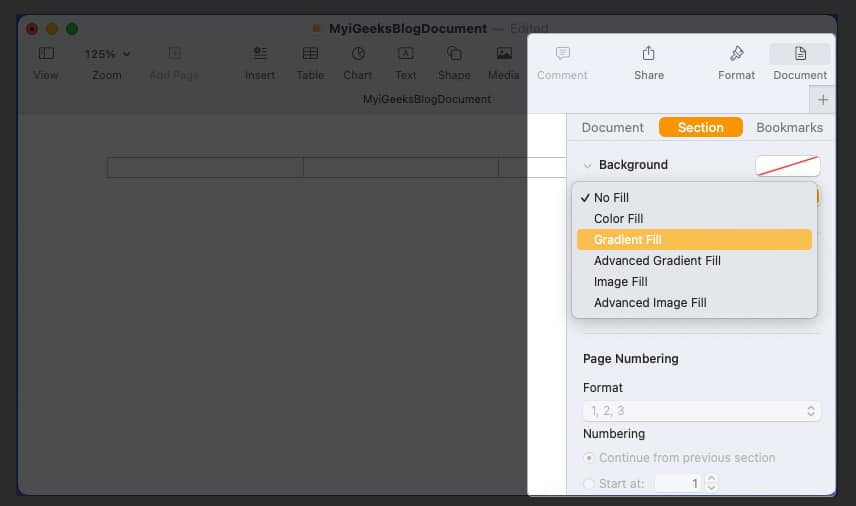
- Go to the Section tab and expand the Background option.
- To the right, click the palette button and choose a color for the document background.
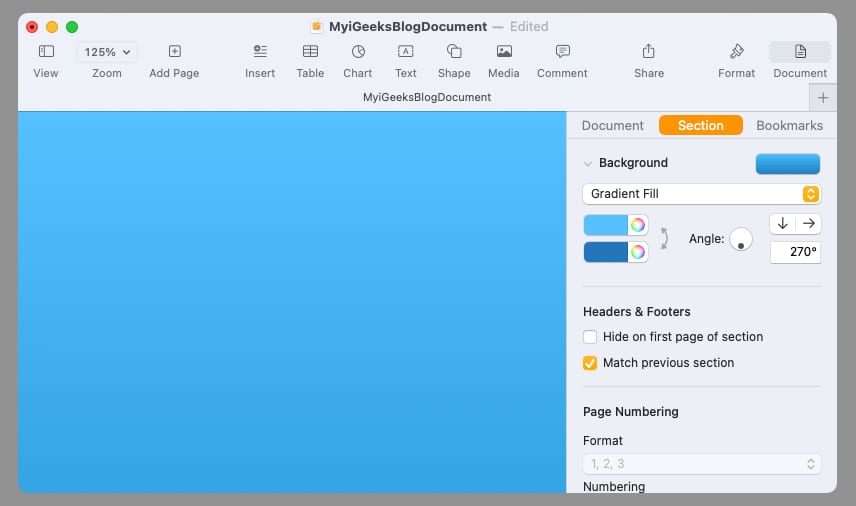
- To use a gradient, image, or advanced options, click the No Fill drop-down box and make your selection.
- Depending on the type of background you choose, you may see additional options. For example, if you pick Gradient, you can pick the colors and adjust the angle.
When you finish, you can close the sidebar by deselecting the Document button.
9. How to highlight text in Pages
Perhaps it’s specific text you’d like to highlight in your document instead. Unlike Microsoft Word, Apple Pages doesn’t offer a handy highlight button. However, you can still highlight text in any color you like.
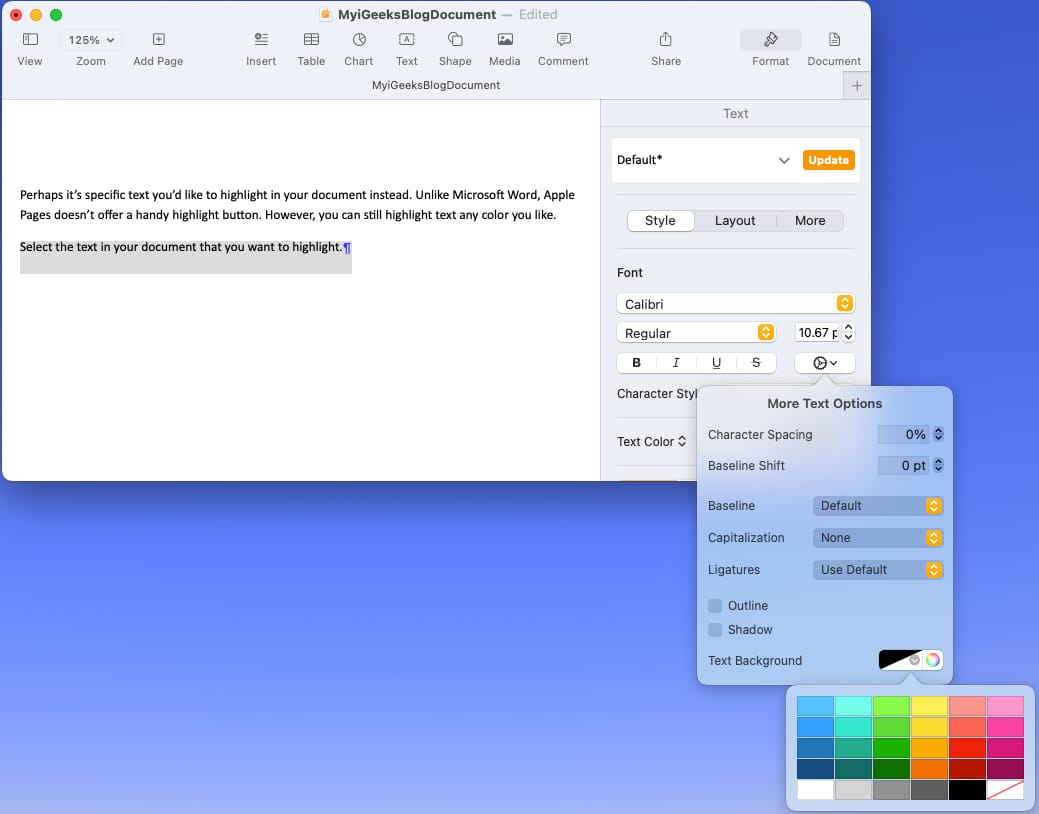
- Select the text in your document that you want to highlight.
- Click the Format button on the top right to open the sidebar.
- To highlight a word, phrase, or sentence, go to the Style tab. Click the gear icon and use the palette or color wheel next to Text Background to choose a color.
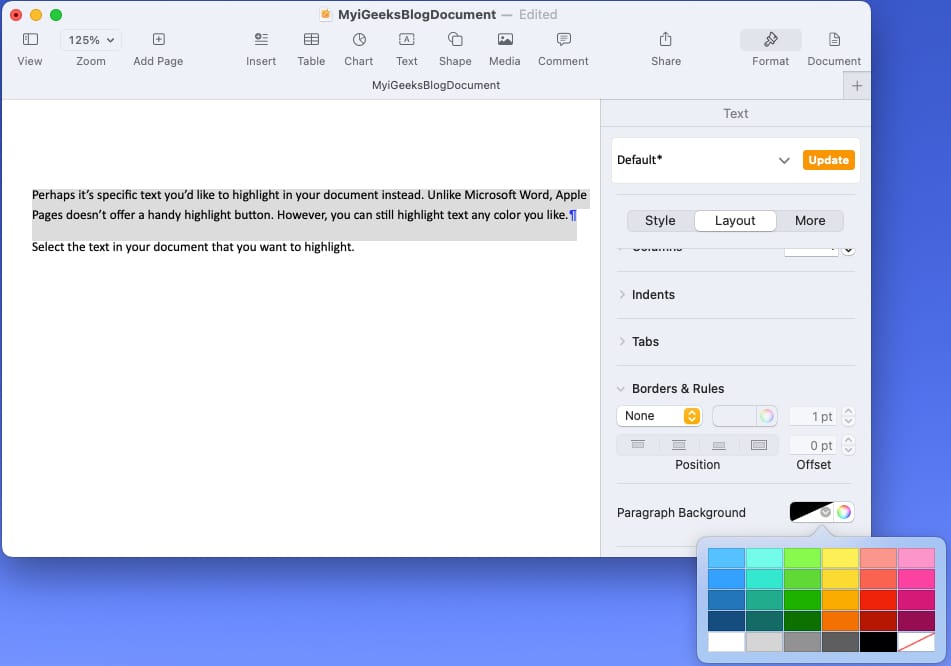
- To highlight a paragraph, go to the Layout tab and expand Borders & Rulers. Use the palette or color wheel next to Paragraph Background to choose a color.
- You’ll then see your text highlighted in your color of choice.
Click the Format button to deselect it and close the sidebar.
10. How to show the word count in Pages
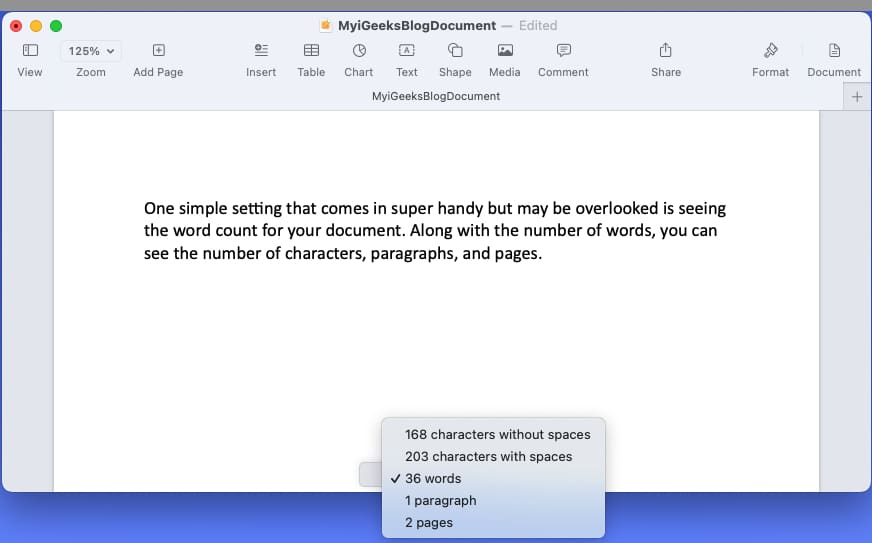
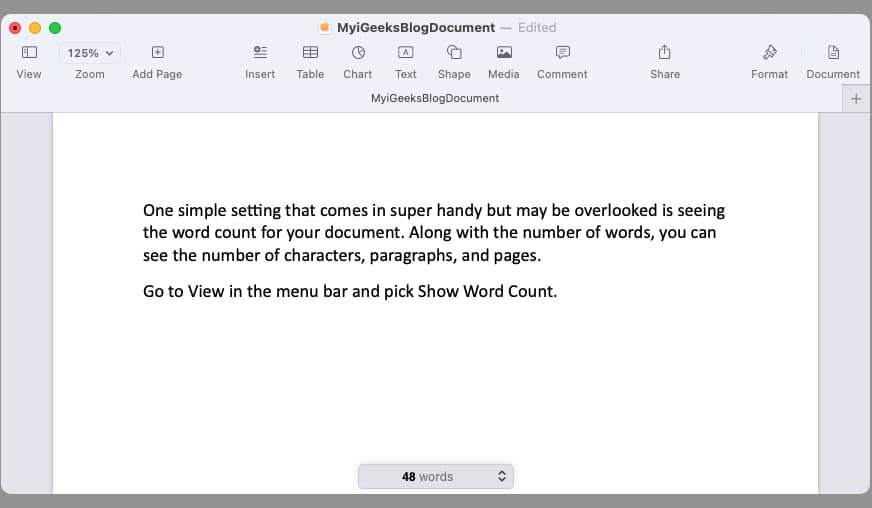
One simple setting that comes in super handy but may be overlooked is seeing the word count for your document. Along with the number of words, you can see the number of characters, paragraphs, and pages.
- Go to View in the menu bar and pick Show Word Count.
- When the counter displays at the bottom of the Pages window, you can click it to view and display the count for words, characters, paragraphs, or pages.
- As you work on your document, you’ll see the count at the bottom adjust accordingly.
To remove the word count at the bottom, select View and pick Hide Word Count.
Are you pumped for Pages?
Hopefully these tips have you ready to do something a little different in Pages. But remember, this isn’t an inclusive list. You can do even more than what you see here to create stunning documents using Pages on Mac. Plus, you can use and sync the app with your iPhone and iPad as well.
Check back with iGeeksBlog for more on using Apple Pages! In the meantime, share your own tips and tricks for using Pages on Mac.
Read more:

