Switching to a new iPhone is always exciting, but when it comes to transferring your cellular plan, things can get a little confusing, especially if you’ve got an eSIM. However, moving an eSIM from your old iPhone to a new one is easier than you think. In this guide, I’ll explain various methods to transfer eSIM without hassle.

Prerequisites for transferring an eSIM between iPhones
To smooth out the process, we’ve got a checklist of what you should check before you get going:
- Carrier support: Your carrier has to support eSIM and allow you to switch your eSIM to other devices. While major carriers like AT&T, Verizon and T-Mobile do, smaller ones might have limitations.
- Update iOS: You should have the latest iOS on both the old and new iPhones to use eSIM Quick Transfer. Check on both devices by going to Settings > General > Software Update.
- Steady internet connection: Wi-Fi and Bluetooth will be needed for the transfer, so make sure both are turned on and connected.
- Apple Account: Verify that both devices are signed in with the same Apple Account. The steps may include verification so don’t forget your password as well.
- Carrier account info: Have your carrier account info (like your phone number or account PIN) handy, as your carrier will need to confirm your identity.
Once you’re covered on these fronts, pick a method and follow the steps to transfer and activate your current eSIM on the new iPhone below.
Method 1: Transfer an eSIM while setting up your iPhone (Quick Start)
If you’re unboxing a new iPhone now, the simplest way to move your eSIM is during the initial setup with Apple’s Quick Start feature. It’s similar to moving data from old iPhone to the new one. Here’s how to do it:
- Turn on your new iPhone and hold it near your old one. Make sure it’s unlocked.
- Your old iPhone will show a pop-up to configure the new device. Tap Continue, and an animation should come up on the new iPhone’s screen.
- Scan the animation using your old iPhone for pairing.
- On your new iPhone, sign in with your Apple Account and follow the on-screen prompts.
- Once you get to the Set Up Cellular screen, choose one phone number linked to your Apple Account. If your numbers don’t appear, tap Transfer From Nearby iPhone.
- On the pop-up prompt on your old iPhone, tap Continue.
- Now verify your number by entering a code displayed on your new iPhone.
- After you get approved, complete your set up process.
iOS immediately deactivates your eSIM cellular plan on your old iPhone and transfers it over to your new iPhone in just a few minutes. This method is smooth as it’s built into the setup process. For additional tips, refer to this guide on using eSIM on iPhone.
Method 2: Transfer an eSIM after setting up your iPhone
Already set up your new iPhone? Don’t worry—you can still move your eSIM without having to start over. Here’s what to do:
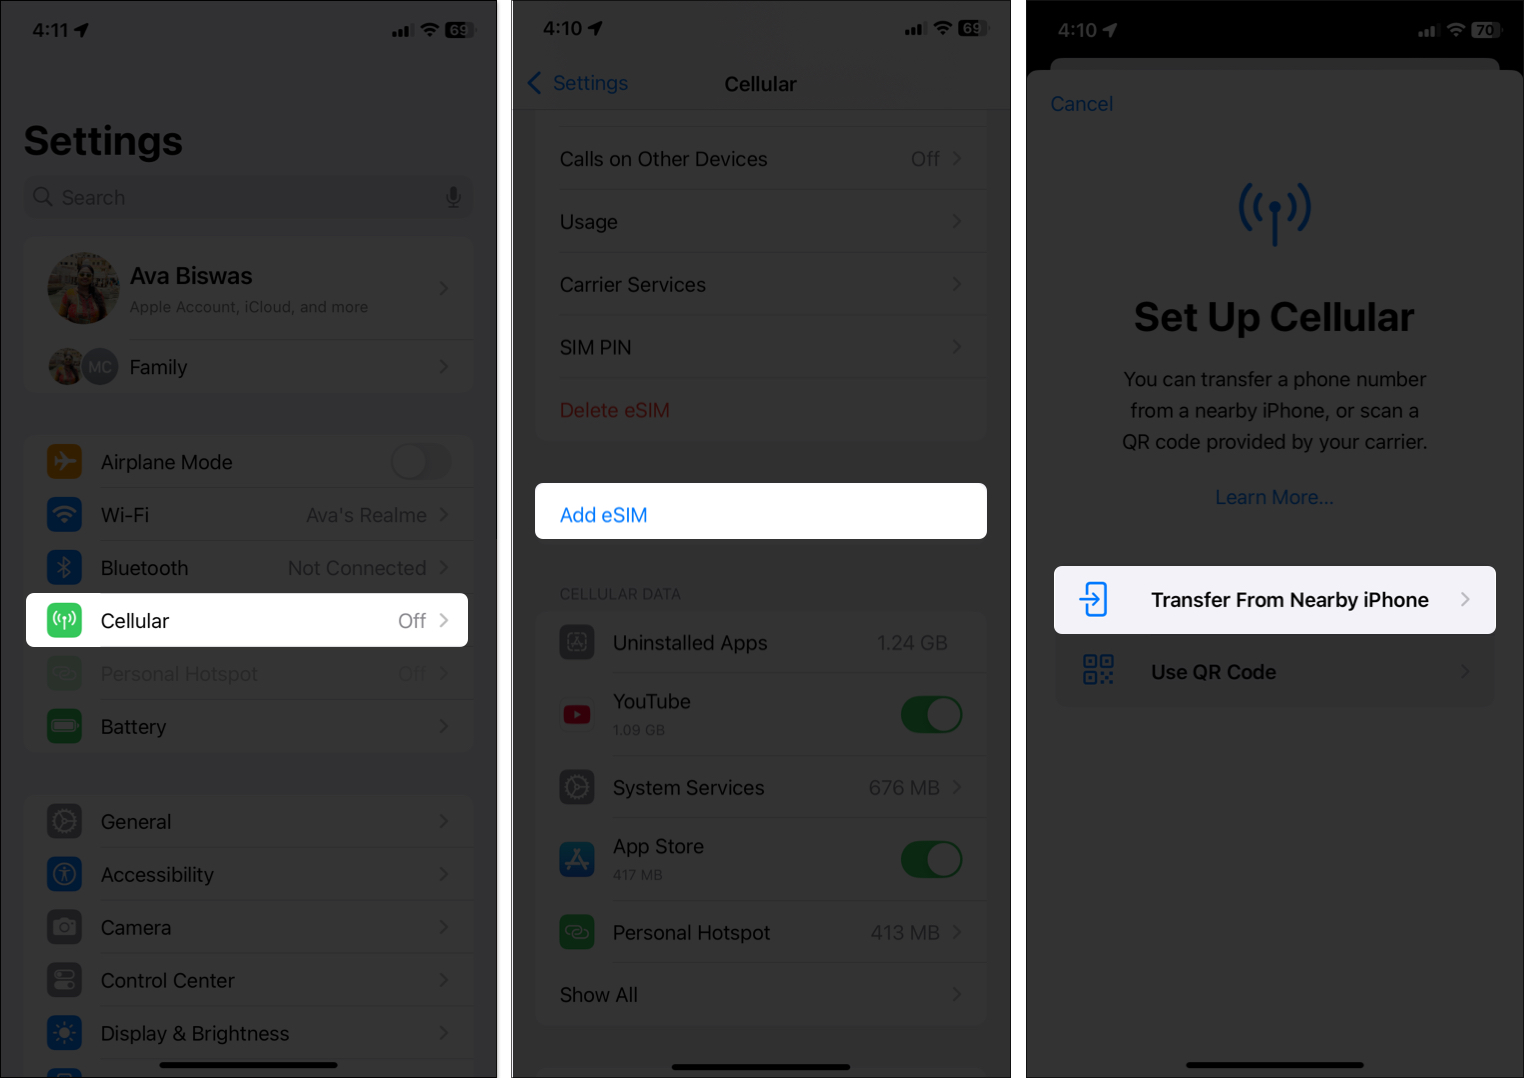
- On your new iPhone, go to Settings and select Cellular.
- Select Add eSIM or Set Up Cellular if you don’t have a number yet.
- Select the Transfer from Nearby iPhone option. Ensure that your old iPhone is nearby and unlocked with Bluetooth and Wi-Fi enabled.
- On your old iPhone, you will see a message to move your eSIM phone number to your new one. Tap Transfer to accept.
- You may have to enter a verification code from your carrier.
- Finally, open Settings on your new iPhone and see if you see anything that says Finish Setting Up Your Carrier’s Cellular Plan. Tap it to finalize the transfer on your carrier’s webpage.
This is the ideal way to transfer if you did not set up cellular initially. But what if you don’t have access to your old iPhone, or your carrier doesn’t support Apple’s Quick Transfer? Let me show you the manual way to transfer an eSIM from one iPhone to another.
Method 3: Transfer an eSIM using a carrier app or a QR Code
If the above didn’t work, some carriers want you to transfer your eSIM via their app or a QR code. Let’s look at the process for each of these methods.
Using your carrier’s app:
- Go to the App Store on your new iPhone and download your carrier’s official app (e.g., My Verizon, or T-Mobile, or AT&T).
- Log into the app using your carrier account credentials.
- Look for a section called Manage Device, Transfer Cellular Plan, or something similar. Follow the instructions to move the eSIM to the new iPhone.
Using a QR code:
- Contact your carrier to request an eSIM QR code.
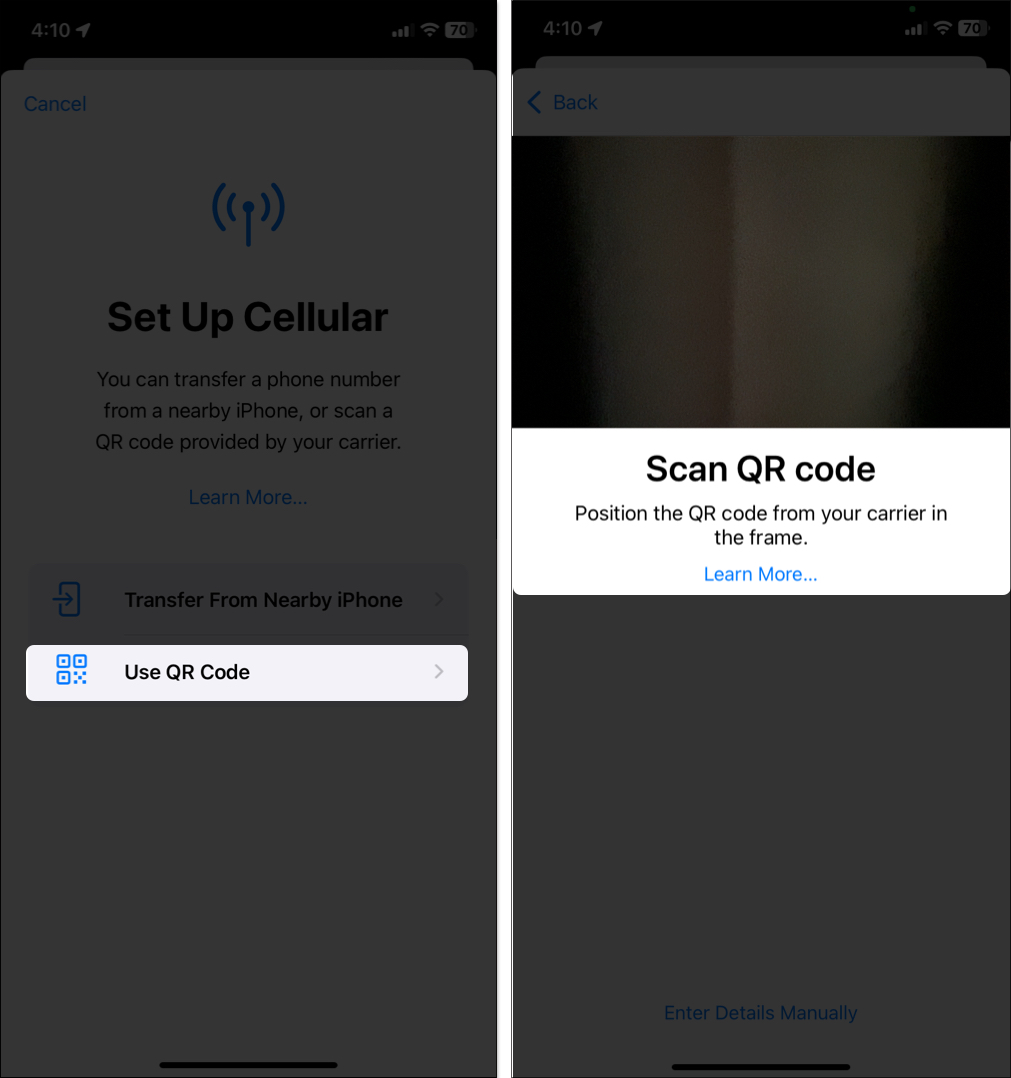
- On your new iPhone, head to Settings > Cellular > Add Cellular Plan/Add eSIM.
- Choose Use QR Code, and when prompted, scan the code your carrier provided (see your email or carrier app).
- Just follow the prompts to finish the activation.
What to do if your eSIM is not transferring to the new iPhone?
Sometimes, eSIM Quick Transfer does not work as intended. If your eSIM doesn’t transfer over, don’t worry—here’s the remedy:
- Restart iPhones: A simple restart can fix minor bugs. Reboot both devices and attempt the transfer once more.
- Carrier compatibility: Ensure your carrier supports eSIM transfers from one iPhone to another. With smaller carriers, you might have to configure it manually.
- iOS version: Ensure you update both iPhones to the latest version of iOS. Problems can arise with an old system.
- Contact your carrier: If the transfer still fails, your carrier may need to manually activate the eSIM on their end. For support, call them or visit their website.
- Reset Network Settings: On your new iPhone, go to Settings > General > Transfer or Reset iPhone > Reset > Reset Network Settings. This clears saved Wi-Fi passwords, so have them on hand.
Signing off
Moving your eSIM from one iPhone to another means you can keep your existing cellular plans, phone numbers, and data without getting new plans or handling physical SIM cards. This saves you time, effort, and money, as you are not buying a new cellular plan or SIM card.
If you have questions or need more help, consider consulting Apple Support or your carrier customer service.
You May Also Like:


