You’re browsing the App Store when you see something that interests you. You hit “Get,” only to be stopped dead by an annoying message. Follow this guide to learn how to stop the App Store “Verification Required” prompt when installing free apps on your iPhone or iPad.
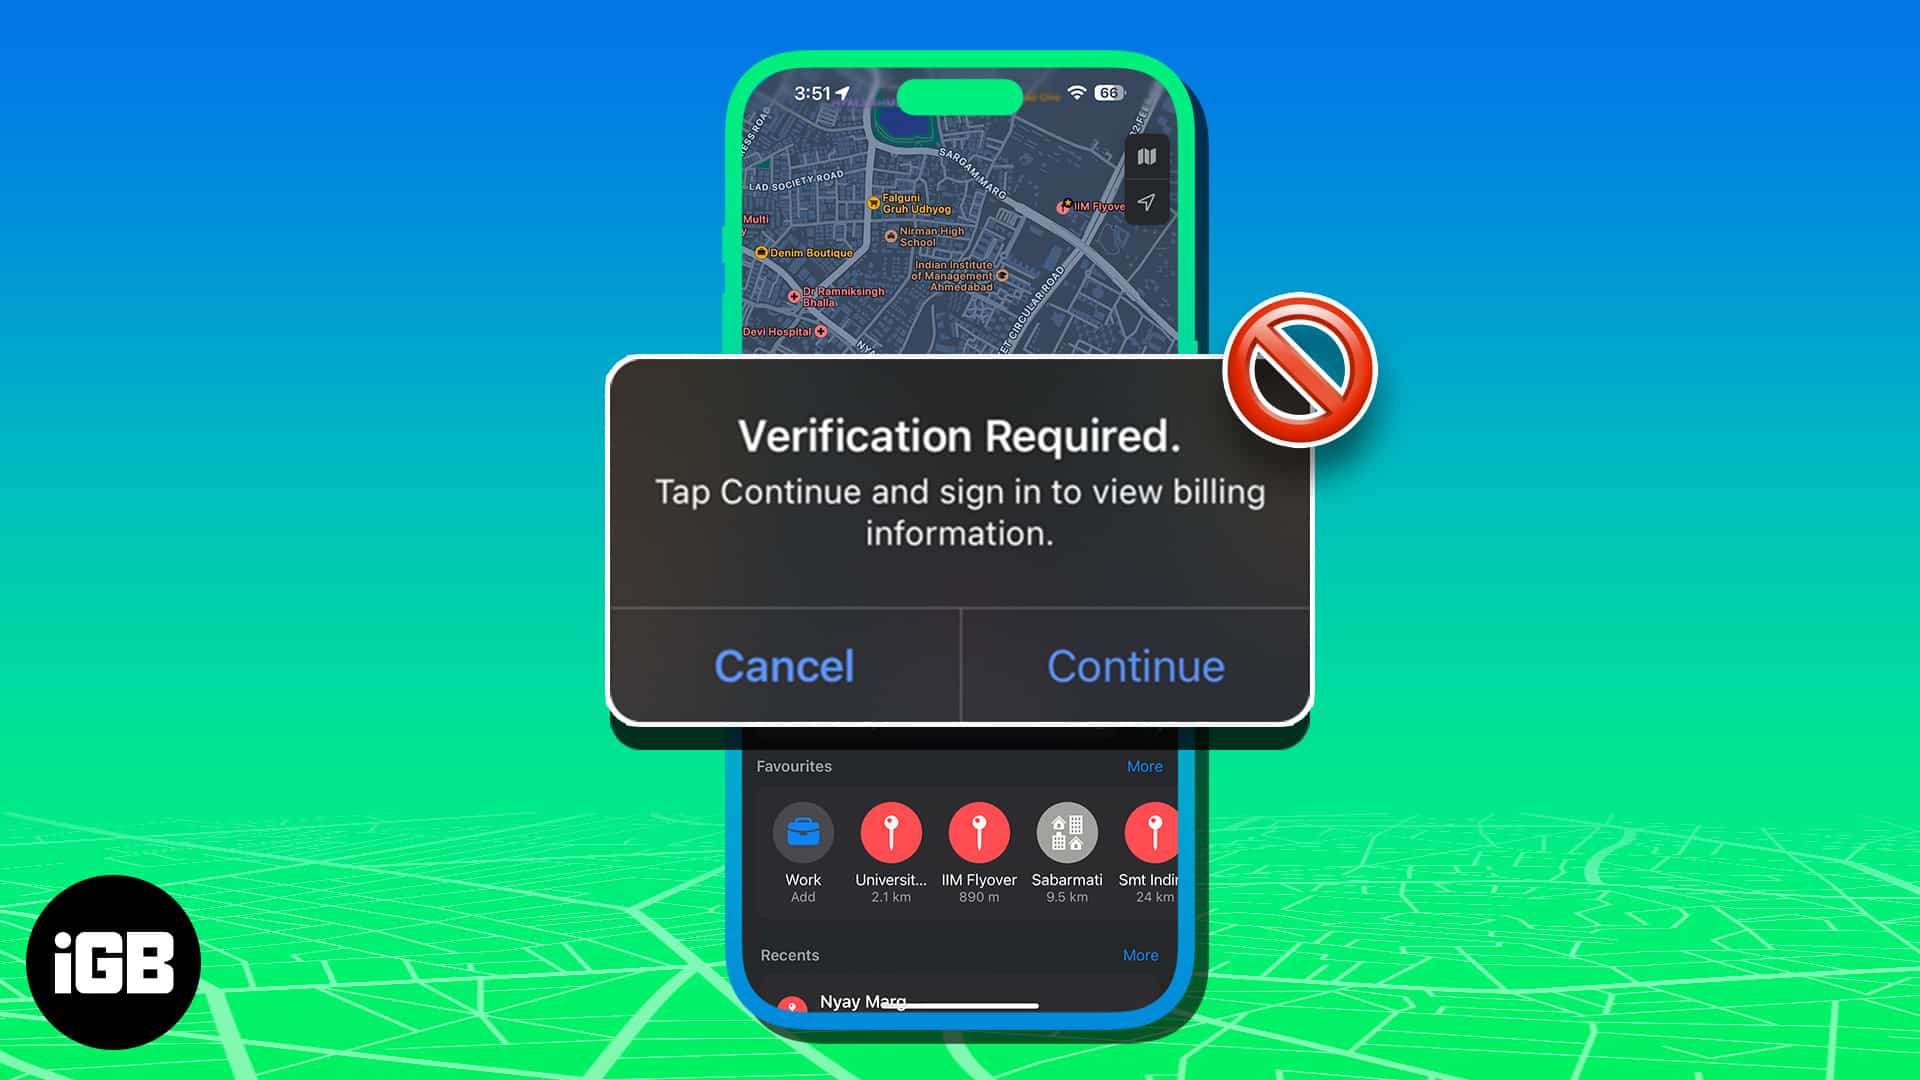
Why does my App Store keep saying “Verification Required”?
The “Verification Required” prompt on the App Store asks you to verify your payment info, preventing you from downloading apps on your iPhone.
Here are some of the potential reasons why you see a “Verification Required” popup whenever you launch the App Store:
- You’ve never used your Apple ID to download an app on your iPhone (whether paid or free)
- There is an error with the current payment method associated with your Apple ID, preventing Apple from charging you
- You have an unpaid balance or insufficient funds on the payment method associated with your Apple ID
- The saved payment method is not supported
- Your payment method has not been updated
- You’re under a Family Sharing account, and your Apple account is restricted
How do I turn off App Store “Verification Required” when installing free apps
Now that you have an idea of what’s causing this message, let’s get into the solutions. Luckily, most of these fixes are quick and easy to follow.
1. Enter a payment method for your Apple ID
If you’re using a new Apple ID or have never downloaded an app under your existing ID, Apple requires you to fill in your payment details before you can download any apps on your iPhone—regardless of whether the app is free or paid.
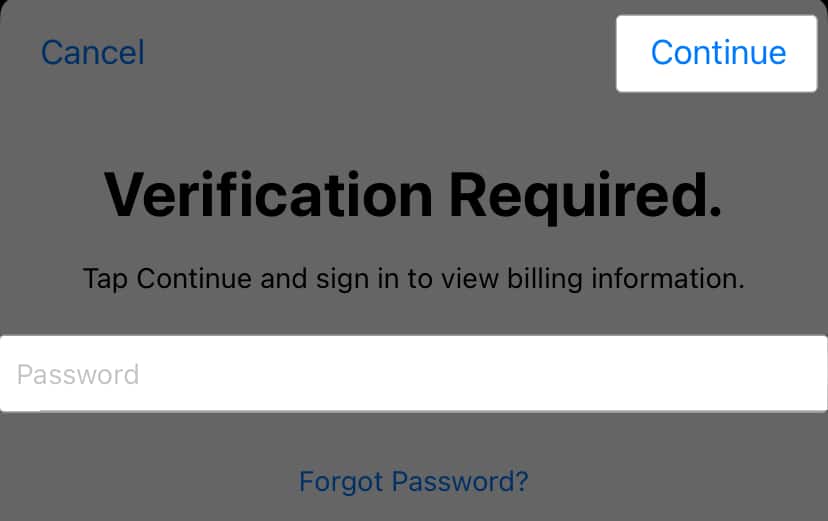
- In this case, enter your Apple ID password in the text field → Tap Continue.
- Your device will redirect you to your billing information → Enter your payment details.
- Once done, you should be able to begin downloading apps.
2. Change or update Apple ID payment method
If you were able to download an app on your iPhone previously but are now getting a “Verification Required” error on the App Store, there’s a good chance it’s because of an issue with your payment method.
If your credit or debit card has expired or there have been changes to your name or address, your financial institution may automatically update your card information.
This can lead to discrepancies between the newly updated card details and the payment information associated with your Apple ID, causing a mismatch that triggers the “Verification Required” error.
In this case, add a new card before removing the old one. To do this:
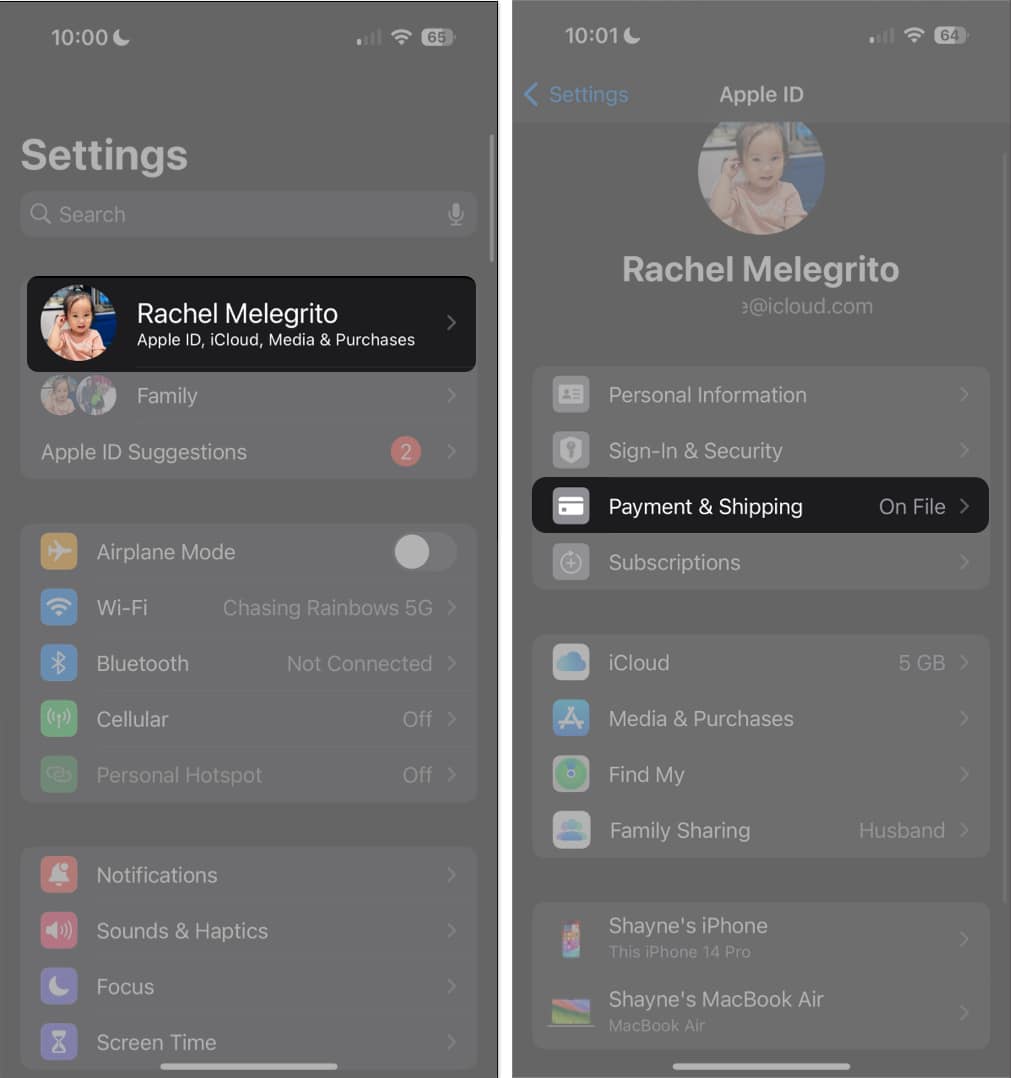
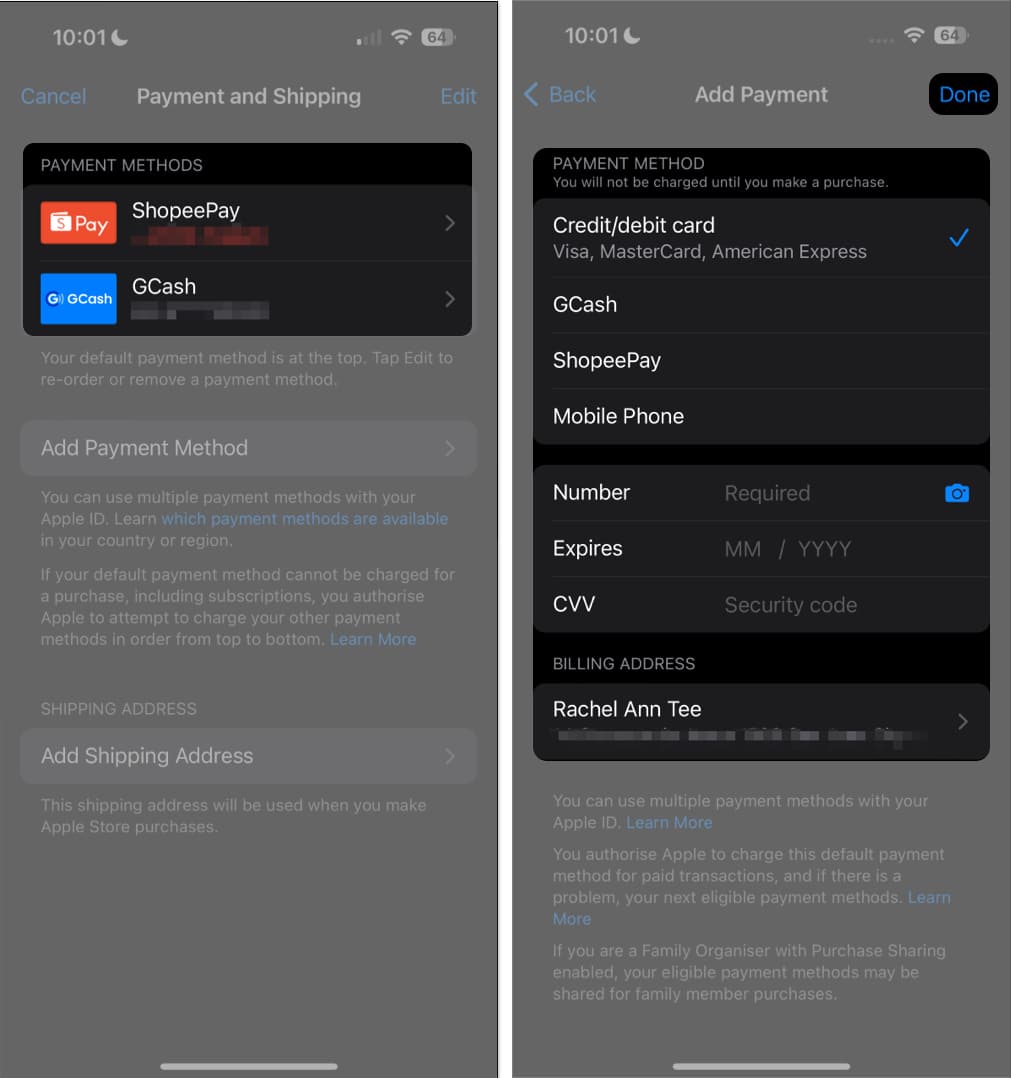
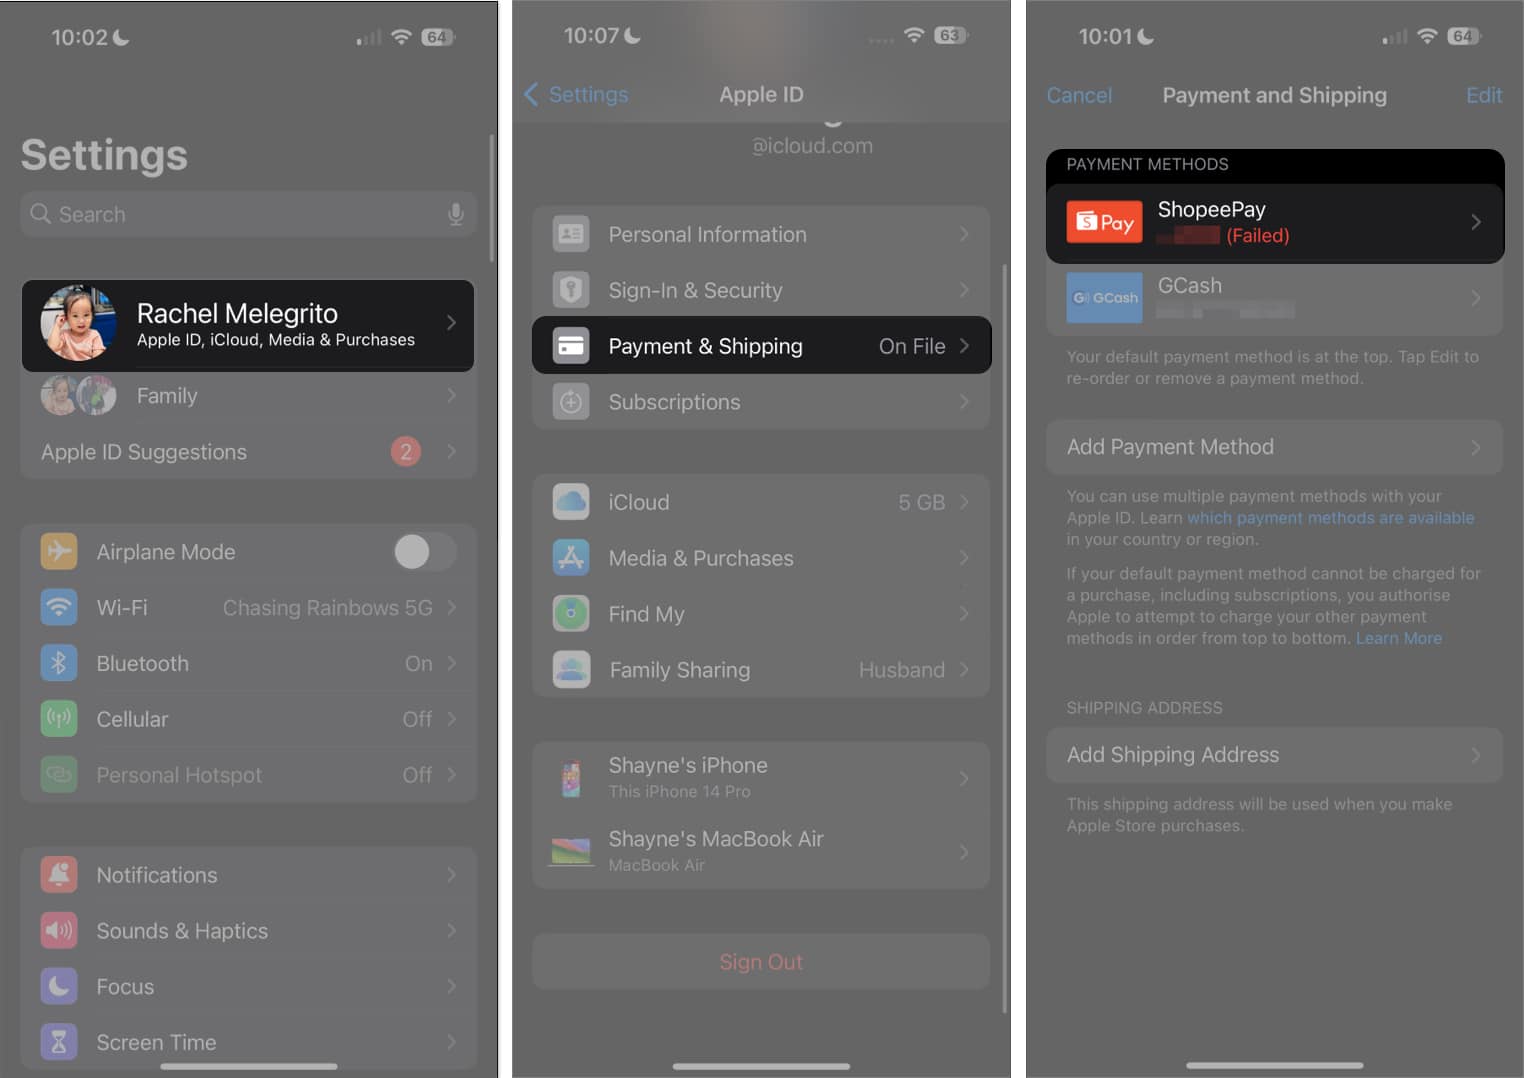
- Go to Settings → Apple ID [your name] → Payment & Shipping.
- Enter your passcode, Touch ID, or Face ID.
- Your current payment information might open → Tap Back to go to Payment and Shipping.
- Select Add Payment Method.
- Fill in with the details and tap Done.
Once you have your new payment method, you can delete the old one with outdated information.
What to do with declined/failed payments?
The Verification Required error can also occur when a payment fails or gets declined if your digital wallet or mobile phone billing doesn’t have enough balance.
- To check, go to Settings → Apple ID [your name] → Payment & Shipping and see the payment methods linked to your Apple ID.
- If you see the payment method in red and a (Failed), you must use a different one.
- If the old payment method doesn’t work, you can change the payment method by selecting from the available Payment Method options and entering all the required details.
Remember that the availability of payment methods depends on your country and region.
3. Pay any unpaid subscription dues
Your purchase may fail if you don’t have sufficient funds on your preferred payment method. In this case, a declined or payment failure will prompt your iPhone to show a “Verification Required” popup. So you can quickly update your payment method.
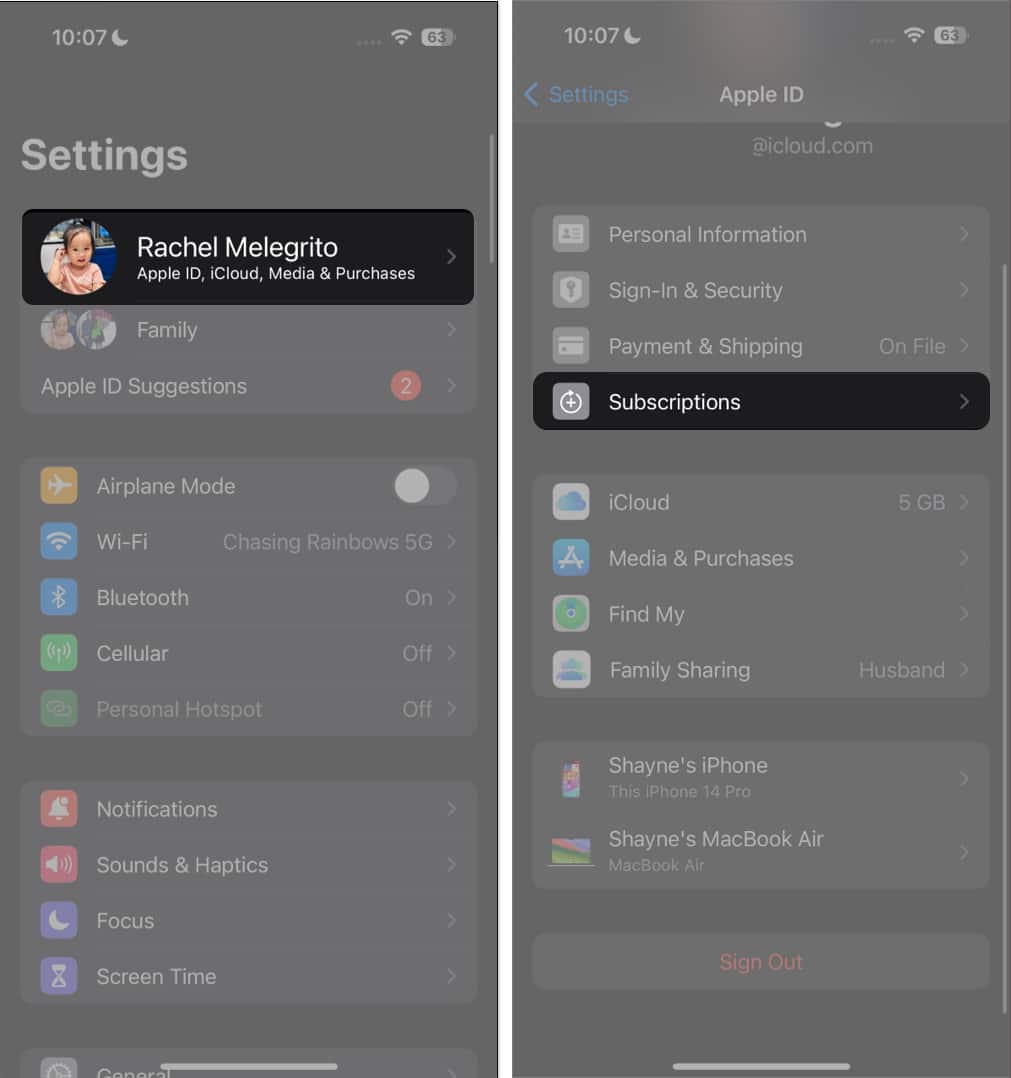
- To check if you have any unpaid subscriptions, head to Settings → [your name] → Subscriptions. Check if you have any subscriptions that require payment.
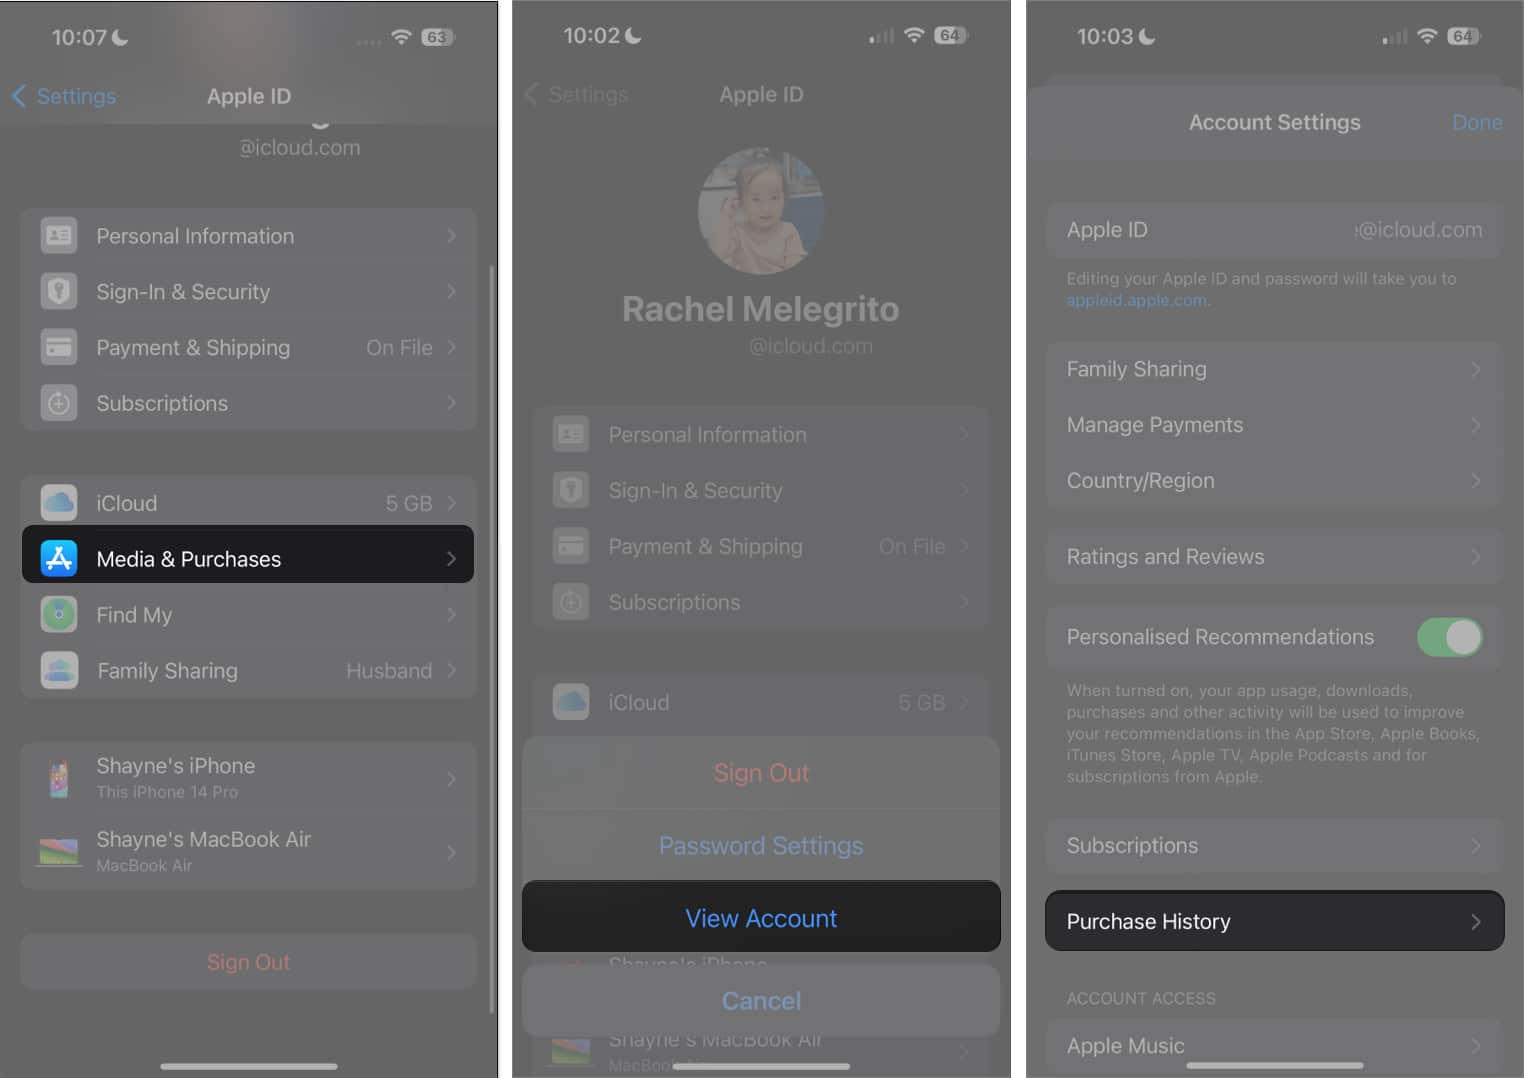
- Then go back to your Apple ID page, tap Media & Purchases → View Account → Purchase History.
- If you’ve hidden them, be sure to unhide your App Store purchases first. If you’ve made purchases you haven’t paid for yet, you’ll see an Amount You Owe in red under the app download or in-app purchase you made.
4. Disable App Store Restrictions
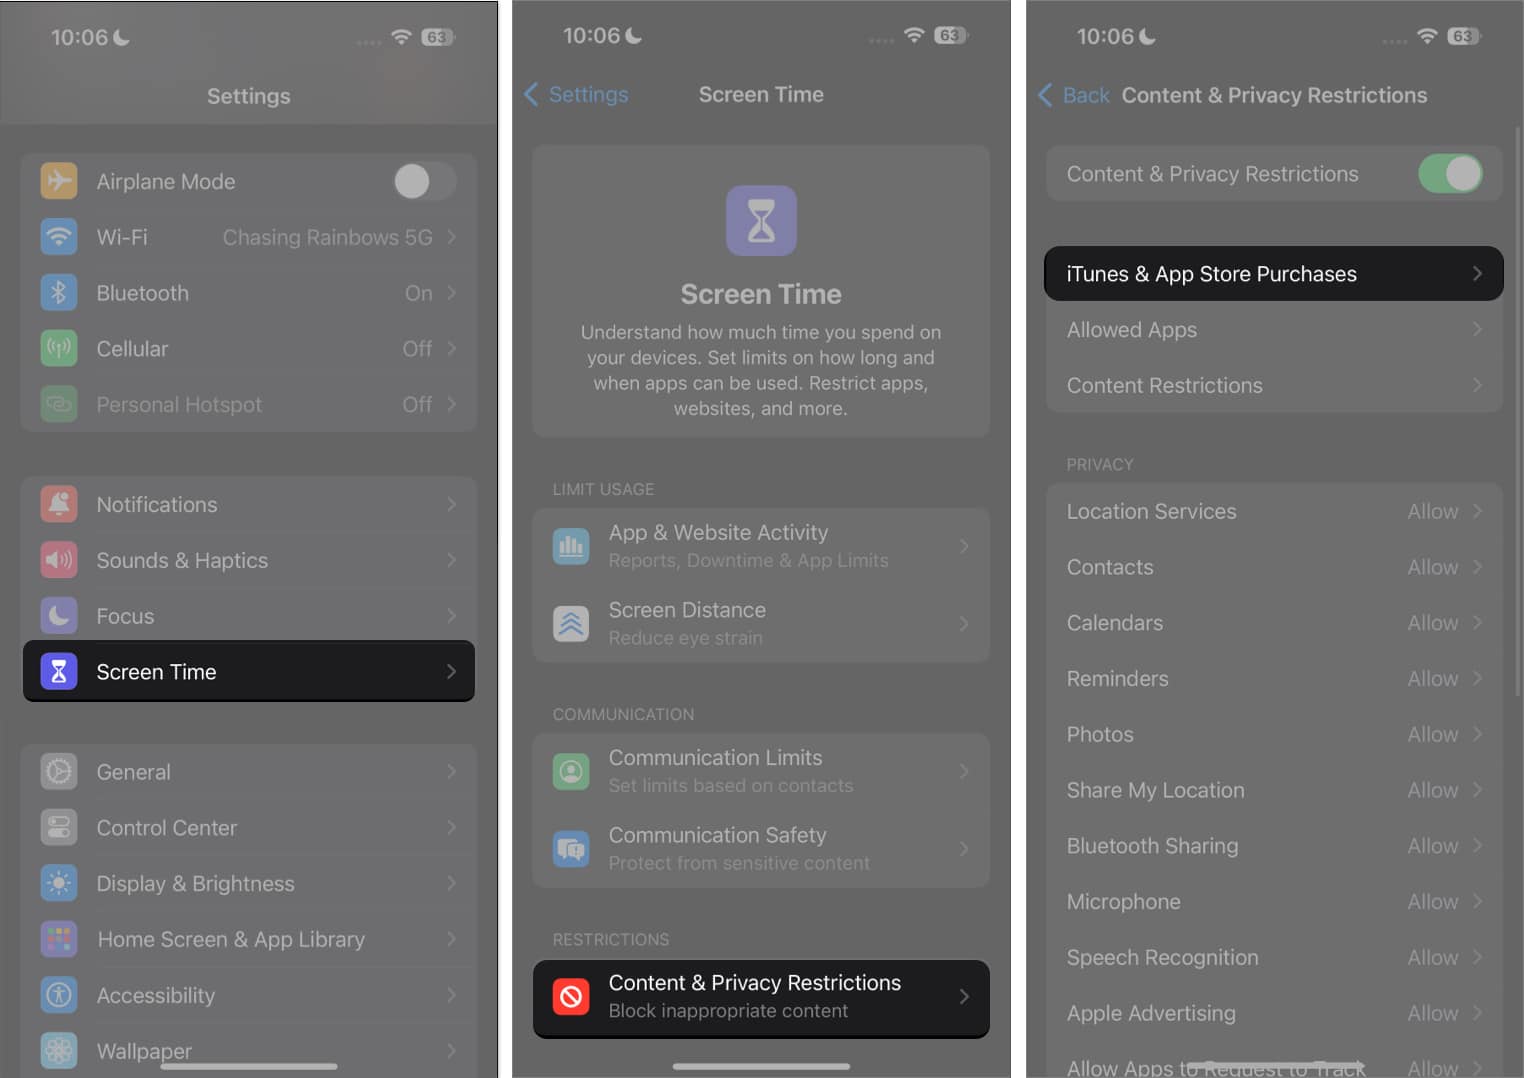
If you’re using Screen Time, it will restrict you from making purchases and downloading apps. Thus, you can fix the Verification Required error on the App Store. Here’s how you can turn it off:
- Go to Settings.
- Select Screen Time → Content & Privacy Restrictions.
If you don’t have this turned on, you can skip this solution. - Tap iTunes & App Store Purchases.
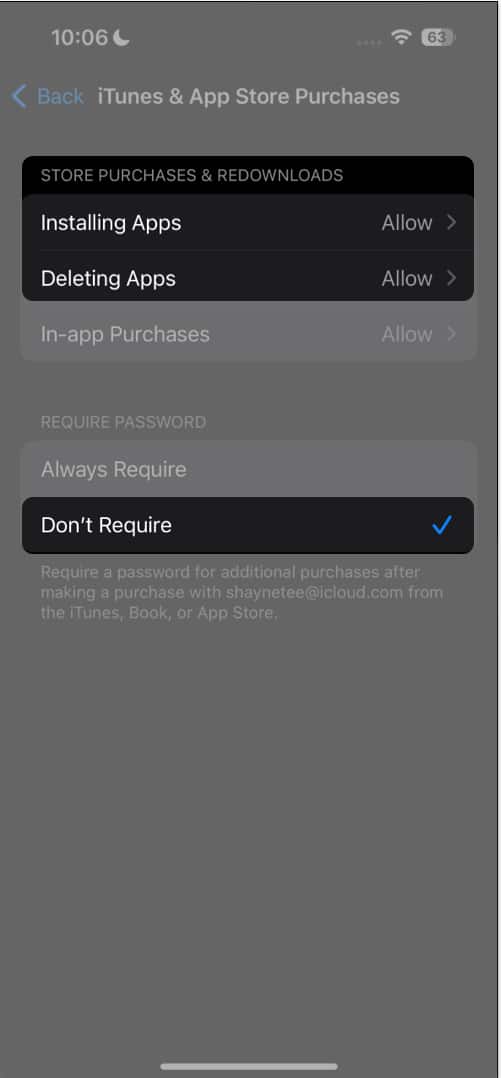
- Ensure that Installing Apps and In-app Purchases are allowed.
- Further, select Don’t Require under the Require Password section.
- Further, select Don’t Require under the Require Password section.
5. Agree to Terms and Conditions for Media & Purchases
It’s also possible that you skipped agreeing to the terms and conditions for purchases on the App Store. This may stop you from installing free apps or making purchases and cause the Verification Required popup to appear on the App Store.
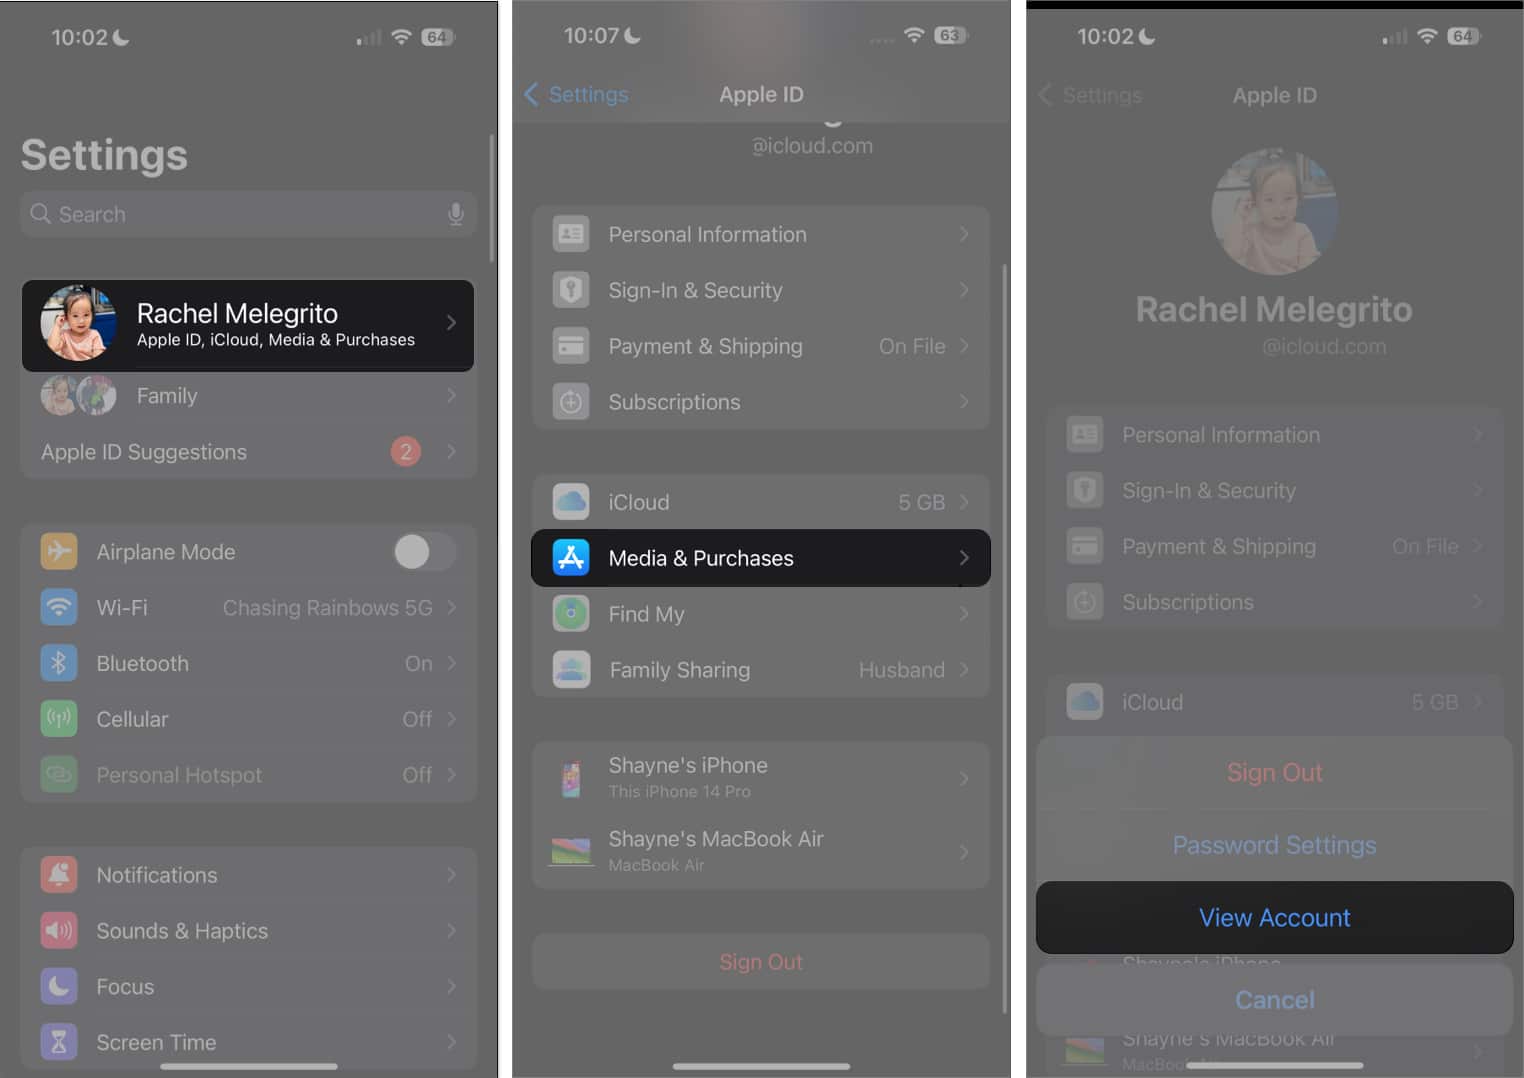
- Go to Settings → [your name] → Media & Purchases.
- Tap View Account.
- If you haven’t agreed to the Terms and Conditions, you’ll see a popup asking you to review and approve them.
6. Sign out and sign in back to Apple ID
If none of the above methods worked and your payment information has no issues, the Verification Required error up may just be a glitch. Signing out of your Apple ID and signing back in can refresh it and flush out any bugs causing the glitch.
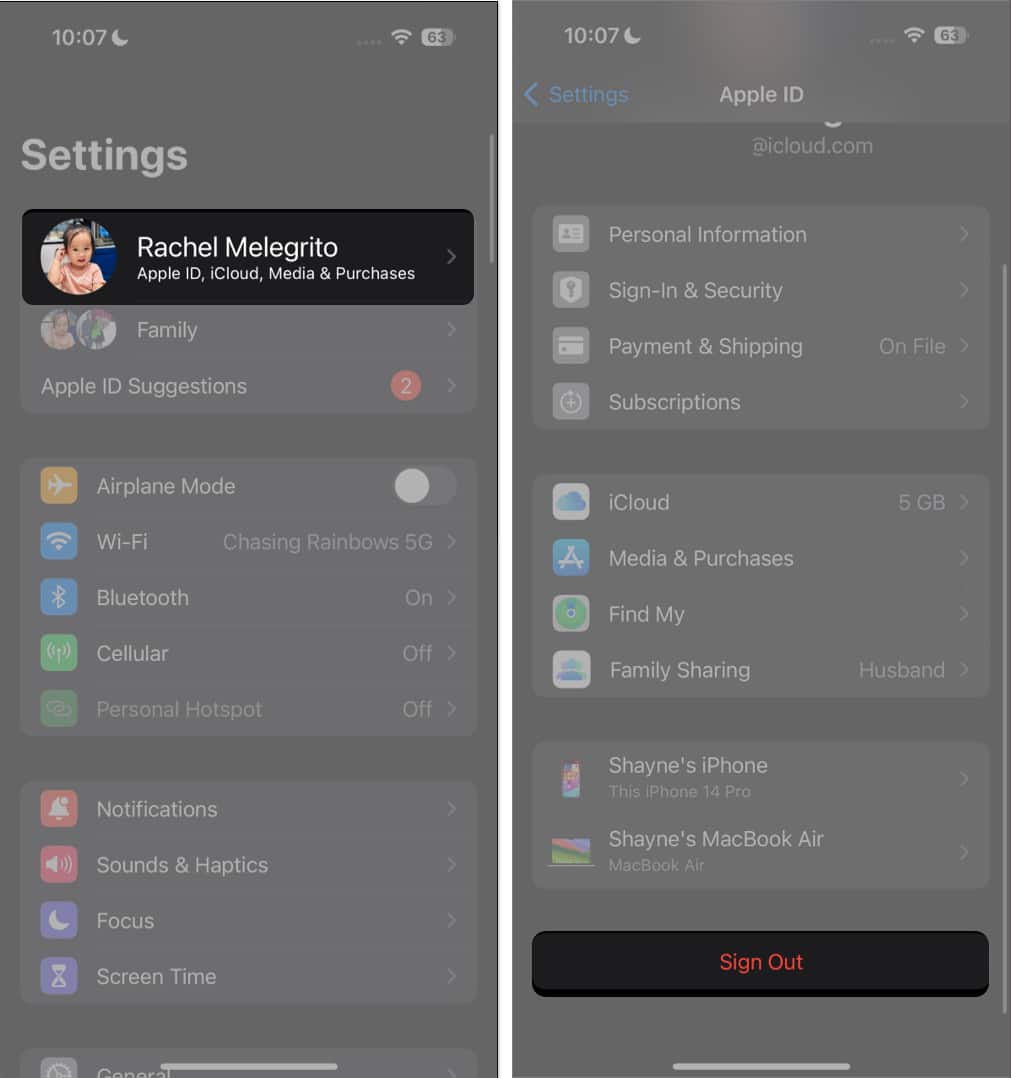
- To sign out of your Apple ID, go to Settings → [your name].
- Scroll down and tap Sign Out.
- Restart your iPhone and sign back in.
Video: How to stop “Verification Required” when installing free apps
Download apps without verification!
There you have it. Since the Verification Required on the App Store is commonly a payment method issue, using one of the fixes listed above should stop the annoying popup when installing free apps.
Which one worked best for you? Share your experience below!
FAQs
Apple requires a valid payment method on file for your Apple ID, even if you’re trying to download a free app. This provides another layer of authentication for your account and ensures you can pay for any in-app purchases should you want to. If the app itself is free, you will not be charged any money even if the popup appears.
If you don’t want to enter your password or use Face ID when installing new apps, head to Settings → Screen Time → Content & Privacy Restrictions → iTunes Store & App Store. Then, toggle Content & Privacy Restrictions on if it’s off and head into iTunes & App Store Purchases. Under Require Password, select Don’t Require.
Read More:


Excellent article! The tip about using a credit account wisely is spot on. I’ve been following this approach, and it’s really been successful.
Thank you for the kind words!
Thanks for the detailed guide! I was really struggling with the Verification Required issue on the App Store, and your step-by-step instructions helped me resolve it quickly. I appreciate the updated tips for 2025. Keep up the great work!