WhatsApp has revolutionized the way we communicate, making it easy to stay in touch with our friends and family. However, that’s not all. Beyond its primary function as a messaging app, WhatsApp also lets you send and receive money using WhatsApp Payments. This feature makes financial transactions as easy as chatting, and you can even send money internationally.
As of writing, WhatsApp Payments is available in India, Brazil, and Singapore. If you reside in one of these supported countries, keep reading to learn how to set up WhatsApp payments on iPhone.
How to set up WhatsApp Payments on iPhone
Setting up WhatsApp Payments on an iPhone is fairly straightforward. However, the exact steps might vary depending on your country. In India, all the transactions made via WhatsApp Payments are processed with the Unified Payments Interface (UPI). This allows you to link your bank account to a virtual payment address, which can be used to send and receive money. Here’s how this works:
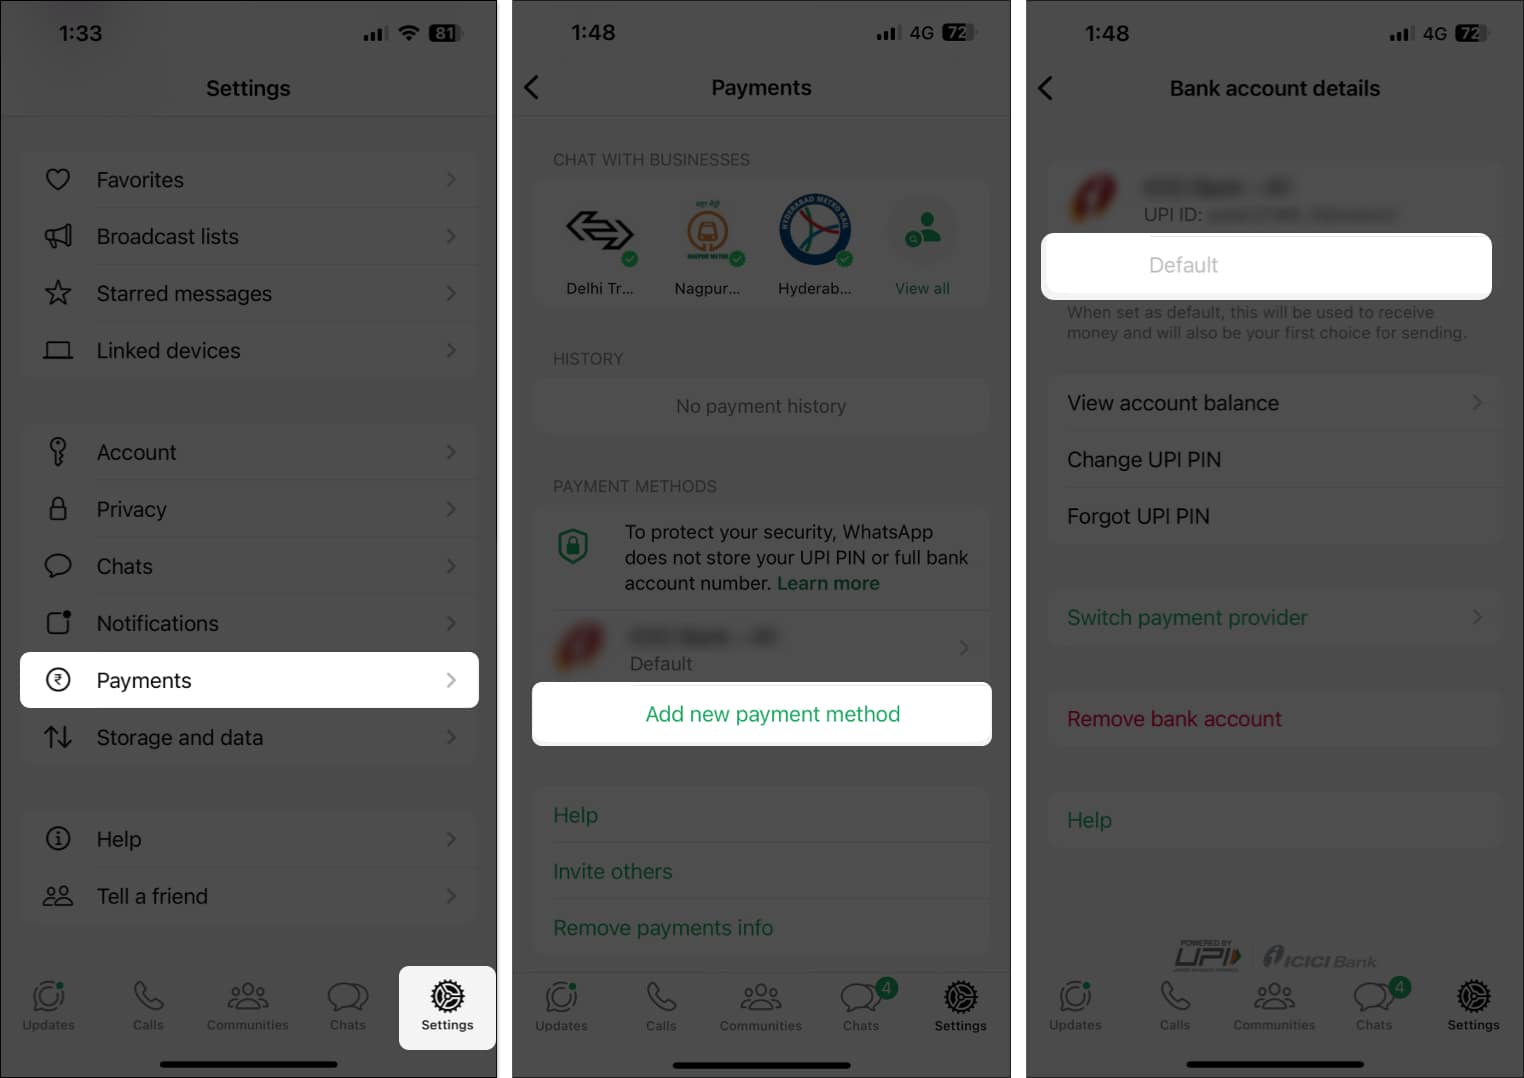
- Open WhatsApp on your iPhone.
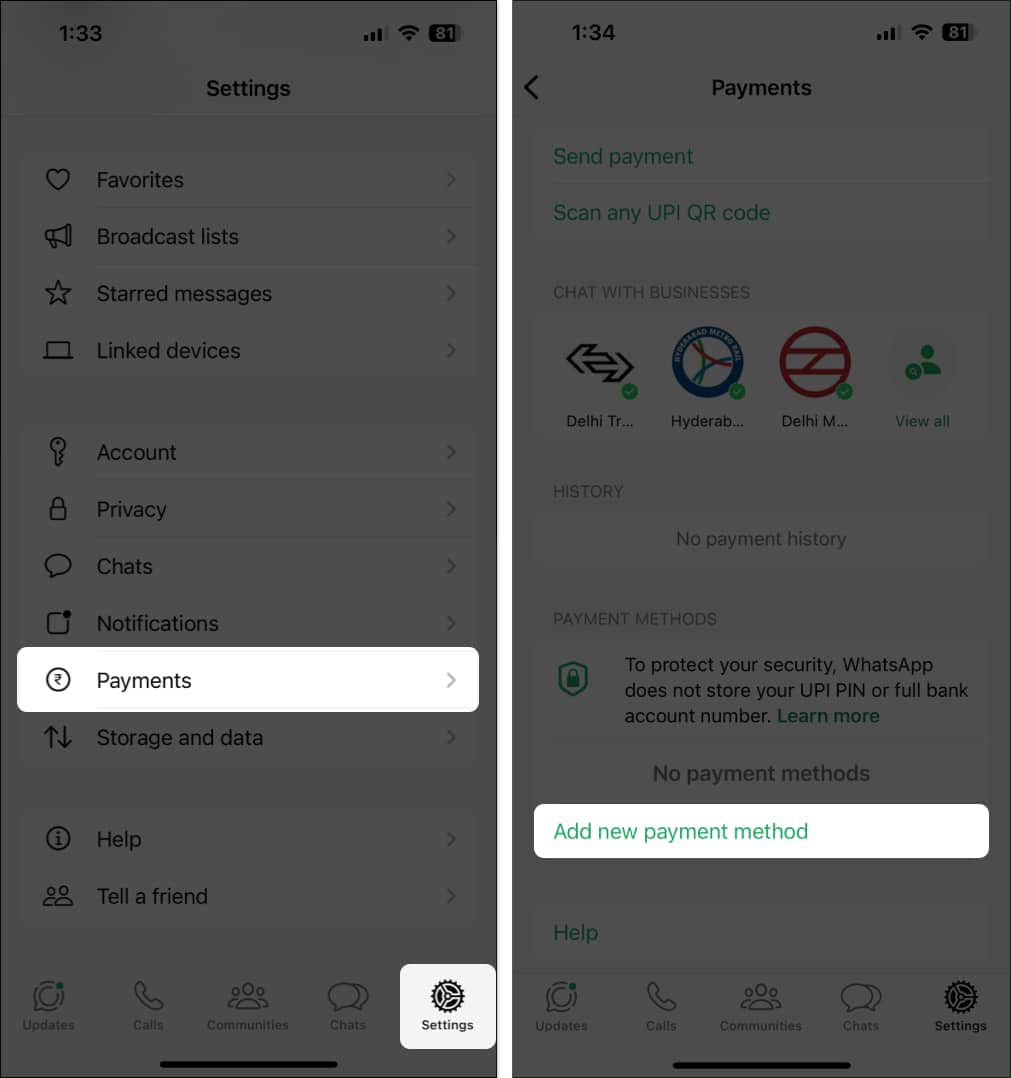
- Tap the Settings tab at the bottom.
- Select Payments and tap on Add New Payment Method.
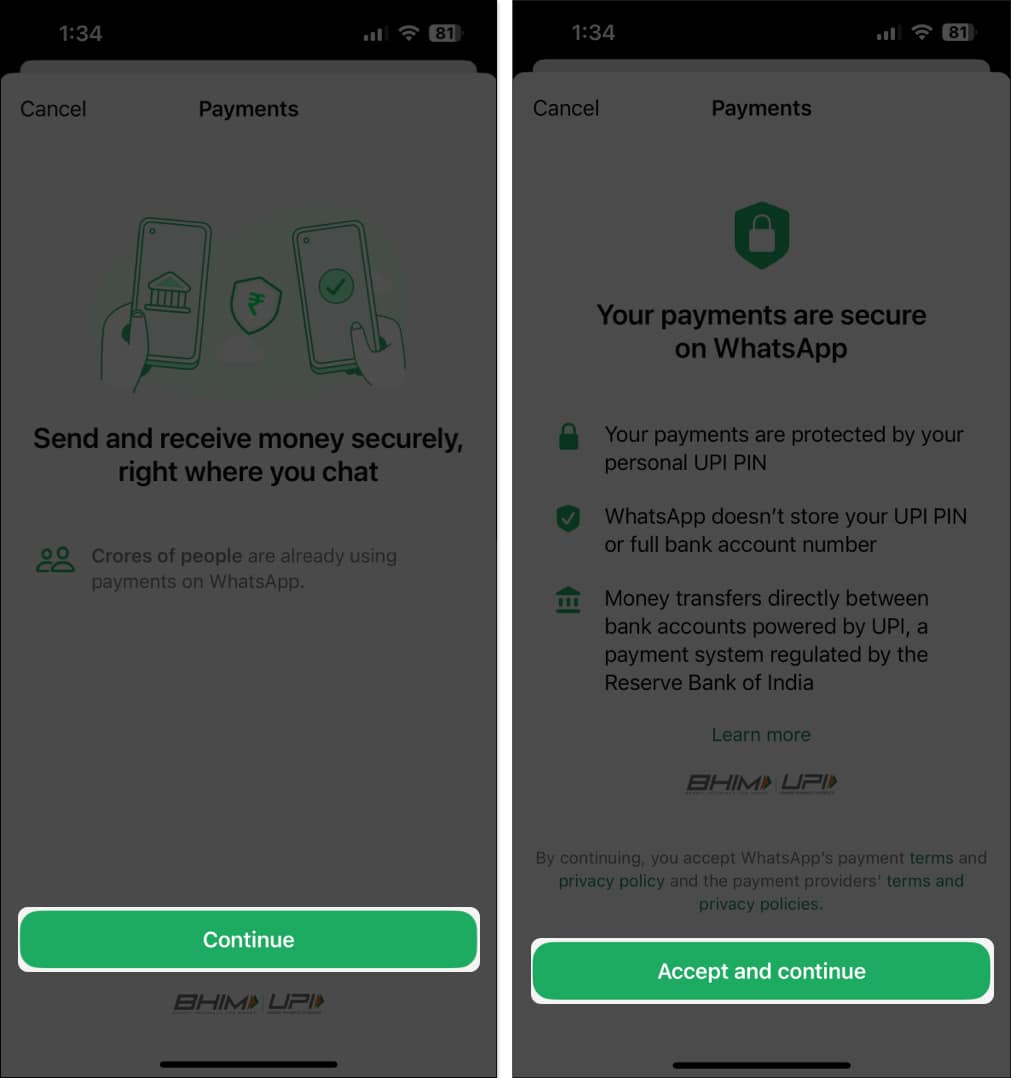
- Then, tap Continue, followed by Accept and Continue.
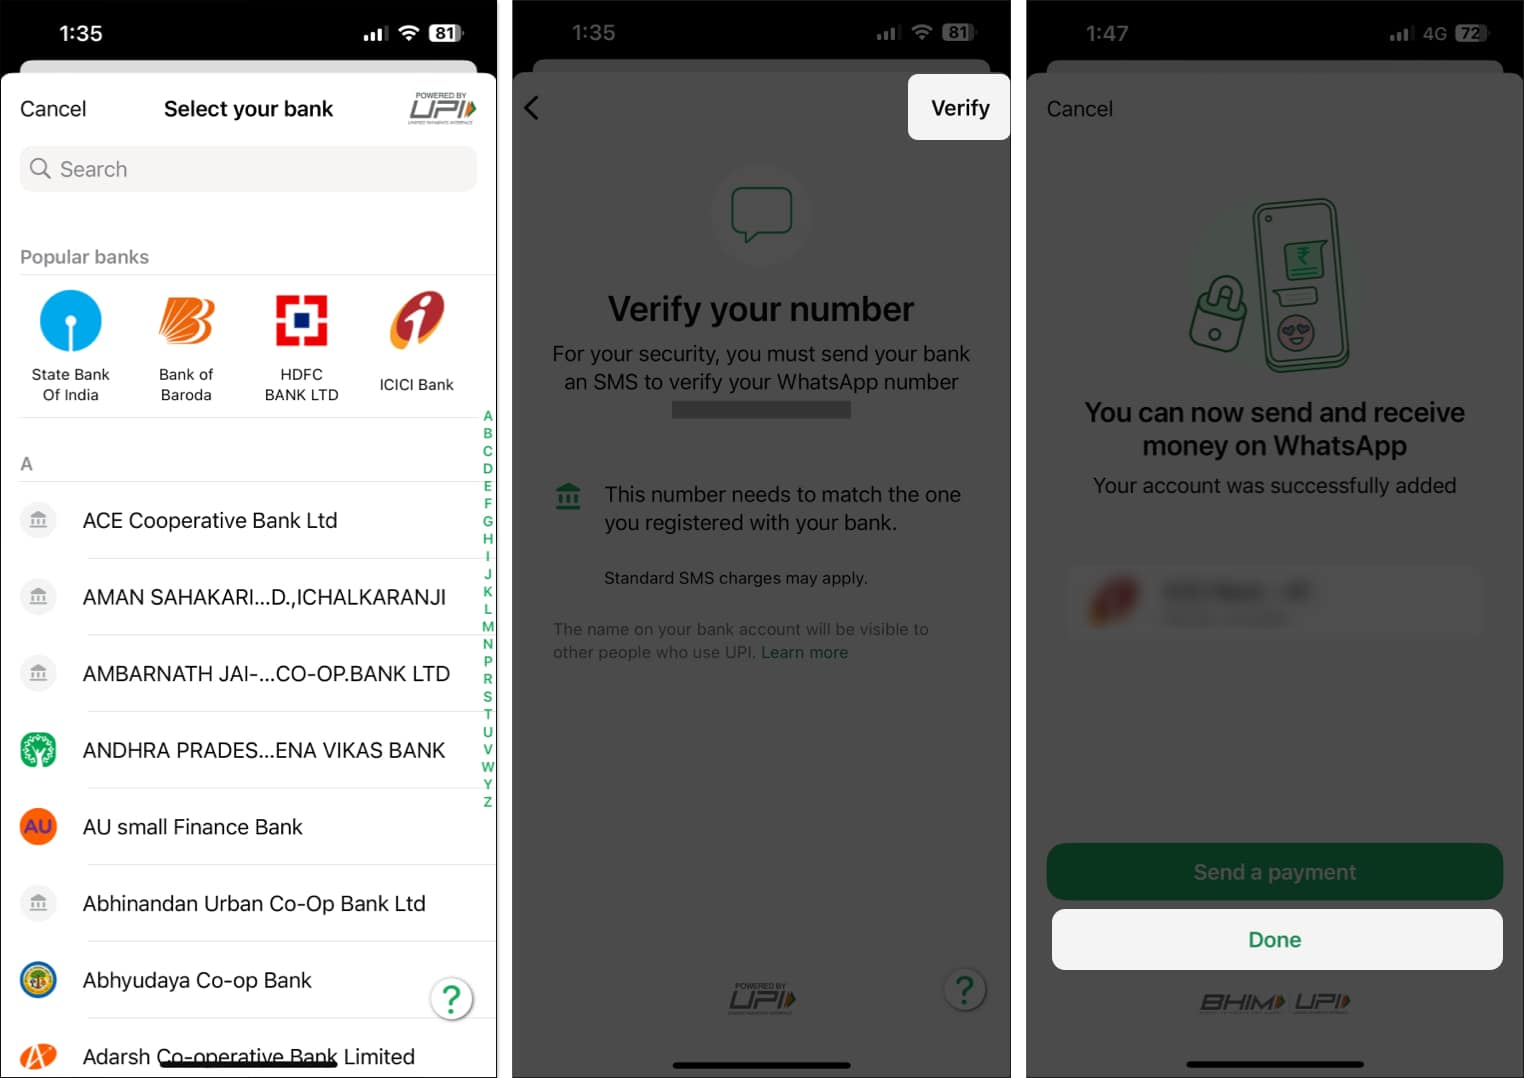
- Choose your bank from the list of UPI-supported banks.
- Tap Verify. Then hit Send to complete the verification.
- After your bank account has been verified, tap Done to finish the setup.
How to transfer money with WhatsApp Payments on iPhone
Setting up WhatsApp Payments is just one part of the equation. Once you link your bank account via UPI, here’s how you can send and receive money using WhatsApp Payments on your iPhone.
How to send money through WhatsApp Payments on iPhone
There are two methods to send money through WhatsApp Payments. You can either send money directly from WhatsApp chats or use a UPI ID, number, or QR code. Depending on the method you use, the steps can be somewhat different. So, here’s a step-by-step breakdown of both methods.
To send money when you’re in a WhatsApp chat, follow these steps:
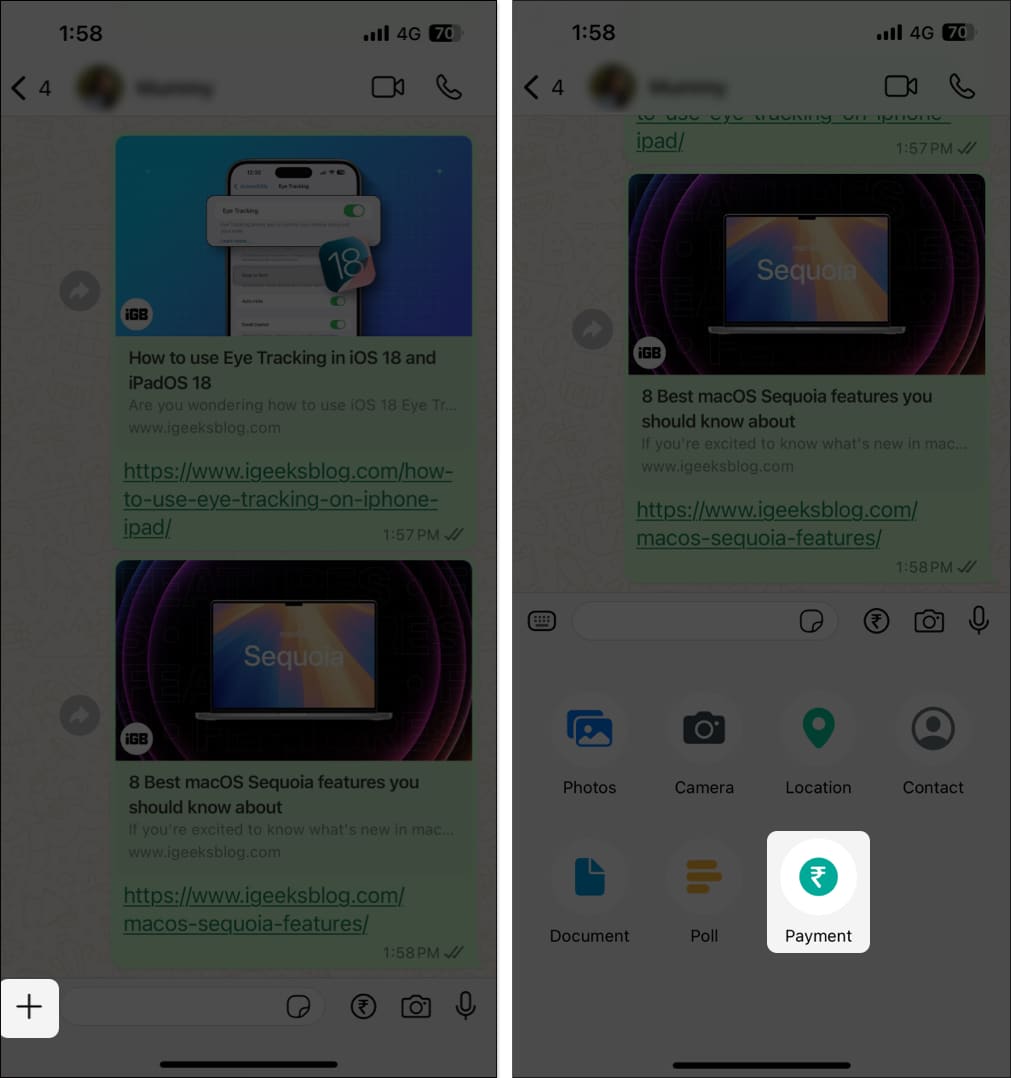
- Start a new chat or open an existing one with the receiver.
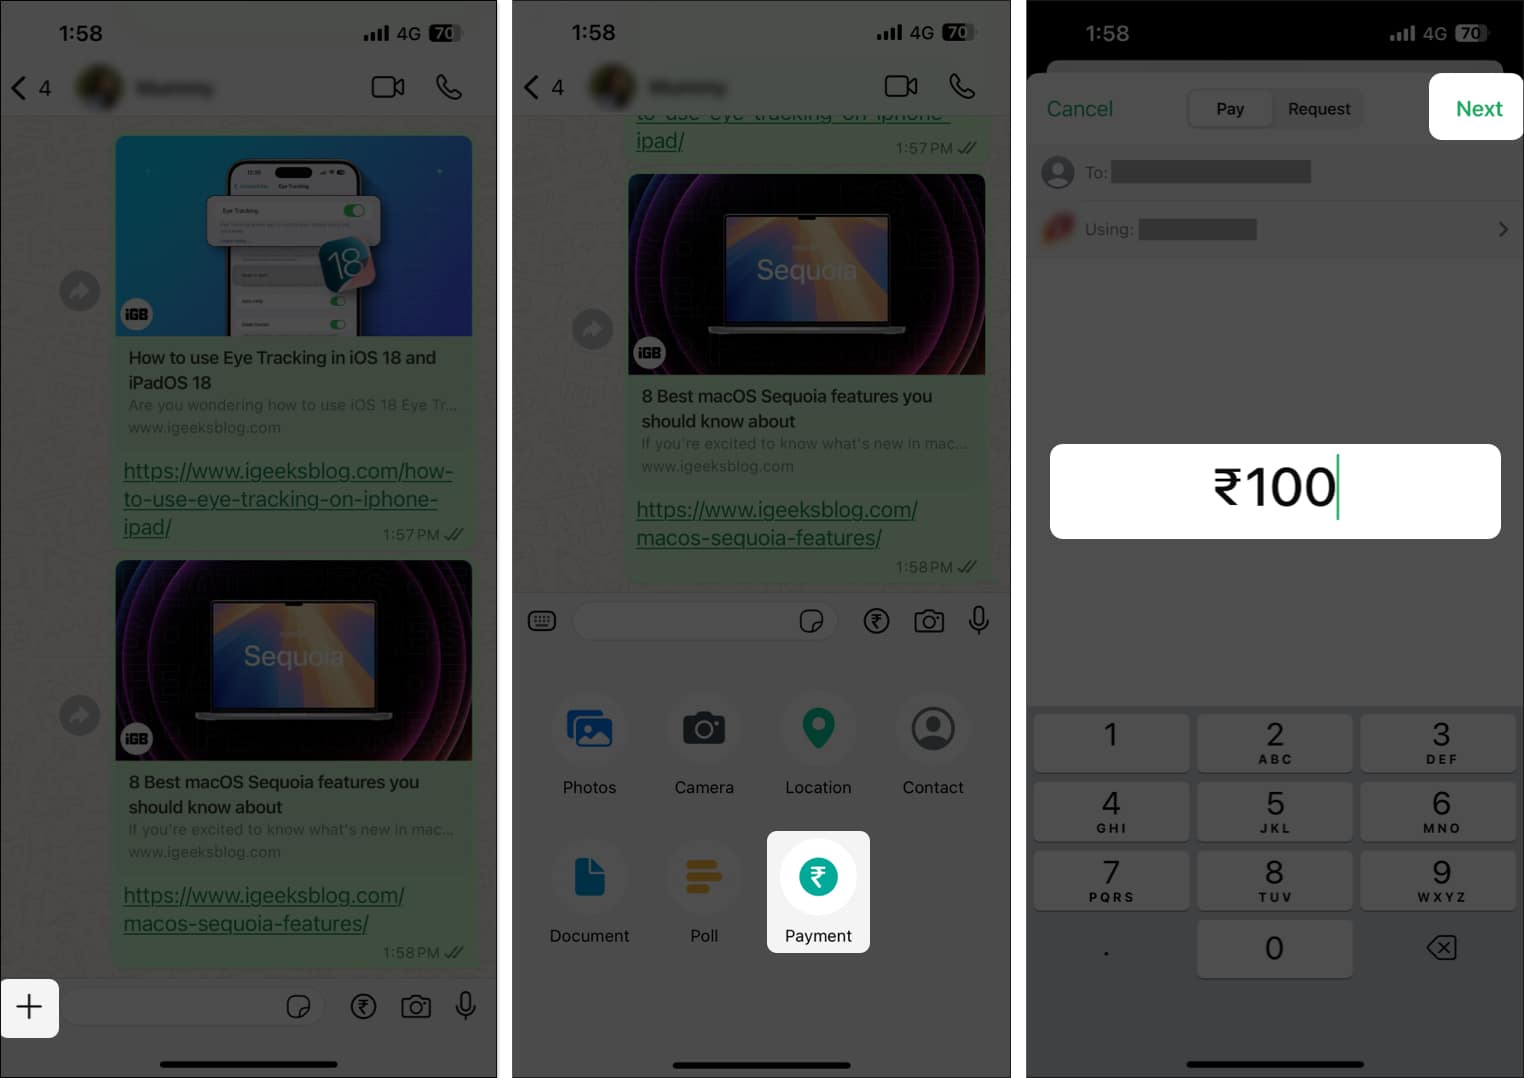
- Hit the + icon located to the left of the text field and tap Payment.
- Enter the amount you want to send and hit Next.
- Enable two-factor authentication if you get a prompt for it.
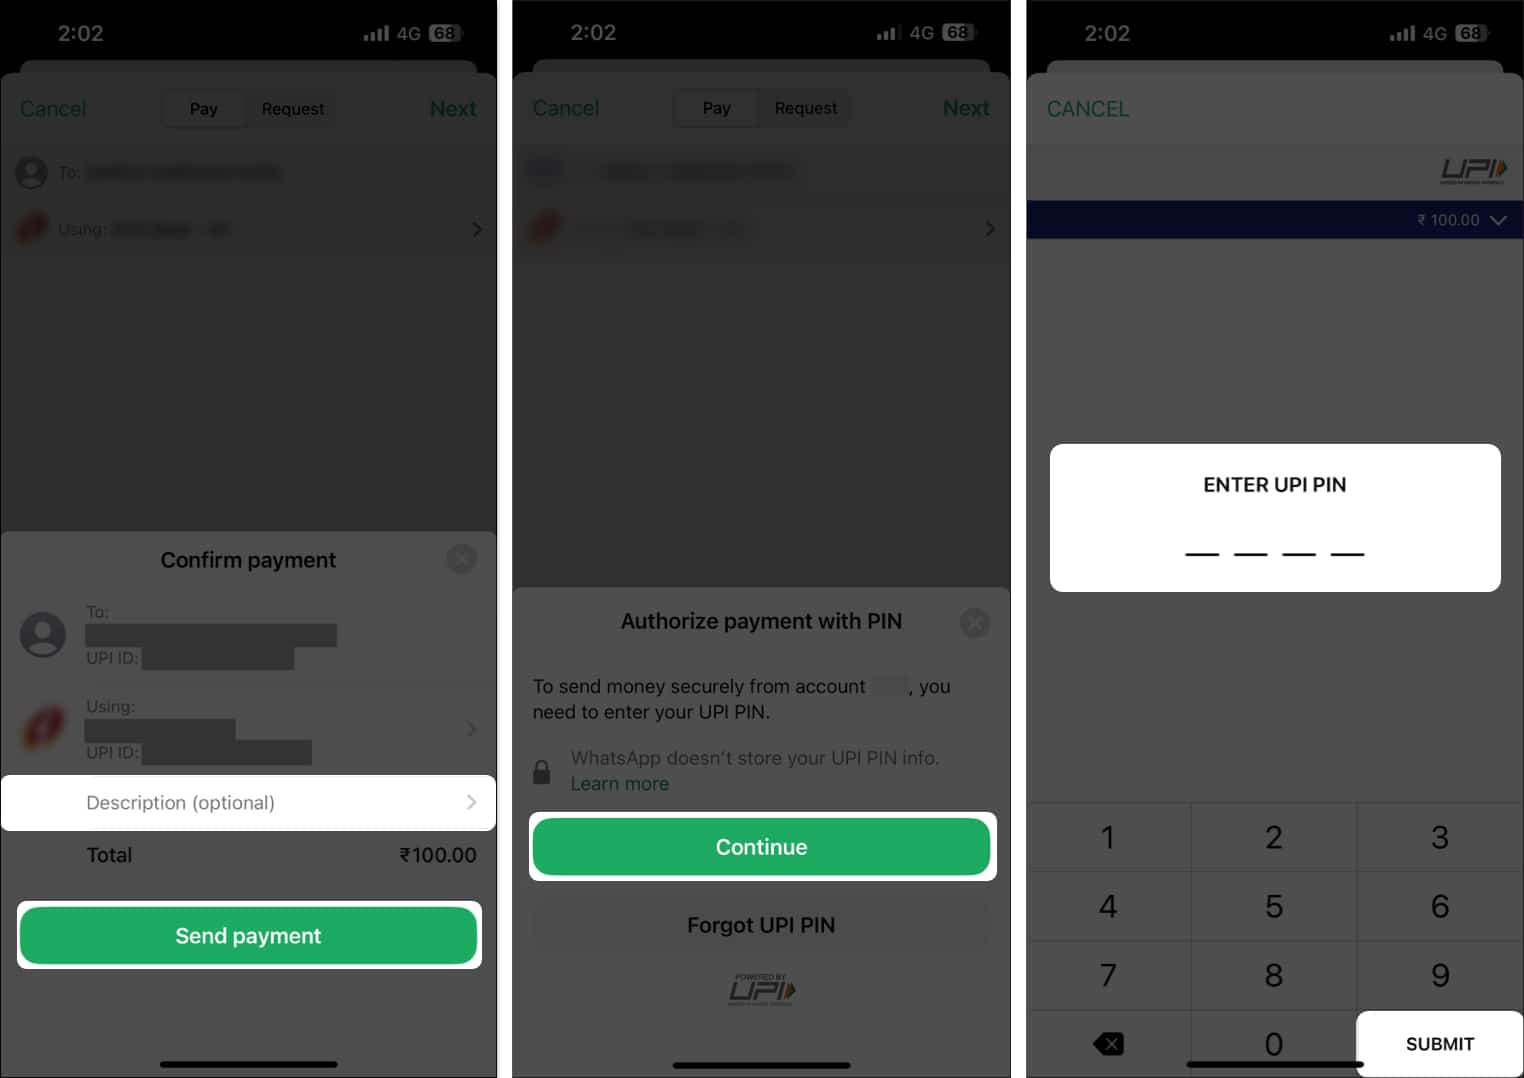
- Add an optional description and tap on Send Payment.
- Tap Continue and enter your UPI PIN.
- Finally, hit Submit to transfer the money.
Alternatively, if you want to send money using a UPI ID or number or by scanning a UPI QR code, here’s what you need to do:
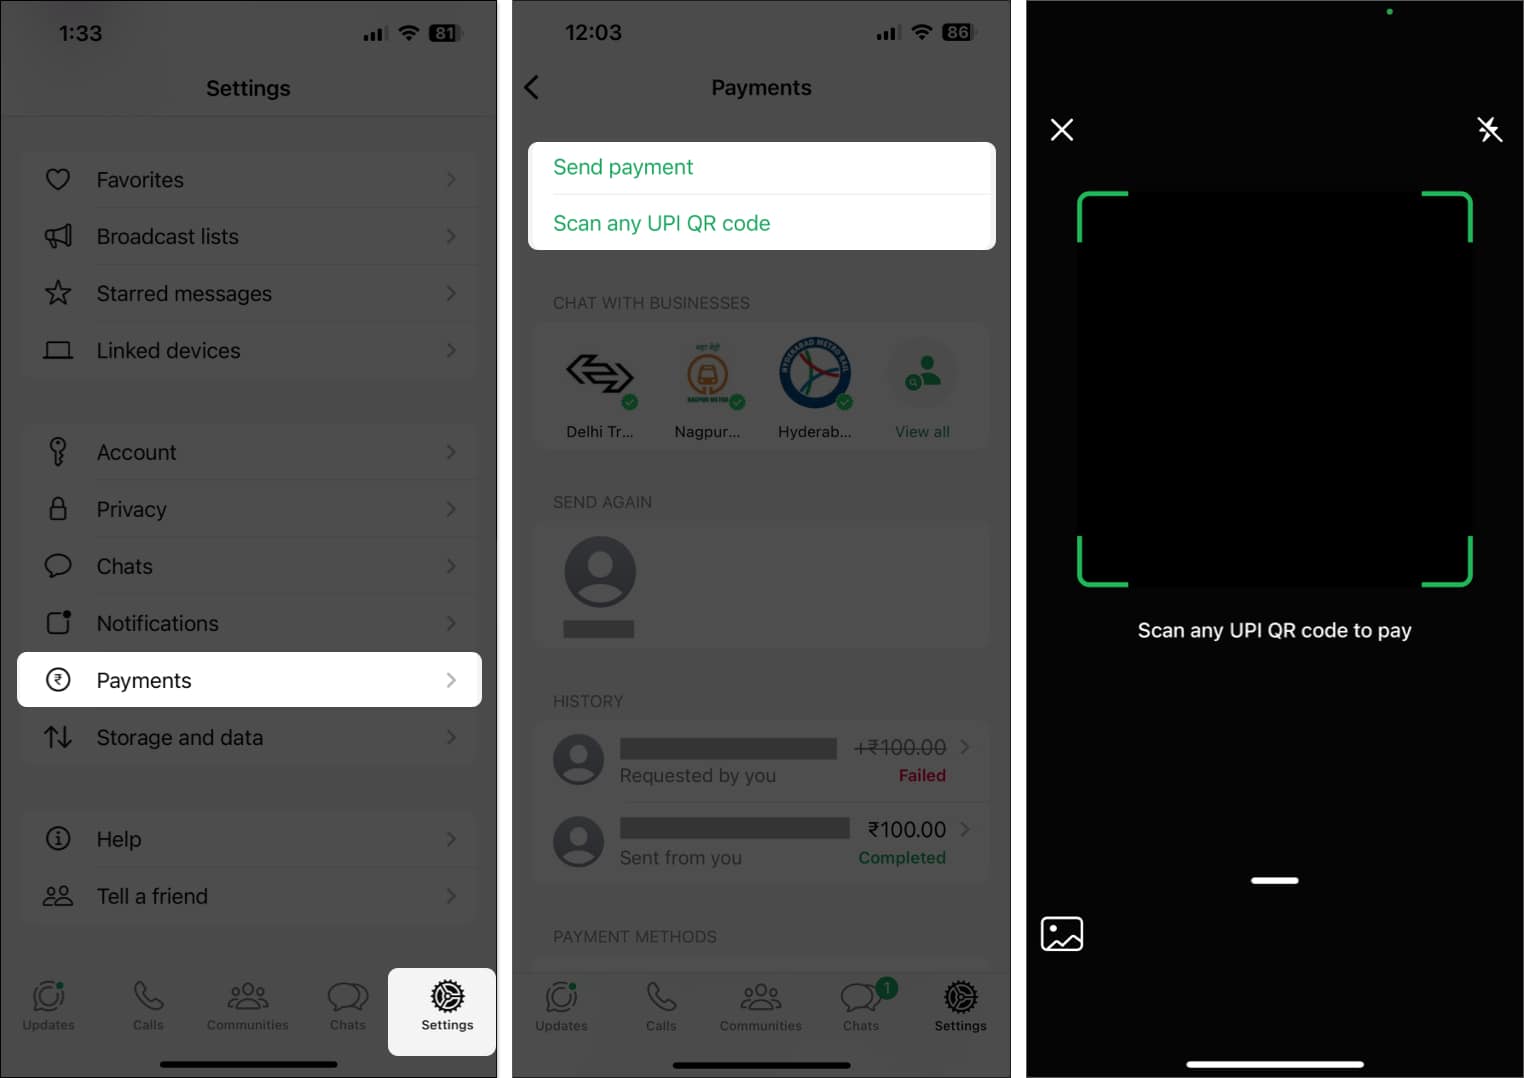
- Open WhatsApp and tap the Settings tab located at the bottom.
- Select Payments and tap Send Payment or Scan any UPI QR Code.
- Follow the on-screen instructions to scan the QR and add the amount.
- Add a description for the transaction and tap Send Payment.
- Tap Continue and enter your 4-digit UPI PIN.
- Hit Submit to send the money.
How to request payment through WhatsApp Payments on iPhone
Once you’ve set up WhatsApp Payments on your iPhone, you can receive money from anyone without having to do anything. When someone sends a payment, you’ll get a notification on your device. Tap it or or head into your transaction history to see all the transaction details.
Alternatively, you can request money from someone through WhatsApp Payments. Here’s how:
- Start a new chat or open an existing chat with the sender.
- Tap the + icon located on the left of the text field and select Payment.
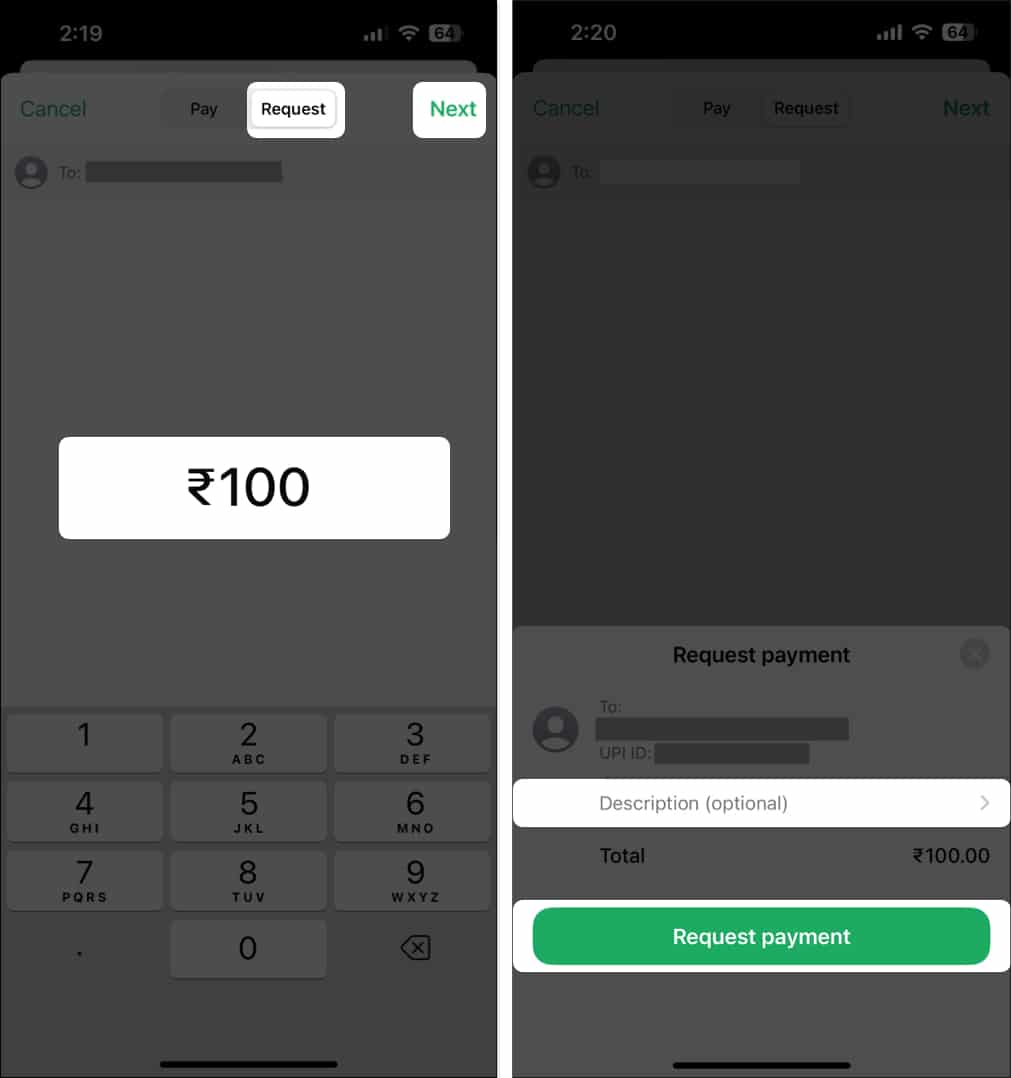
- Go to the Request tab at the top, enter the amount, and then hit Next.
- Add an optional description for the payment and tap on Request Payment.
How to check WhatsApp Payment history on iPhone
All the transactions you’ve made and any pending requests to receive payments can be tracked easily using the history feature in WhatsApp Payments. To access this, simply go to the Settings tab in WhatsApp, tap Payments, and scroll down to the History section. If you want more details on a transaction, you can simply tap on it to find things like the transaction ID along with the date and time.
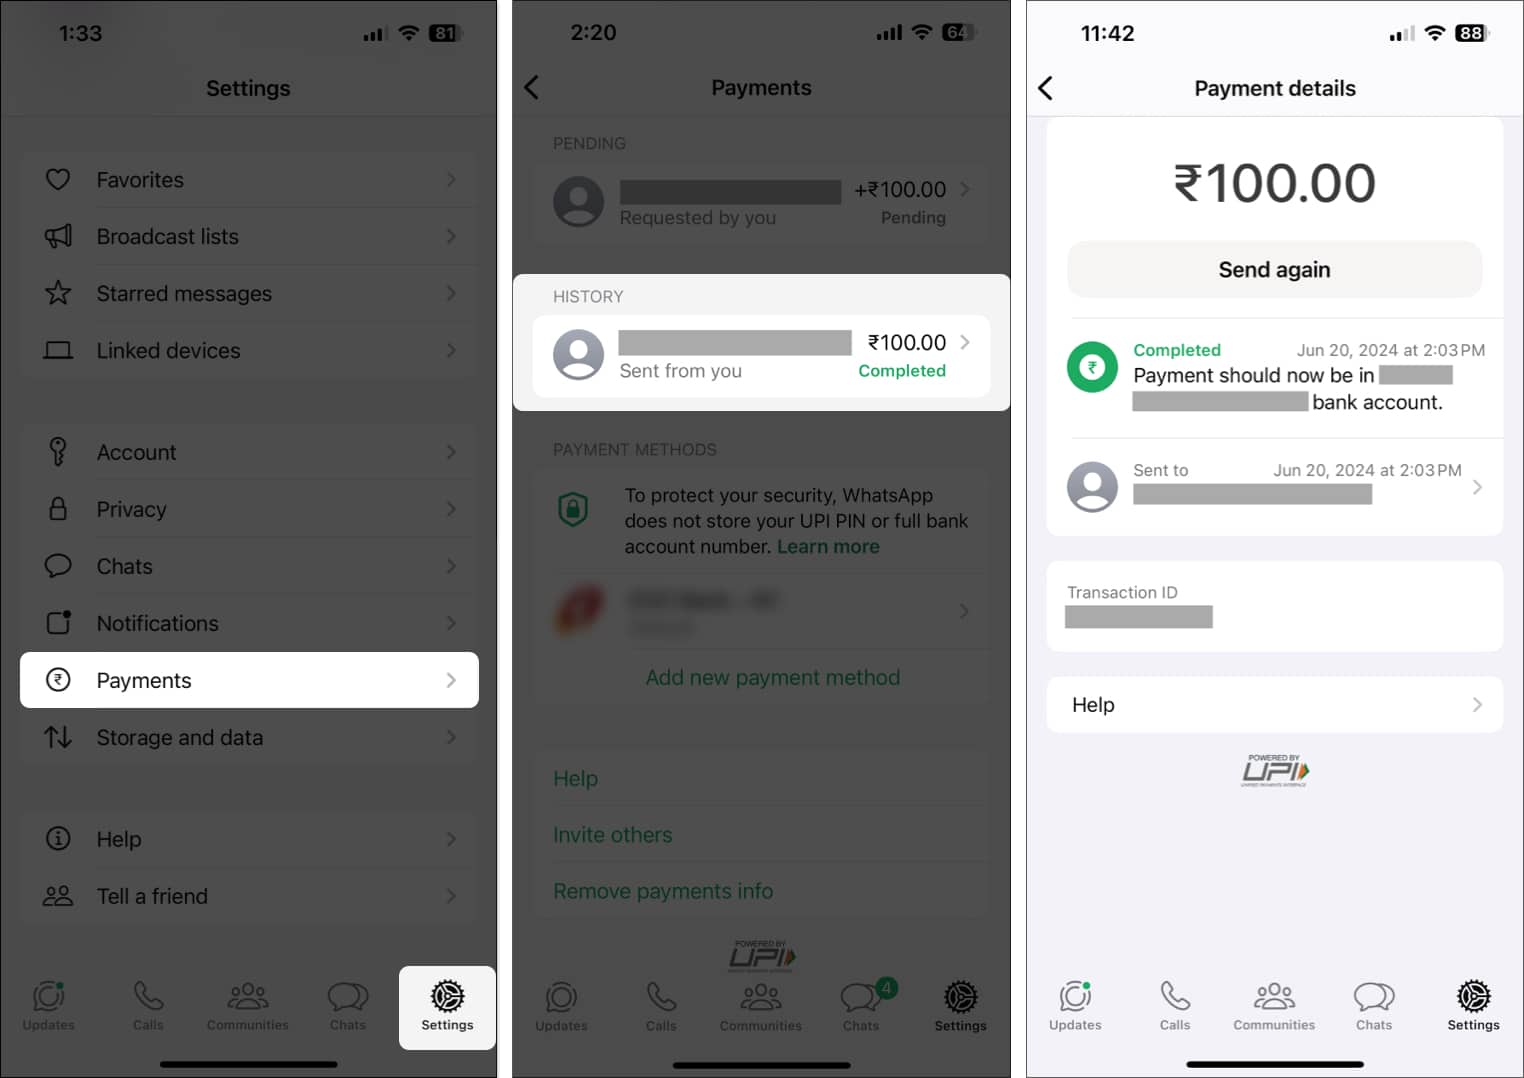
While that’s useful, WhatsApp Payments currently doesn’t offer any way to delete a transaction.
How to change or add a new WhatsApp Payments account on iPhone
WhatsApp Payments offers several advantages over other UPI apps. For instance, you can easily link two or more bank accounts and even set one as the default. This way, you can use one bank account for most payments and switch to another account when required. Here’s how this works:
- Open WhatsApp and tap on the Settings tab.
- Select Payments and tap on Add new payment method.
- Then, tap Continue, followed by Accept and Continue.
- Select your bank from the list of UPI-supported banks.
- Tap Verify and hit Send to complete the verification.
- Once the account is successfully verified, tap Done.
- After the account is linked, go back to Payments.
- Select the account you want to set as default.
- Finally, tap on Set as Primary Account.
How to remove a bank account from WhatsApp Payments on iPhone
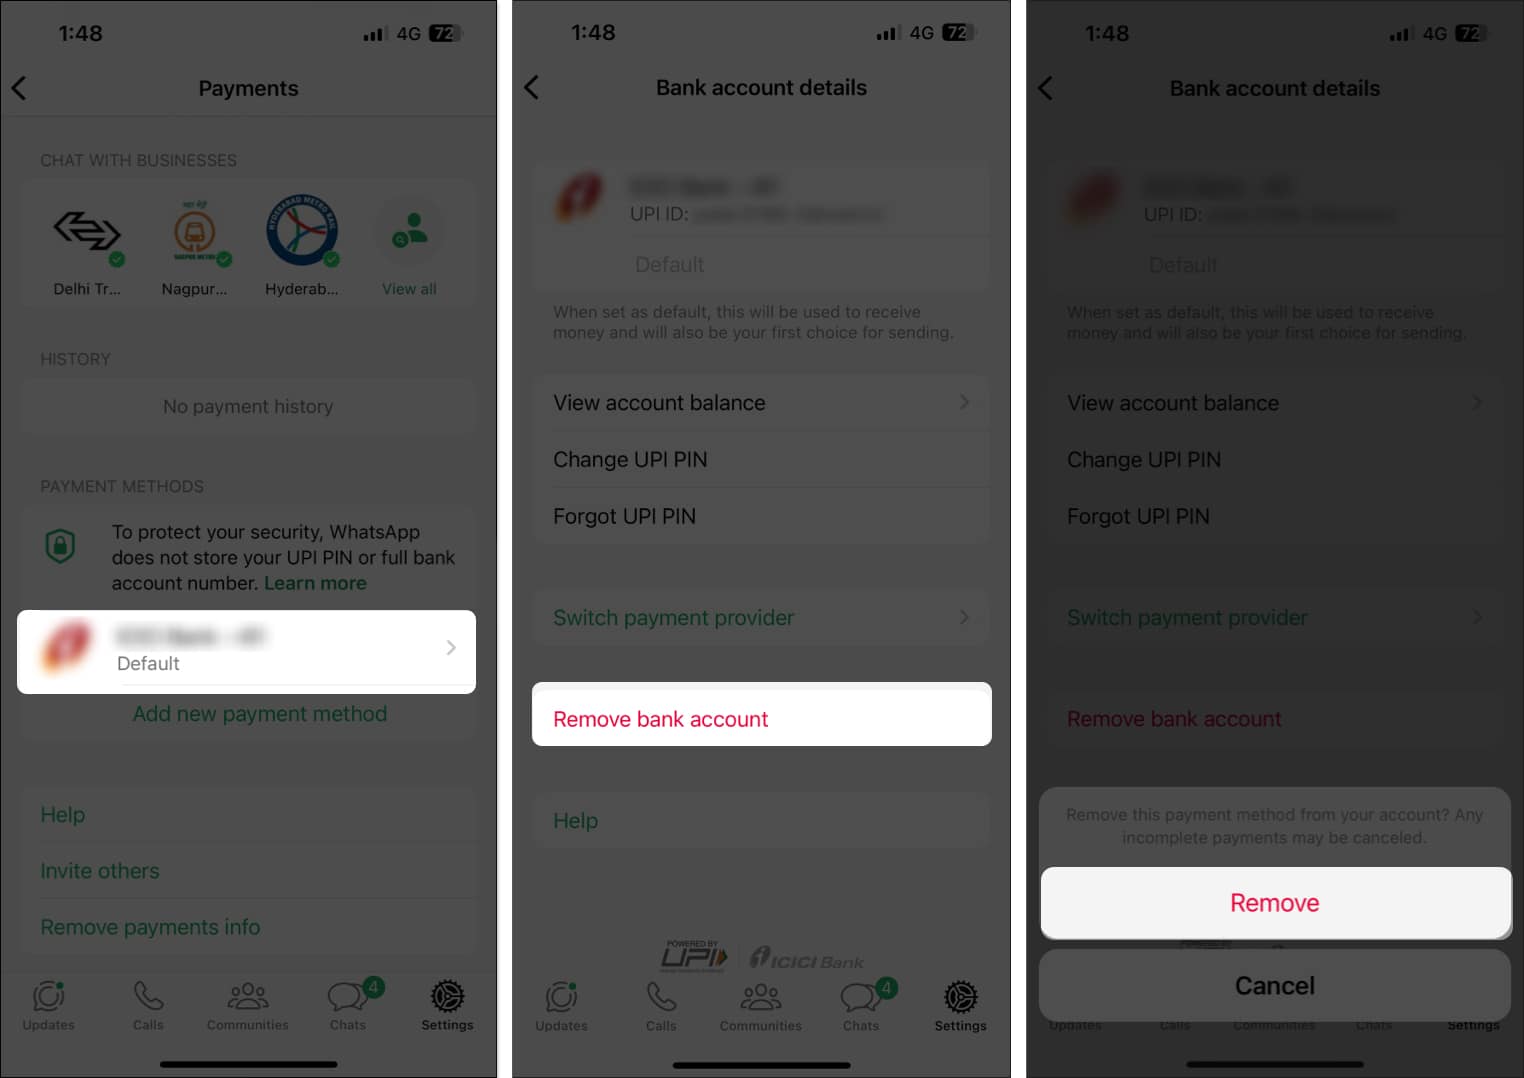
If you ever change your mind and don’t want to use WhatsApp Payments, removing a bank account is just as easy as adding a new one. Here are the steps explaining how to do this:
- Open WhatsApp and navigate to the Settings tab.
- Select Payments and tap on the bank account you want to remove.
- Tap Remove Bank Account and hit Delete to complete the process.
Wrapping up…
Setting up and using WhatsApp Payments on your iPhone offers a simple and efficient method to handle transactions. Whether you’re sending money to friends or receiving payments, WhatsApp Payments makes it hassle-free and quick. With the added ability to manage multiple accounts and view transaction history, it’s a versatile tool designed for business and individual users.
FAQs
The limit for sending money using WhatsApp Payments varies by country and bank policies. In India, UPI allows a maximum of 20 transactions totaling up to Rs. 1,00,000 in a single day.
Most banks do not charge any additional fees for using WhatsApp Payments. However, it’s generally advisable to contact your bank to know about any potential fees or deductions.
There’s no difference between using WhatsApp Payments with a regular WhatsApp account and a WhatsApp Business account. Except for the ability to add product listings, both can use WhatsApp Payments as long as the feature is available in your region and you have linked a valid bank account.
Also read:

