Thanks to iCloud, backing up your iOS Contacts is pretty easy. But what if you want to change the device or share the Contacts with other devices? That’s quite simple as well—there are multiple ways to export iPhone Contacts from iCloud.
Depending on your needs, you can either export your Contacts via VCard (VCF) format or in Excel/CSV format. In this guide, we’ll share an in-depth guide with you for both methods.
But before we proceed, make sure that your Contacts are properly backed-up on your iCloud account.
- What is vCard or VCF
- How to export iPhone Contacts from iCloud as VCF (vCard)
- Convert iPhone Contacts from VCF to Excel/CSV format
- How to export iPhone Contacts to Excel/CSV using third-party apps
What is vCard or VCF?
vCard or VCF (Virtual Contact File) is a standard file format for electronic business cards. They can include a name, address, phone number, email address, URL, photographs, and audio clips.
iOS devices, Android devices, Google Contacts, mail apps, and more support vCard as a default format. And here’s how you can export contacts from iCloud to vCard:
How to export iPhone Contacts from iCloud as VCF (vCard)
- Launch any web browser on your computer and go to iCloud.
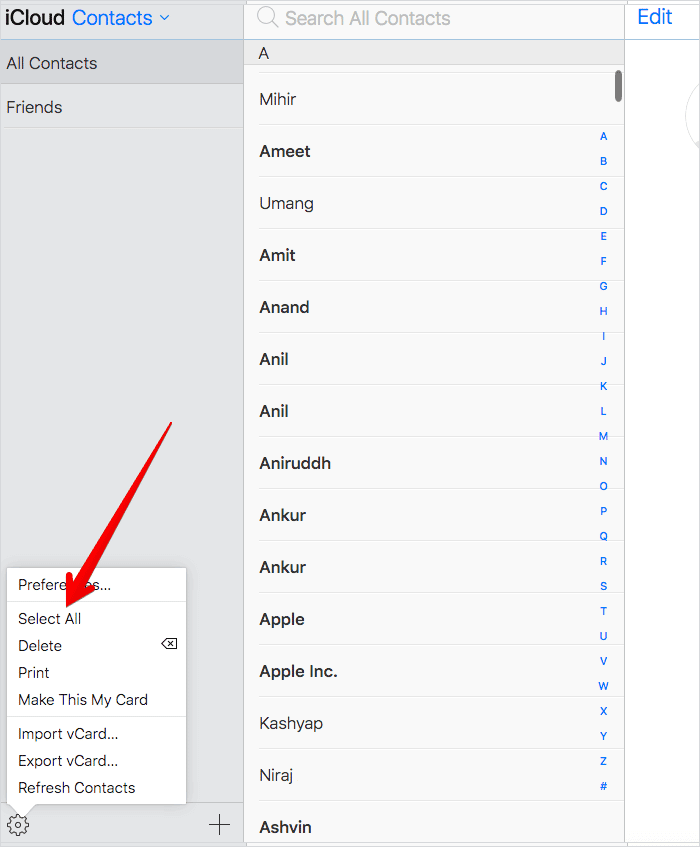
- On the next screen, all of your Contacts will be listed. Click the Settings icon at the bottom left corner.
- Next, a menu will appear with several options. Click Select All to export your entire Contacts list.
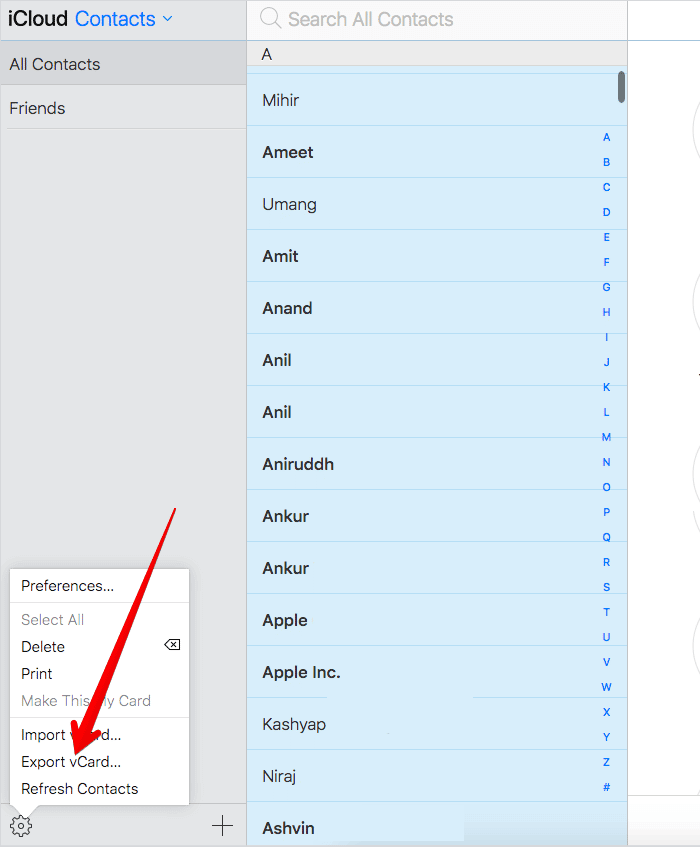
- Click the Settings icon again and choose Export vCard.
- The vCard file of your Contacts will download to the Downloads folder on your Mac.
Note: Once you download vCard, you can just as easily import your Contacts to another device or platform. This method can also be employed if you prefer a local backup of your iCloud Contacts for additional safety.
Convert iPhone Contacts from VCF to Excel/CSV format
There might be times when the application you want to import your Contacts to doesn’t support VCF formatting. Or perhaps you want to export your iPhone contacts to Apple Numbers, Microsoft Excel, or other Office alternatives.
The latter is particularly helpful when you deal with hundreds of customers every day—the CSV format is a bit more efficient. In such scenarios, CSV formatting is required.
However, there is no official way to copy your Contacts from iPhone to Excel. There are some workarounds to circumvent the issue, though. You will need to use some third-party tools to convert the vCard to Excel format.
Web applications like Online vCard Converter or VCF to XLS can help you with the conversion.
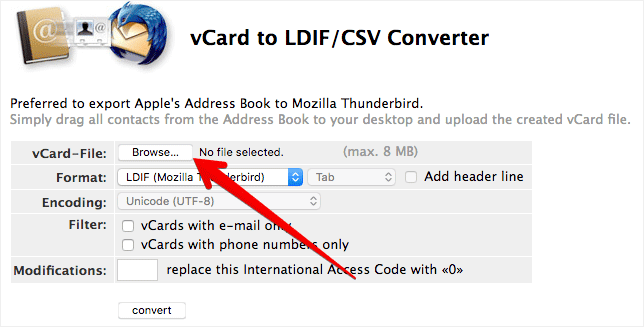
In this article, let’s head over to vCard to LDIF/CSV Converter using your web browser.
- Up next, click Browse.
- Select the vCard file you downloaded just a few moments ago. Click Open to upload the file. Now, you have to make some changes:
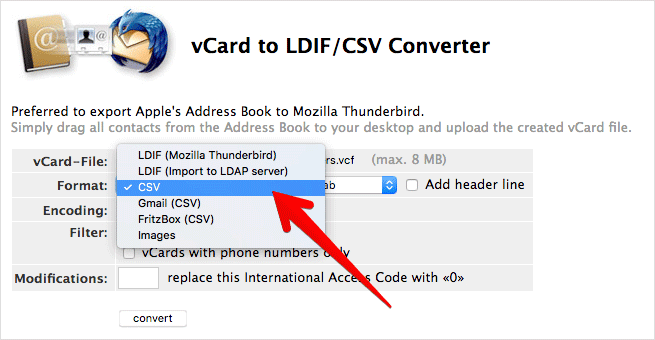
- Click the drop-down button next to Format and select CSV.
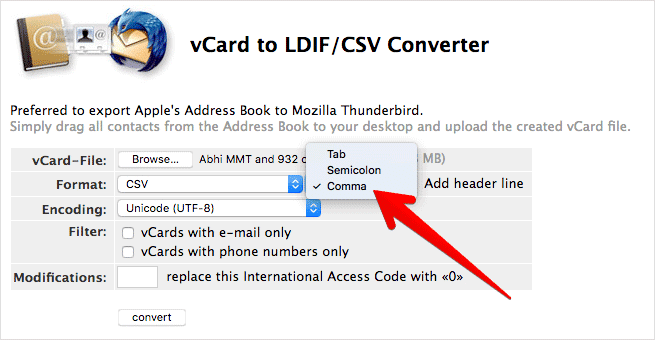
- Click the drop-down button next to Tab and select Comma.
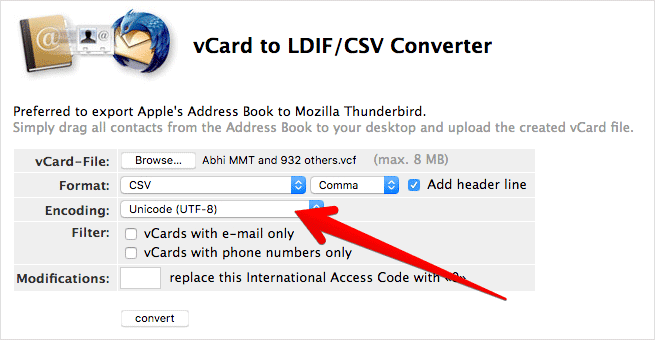
- Check the box for Add header line.
- Click the drop-down menu next to Encoding and select Unicode (UTF-8) if it’s not already chosen.
Note: Do not select Modifications or Filter.
Once you have perfectly configured the options, hit the Convert option.
How to Export iPhone Contacts to Excel/CSV using third-party apps
Export Contact is a good option to backup and transfer contacts. Some of these apps let you export Contacts in various file types including Excel (.xlsx), CSV (.csv), and vCard (.vcf).
What’s more, you can also choose the Export method to export Contacts using email, SMS, iMessage, Dropbox, Google Drive, iCloud Drive, Slack, Evernote, and more.
Price: $2.99
It also lets you pick which data you would like to export. For instance, you can choose to add or remove your email, address, etc. In the end, you get a clean, customized spreadsheet that you can export via Email or Dropbox.
Price: Free
Signing Off…
Contacts have become an essential part of our smartphone usage. From a friend we made by chance to the occasionally needed electrician, our contact book holds all of that and more. So, it’s not surprising that we want them properly protected, backed up, and transferred to devices we are currently using.
Hopefully, one of the solutions outlined in this guide worked for you. Run into trouble along the way? Leave us a comment telling us about what happened. We might just be able to help you out.
Any other Apple-related questions rolling around in your head? We’d love to hear them. Drop us a comment!
You may like to read:


Fantastic website! I’ve been looking for a hassle-free document converter, and LaztyConvert works like a charm. Completely free and efficient. Highly suggested!