Two-factor authentication for your Apple ID adds an extra layer of protection to secure your account. It involves giving two pieces of information to be able to log in and access your account. This is incredibly useful to prevent any unauthorized people from using your Apple ID. Once you set it up, even if someone gets access to your password, it won’t be enough to log in to your account. So let’s learn how Apple ID two-factor authentication works and how to set it up.
- How Two-Factor Authentication Works for Apple ID?
- Minimum System Requirements for 2FA
- How to Turn On Apple Two-Factor Authentication on iPhone and iPad
- How to Turn On Apple Two-Factor Authentication on Your Mac
- Use Verification Codes of Two-Factor Authentication
- What to remember when you use 2FA for Apple ID?
How Two-Factor Authentication Works for Apple ID?
As mentioned above, two-factor authentication ensures that only you can access your Apple account on the web or a trusted device. It is also known as 2FA in short. Whenever you try to sign in from a new device, you will be required to give two pieces of information, namely your password and a six-digit verification code. The verification code will appear on your trusted devices or will be sent to your phone number.
In this way, Apple makes you confirm that you trust the new device. For instance, suppose you have an iPhone and want to use your Apple ID for the first time on a new iPad or Mac or even on a browser on any other device. You’ll be triggered to enter your password and the verification code that will automatically appear on your iPhone.
In this way, 2FA improves the security of your account by preventing access with just your password. So even if someone recognizes your password, they won’t be able to access your account and see your personal information.
Once you have successfully signed into a device after giving the verification code, you will not be asked for it again unless you sign out ultimately, erase the device, or attempt to change your password.
While signing in on the web, you can choose to trust your browser, which will prevent the need for a verification code the next time you log in from that computer.
Trusted Devices
Once you sign into a device using two-factor authentication, it becomes a trusted device. This means that Apple recognizes it as yours and can use it to verify your identity by displaying a verification code on it whenever you sign in on a different device or browser.
An Apple Watch running watchOS 6 or later can be used to receive verification codes when signing in with your Apple ID but cannot serve as a trusted device for password resets.
Trusted Phone Numbers for 2FA
To activate 2FA, you must verify at least one trusted phone number. This number can be used to receive verification codes by text message or automated phone call. It’s a good idea to verify an additional phone number, too such as that of a family member, in case you unexpectedly lose access to yours.
Verification Codes
A verification code should not be confused with your device passcode. It’s just a temporary code that’s sent to your trusted device or phone number when you try to sign in to your Apple ID on a new device or browser. You can also get a verification code from trusted device Settings.
Minimum System Requirements for 2FA
2FA is available for anyone using iCloud and iTunes on a device with the latest iOS or macOS, or a web browser and a phone number. It is recommended to use a credit card, too, as it can help you verify your identity in case you forget your password.
Sometimes, you might see that two-factor authentication is enabled by default when you first set up your Apple ID. This is true of Apple IDs created in iOS 10.3 or macOS 10.12.4 and later.
Here are the minimum system requirements for any device:
- iPhone, iPad, or iPod touch running iOS 9 and later
- Mac running OS X El Capitan and iTunes 12.3 and later
- Apple Watch running watchOS 2 and later
- Apple TV HD running tvOS
- Windows Computer with iCloud for Windows 5 & iTunes 12.3.3 and later
In case you don’t meet these system requirements on all the devices you use with your Apple ID, or if you don’t have a valid credit card on file, you’ll see a warning message about it. Read it before proceeding. Therefore, it is recommended that you keep your device updated with the latest software or add your credit card information for a seamless experience when signing into Apple ID or resetting your password.
How to Turn On Apple Two-Factor Authentication on iPhone and iPad
If you’re using iOS 10.3 or later:
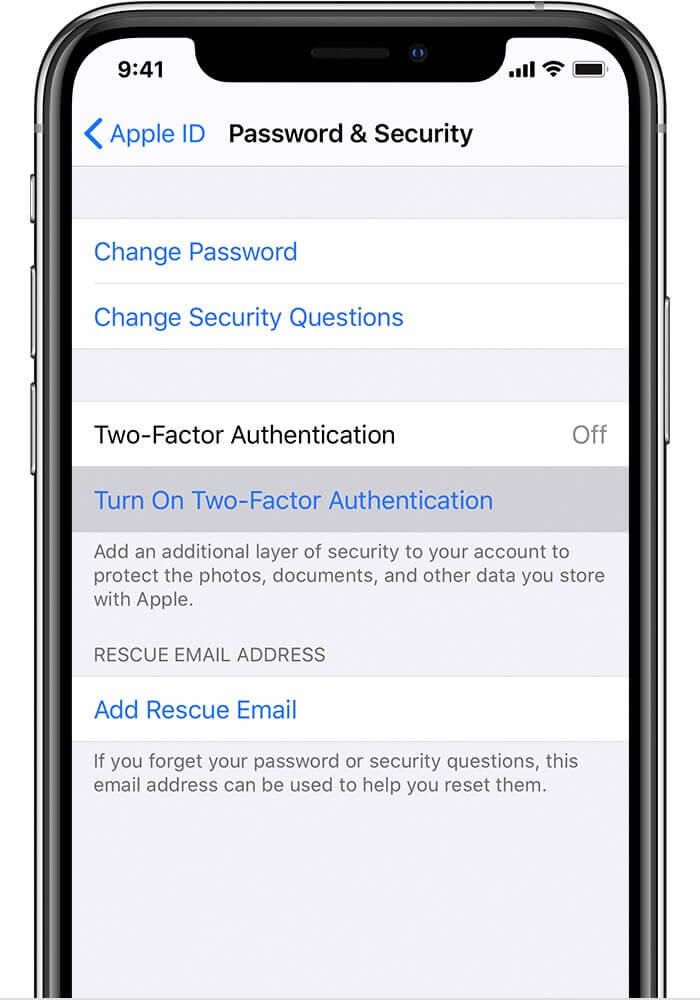
- Open Settings and tap on your Profile Name.
- Next, tap on Password & Security. Newer iOS versions will show Sign-In & Security.
- Tap on Turn On Two-Factor Authentication.

- Tap Continue.
If you’re using iOS 10.2 or earlier:
- Go to Settings → iCloud.
- Next, tap your Apple ID → Sign-In & Security (Password & Security).
- Tap on Turn On Two-Factor Authentication → Tap Continue.
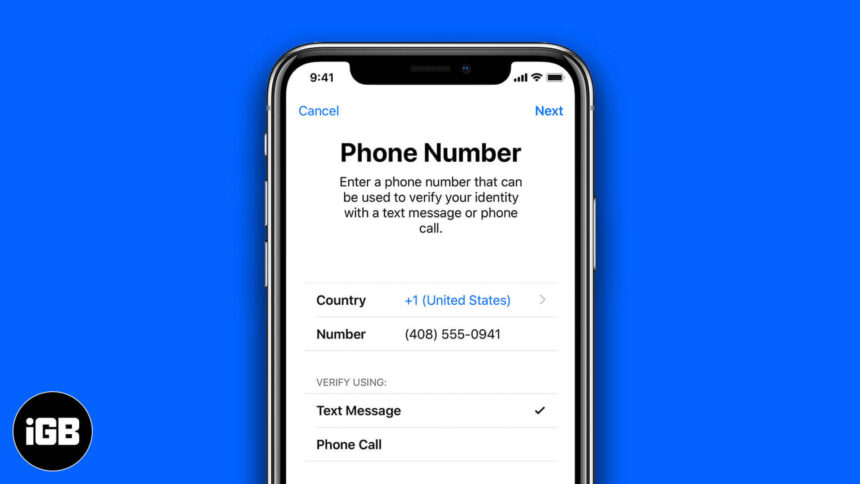
Now, you will have to enter the phone number on which you want to receive verification codes when you attempt to sign in. The codes can be received via text message or automated phone calls.
Once you tap Next, a verification code will be sent to the phone number you entered.
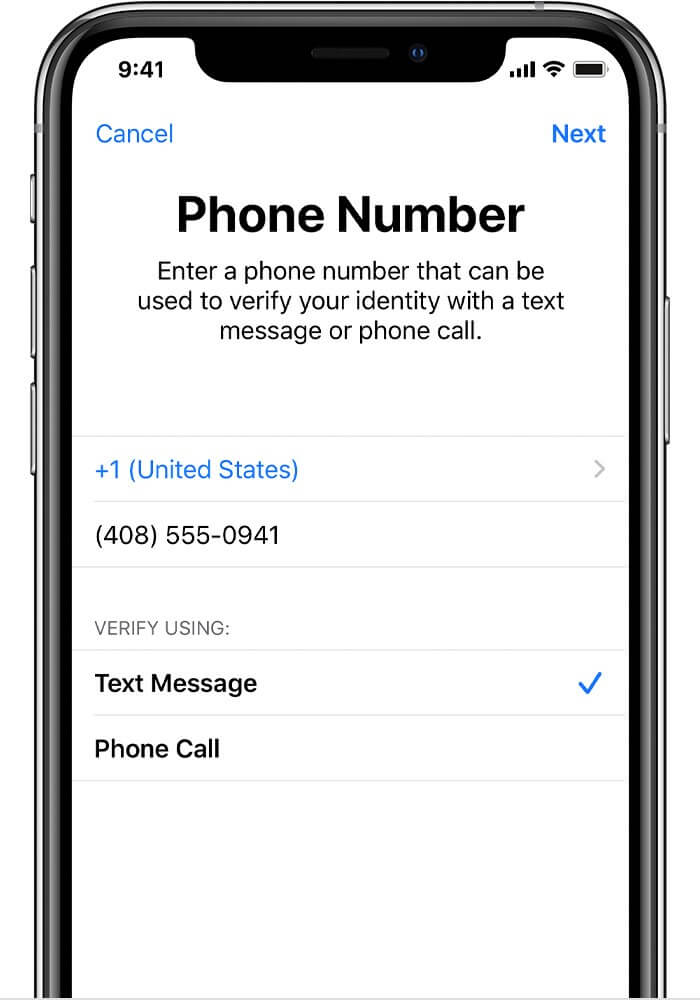
Verify your phone number by entering the code you received, and this will successfully turn on.
How to Turn On Apple Two-Factor Authentication on Your Mac
If you’re using macOS Catalina and later:
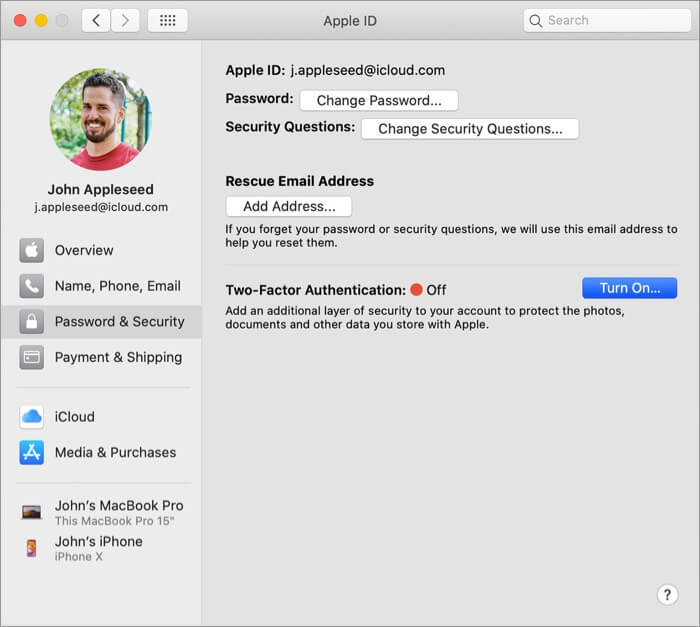
- Click on the Apple Logo at the top of the screen and select System Preferences.
- Next, click on Apple ID, and under your name, click on Password & Security.
- Click on Turn On Two-Factor Authentication.

If you’re using macOS Mojave or earlier:
- Click on the Apple logo and select System Preferences.
- Next, click iCloud and select Account Details.
- Click on Security and then click Turn On Two-Factor Authentication.
Use Verification Codes of Two-Factor Authentication
- Once you have enabled 2FA, use your Apple ID to sign into a website, app, or device.
- A popup will appear on one of your trusted devices. Tap Allow on it.
- You will see a code to enter on the website, app, or device that you’re trying to sign into.
- Tap OK to dismiss the code.
You can also get a verification code any time you want.
- Go to Settings on your iPhone or iPad and tap on your Profile.
- Next, tap Password & Security.
- Tap Get Verification Code > Tap OK when you’re done with the code.
What to Remember When You Use 2FA for Apple ID?
It is an excellent way to enhance the security of your Apple account. To keep things as secure as possible and not lose access to your account, follow these guidelines when using 2FA:
- Remember your Apple ID password.
- Use a passcode on all your devices.
- Keep your trusted phone number(s) updated.
- Safeguard your trusted devices to avoid losing them.
Signing Off
So, this was the complete guide to set up 2FA for your Apple ID. You can also create a new Apple ID on the web. Let us know in the comments below if you have any questions.
You may also like to read these:
- Enable 2FA for Twitter
- Remove Apple ID Payment Method from iPhone or iPad
- How to Delete Apple ID Account Permanently
- How to change Apple ID security questions
🗣️ Our site is supported by our readers like you. When you purchase through our links, we earn a small commission. Read Disclaimer.