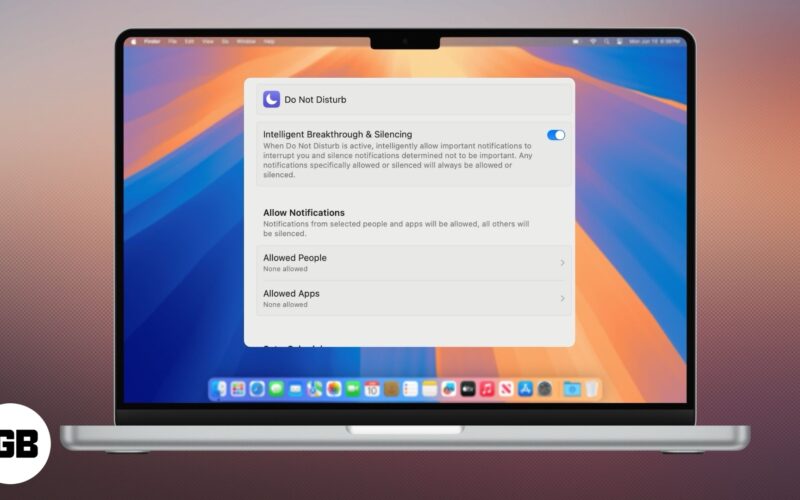
Notifications can be a major source of distraction when you need to focus. Luckily, macOS offers the Do Not Disturb (DND) feature to help you work uninterrupted by silencing notifications. With the latest macOS Sequoia, this feature has been enhanced with intelligent silencing, offering smarter ways to manage notifications.
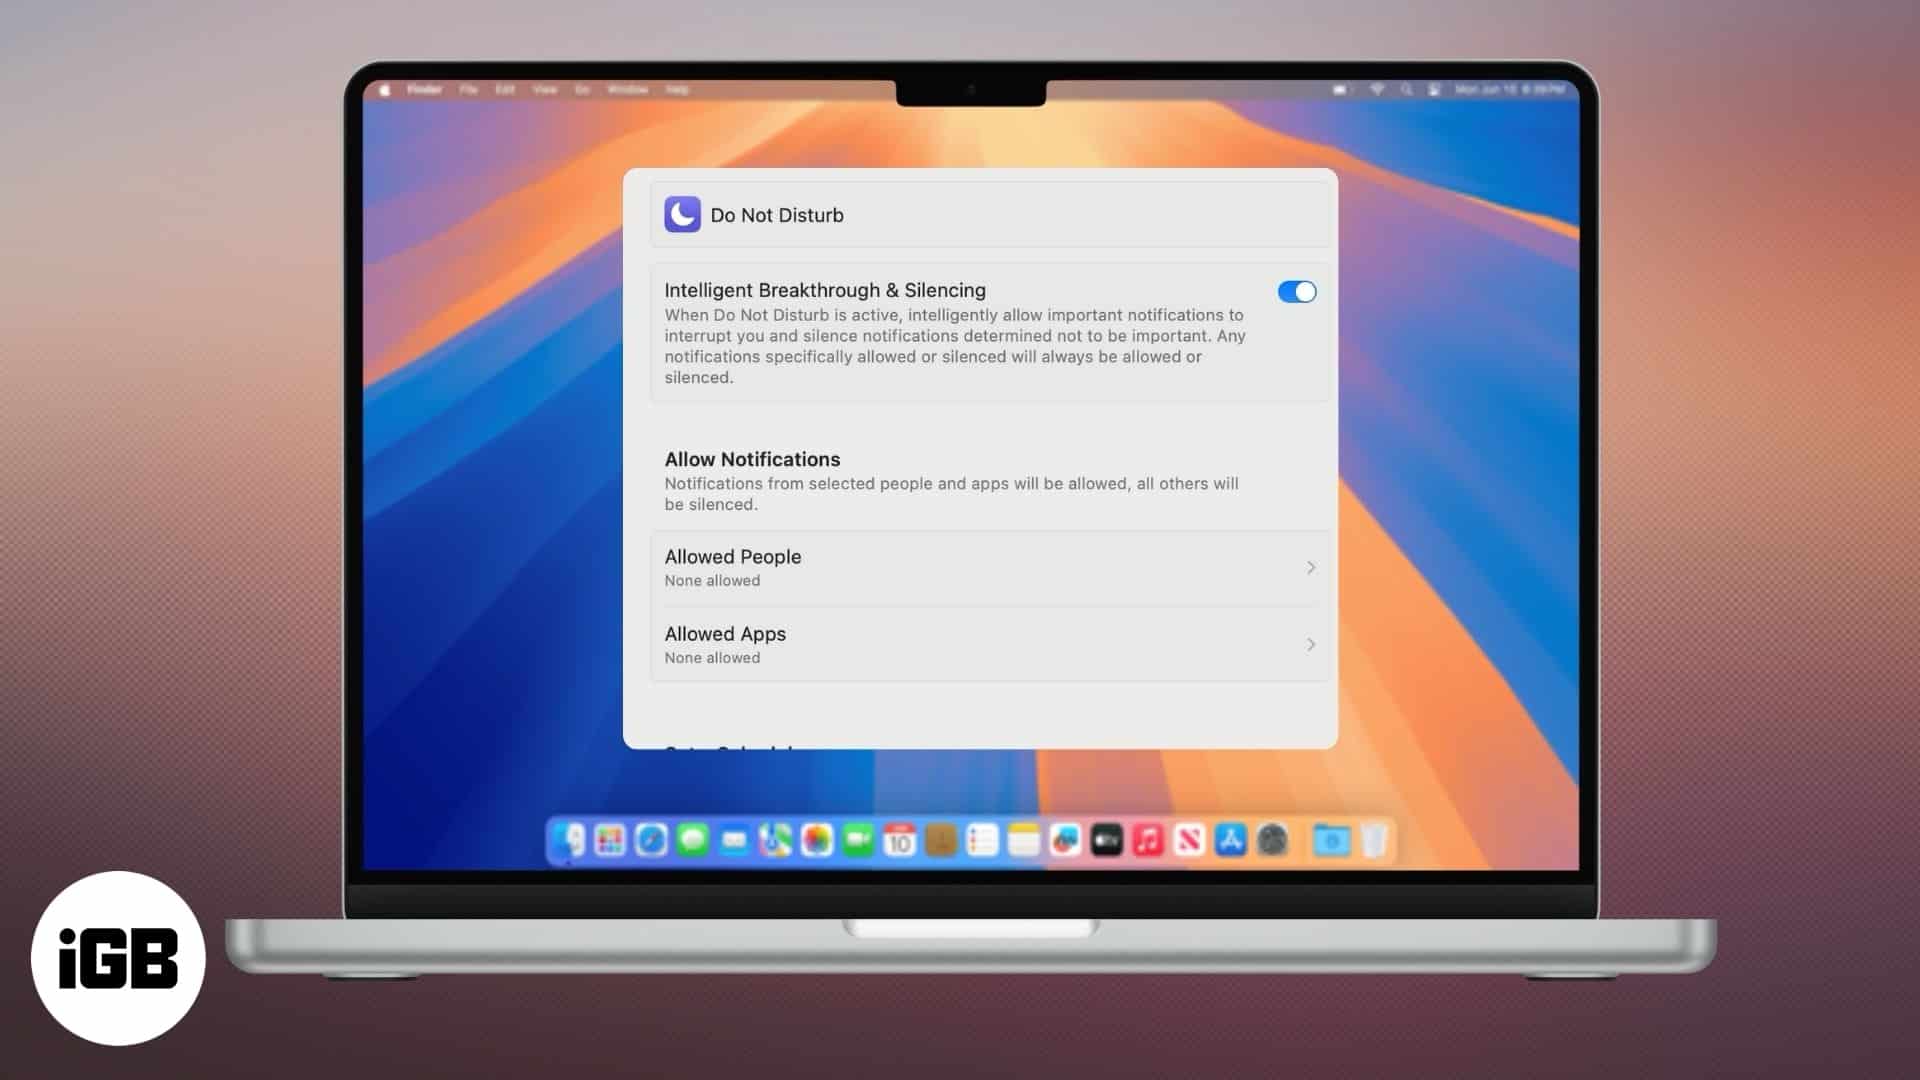
In this guide, I’ll share how to turn on, use, and customize Do Not Disturb on your MacBook, so you can stay productive and in control of your alerts.
Table of Contents
What is Do Not Disturb on Mac?
Do Not Disturb (DND) is a Focus mode on your Mac designed to temporarily silence notifications. When Do Not Disturb is turned on, your Mac will stop showing notifications on your screen. You won’t hear notification sounds, see banners, or get interruptions. However, you can allow time-sensitive notifications to avoid missing urgent tasks.
Do Not Disturb is more flexible than turning off notifications completely, which blocks all alerts from apps and contacts. It simply hides notifications temporarily, allowing you to check them later in the Notification Center when it’s convenient for you. This means you can still stay updated without interruptions.
With macOS Sequoia, DND has an Apple Intelligence feature that determines the urgency of the notification. You can also customize when and how DND activates. For example, you may schedule it for specific times and locations or while using certain apps.
Moreover, it allows you to choose which apps or contacts are allowed to break through the silence for important updates.
How does Do Not Disturb work?
As mentioned above, when DND is enabled, all notifications are temporarily muted. Here’s a closer look at how it functions:
- Hides notifications: Do Not Disturb silence notifications on your Mac. You won’t see banners or alerts interrupting your workflow.
- Stores notifications in Notification Center: Even though notifications are silenced, they aren’t lost. You can view them later by opening the Notification Center, ensuring you don’t miss anything important.
- Customize exceptions: You can allow specific apps or contacts to bypass Do Not Disturb. For example, you might allow calls from close family members or messages from work-related apps.
- Scheduling and automation: Do Not Disturb can be set to turn on automatically at specific times, in certain locations, or when using particular apps. For instance, you could schedule it during your work hours or when you’re at the gym.
- Intelligent Silencing: With macOS Sequoia, Do Not Disturb uses intelligent silencing to adapt to your habits. It can determine which notifications need your instant attention.
- Works across devices: You can sync your Focus mode across your Apple devices, such as your iPhone or iPad. This ensures a consistent, interruption-free experience.
- Show your focus: You can let others know that you have turned on DND on your Mac, which is why you haven’t responded.
Now that you understand the feature well, let’s jump into the steps to put your MacBook on Do Not Disturb.
How to turn on Do Not Disturb on Mac
There are several ways to enable Do Not Disturb (DND) on Mac. You can use any method at your convenience.
Method 1: From Control Center
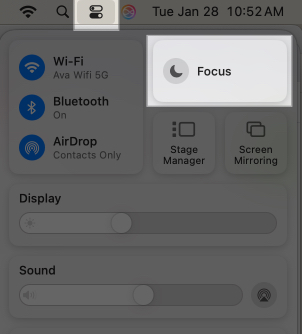
- Click the Control Center icon in the top-right corner of the menu bar.
- Select the Focus tile.
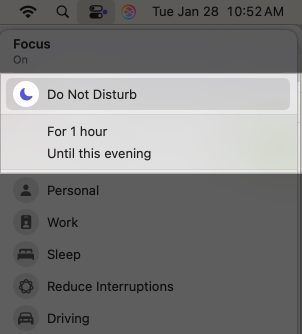
- Click Do Not Disturb. It will enable DND temporarily. You can choose durations like For 1 hour or Until tomorrow morning.
Method 2: Via Menu Bar icon
If you use DND mode frequently, you can add it on your menu bar for quick access. Here’s how:
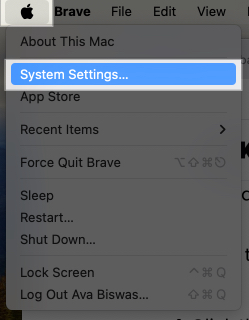
- Click the Apple logo in the top left corner and select System Settings.
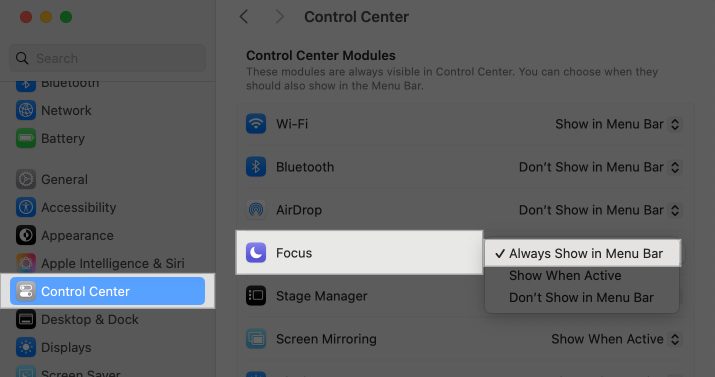
- Access Control Center menu from the left pane.
- Then, click the drop-down next to Focus and select Always Show in Menu Bar.
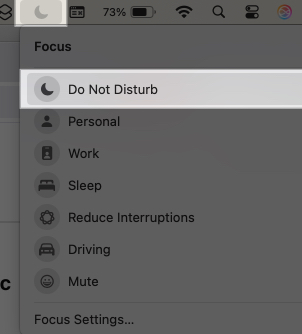
- Now, click the moon icon on the left side of your battery and select Do Not Disturb.
Method 3: Using keyboard shortcut
You can use several keyboard shortcuts to put your MacBook in DND mode.
- Press F6 to quickly enable Do Not Disturb.
- Press and hold the Option key and click the date and time area at the top right corner of your Mac screen.
- You can also create a keyboard shortcut for DND mode.
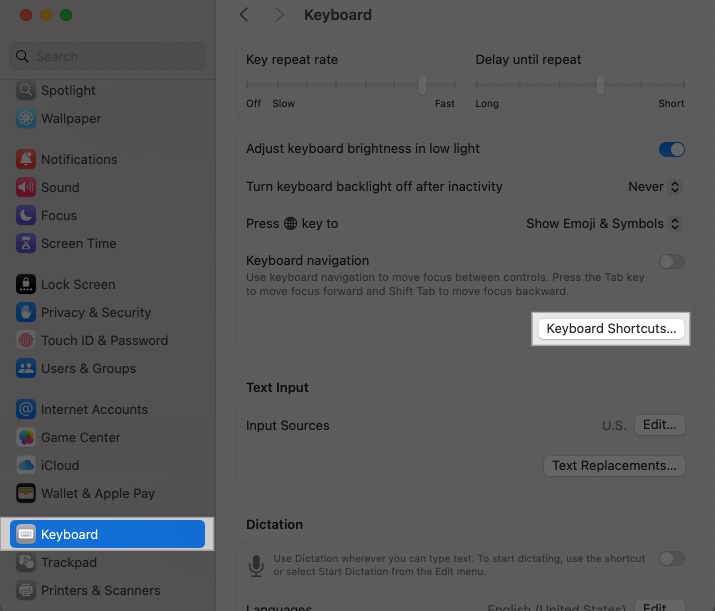
- Go to System Settings → Keyboard → Keyboard Shortcuts.
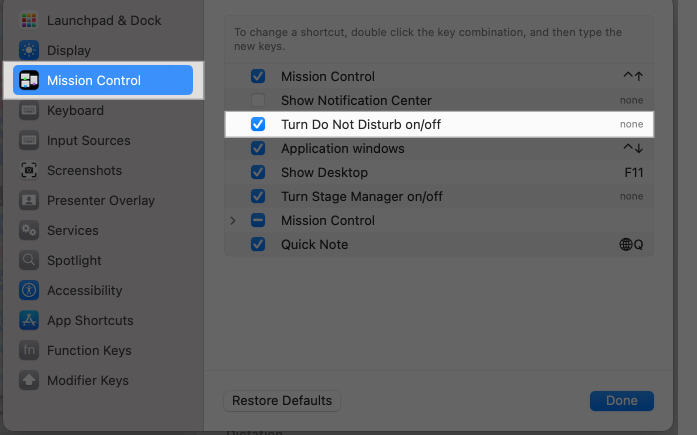
- Access Mission Control from the left pane and check the box for Turn Do Not Disturb On/Off.
- Double-click on none or the key you see next to it and enter the key combination.
- After you set the key combination of your choice, press them together.
- Go to System Settings → Keyboard → Keyboard Shortcuts.
Method 4: Asking Siri
For hands-free operation, simply ask Siri by saying, “Hey Siri, turn on Do Not Disturb.”
How to schedule Do Not Disturb on Mac to turn on automatically
If you have a fixed time when you require the Do Not Disturb mode, you can schedule it to activate automatically. The automation is based on specific conditions. Let’s see how:
- Open System Settings on your Mac.
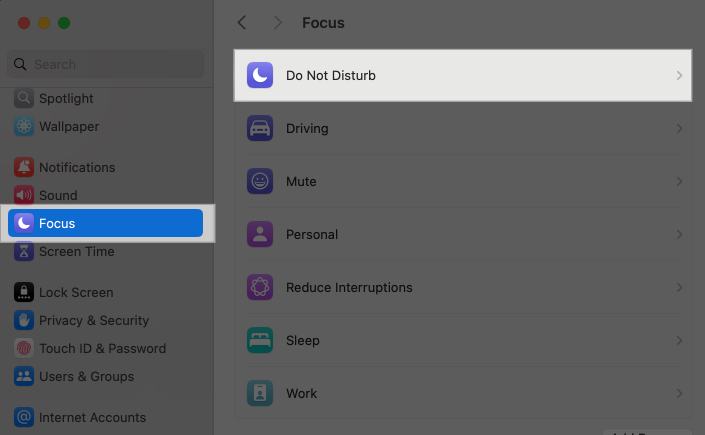
- Go to Focus and select Do Not Disturb.
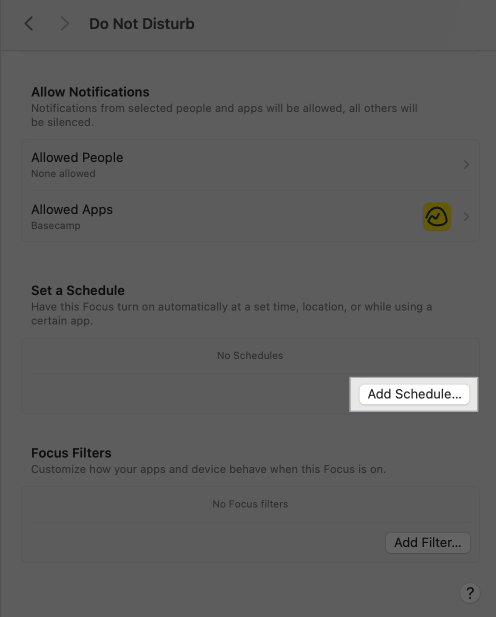
- Scroll down and click Add Schedule.
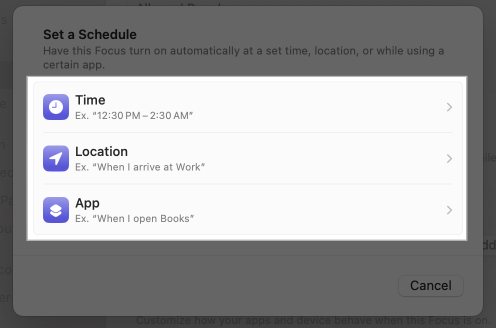
- Now, choose your preferred option:
- Time: Set a start time in From and end time in To. Then, choose the days when you want to use Do Not Disturb mode and click Done.
- Location: You can configure Do Not Disturb to turn on automatically when you’re in a specific location, such as your office or home. Search and add the desired location and set the radius. Hit Done to save it.
- App: Some apps might require your full attention. You can set DND to start automatically when using specific apps. Scroll and select the app for which you want Do Not Disturb to activate and click Done.
How to customize Do Not Disturb on Mac
You can make Do Not Disturb even more effective by tailoring its settings to fit your needs. Here’s how you can customize it:
Set up Intelligent Breakthrough and Silencing
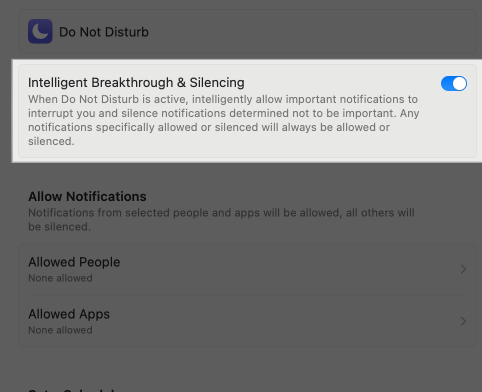
With macOS Sequoia, you can enable intelligent silencing to analyze your notifications and show you the urgent ones. For example, important notifications, such as calendar alerts, reminders, or time-sensitive mail, will notify you with a sound. On the other hand, push notifications from apps will be silenced automatically.
- Open System Settings → Focus → Do Not Disturb.
- Toggle on Intelligent Breakthrough and Silencing.
However, if you want some apps to bypass this setting, you can whitelist them. Follow the steps below.
Allow specific notifications
While Do Not Disturb is on, you can still allow notifications from certain apps or people. This ensures you don’t miss critical alerts:
- Go to System Settings → Focus → Do Not Disturb.
- To whitelist an app, click Allowed Apps → +(Add) button and select the app. Hit Add. Repeat the step to add another app. You may also toggle on Time Sensitive Notifications to never miss an urgent update. Click Done to save everything.
- To get notification from specific person, click Allowed People → Add People. Select the contact and click Add. Repeat the process and hit Done. If you have a list of Favorite contacts, you can allow their calls altogether. Select Favorites from the Allow calls from drop-down.
Add Focus Filters
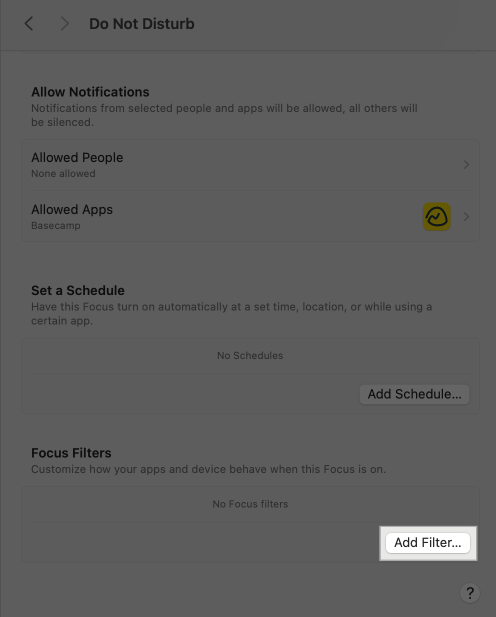
Focus filters help you fine-tune what your apps show during Do Not Disturb mode. These customization options ensure that Focus mode aligns with your routine.
- Open System Settings → Focus → Do Not Disturb.
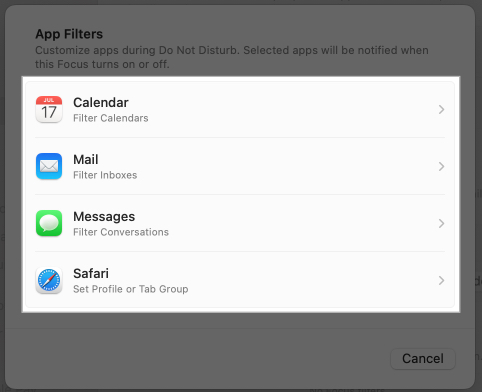
- Select Add Filter and choose the app:
- Calendar: Choose which calendar you want to view when DND is enabled and click Add.
- Mail: Select a mail account that you can access in your inbox in Do Not Disturb mode.
- Messages: Toggle on Filter by People List and hit Add to keep the chats from contacts you have allowed.
- Safari: Choose Profile or Tab Group you want to use in DND. The rest of the profiles or tab groups will be unavailable to help you stay better focused and organized.
How to turn off Do Not Disturb on Mac
When you are done with your task or don’t need the Focus schedule anymore, you may want to delete it and resume getting notifications as usual on your Mac.
Turn off DND temporarily
- Click the black moon icon in the Menu Bar and select Do Not Disturb.
- Press F6 from the keyboard to turn off Do Not Disturb.
Disable Do Not Disturb
- Go to System Settings → Focus → Do Not Disturb.
- Select the existing schedule under the Set a Schedule section.
- Now, toggle off Schedule/Automation based on the type of schedule.
It will stop the DND mode, turning it on automatically on your Mac. If you no longer need the schedule, click Delete Schedule and confirm your choice by tapping Delete Schedule on the prompt.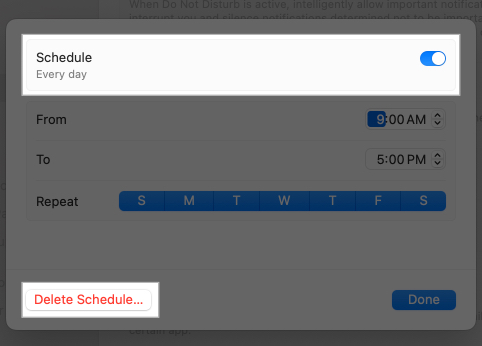
What to do if Do Not Disturb is not working on Mac?
If Do Not Disturb isn’t functioning as expected, here are some quick fixes:
- Check DND settings: Ensure schedules and preferences are correctly configured.
- Update macOS: Install the latest software updates to fix potential bugs.
- Restart your Mac: A simple reboot can resolve many issues.
- Disable Share Across Devices: Turn off this feature temporarily to see if syncing is causing issues.
Signing off…
Do Not Disturb is an invaluable tool for managing notifications and enhancing productivity on your Mac. With macOS Sequoia’s intelligent silencing and customizable settings, staying focused has never been easier. I use it to create a distraction-free environment whenever I’m working, presenting, or watching a movie.
Got questions? Share your thoughts or experiences in the comments below!
FAQs
If you don’t want to put your iPhone and Mac on Do Not Disturb together, go to System Settings → Focus and toggle off Share Across Devices. This ensures DND is managed independently on each device.
Check your scheduled settings under System Settings → Focus → Do Not Disturb and ensure no automation is activating it unexpectedly.
Also read:

