With the release of iOS 18, Apple has redesigned the Photos app and integrated powerful editing features so that it can do anything: trim, crop, adjust color, change speed, remove noise, etc. Therefore, any kind of editing—from minor to complex—can be achieved on an iPhone. In this guide, I’ll show you how to edit videos on an iPhone using the Photos app and iMovie.
Table of Contents
- How to edit a video on iPhone using Photos app
- Trim a video
- Crop, flip, rotate, and straighten the video
- Add a filter to video
- Change video color, brightness, and other visual effects
- Adjust the video playback speed
- Customize slo-mo video
- Remove sound from a video
- Edit Audio Mix
- Edit Cinematic mode videos
- Apply copy edits in bulk to videos
- Revert a video to its original state
- How to add text, merge clips, and add music to videos on iPhone with iMovie
How to edit a video on iPhone using Photos app
The Photos app is a professional-level tool for video editing on iPhone. Before you begin, ensure your iPhone is updated to iOS 18 to access all the features.
Trim a video
Trimming and splitting a video is the most basic yet useful editing tool. It lets you remove unnecessary parts of the clip and shorten the video length.
- Launch the Photos app and open the video you want to edit.
- Tap the edit button below.
- You will see the video timeline at the bottom. Drag either or both ends (< >) to trim the video. The portion inside the handles will remain, while the rest will be removed.
- Tap the triangle play button to ensure you have made the suitable trims. You can adjust the handles again if necessary.
- Tap Done and select Save Video or Save Video as New Clip.

The save video option overwrites the original file and only saves the trimmed version. If you want to undo the trim, you can revert the video to the original state. We will discuss this later in the post.
2. Crop, flip, rotate, and straighten the video
Sometimes, your video might need adjustments to its orientation, angle, or frame. Whether it’s cropping, flipping, rotating, or straightening, iOS 18’s Photos app makes it effortless.
First, let’s see how to crop videos on iPhone:
- Open the Photos app, select your video, and tap Edit.
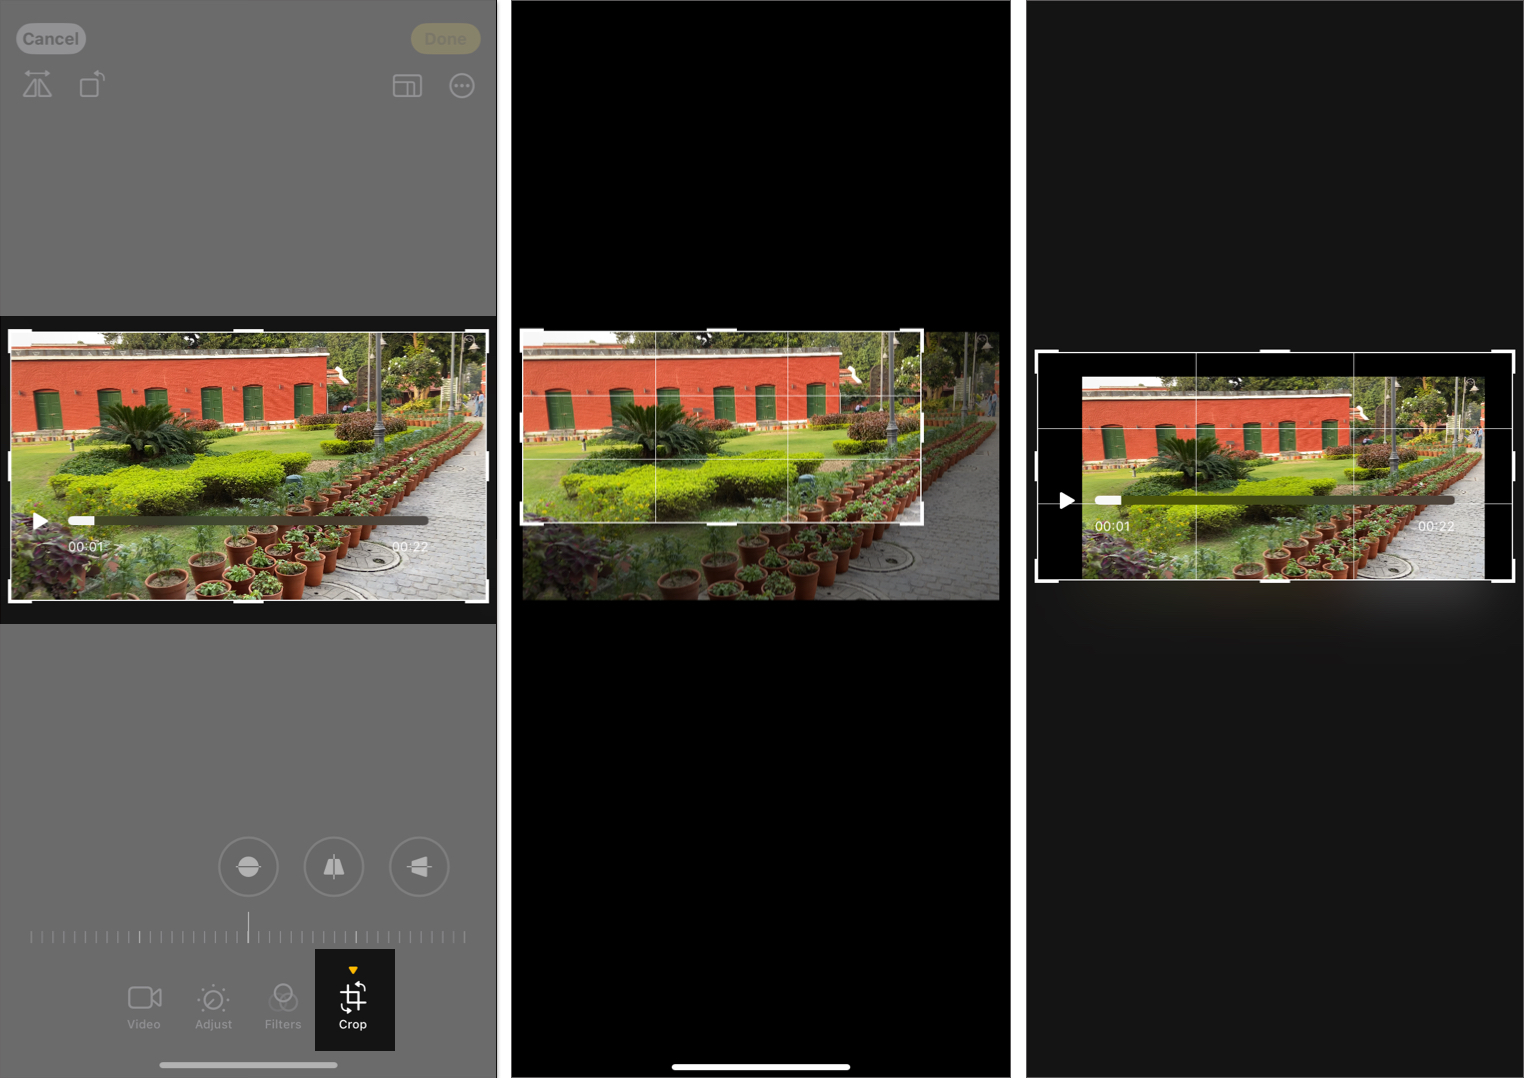
- Select Crop from the toolbar to access the crop tools. Drag either one of the four edges to crop the video. You may also drag from the corners. If needed, use two fingers to zoom in and out.
- You can also use pre-built crop options like square, rectangle, 9:16, 16:9, 3:4, etc. To do this, tap the rectangle icon at the top right and choose the desired aspect ratio.
- Finally, tap Done to save the video.
You can quickly change the video if you accidentally captured it in the wrong orientation. Here’s how to rotate a video on an iPhone:
- From the Crop tools, tap the square icon with an arrow at the top left corner.
- Tap the same icon several times to get the desired rotation.
- Hit Done to save the video.
The Photos app also lets you rotate a video in multiples of 90 degrees (as shown below). Tap the two semi-circles icon and drag the slider left or right to rotate the video the way you want. This may significantly crop out the corners of the video.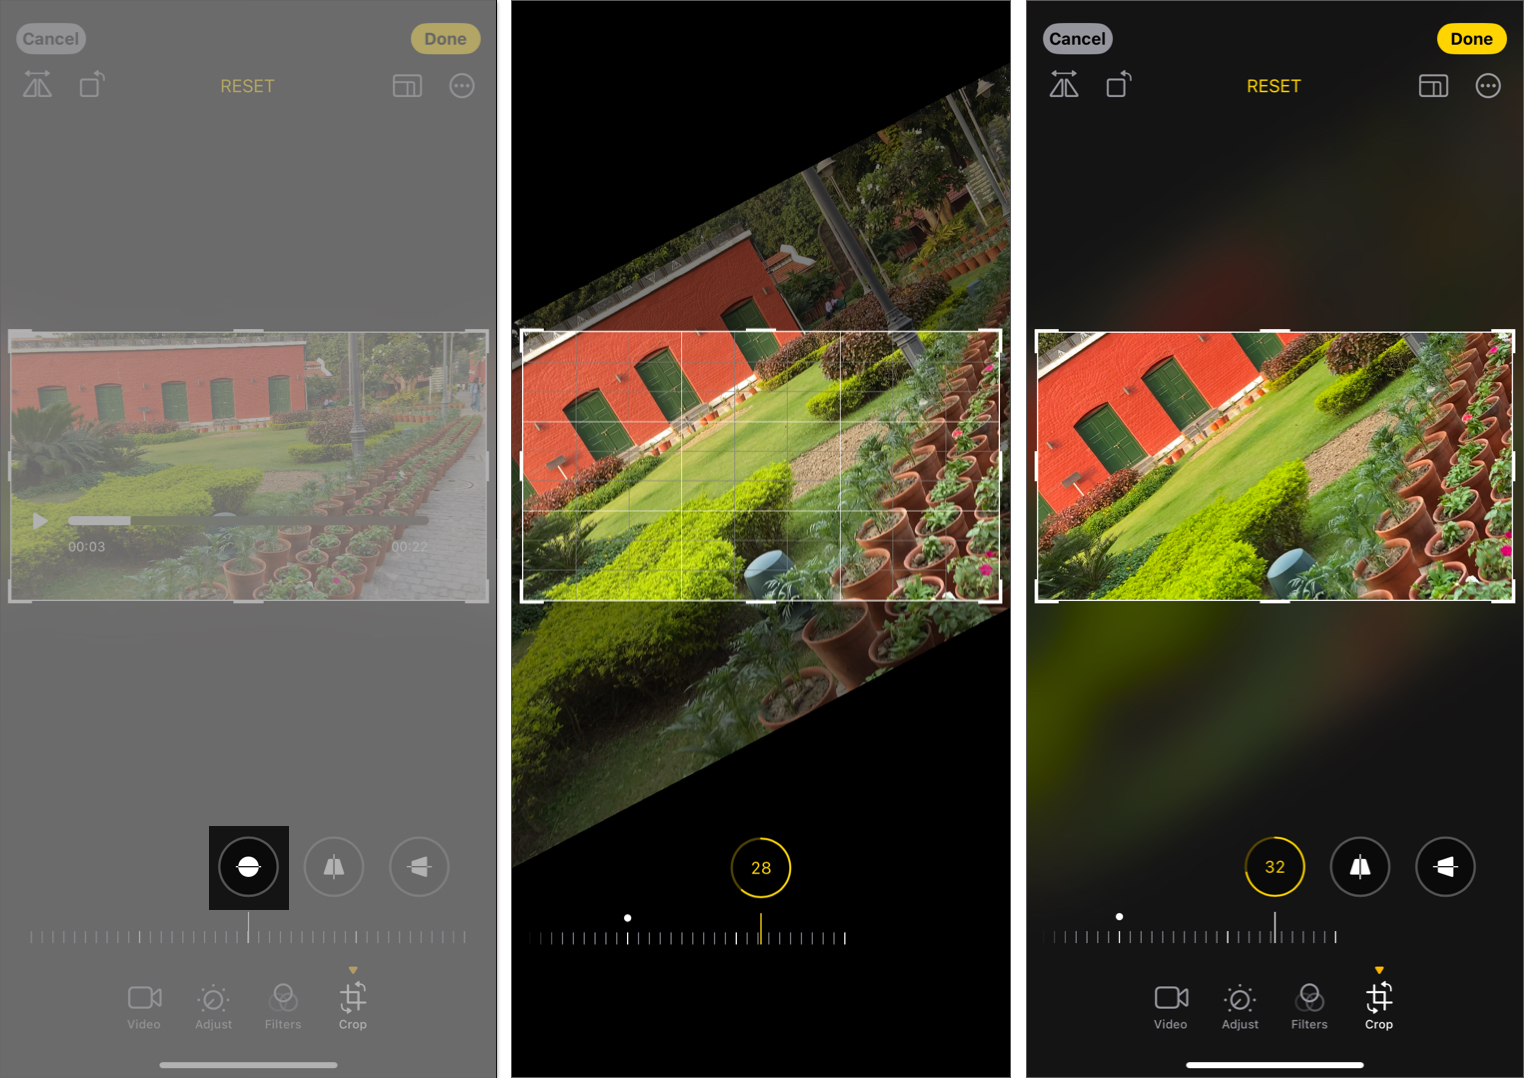
Next, you can flip a video to rectify the mirrored recordings or create a reverse perspective effect. In this edit, the left becomes right, and the right becomes left. To do so, tap the two-triangle icon at the top left from the Crop tools.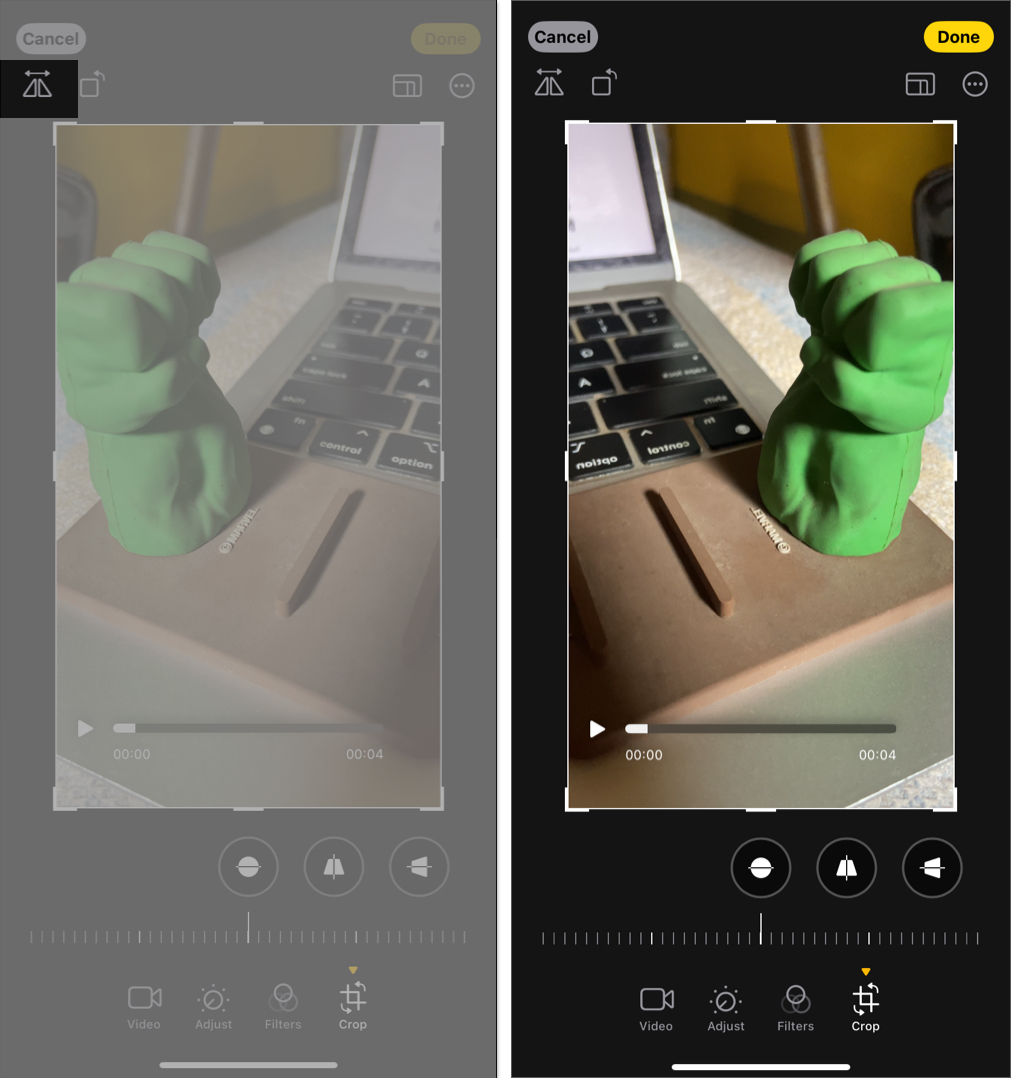
Lastly, you can stretch the video frame. Select either of the trapezium icons according to your needs, and drag the slider. The middle one stretches the video vertically, and the last one is for horizontal stretch. Tap Done to save the video.
Add a filter to video
Just like applying filters to images, you can do the same with videos. This can completely transform the mood and aesthetic of your video. Here’s how to apply them using the Photos app:
- Open a video in the iPhone Photos app and tap the edit icon.
- Tap Filters (three overlapping circles icon) at the bottom.
- Swipe through the available filters, such as Vivid, Dramatic, Mono, Noir, etc.
- After selecting a filter, adjust its intensity with the slider below it. Dragging the slider left decreases the effect, while dragging it right increases it.
- Play your video to see how the filter looks in motion.
- Once satisfied, tap Done to save your video with the applied filter.
Filters are an easy way to enhance the overall look of your videos, making them more vibrant, dramatic, or stylish. Experiment with different filters to find the perfect match for your content.
Change video color, brightness, and other visual effects
Not every time you get the desired visual look with preset filters; in such situations, you can manually adjust the color and brightness of the video.
- Launch the Photos app, select your video, and tap the edit icon.
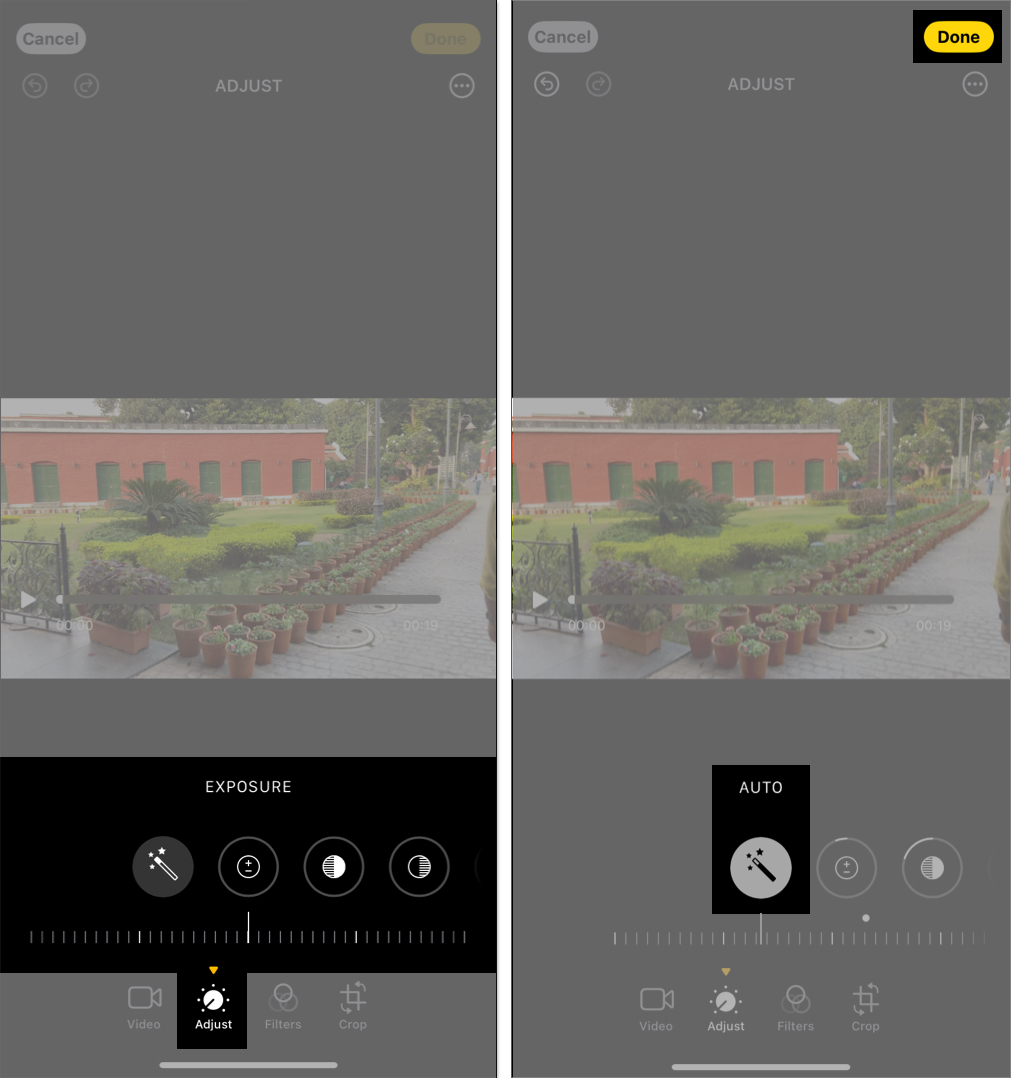
- From the available tools, select Adjust (dial-shaped icon).
- Here, you have the following controls:
- Auto
- Exposure
- Highlights
- Shadows
- Contrast
- Brightness
- Black Point
- Saturation
- Vibrance
- Warmth
- Tint
- Sharpness
- Definition
- Noise Reduction
- Vignette
- Tap Auto to let the iPhone do the magic.
- Tap other options and drag the slider left or right to adjust it. Experiment with multiple options to achieve the desired level of editing.
- Finally, tap Done to save the video.
By fine-tuning these settings, you can significantly enhance your video’s quality and make it visually appealing.
Adjust the video playback speed
With iOS 18, you can easily change the playback speed of your videos to create captivating slow-motion effects. The video must be captured at a frame rate higher than 30FPS. Here’s how to adjust the video playback speed:
- In the video editing screen, tap the Speed control icon at the top right corner.
- Select the playback speed from the dropdown menu.
- Play the video to review the edit and hit Done.
That’s how you can convert a regular video into slow motion. Next, let’s understand how you can edit slo-mo videos on an iPhone.
Customize slo-mo video
Refining the slo-mo effect in your videos lets you highlight a particular moment. This feature allows you to control precisely where the slo-mo effect begins and ends.
- Go to the edit menu of the video and tap the Speed control button.
- The slo-mo section will be highlighted below the timeline.
- Drag the longest vertical bars to change the range of the slo-mo effect.
- Play the video to see how the adjusted slo-mo section looks.
- Once satisfied, tap Done.
Remove sound from a video
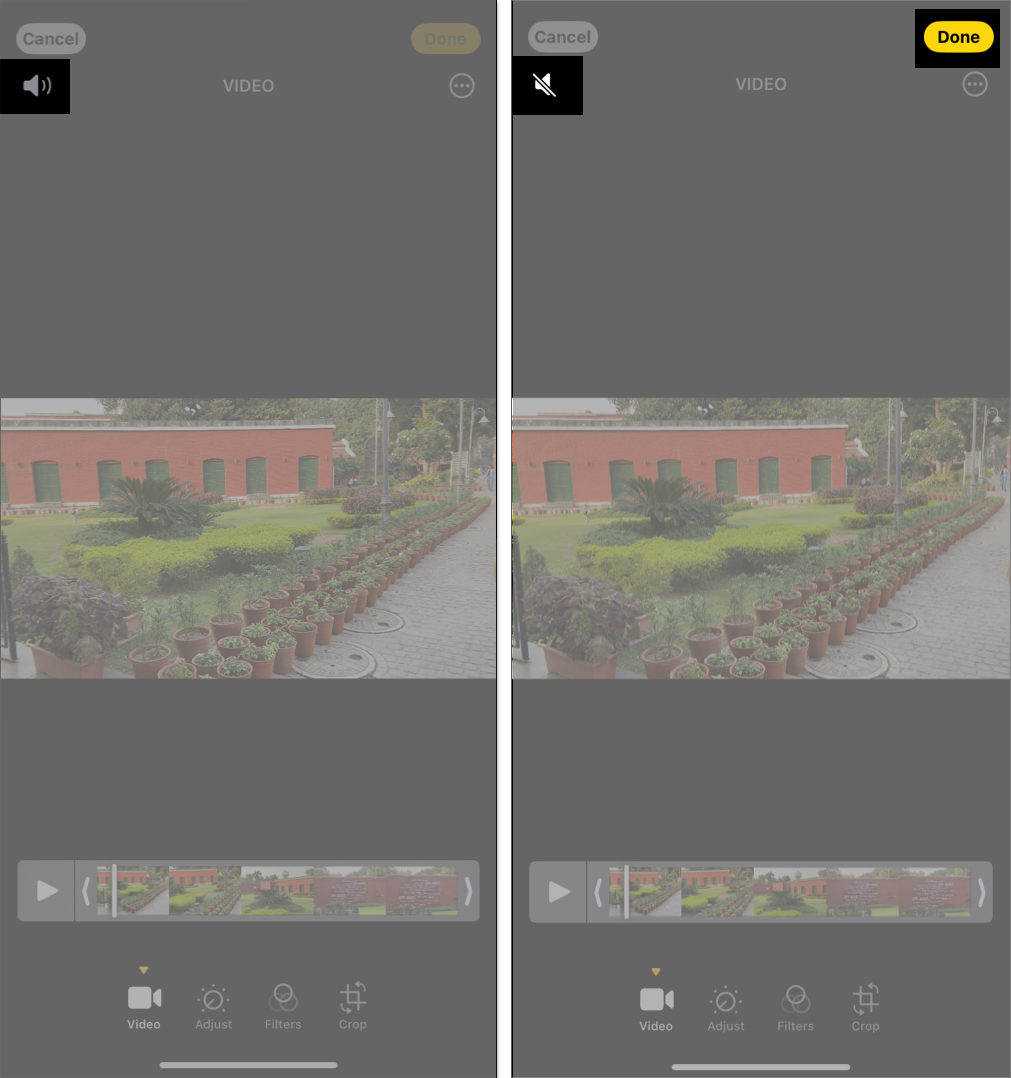
Removing sound from a video can help eliminate unwanted background noise. Follow these steps to mute a video in the Photos app:
- Open a video in the Photos app and tap the edit icon.
- Tap the speaker icon at the top left. It will cross out the speaker.
- Tap Done to save the video without audio.
Edit Audio Mix
The latest iPhone 16 series has an advanced camera feature called Audio Mix, which lets you capture videos with Spatial Audio for a more immersive experience. Later, you can edit the video sound using different modes to remove background noise and focus more on in-frame voices.
All iPhone 16 models have Spatial Audio turned on by default, so each video you record will capture the surroundings. To edit the video sound and vocals with Audio Mix on iPhone, follow the steps below:
- Open your video in the Photos app and tap the edit icon.
- Tap the Audio Mix option.
- Now, you will see the following modes:
- Standard: Keep the actual audio you recorded.
- In-Frame: Reduce audio from sources that are not visible in the video frame. So, the person talking in the video can be heard clearly.
- Studio: It modifies the voices like studio recording, eliminating background noises.
- Cinematic: If you want your video to sound like a film, select this. It focuses on the vocals in the video frame while leaving environmental sounds in the surroundings.
- Choose an effect you prefer and drag the intensity slider to adjust it.
- Once satisfied, tap Done.
Edit Cinematic mode videos
Cinematic mode on the iPhone enables you to focus on a subject while blurring the background like high-end cameras. You can edit various aspects of Cinematic mode videos, such as adjusting focus points and changing depth-of-field intensity.
Depth-of-field intensity: Adjust the amount of background blur.
First, let’s see how to change the focus subject in the Cinematic mode video.
- Launch the Photos app and locate your Cinematic video. Tap on it to open.
- Select the edit icon below.
- You will see white dots under the video timeline where your camera automatically shift the focus. Play the video and pause on the frame where you want to change the focus.
- Now, tap the subject to shift focus on it. If you want to continue the focus on the subject, double-tap on it.
- To lock the focus at a specific distance, tap and hold the screen.
- You can repeat the process through the video timeline to adjust focus for different frames.
- Hit Done to save the edited video.
Next, you can modify the depth of field intensity in your Cinematic mode video.
- Go to the video editing screen and tap the f icon at the top.
- Below the video, you will see a depth slider. Drag the slider to increase or decrease the background blur.
- Preview the changes and tap Done.
Apply copy edits in bulk to videos
The Photos app also lets you batch-edit your videos to save time and maintain consistency. You can simply copy edits from one video and apply them to multiple others.
Therefore, to use the feature, you need to edit a video first for reference. Then follow the steps below:
- Open the Photos app and select the video you have already edited.
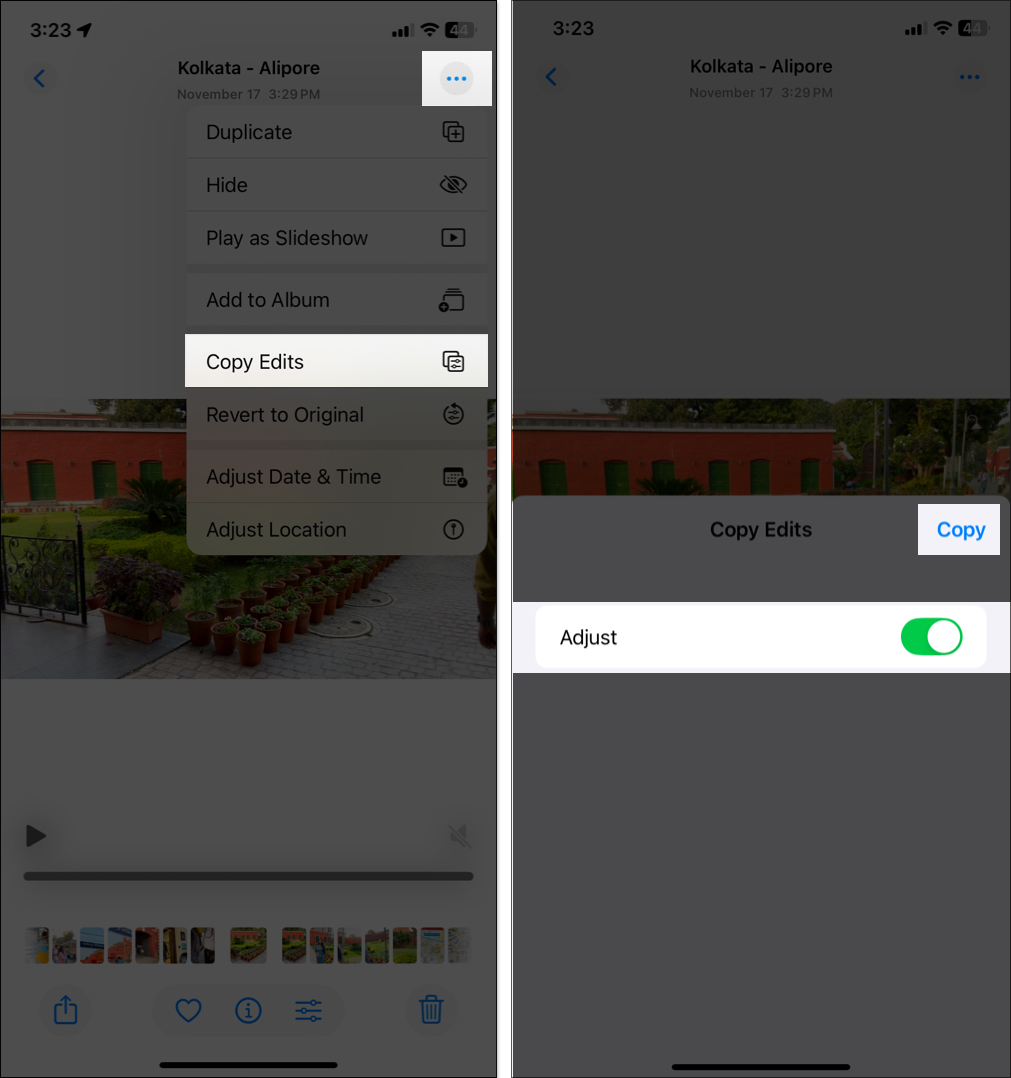
- Tap the three-dot menu at the top right corner and select Copy Edits.
- Ensure the Adjust toggle in enabled and tap Copy. This copies all the adjustments you’ve made, including filters, color tweaks, and other visual effects.
- Now, go back to your library and tap Select. Choose the videos you want to edit.
- Tap the three-dot menu at the bottom right corner and select Paste Edits.
The copied adjustments will be instantly applied in bulk to all the selected videos. You can play them to ensure they look as intended. If a specific video requires additional changes, you can edit it individually without affecting others.
Moreover, if you want to paste edit only to one video, open it, tap the three-dot menu at the top, and select Paste Edits.
Next, comes the most important steps for editing videos on an iPhone.
Revert a video to its original state
If you’ve made edits to a video but want to go back to its unaltered version, iOS 18 makes it simple to revert your video to its original state. Here’s how you can do it:
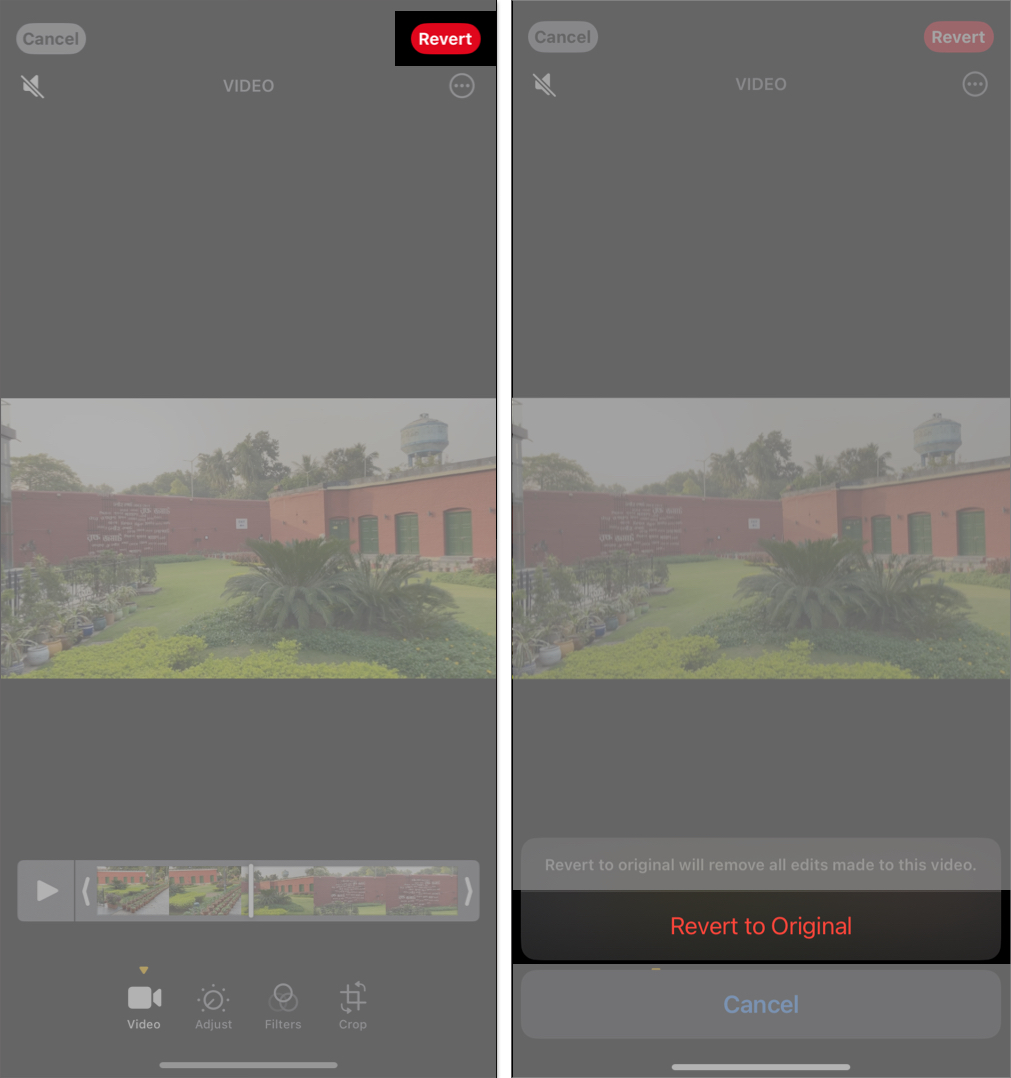
- Launch the Photos app, open the video you’ve edited, and tap the edit icon.
- Select the red Revert option at the top right corner of the screen.
- Confirm your choice by tapping Revert to Original. The video will instantly return to its original state, discarding all the previous edits.
Once you confirm, the video is automatically saved. It will now appear exactly as it was before any edits were made. However, note that if you have saved a video as a new clip after trimming, it will not undo the trimming.
You can only do basic editing with your videos in the native Photos app. If you want more advanced editing, you need Apple’s iMovie app. In the next section, I will discuss some editing methods in iMovie.
How to add text, merge clips, and add music to videos on iPhone with iMovie
Before you start the steps, download and set up iMovie from the App Store. It’s free to use.
Add text in a video
Adding text to your video can help convey a message, emphasize key moments, or provide context. Here’s how to do:
- Launch iMovie and tap Movie.
- Select a video and tap Create Movie.
- Hit the video timeline to reveal the editing tools.
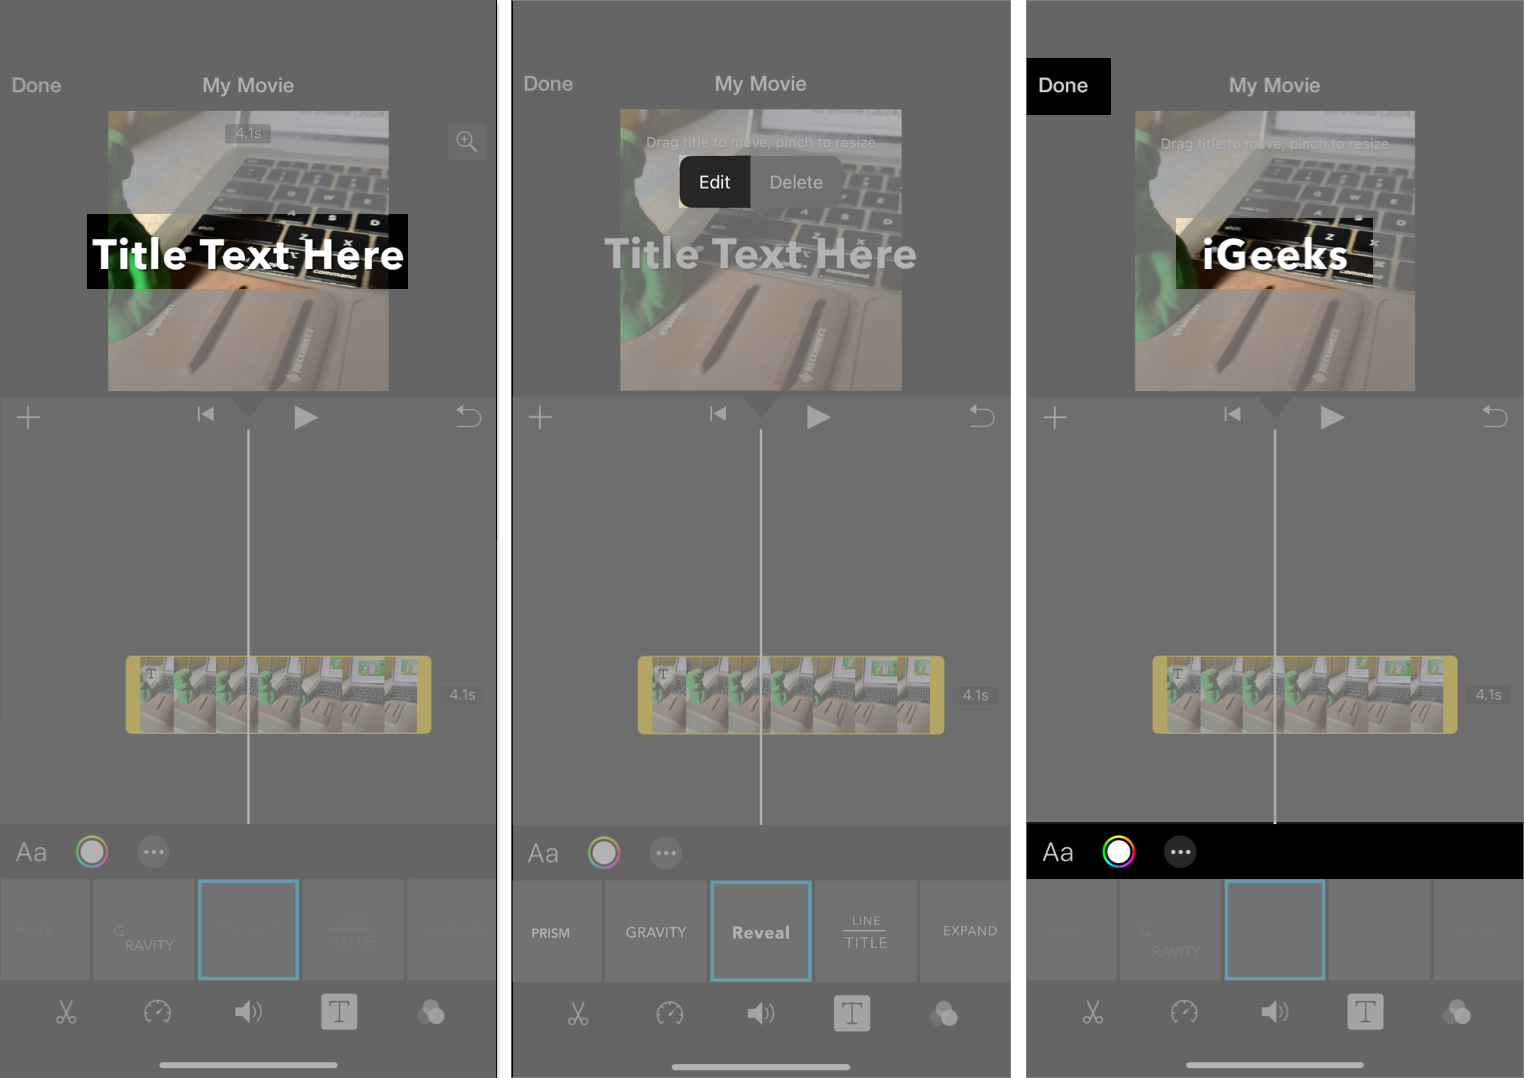
- Tap T from the bottom toolbar.
- Choose a text style like Slide, Split, Chromatic, etc.
- You will see TITLE TEXT HERE on the video. Tap it and choose Edit.
- Now, type the desired text and tap Done on the keyboard.
- To change the text position, drag the text around.
- Next, you can customize the text:
- Tap Aa to choose another font.
- Tap the color wheel icon to set the text color.
- Hit the three-dots icon to style the text.
- Enable Full Clip Duration if you want the text to stay on the video in its entirety.
- If you want to remove all the styling, tap the customized text from the video preview and select Reset.
- Tap the triangle play button to preview the video.
- Once satisfied, tap the Done → Share icon and select Save or Share Video.
Combine two or more videos together
iMovie lets you merge video clips quickly on iPhone and apply beautiful transitions for a seamless effect.
- Open iMovie and tap Movie.
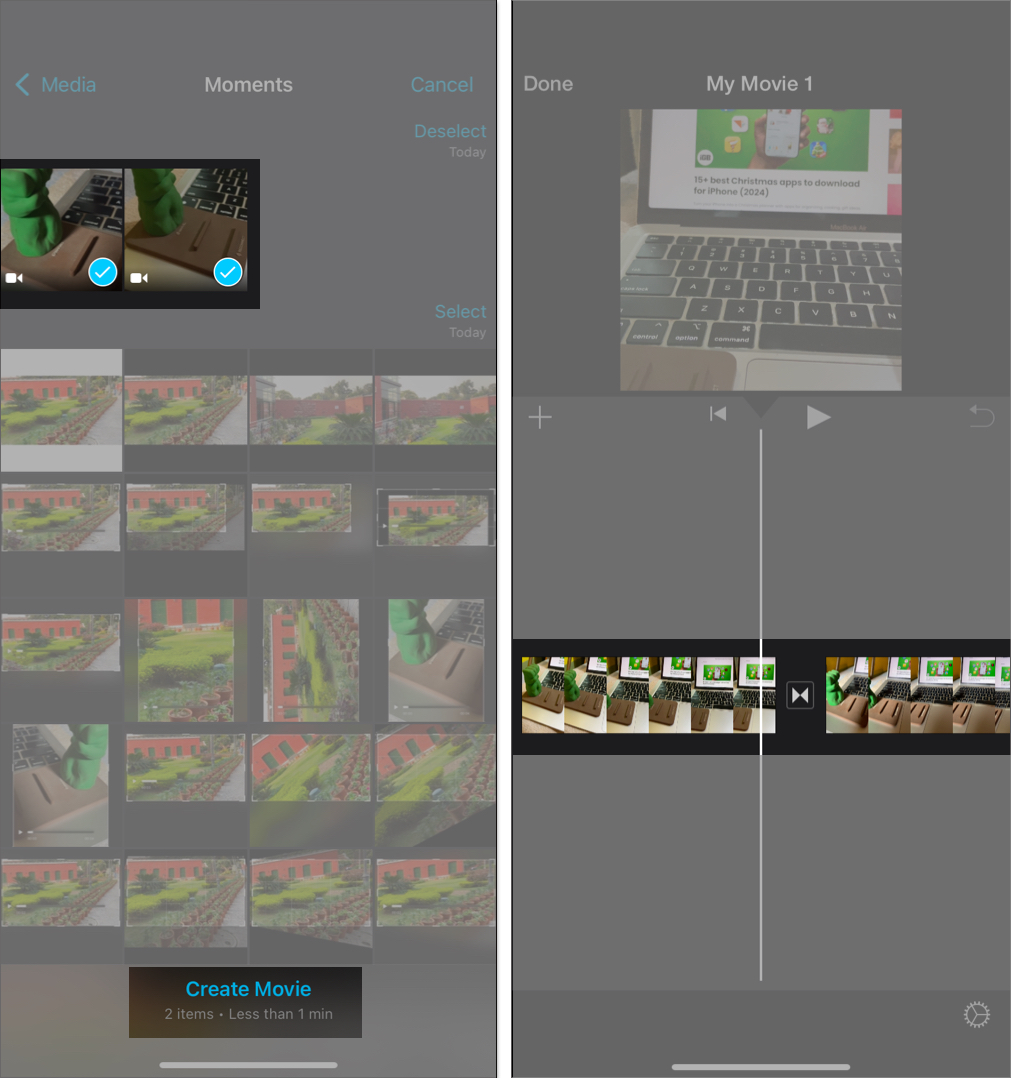
- Tap to select two or more videos.
- Or, tap < Media from the top left and hit Video to see all clips.
- Tip: If you rotate your iPhone into landscape orientation, you will automatically see the media types like Video, Albums, etc. Next, tap a video and then tap the check box.
- After selecting the videos, tap Create Movie.
- The selected videos will automatically be added to the timeline one after another. If you like the video order, jump to step 6. If you do not, touch and hold one of the videos and drag it all the way to the left or right to change the order.
- Transition effects: You will see a tiny icon made of two triangles between two videos. This symbolizes the transition effect.
- Tap it and choose None if you want no effect when one video ends and the other one begins. You may choose one of the other transition effects like Theme, Dissolve, Slide, Wipe, and Fade.
- To turn off the transition sound, tap the speaker icon.
- Use 0.5s, 1.0s, 1.5s, or 2.0s to set the length of the transition effect.
- Now, tap the triangle play button to preview the final video.
- Once satisfied, tap Done at the top left.
- Now, tap the Share icon and tap Save or Share Video to get the merged video in the iPhone Photos app. You may also share the merged video directly using AirDrop or other apps from the Share sheet.
Add music to video
You can use iMovie or other third-party apps to add music and songs to your videos.
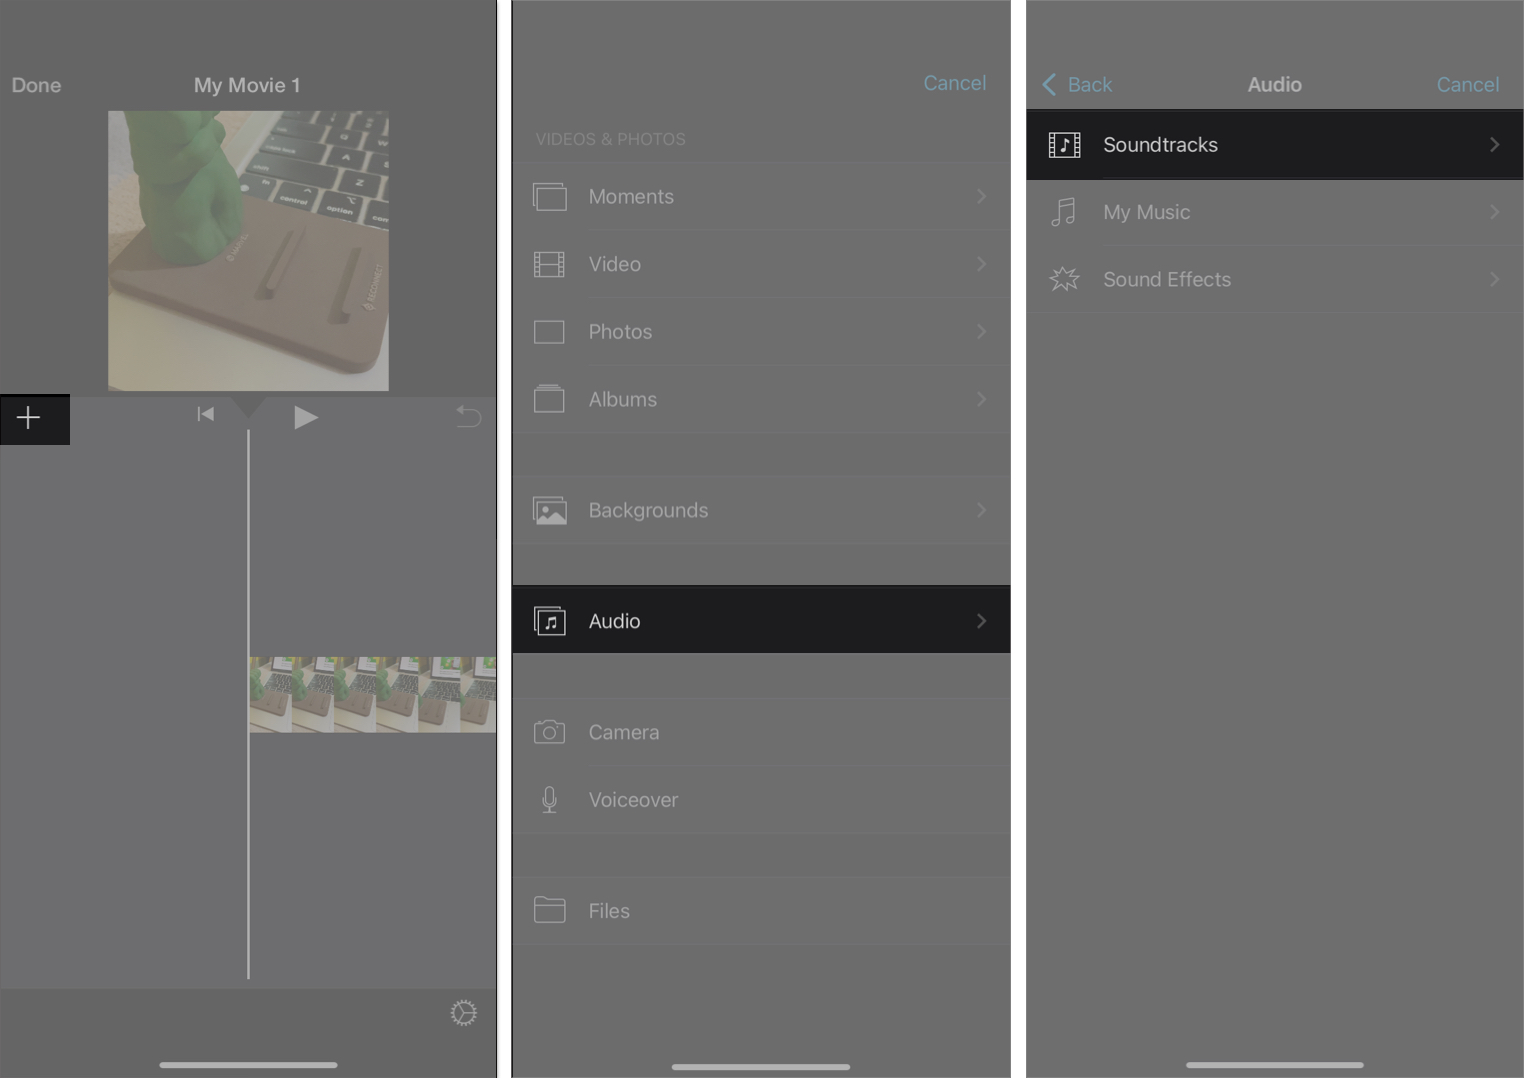
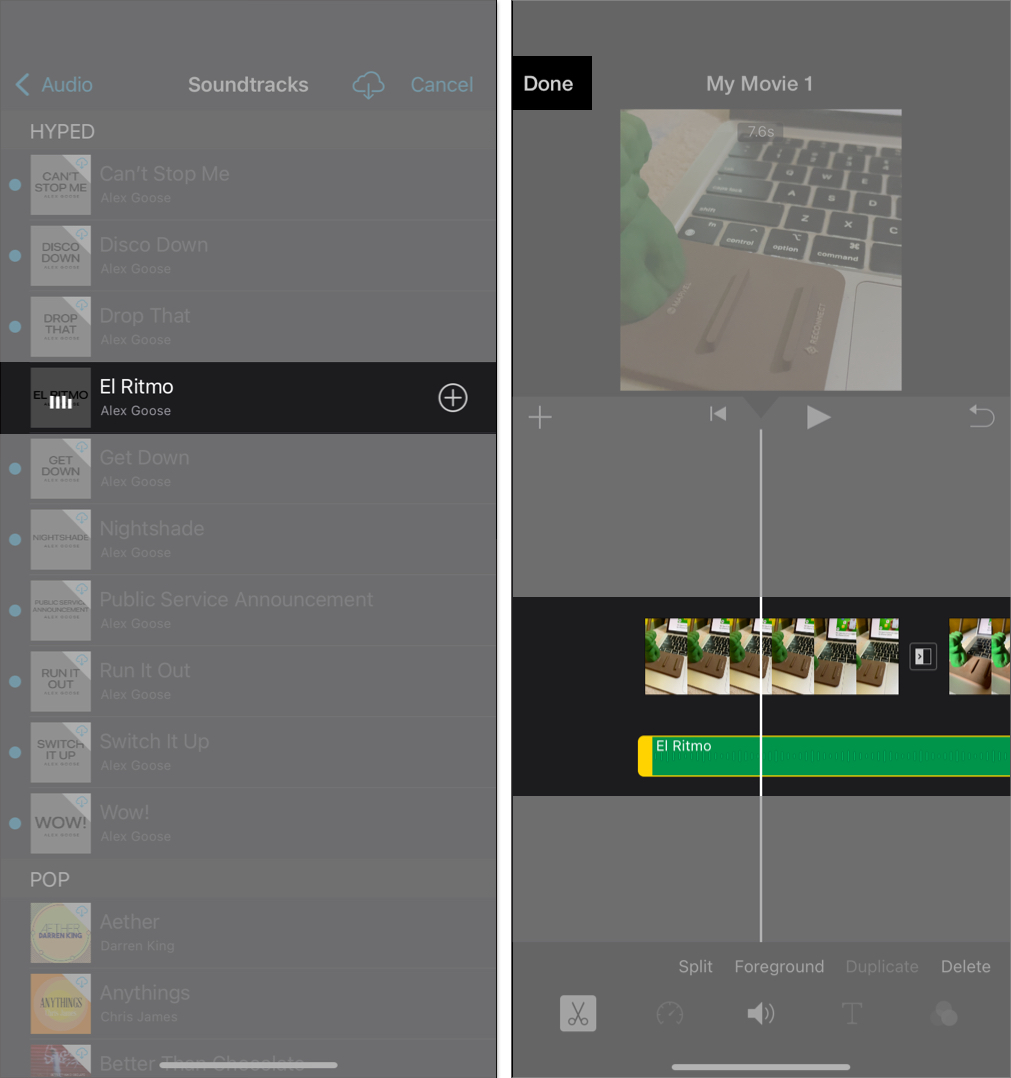
- Launch iMovie, tap Movie, select a video, and tap Create Movie.
- Tap the plus icon and select Audio.
- Choose Soundtracks to get popular music.
- Select a song and tap the plus icon beside it.
- Now, tap the audio timeline to edit it.
- Once satisfied, tap Done.
Signing off…
Editing videos on your iPhone and iPad has never been easier. The Photos app offers a wide range of powerful tools, and beginner-friendly apps like iMovie allow you to create stunning videos directly from your device.
I hope this guide was helpful. If you have any additional questions, please ask via the comments section below.
Check out next:


