Shared Album on the iPhone and Mac is one of the underrated features that people often overlook. In a few clicks, it lets you share several images and videos with your family and friends. They can also add their pictures and videos to your shared album, which everyone can view and download. Interested? This full guide shows you how to create shared albums on Mac.
Before You Begin:
iCloud must be set up for Shared Albums to work. For this, click on the Apple logo → System Preferences → Apple ID → sign in, if asked. If you do not see the sign-in screen, it means iCloud is already set up. Follow along.
Table of Contents
- How to Turn ON Shared Albums on Mac
- How to Create a Shared Album on Mac
- How to Add Photos and Videos to Shared Album on Mac
- How to Delete Photo and Video from a Shared Album on Mac
- How to Invite More People to Shared Album
- How to Remove People from Shared Album
- How to Delete a Shared Album on Mac
- How to Save Photos to Your Mac from an Album Shared by Other
- Limitation of Shared Album
- File Formats Supported by Shared Albums
How to Turn ON Shared Albums on Mac
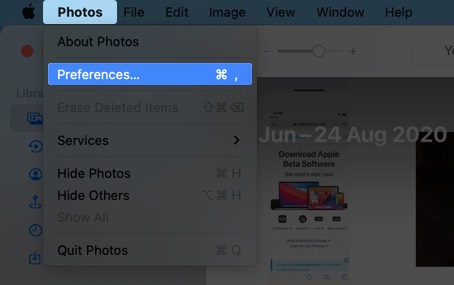
- Open the Photos app on Mac. From the top menu bar, click on Photos → Preferences.
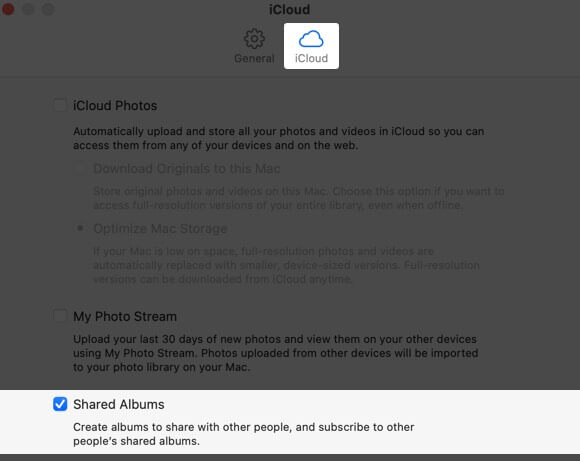
- Click on iCloud and enable Shared Albums.
How to Create a Shared Album on Mac
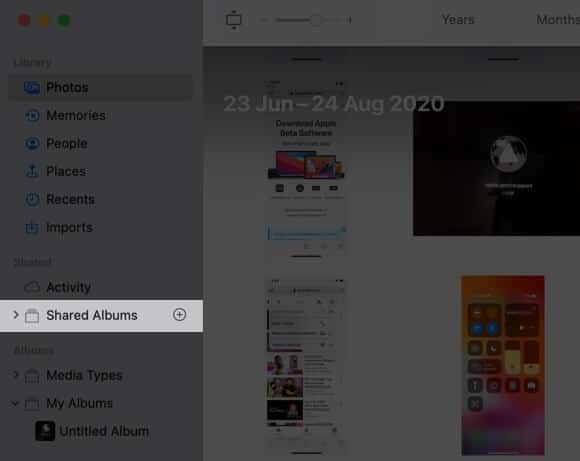
- Open the Photos app. Take the mouse pointer over Shared Albums and click on the plus (+) button.
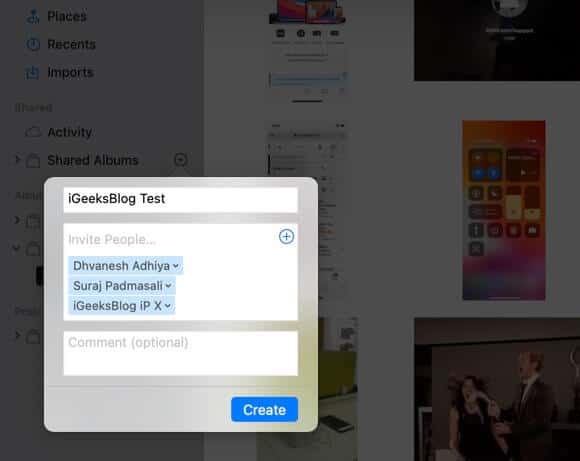
- Type desired name for this shared album.
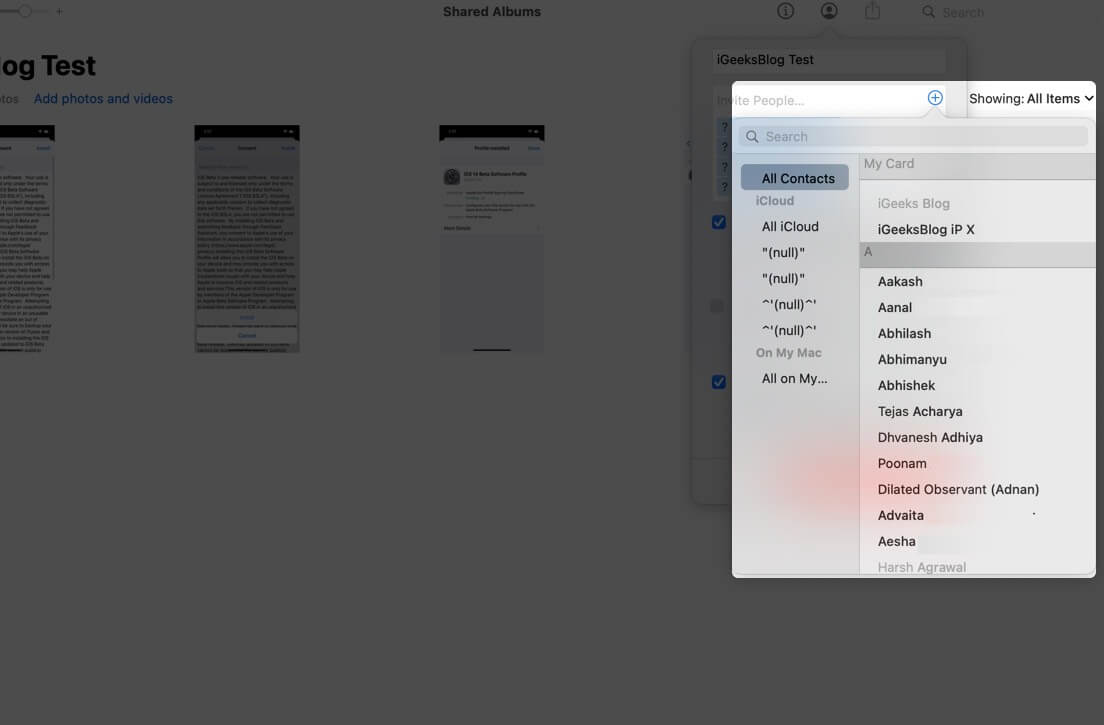
- In the textbox for Invite People, type the email address of the people you wish to share the album. You may also click on the plus button (+) and choose a contact from your iCloud. Repeat the steps to add up to 100 people.
- Finally, click on Create.
Another Way:
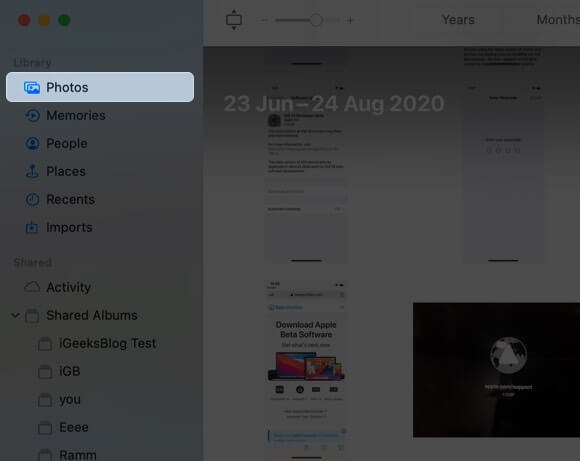
- Launch the Photos app, and from the left sidebar, click on the Photos tab or one of the other options like Recents, or Imports. Next, select the images and videos.
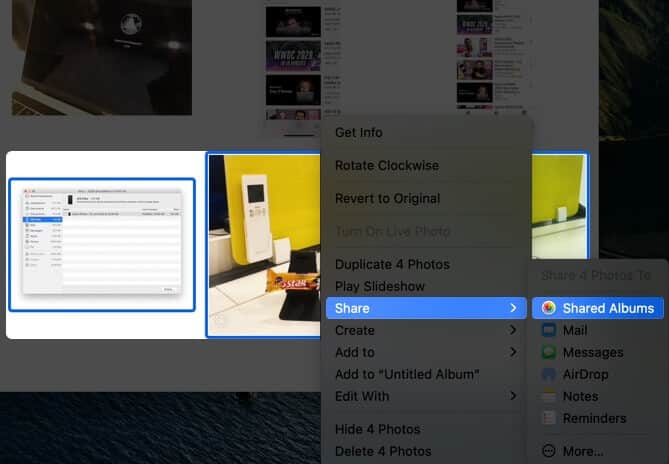
- Right-click or press the control key and click. Choose Share → Shared Albums. You may also click on the share icon from the top.
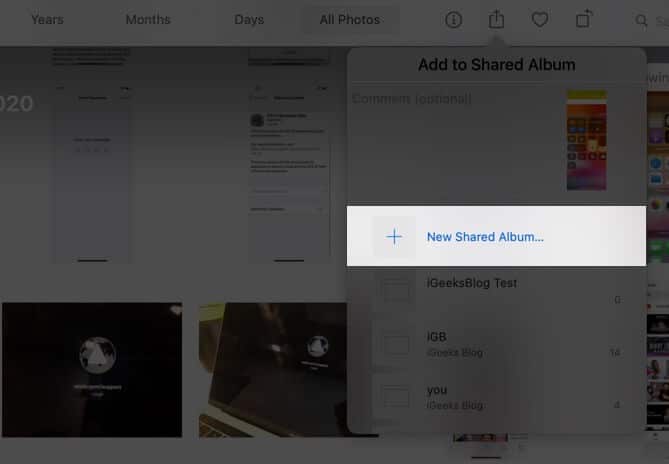
- Click on New Shared Album. Follow the easy steps explained in the method above.
Now let me show you how to add pictures and videos to this shared album.
How to Add Photos and Videos to Shared Album on Mac
Here are three ways to add media to a shared album.
I. You can drag pictures to a shared album. For this, in the left sidebar, click on the tiny arrow before Shared Albums. This will reveal all your shared albums. Now, click on Photos, Recent, Imports, etc. Finally, select the photos or videos and drag them over the shared album name.
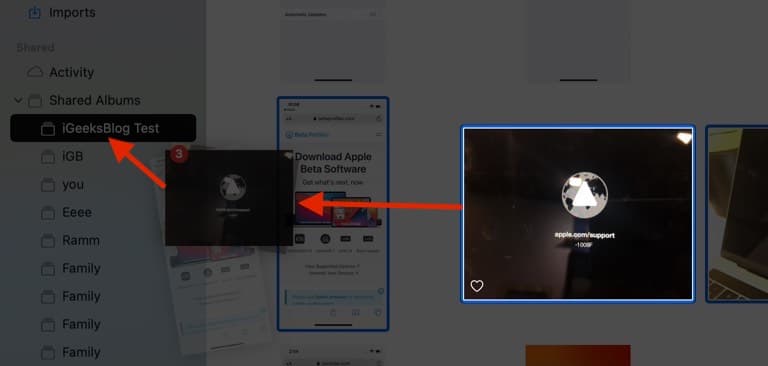

II. From the left sidebar, open a shared album. Click on Add photos and videos. Choose photos and videos and click on Add from the top right.

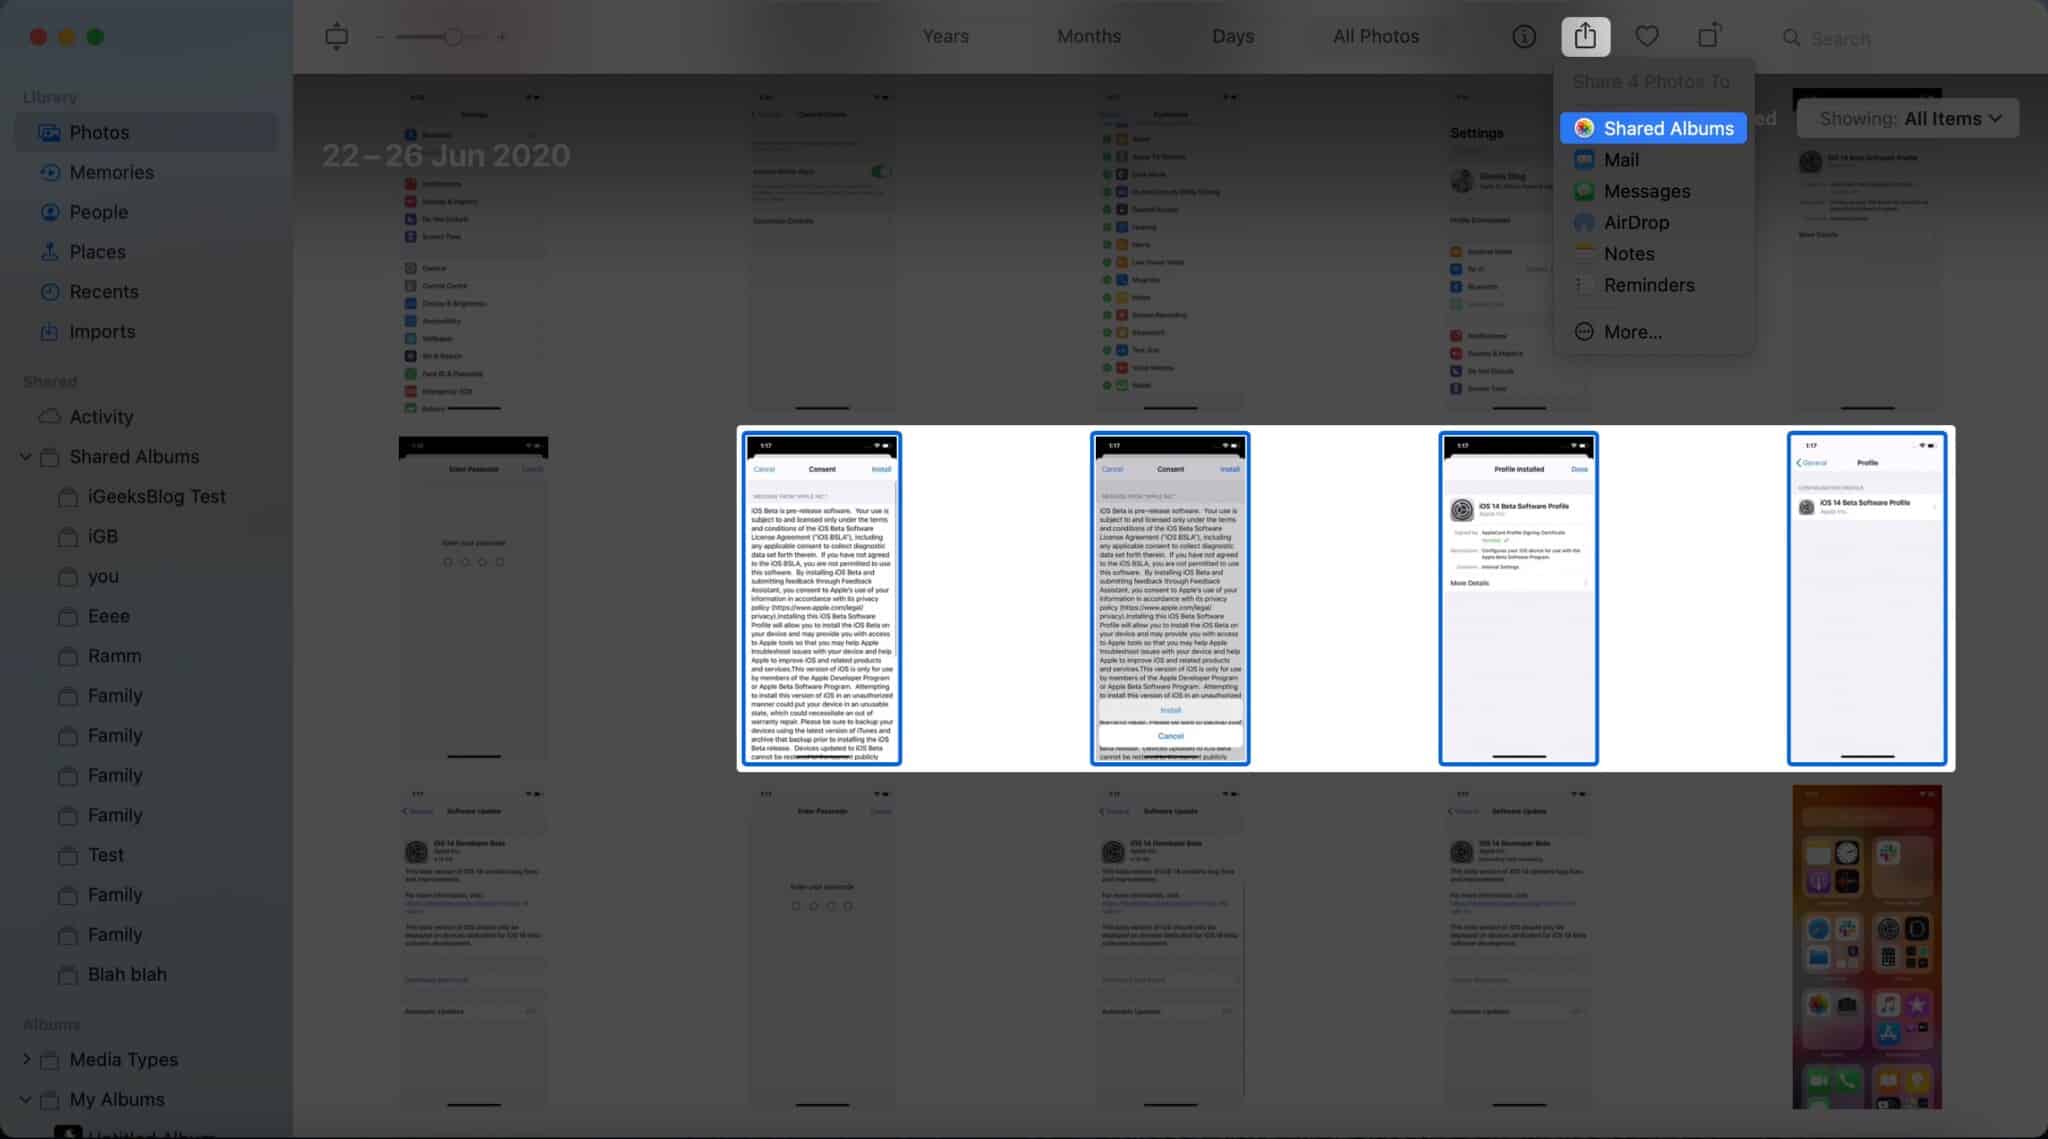
III. Select the pictures and videos inside the macOS Photos app. Next, use the share button in the top-right of the app and choose Shared Albums. Click on an existing shared album name from the list.
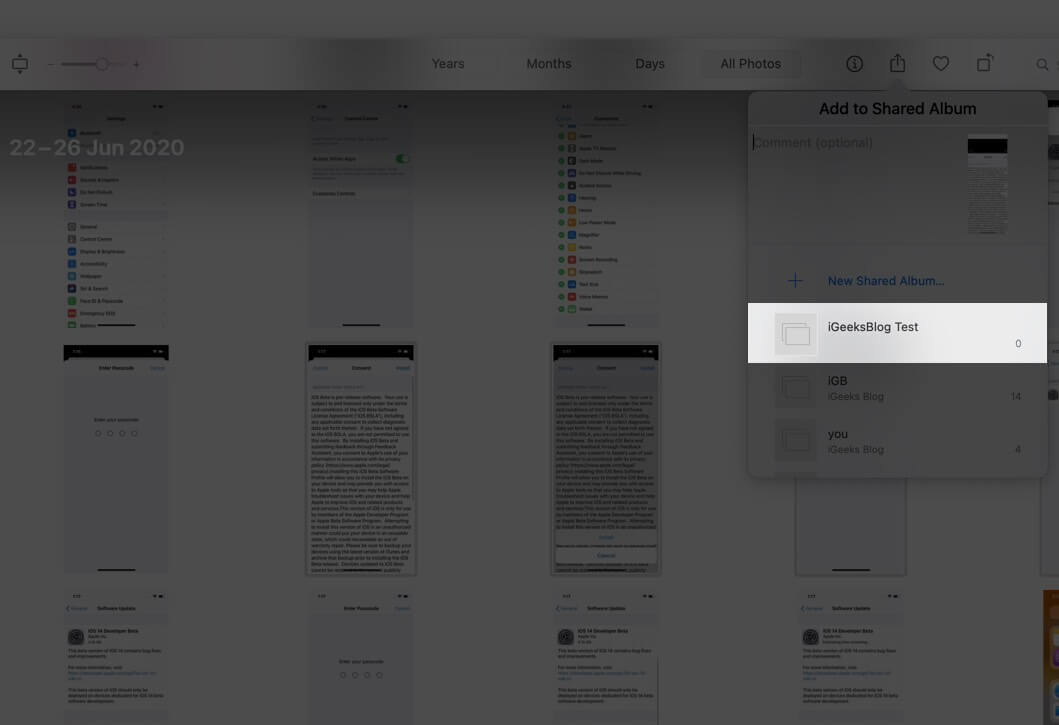
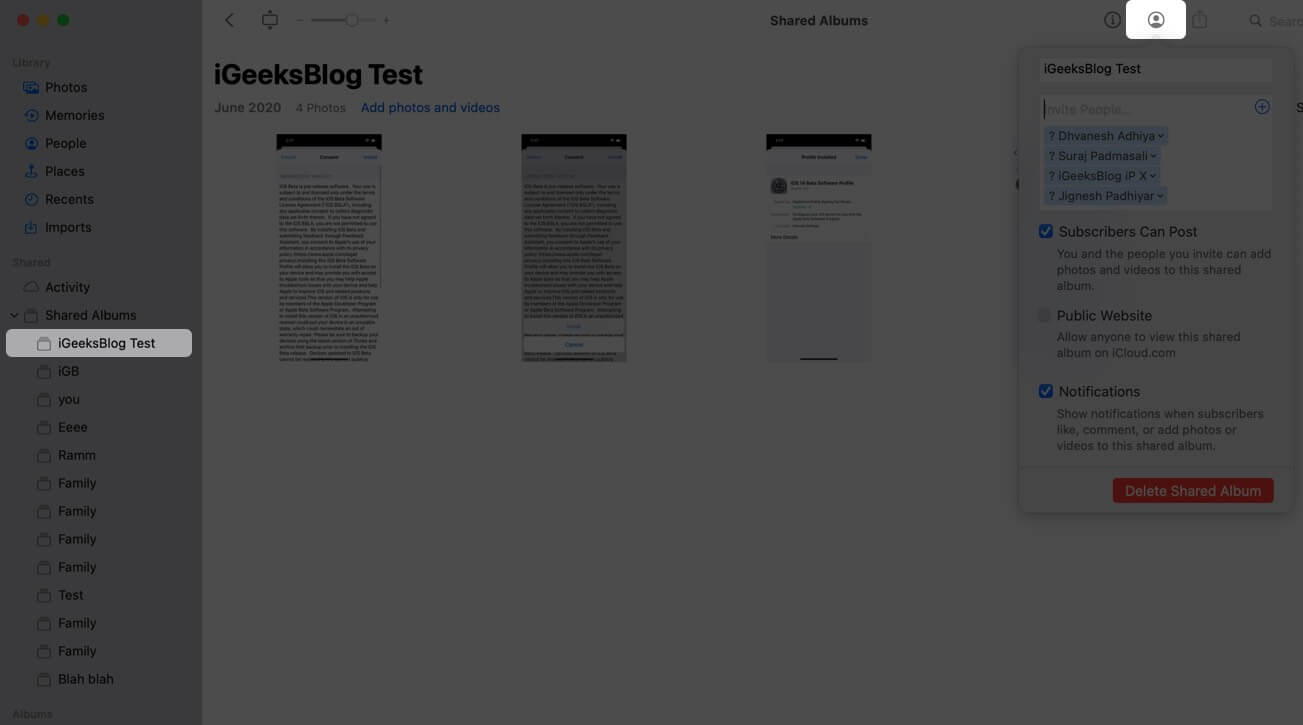
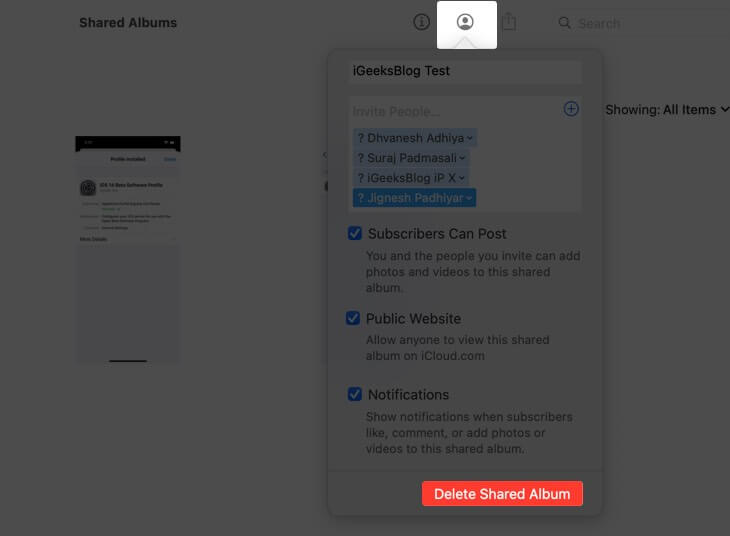
Note: By default, subscribers can also add photos and videos to the shared album. But you may prevent this by clicking on the People button inside the shared album and unchecking Subscribers Can Post.
How to Delete Photo and Video from a Shared Album on Mac
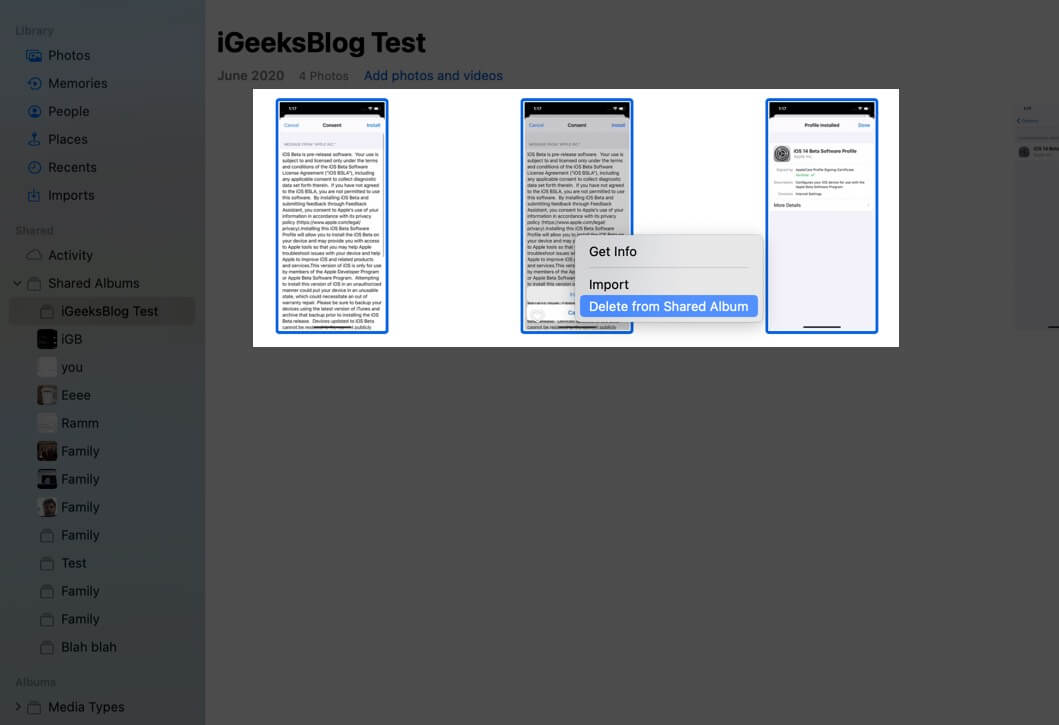
- Go to a shared album inside the Photos app and select the photos.
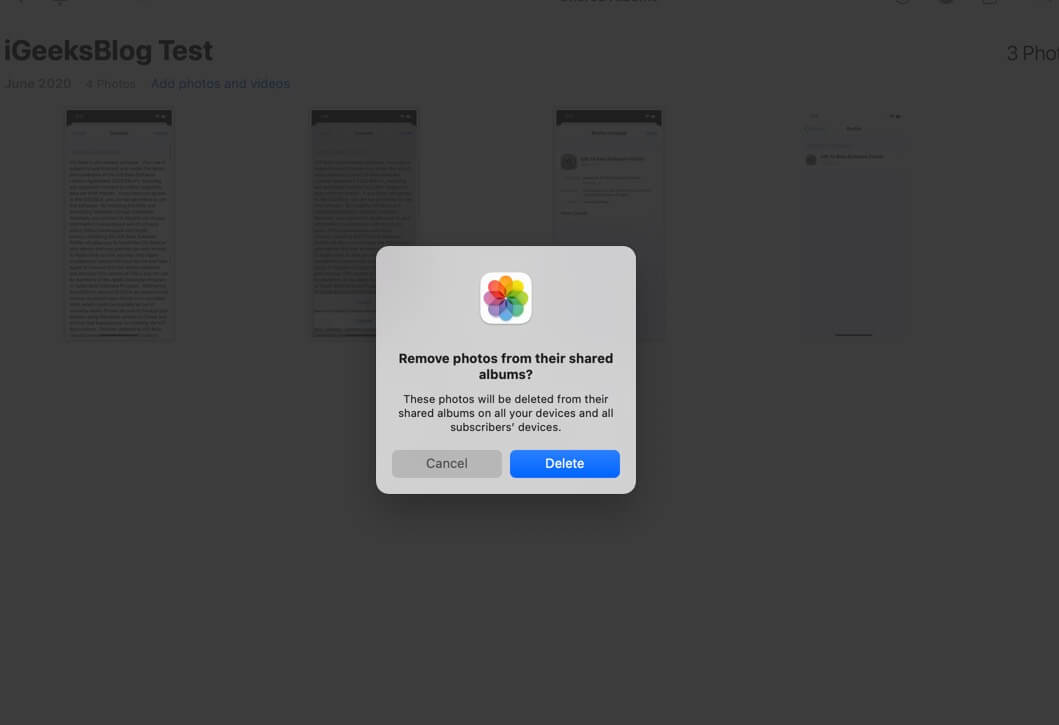
- Right-click and choose Delete from Shared Album. At last, click on Delete again.
Note: You may also press the delete key and click on ‘Delete.’ Or, click on ‘Image’ from the top menu bar and choose ‘Delete from Shared Album.’
The selected photos and videos will be deleted from the shared album on all your devices and all subscriber’s devices. If needed, you can save them before deleting.
How to Invite More People to Shared Album
While creating a shared album, you get the option to add subscribers. However, if you missed someone, it is effortless to invite them later.
- Inside the Mac’s Photos app, click on Shared Albums from the left sidebar. Next, click on an album.
- Click on the People button from the top-right of the app.
- In the Invite People textbox, type the email address. To choose from your iCloud contacts, click on the plus (+) icon, or type the name and select from the suggestions. Click anywhere outside this box to save the changes.
Create Public Website for a Shared Album
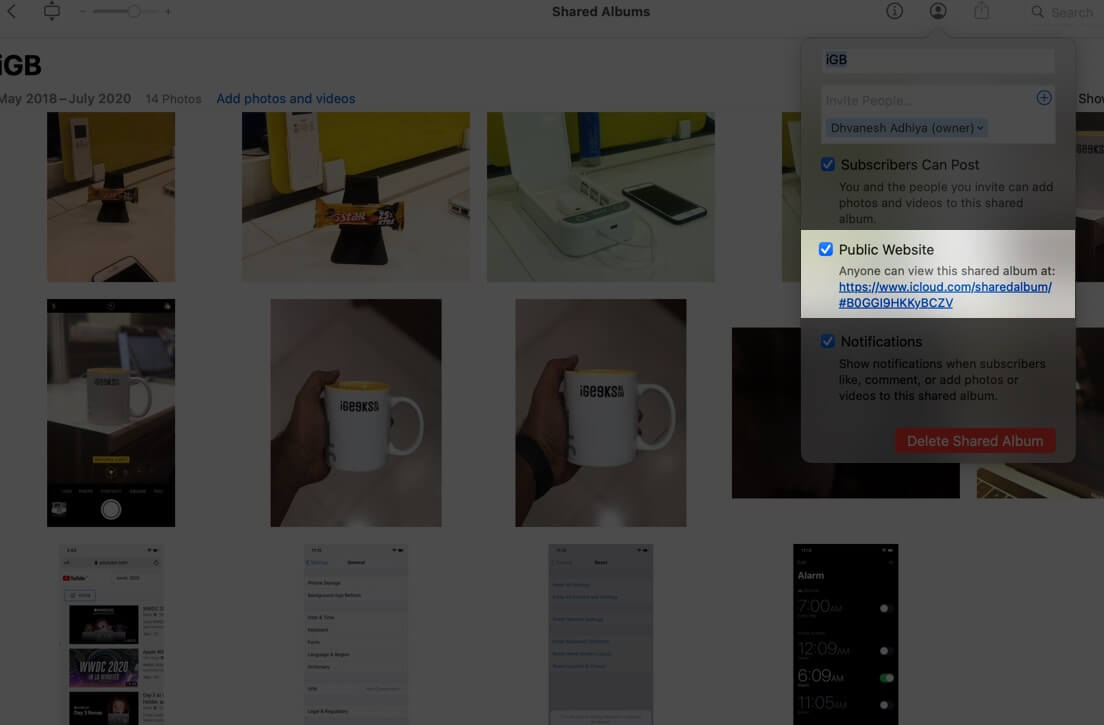
Do you want to share these albums with people who do not use iCloud – like someone who uses Android? It is easy. Check the box for Public Website. Give it a few seconds to generate a unique link. Finally, copy this link and send it to your contacts. They can click on it and view the entire shared album using any browser irrespective of the device and OS.
How to Remove People from Shared Album
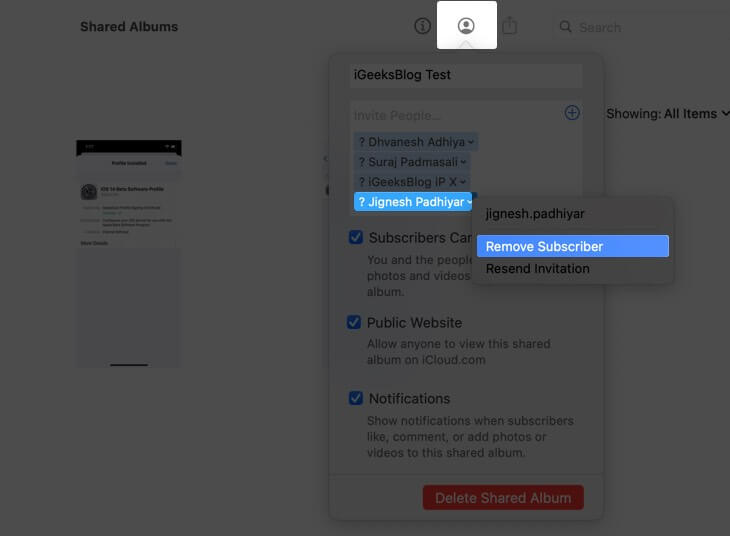
- Open a shared album and click on the People button from the top-right of the Photos app.
- Select the subscriber and click on the tiny arrow next to its name. Finally, choose Remove Subscriber.
How to Delete a Shared Album on Mac
- Inside a shared album, click on the People button from the top-right.
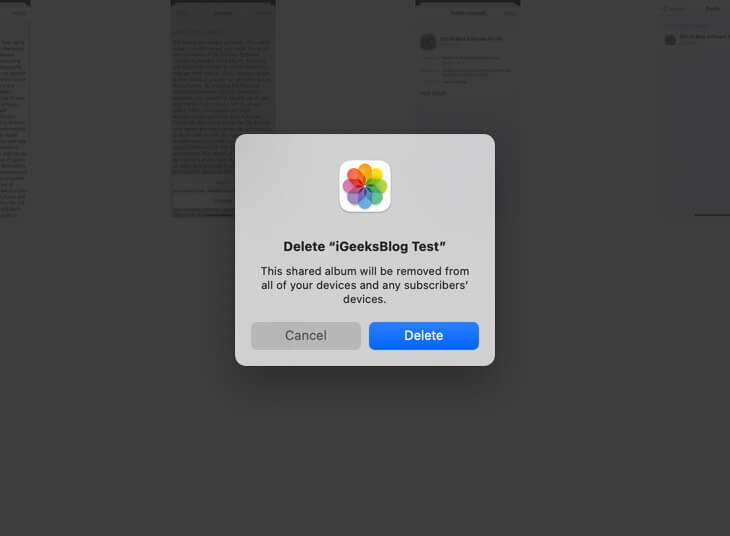
- Click on Delete Shared Album. Click on Delete again to confirm.
The entire album will be removed from all your and subscriber devices. The public website link (if created) will also stop working.
Note: The images and videos of this shared album, if present anywhere else in the Photos app (like other albums or Photos tab), will not be deleted. But, if you believe that the media inside the shared album is not present anywhere else in the Photos app, you may save it before deleting. Here’s how.
How to Save Photos to Your Mac from an Album Shared by Other
A subscriber of a shared album has the option to save these images and videos to their library. Here’s how.
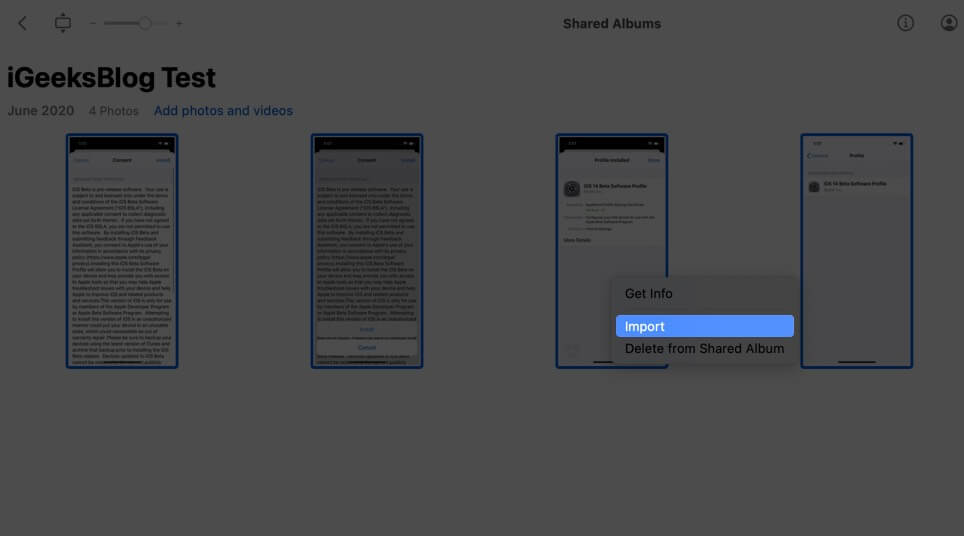
- Open the shared album and select the desired media.
- Right-click and choose Import.
To view imported images, click on Photos, Recents, or Imports from the left sidebar of Mac’s Photos app.
If you wish to edit an image from the shared album, you will have to import it first. After that, you can modify it just like any other picture.
Limitation of Shared Album
- You can add up to 100 people to a shared album.
- You can add up to 5000 pictures and videos in a shared album.
- If needed, you may create multiple shared albums.
- The video duration limit is up to 15 minutes. Further, a video will be shared in up to 720p resolution (even if you add higher quality videos.)
- Pictures in a shared album are reduced to 2048 pixels on the long edge. For panoramic images, it can be up to 5400 pixels.
- Interestingly, even though the photos in videos in your shared album are stored in iCloud, they do not count against your iCloud storage limit.
File Formats Supported by Shared Albums
For Image
- HEIF
- JPEG
- PNG
- GIF (up to 100MB or less)
- TIFF
- RAW (can’t be uploaded to shared album from iCloud app on Windows PC)
- Besides these, you can also upload Memory videos, slo-mo, time-lapse, Live Photos that you shoot from your iPhone.
For Video
- HEVC
- MP4
- QuickTime
- H.264
- MPEG-4
Signing Off
This is how you can create and use shared albums on Mac. What do you think of this handy option? Do let us know that in the comments.

