Images stored on your iPhone have different file types, such as HEIC, JPEG, PNG, etc. Most of these file formats are compatible with all major platforms, but there are many instances when you might need to convert a photo to PDF. So, in this guide, I’ll show you multiple methods to save a photo as a PDF on your iPhone.
How to convert a picture to PDF on iPhone in 4 ways
Here are the easiest ways to save your JPG as a PDF. I’ve tested each method on my iPhone—let’s take a look.
1. Using the Print option
The Print option from the Share Sheet on the iPhone or iPad lets you print files and images directly without an app. When printing images, it converts JPG into PDFs before it sends them to the printer. Here’s how you can do it!
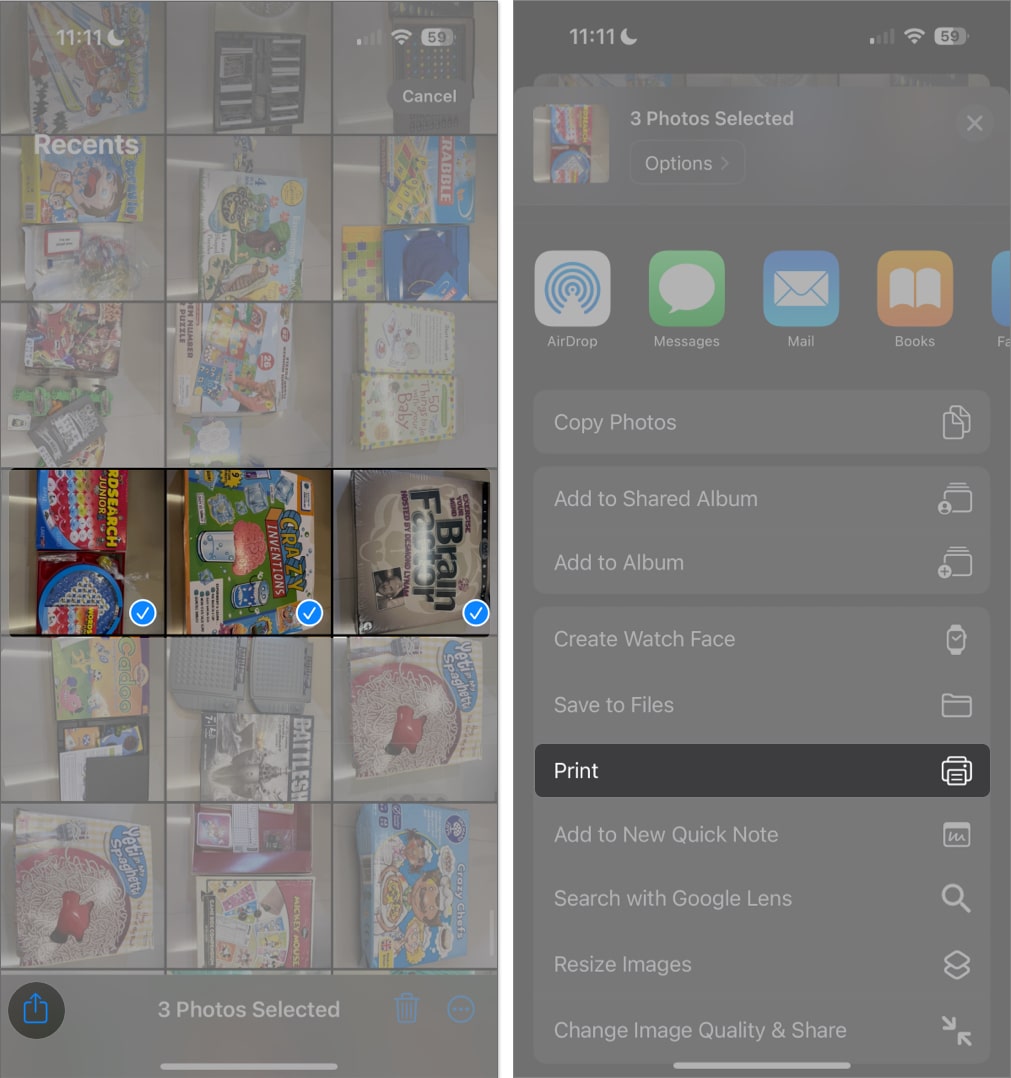
- Open Photos → Tap Select.
- Choose the photos you want to convert into a PDF.
Selecting more than one will create a single PDF file containing all the selected images. - Tap Share → Choose Print.
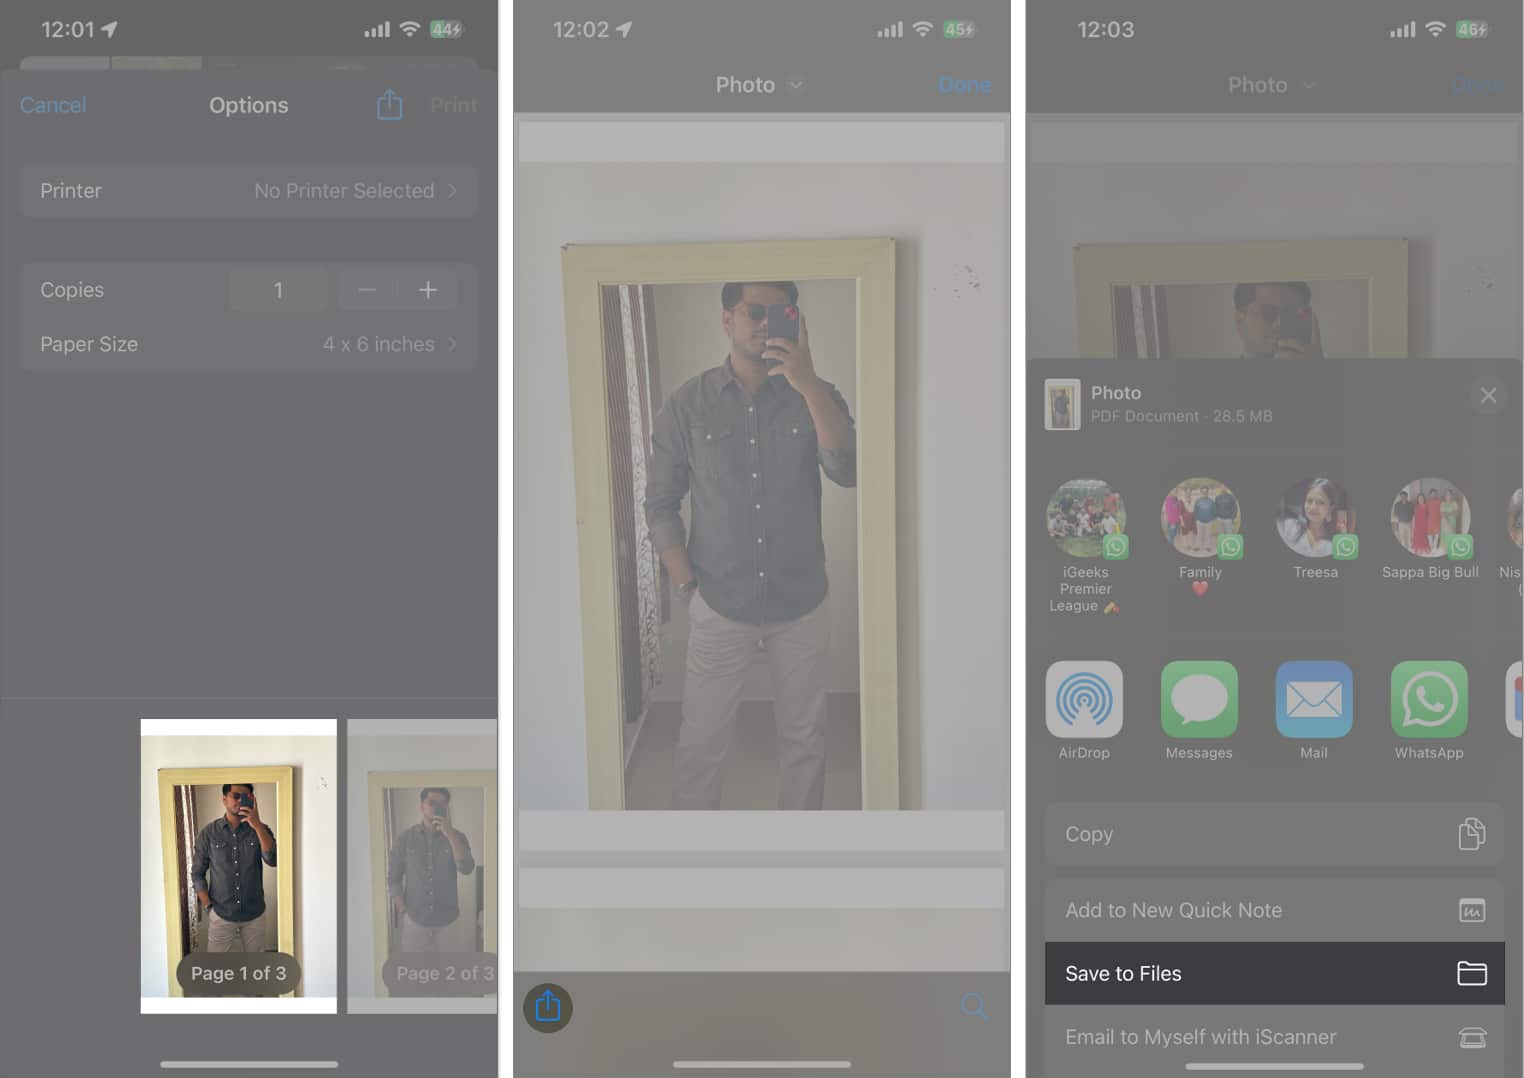
- You will see a preview of the PDF with each photo on a single page. Tap and hold the page to see the Preview → Tap the image once more to see the share icon.
- Tap the Share button and send it to others via messaging apps or email, or Save to Files.
2. Using the Files app
The Files app on iPhone is great for saving photos into PDF files and editing PDFs. Here’s how to do it.
- Open Files.
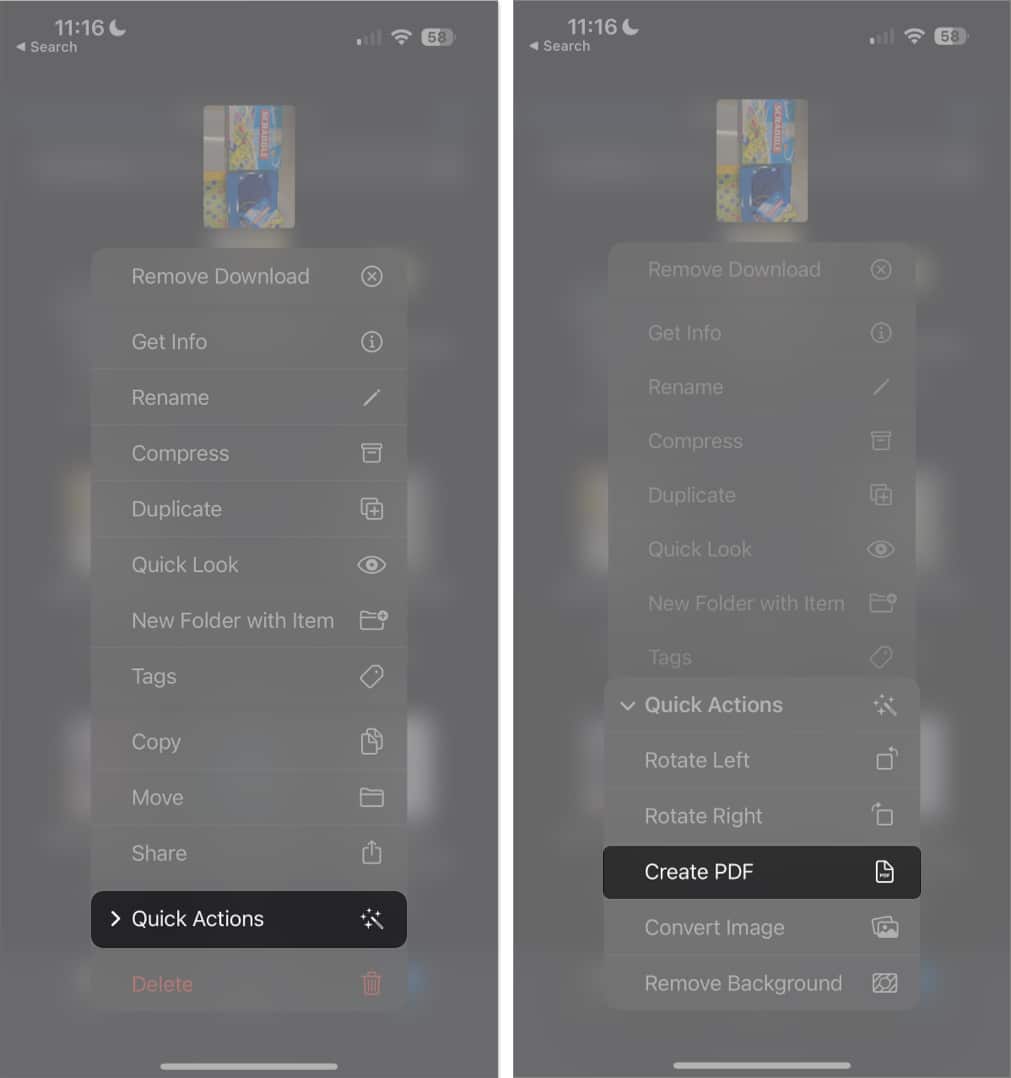
- Long-press the image → Quick Actions → Create PDF.
To convert multiple images to PDF
- Launch Files → Tap the More (…) button → Choose Select.
- Select the images you want to convert into PDF.
- Tap More (…) at the bottom right → Create PDF.
The new PDF file will be saved in the same folder as the images.
3. Using the Books app
Another convenient way to save your images into PDF files is via Books, as explained below:
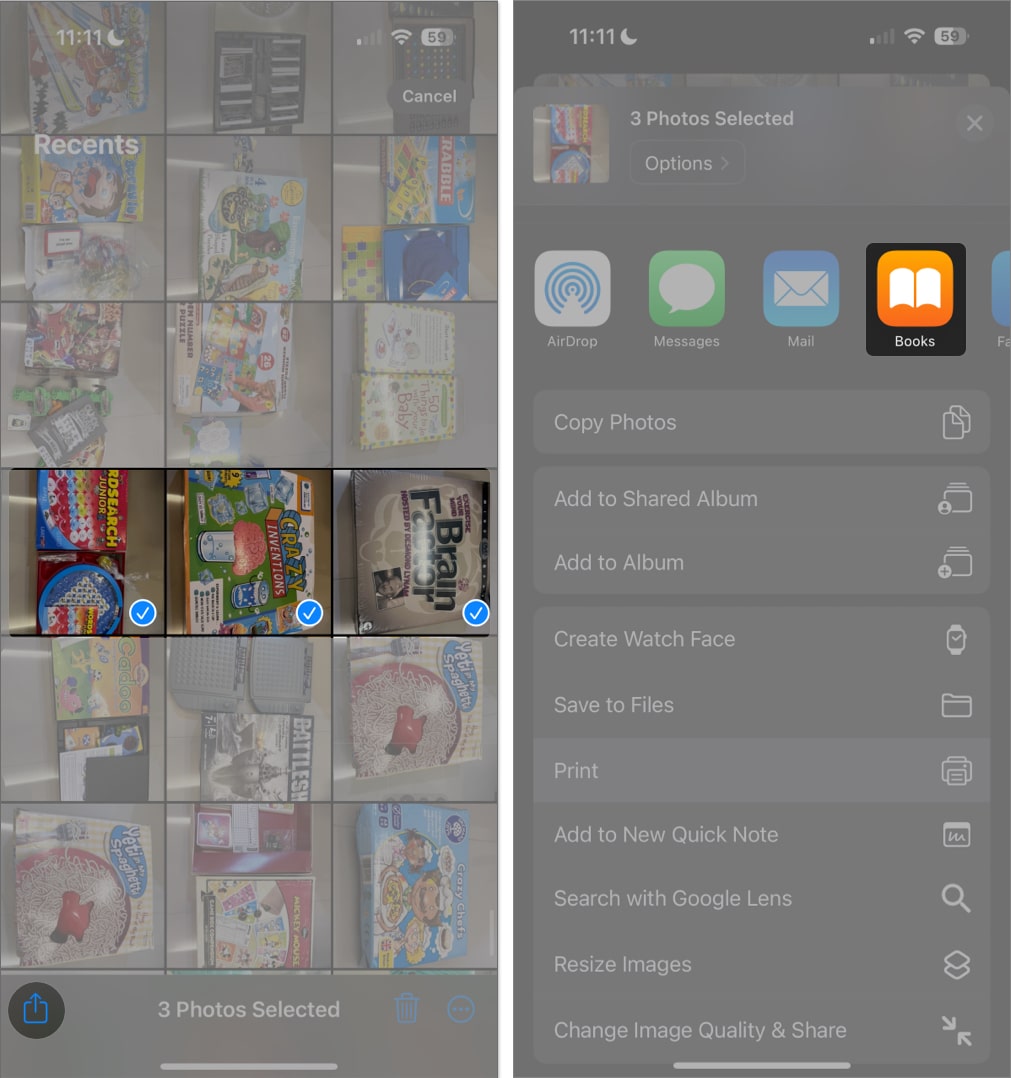
- Open Photos → Select the pictures → Tap Share.
- Swipe through the apps → Select Books.
- Doing so immediately converts the images into a PDF document that opens in the Books app. However, the file is also automatically saved into the Books app. To share or send it, do the following.
- Head to Books.
- Tap More (…) under the file → Share PDF.
- Choose how you want to share your file and send it.
4. Using the Shortcut app
Creating a shortcut will save you a lot of time. The process is quite straightforward:
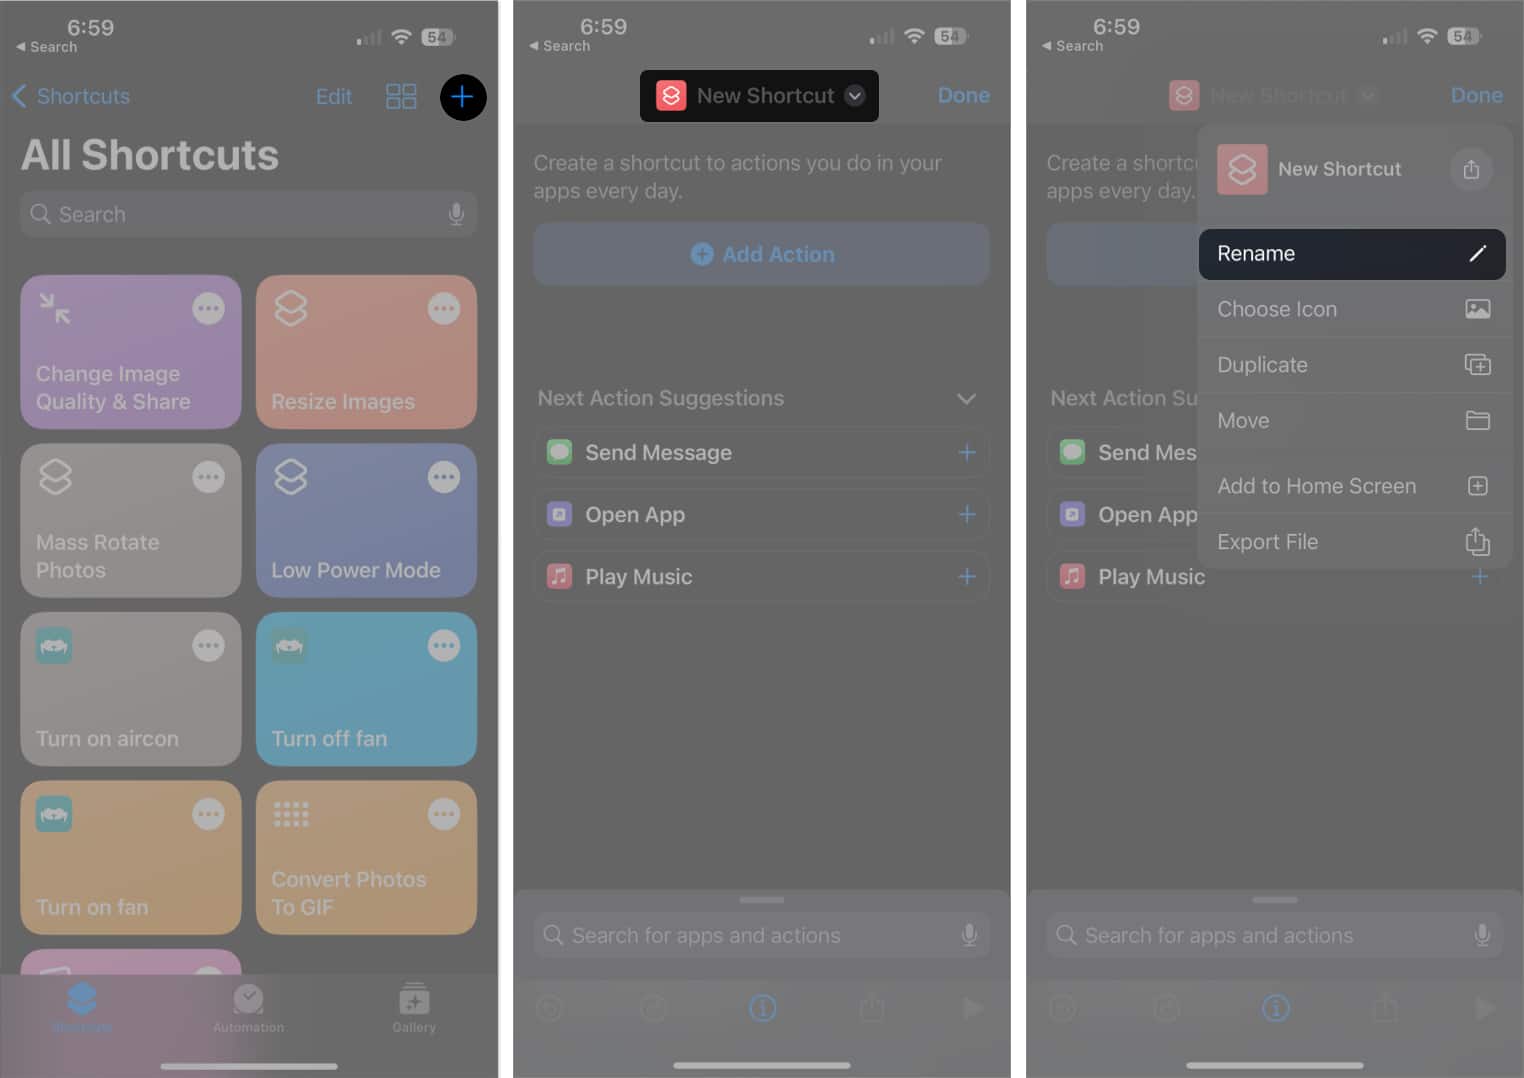
- Open Shortcuts → Tap the Add (+) button.
- Select New Shortcut → Tap Rename.
- Type in a new name for your shortcut → Select Done.
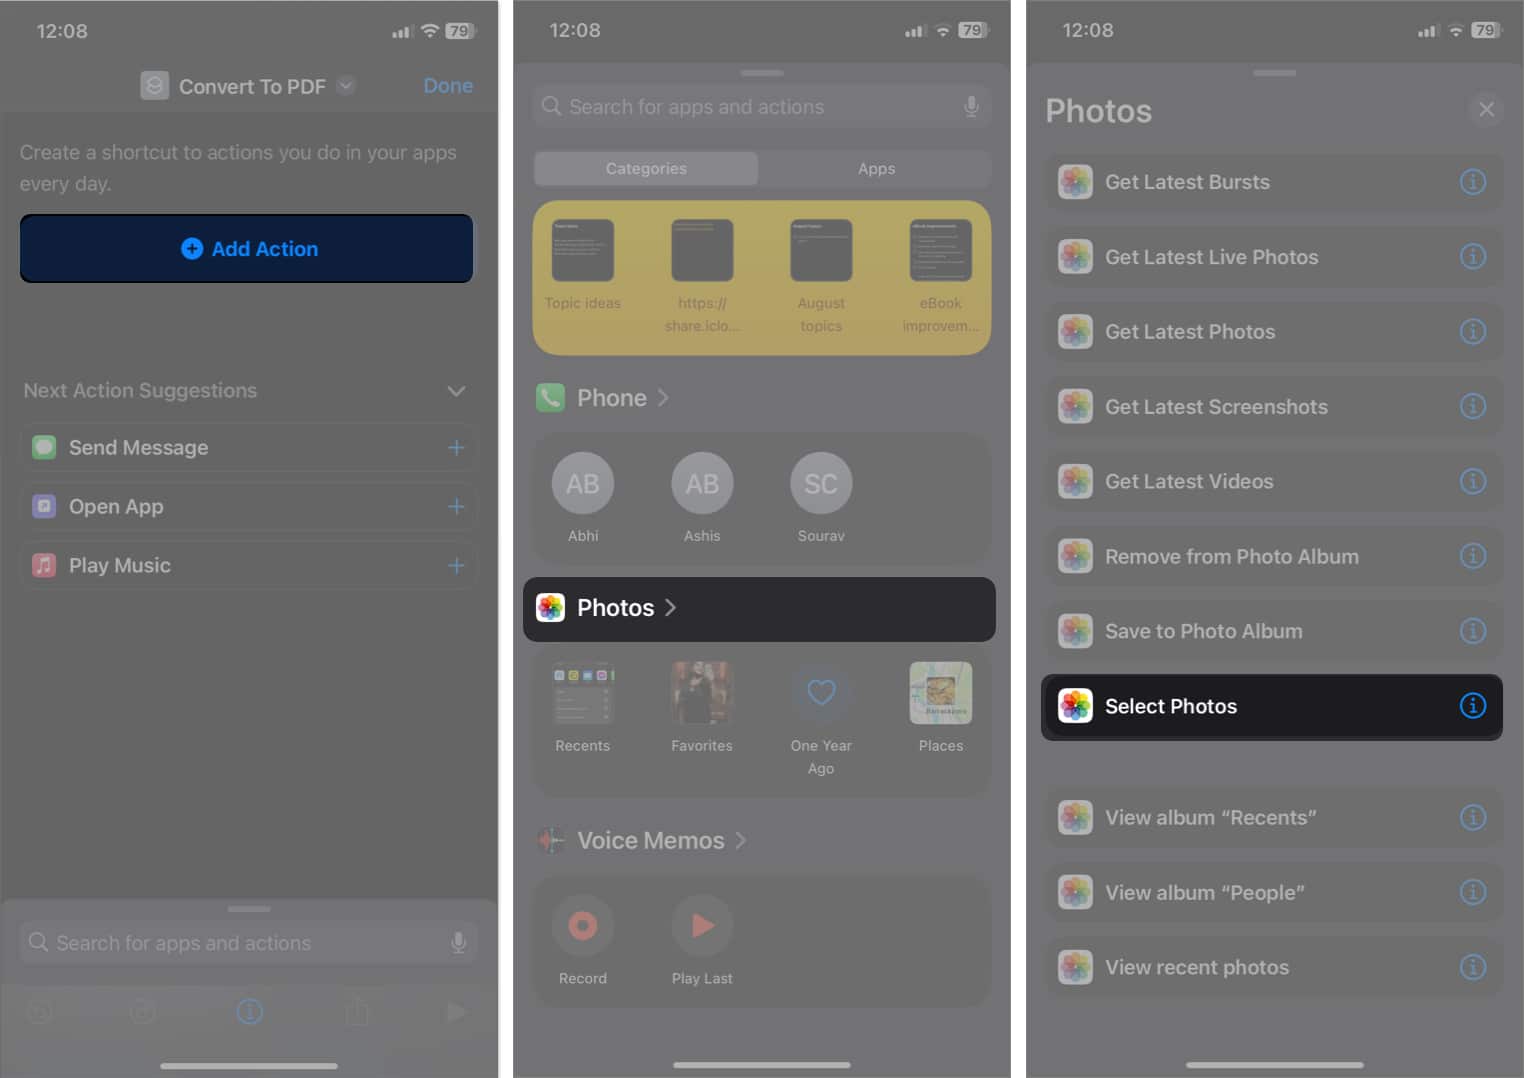
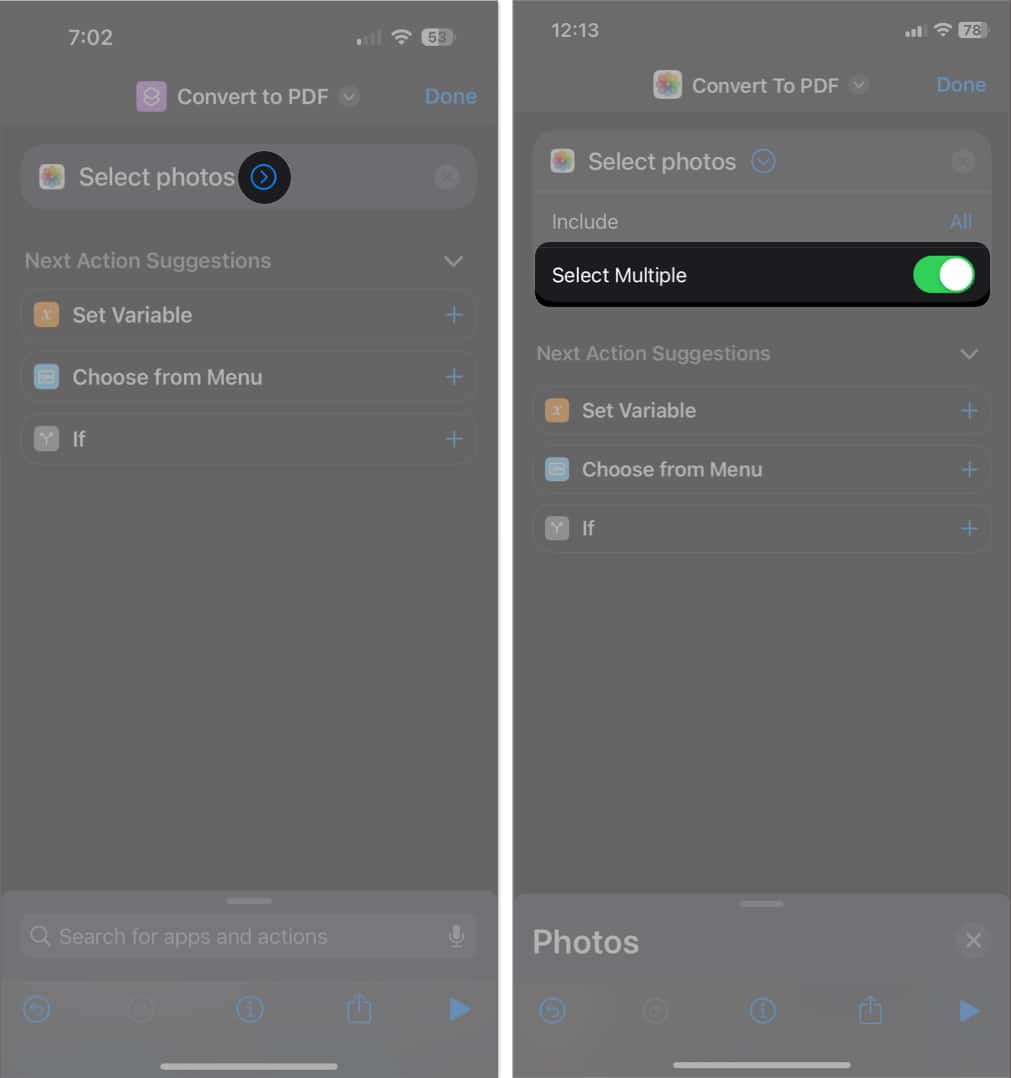
- Tap Add Action → Choose Photos app → Tap Select Photos.
- Tap the downward arrow and toggle on Select Multiple to convert multiple images into PDF.
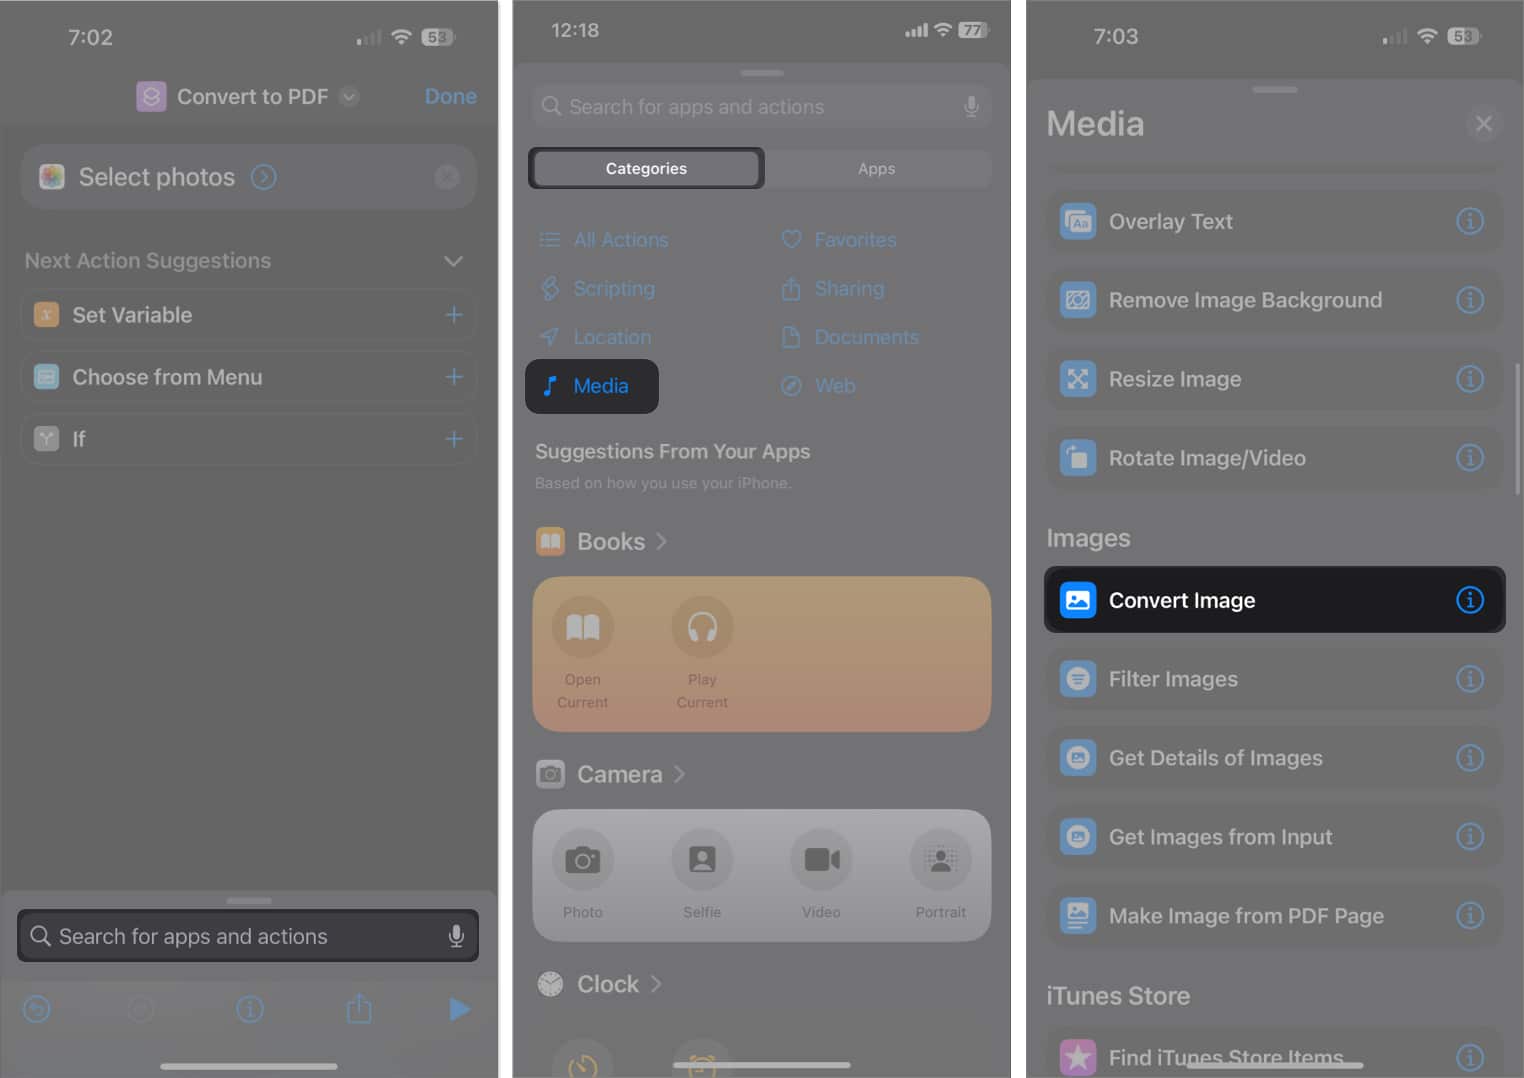
- Tap the search bar below → Go to the Categories tab → Select Media → Tap Convert Image.
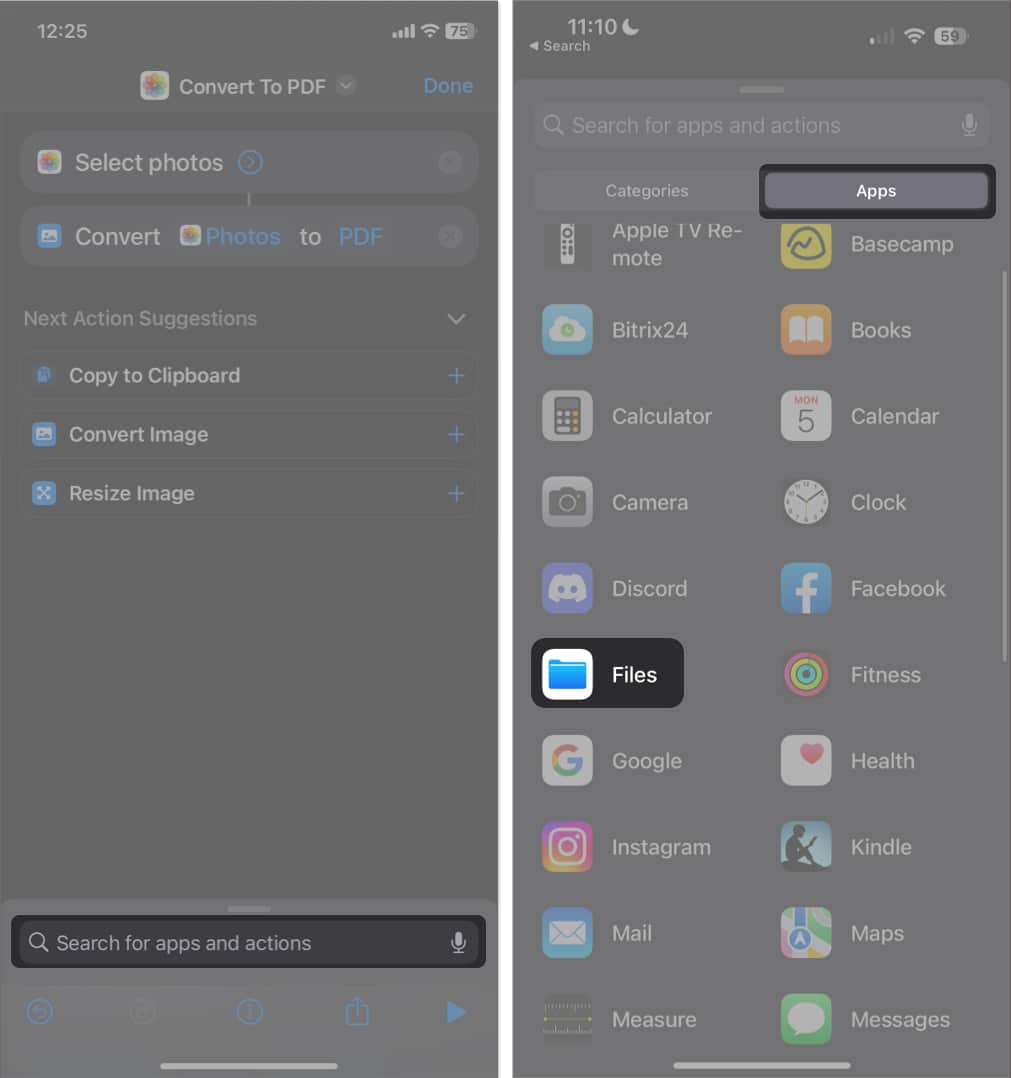
- Now, tap JPEG and replace it with PDF.
- Again, tap the search bar → Go to the Apps tab → Select Files.
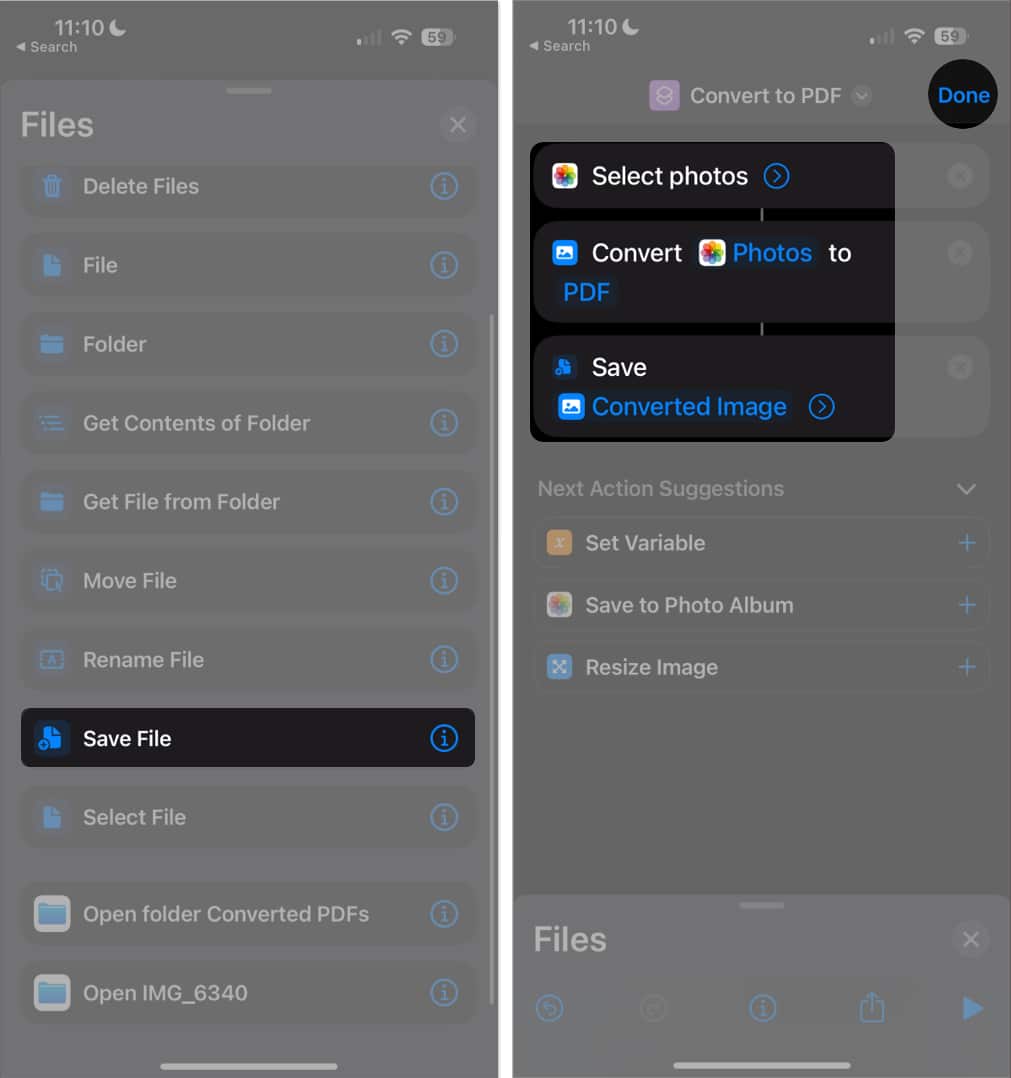
- Choose Save File → Select Done.
To run the Shortcut:
- Launch Shortcut → Tap the shortcut you made.
- Select the photos you want to convert → Tap Add.
- Choose the folder where you want to save your PDF document → Tap Open.
This will create individual PDFs for each photo you selected.
Best third-party apps and tools for converting photos to PDF
There are some third-party apps and online tools that help you to turn any photo into a PDF. I recommend the following:
The process for all these apps is similar. You simply have to open the app and select the photos you want to convert.
However, some apps may place a watermark on the generated PDF and require you to upgrade to a paid version to remove it.
Turn your photos into PDF online
Lastly, you can also use some online tools that turn your images into PDFs for free. For instance, Adobe offers a free image-to-PDF converter, which allows you to quickly convert your PNG, JPG, GIF, or TIFF files to PDF format.
Other online image-to-PDF converters you might want to check out include:
Why convert a photo to PDF?
First, let’s consider why you might need to turn photos into PDFs. Here are some reasons.
- Ease of sharing: PDF files are universally compatible across many devices and operating systems. So, sharing images in PDF format eliminates any compatibility issues or errors when trying to view an image.
- Preserve Image Quality: Converting a picture to a PDF can maintain the original resolution and quality, ensuring that the image does not become pixelated or lose clarity when shared or printed. This is useful, for instance, when sharing images through messaging apps like WhatsApp that compress image files and reduce their original quality.
- Preserve Layout: Similar to image quality, PDFs can maintain the layout of images to look the same across devices and be easily printed. This can be important when sharing or printing edited images with additional elements like text added to them.
- Reduce File Size: Converting images to PDF can compress the file size while retaining quality and layout. This makes it more convenient to store or send large files via email or other platforms.
- Security: PDFs can be password-protected, which adds an extra layer of security. This is great when sharing sensitive or confidential images.
- Combine multiple images: You can combine multiple images into a single PDF document, making it easier to organize, view, and present related images together.
- Annotation and editing: PDF viewers often provide tools for adding comments, annotations, or text to images, making it easier to collaborate and share feedback.
Video: How to Convert a Photo to PDF on iPhone and iPad
Wrapping up…
Now, you know all the different ways to convert photos to PDF on an iPhone. If you still have questions, leave me a comment below, and I’ll help you out.
FAQs
No, if you convert your photo to a PDF using built-in iOS apps, the quality is usually not compromised. However, if you create a PDF using third-party tools, some may compress the image, reducing its quality, sharpness, or color accuracy. To preserve the highest quality, ensure you’re working with a high-resolution image and avoid apps that apply strong compression.
Yes, you can easily combine multiple photos into a single PDF. Simply open the Photos app and select the images you want in the PDF. Then, tap the Share button, scroll down, and choose Print (even if you don’t have a printer). On the print preview, pinch out (zoom in with two fingers) to expand the preview. Finally, save the images as a PDF file using the Share button (e.g., Save to Files, AirDrop, or Email).
Yes, you can use built-in iOS features without relying on third-party apps or online services. Various native apps, including the Photos app, Files app, Apple Notes, and Books app, offer this feature. For additional customization—such as rearranging pages or adding annotations—you can use free third-party apps like Adobe Scan or Microsoft Lens. However, the built-in iOS tools are sufficient for basic PDF creation.
Read more:


Great guide! I never knew converting pictures to PDF on my iPhone could be so straightforward. The step-by-step instructions were super helpful. Thanks for sharing!
Great tips! I never knew there were so many ways to convert photos to PDF on my iPad. The step-by-step guide makes it super easy to follow. Thanks for sharing!