HDR (High Dynamic Range) is another buzzword that has been used in smartphone photography for a long time. If you are an iPhone user who loves capturing memories, you’ve probably seen this term pop up in the Camera settings. But the question is, what exactly does HDR mean, how does it make your photos and videos better (or not), and how do you make the most of it on your iPhone? This post explains it all.

What is HDR, and how does it work on an iPhone?
The term HDR stands for High Dynamic Range, and in photography, Dynamic Range refers to the distance between the lightest and the darkest of a captured image. Non-HDR (normal images) photos often fail to strike the right balance between the bright skies and dark shadows, ultimately resulting in either overexposed highlights or underexposed shadows.
An HDR-enabled camera solves this issue by capturing multiple images taken automatically at different exposure levels and then combining them to create an image with a well-balanced dynamic range.
While non-HDR images can often look dull or overexposed in some cases, HDR images, in almost all cases, have better details in shadows and highlights, resulting in more natural-looking photos in tricky lighting conditions.
How does HDR work on iPhone?
HDR on the iPhone works by capturing multiple photos in a single shot—one underexposed, one correctly exposed, and one overexposed. Then, the iPhone’s computational photography system analyzes the captured photos and combines the best-exposed parts from each, retaining details in bright areas (like the sky) and dark areas (like shadows).
On iPhones, Apple takes post-processing a level further with Smart HDR, which enhances each image by intelligently balancing exposure, reducing noise, optimizing texture, and more.
Once all this is done, the iPhone merges the optimized frames into one final image, ensuring highlights are not blown, shadows are detailed, and colors are vibrant yet natural.
How to turn on or off HDR camera settings on your iPhone
On all iPhones that support smart HDR, Apple uses HDR when required and in the most effective way by default to ensure you always get the best possible photo every time you hit the Capture button.
While Apple does not let you manually control HDR on iPhone 12 Pro and later models, a few iPhone models, such as Phone XS, iPhone XR, iPhone 11 models, iPhone SE (2nd generation), and iPhone 12, can turn off Smart HDR via the Camera settings and then manually control it.
So, if you own one of the said iPhone models, you can decide whether you want HDR to kick in automatically or have manual control over it.
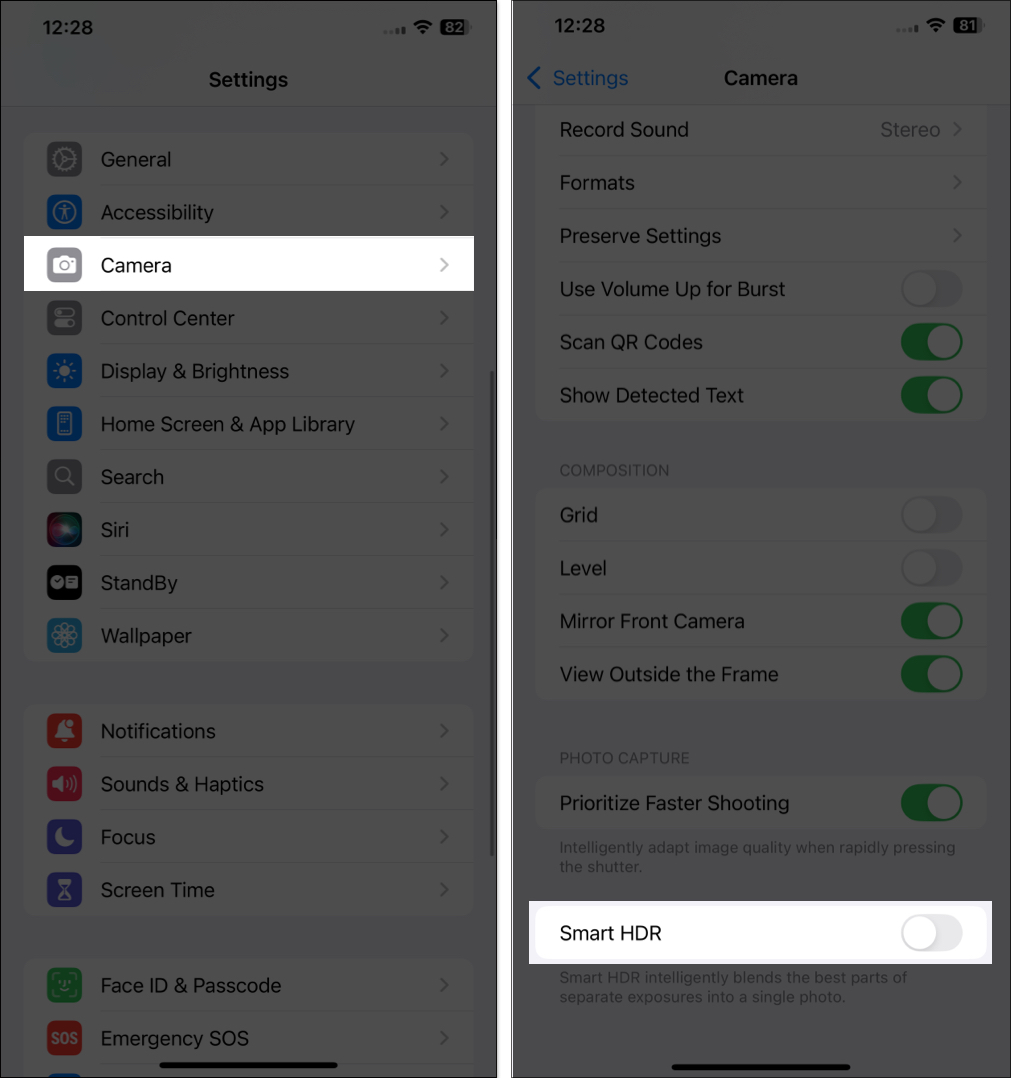
Here’s how you can turn Smart HDR on or off on your iPhone:
- Open Settings and head to Camera settings.
- Here, scroll down to the bottom and toggle off Smart HDR.
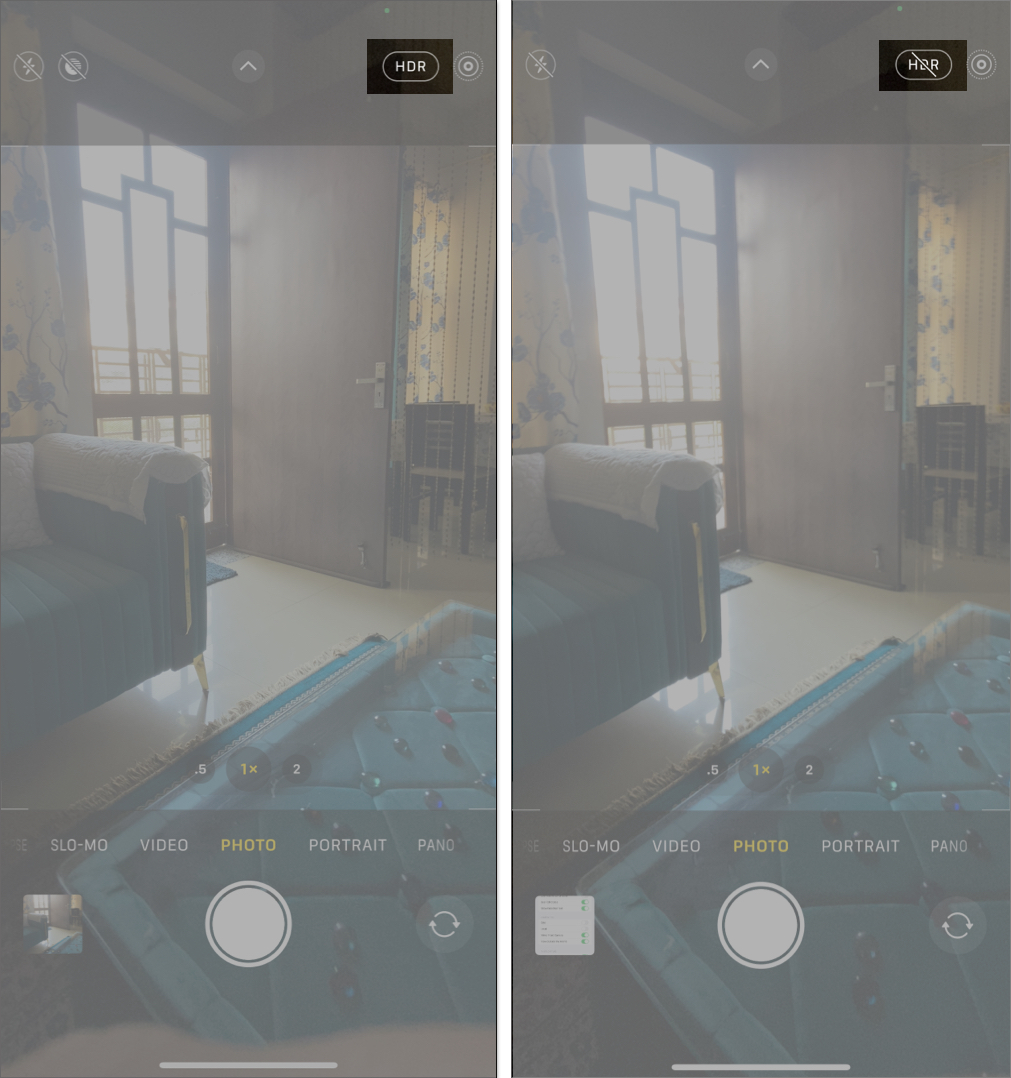
No matter if Smart HDR is on or off, HDR remains enabled. However, once Smart HDR is off, you can manually control it whenever you open the Camera app to capture a photo. Here’s how:
- Open the Camera app.
- Here, tap the HDR button at the top to disable it.
- To re-enable it, tap the button again.
Turn HDR video on or off on an iPhone
Starting the iPhone 12 series, Apple added HDR Video features that improve the video quality by recording in Dolby Vision HDR to get the best possible true-to-life color and contrast in each frame. However, not all users may want to record every video in a 10-bit high dynamic range and would want to turn HDR video off. Let me show you how you can:
- Open the Camera settings on your iPhone.
- Here, tap on Record Video.
- Next, toggle off HDR Video or HDR (depending on your model).
Pro tips for capturing stunning HDR photos on your iPhone
Now that you know how HDR can significantly improve the quality of your photos and videos on your iPhone, here are a few pro tips for you to make the most of HDR:
- Keep iPhone steady: As you already know, HDR combines multiple images to create a perfect image; even slight movements can cause blur. So, it would be best to use a stable tripod or stabilize your hands for sharper results.
- Avoid extreme motion: Similar to your hand movements, having fast-moving objects in your frame can cause motion blur by disrupting HDR processing. So, always avoid HDR when capturing fast-moving objects.
- Frame your subject thoughtfully: While HDR excels in complex lighting conditions, you must use it to your advantage. You can do so by including interesting foreground and background elements to create depth and visual appeal.
- Use natural light: HDR works best with natural light. Early morning or late afternoon (golden hour) often yields the best results.
- Edit your HDR photos: If you are not content with the resultant HDR photos, you can edit them on your iPhone using the built-in editing tools or a third-party photo editing app to fine-tune highlights, shadows, and overall contrast.
Signing off…
That’s pretty much it; this was all you need to know about HDR photography on iPhone. While the automatic HDR on the newer iPhones works great, Apple should have continued with the manual HDR option for users who love experimenting. If you own an iPhone that supports manual HDR, experiment with both automatic and manual settings. Also, don’t forget to use iOS 18’s built-in editing tools to perfect your shots.
Feel free to reach out to us via comments if you have any questions regarding everything Apple.
FAQs
Yes, an HDR photo can be 10-30% larger than a standard photo, depending on lighting conditions and scene complexity.
No, only iPhone XS and later models support HDR photography.
While standard HDR captures multiple shots and combines them into one with perfect highlights and shadows, Smart HDR takes this further by using computational photography technology to ensure highlights are not blown, shadows are detailed, and colors are vibrant yet natural.
Also read:


