Finder is an essential feature on macOS to find and organize files and folders on your Mac. It’s constantly running in the background, contributing to your workflow. But do you know how to customize Finder preferences to speed up daily tasks?

Here are some Finder tips and tricks to help you use it efficiently and simultaneously increase your productivity. So let’s not delay any further and get to them.
- Basic Finder tricks every Mac user should know
- Finder hacks every Pro user needs to know
- Bonus: Keyboard shortcuts for Finder
Basic Finder tricks every Mac user should know
If you rely on the default Finder settings, these Mac Finder tips can improve your experience when using Finder. These are some of the essential Finder tips I believe every Mac user should know.
1. Change how you view files in Finder
You can default select a file and press the space bar to use the Quick Look in Finder. But there’s a much quicker way to display files more efficiently. You can view items as icons, lists, gallery, or columns to run through them quickly.
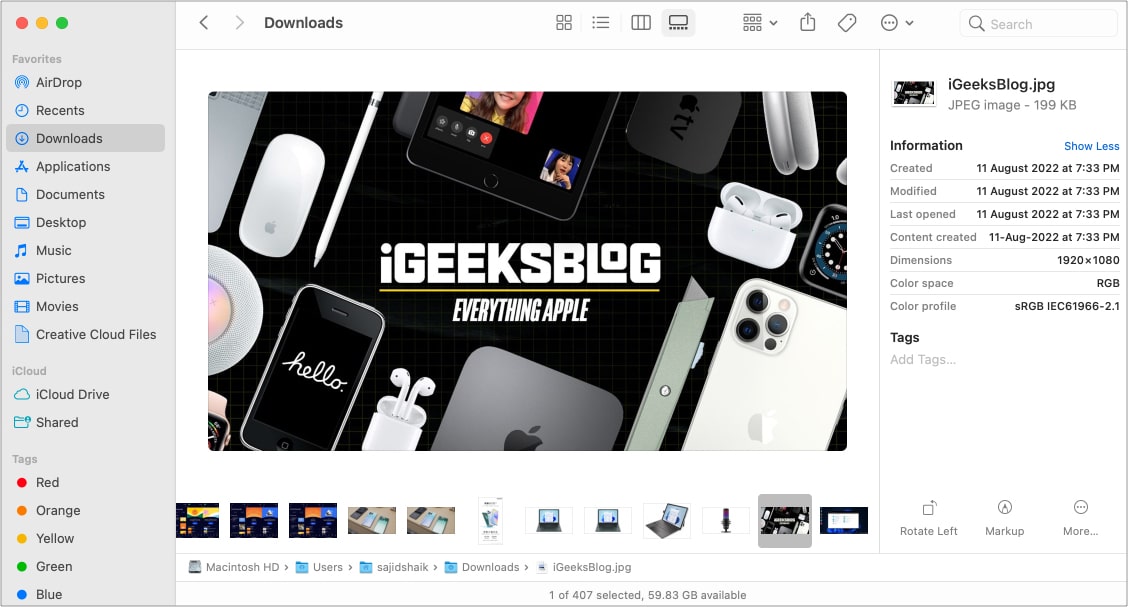
Depending upon your preference, tap the gallery or column icon on top of the Finder window to change how Mac displays folders. Both options show a quick preview of the file you select so you can find your files quickly.
2. Customize the sidebar in Finder
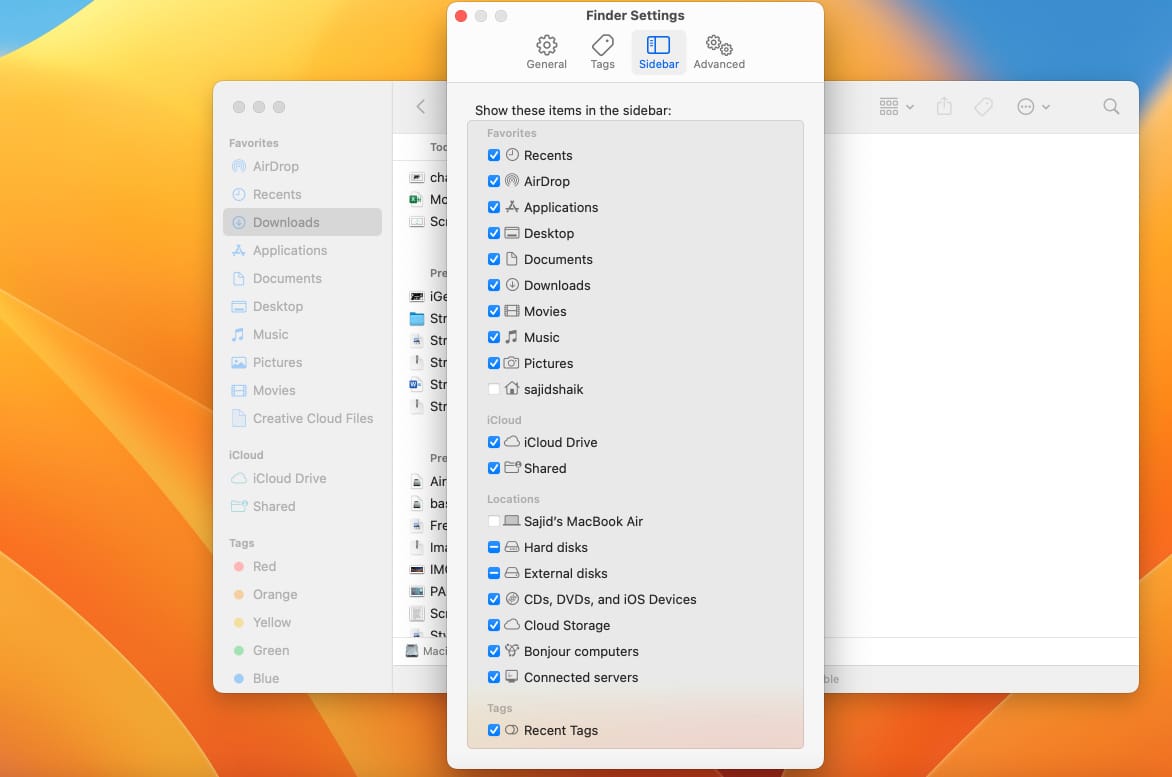
The sidebar in Finder, located on the left, offers a quick way to access AirDrop and other folders like iCloud Drive, Photos, and other commonly accessed folders.
You can also use select which items to show on the sidebar. To do so, select Finder from the menu bar, Preferences → Sidebar, and choose the items you want to display in the sidebar. Later, you can drag and rearrange these items as per your liking.
3. Change the default Finder window
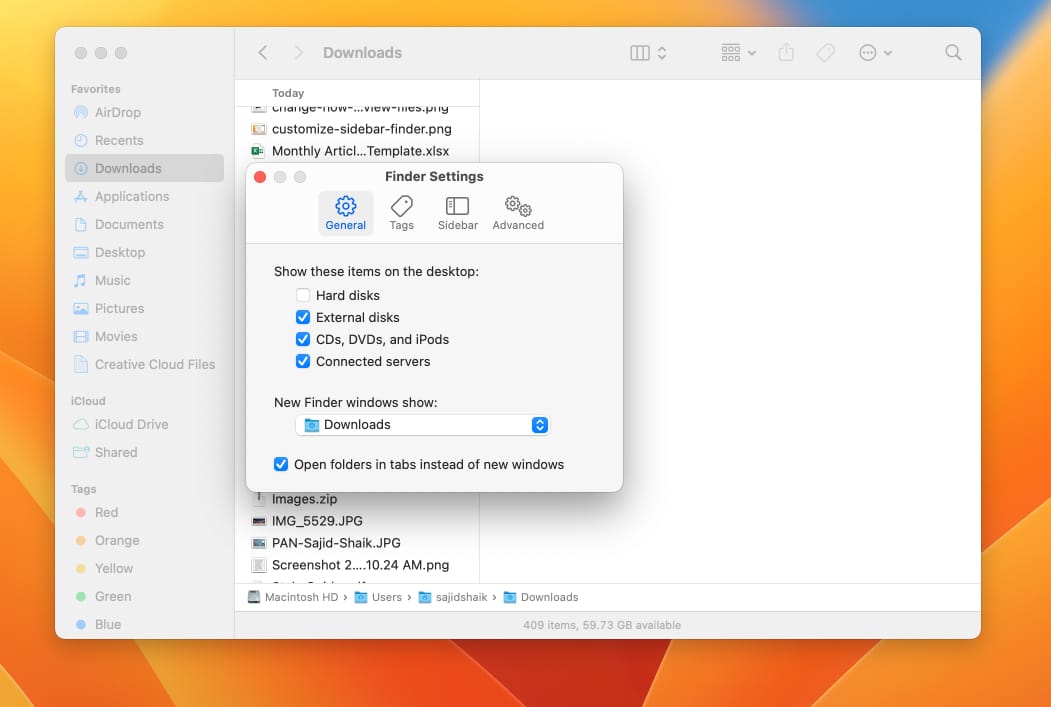
Sometimes you open Finder and go to a specific folder every time. However, you can set that particular Finder folder as default when you open Finder.
Go to Finder → Preferences → General from the menu bar, and select the folder you want to open under the “New Finder windows show:” section. I’ve set it to the Downloads folder since I open it several times daily.
4. View file/folder path in Finder
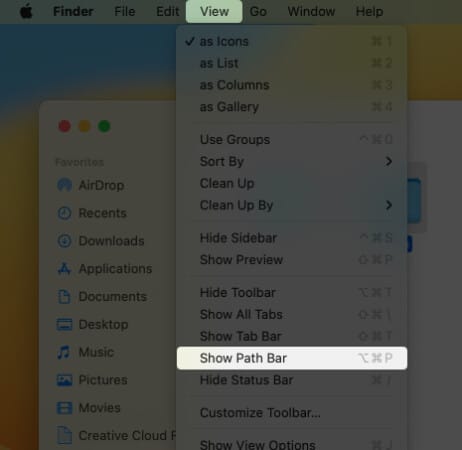
If you want to see the full path of a file/folder in Finder, you have to hold the Command key and select the folder name on the top to see its path. Although, there’s a much faster way to view the file or folder path: Path bar.
It comes pretty handy when you’re locating items in the Library. To enable it, open a Finder window and head to View → Show Path Bar from the menu.
5. Show the Status Bar in Finder
Status Bar is yet another option that comes in handy when you want to check the number of files in the current directory. Along with that, it also shows the total storage space available on your Mac.
You can enable it by opening a Finder window and selecting View → Show Status Bar from the menu.
6. Enable filename extensions
The file info option shows all the information, including file type, date modified, and more about the selected file or folder. However, showing file extensions next to the filenames could ease your task if you want to see the file type.
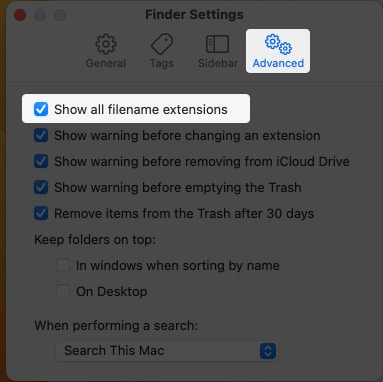
To get filename extensions, go to Finder → Preferences → Advanced and enable the “Show all filename extensions” option.
7. Merge all Finder windows
When you open multiple instances of Finder windows for different files and folders, going back and forth between them can be troublesome. Mac has a way to get you out of the mess: Merge all windows.
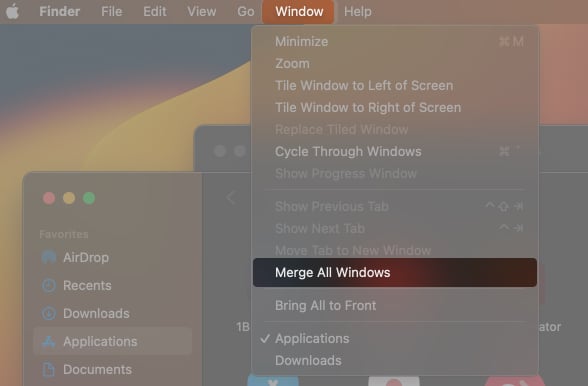
Finder brings all the Finder instances into a single window and keeps them separate using tabs. Select a Finder window to merge all the Finder windows, then select Windows → Merge All Windows.
Finder hacks every Pro user needs to know
While the above tips and tricks can help improve your Finder experience, these tips can take your productivity to the next level.
8. Rename multiple files at once
Renaming many files can be a strenuous task, especially when you’ve to rename each separately. Finder on Mac makes it easy to rename files with a few clicks.
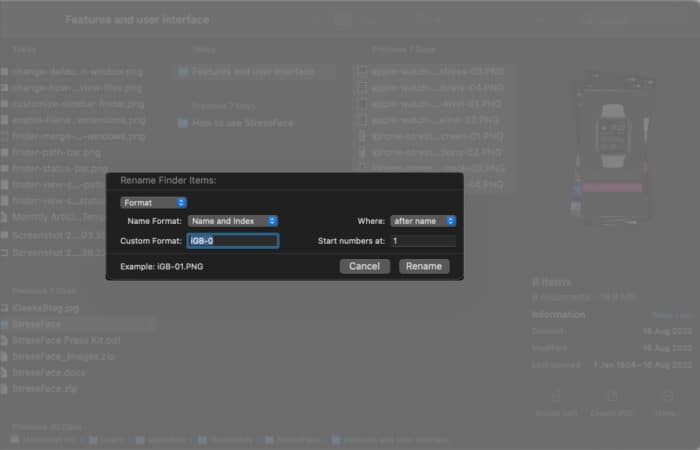
Select the files you want to rename, right-click on any of them, and select the “Rename…” option from the menu. A dialog box will appear, asking you to specify the criteria using which you want to rename the files.
For example, I can select a format and choose the settings accordingly to rename multiple files at once.
9. Extra toolbar customizations
Finder’s default toolbar is quite helpful right out of the box. You can perform actions like adding tags, sharing the selected file, changing views, and more. However, Finder allows you to customize the toolbar and add more options according to your preferences.
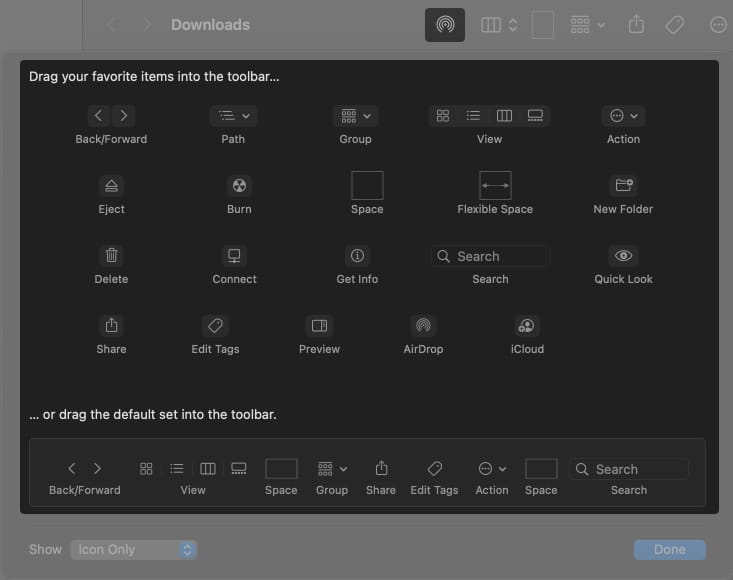
To customize the Finder toolbar, right-click on the toolbar and select Customize Toolbar from the listed options.
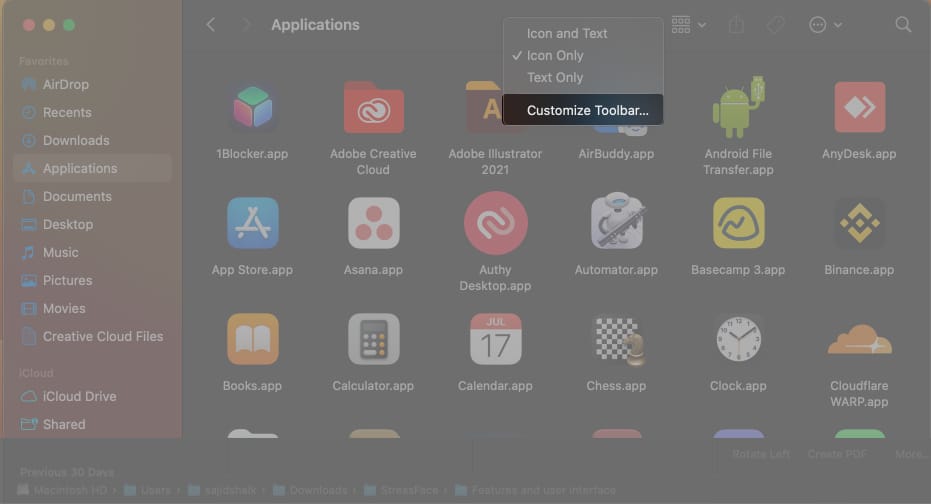
Drag and drop the icons to where you like on the toolbar. In my case, I’ve added the AirDrop icon to the toolbar to access it quickly when sending files.
10. Use tags to organize files
One of the best features of the Finder is that you can organize files and folders using tags. A tag is nothing but a color label that you can assign to a file or folder so you can find it easily. You can also rename the existing tags or create new ones.
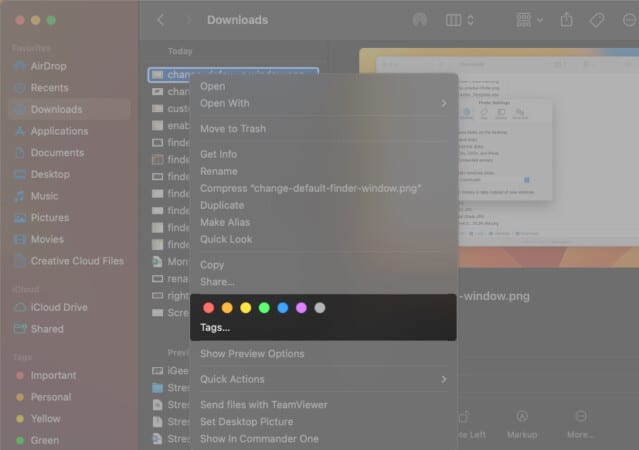
To assign a tag in Finder, right-click on the file or folder and select a color from the options you’d like to give it. You can also click on the “Tags…” option to add or manage default tags. All tags are accessible from the Finder sidebar.
To remove a tag, right-click on the file or folder and click on the assigned color to remove it.
11. Set up Smart Folder
If you have a set of files with something in common, moving them to a specific folder can be a little hectic if you have to do it repeatedly. Instead, you can set up a Smart Folder to do it for you.
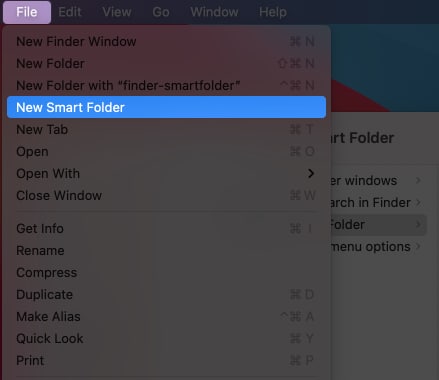
To create a Smart Folder, open Finder and go to File → New Smart Folder. Then specify the first criteria—for instance, all files with the phrase Finder. You can also set second criteria to narrow your results further. Click Save, and provide a name and location to the Smart Folder.
Also, you can unselect the Add to Sidebar option if you don’t want to see it in your sidebar. Rename the file and avoid using special characters if you see an error message.
12. Use a custom icon for files and folders
The Finder has standard previews and icons to identify files and folders. Fortunately, Finder allows you to have a custom icon for any app, file, or folder. You can either use an image from the web or use one from your Mac.
13. Narrow your search in Finder
When you search for specific items in the Finder, you can narrow down your searches to find them quickly by adding criteria to your search. Here’s how you can filter your search results.
- Open a Finder window, enter a search term, and hit Return.
- Click the “+” button on the right side below the search field.
- Choose the required criteria from the pop-up menus.
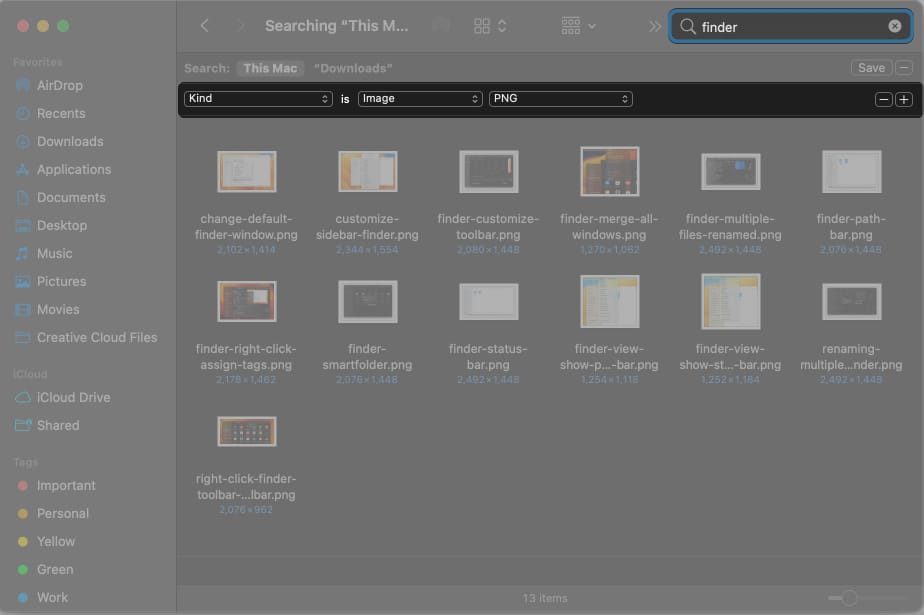
For instance, you can select Kind first, then select the type of document like Images, and finally choose the file format, which can be JPEG, PNG, and more.
You can narrow your search results further by clicking on the “+” button and adding more criteria.
14. View additional menu options
Generally, you can right-click or tap with two fingers to view a context menu. However, you can see additional options if you hold down the Option key on your keyboard to see different options. Also, if you hold Option and Shift keys together in a context menu, you’ll have other options.
Bonus: Keyboard shortcuts for Finder
- To open a new Finder window: Command (⌘) + N
- To create a new folder in the current location: Command (⌘) + Shift (⇧) + N
- To open a new Finder tab: Command (⌘) + T
- To show or hide the tab bar in Finder: Command (⌘) + Shift (⇧) + T
- To open the Applications folder: Command (⌘) + Shift (⇧) + A
- To open the Utilities folder within the Applications folder: Command (⌘) + Shift (⇧) + U
- To duplicate the selected file: Command (⌘) + D
- To search for files or folders in Finder: Command (⌘) + F
- To open the Downloads folder: Option (⌥) + Command (⌘) + L
- To open the AirDrop window: Command (⌘) + Shift (⇧) + A
- To create a new Smart Folder: Option (⌥) + Command (⌘) + N
- To empty the Trash: Option (⌥) + Command (⌘) + Delete
Want more keyboard shortcuts at your fingertips? Get our dedicated ebook for Mac keyboard shortcuts.
Make the most out of your Finder on Mac
The Finder on macOS is a fantastic tool if you start using it. These Mac Finder tips might help you get yourself to use the Finder productively and efficiently.
Furthermore, there are other Finder tips like changing fonts and text size, bookmarking a folder, changing the Finder icon in the dock, and many more. If you know any more tips, feel free to share them with us.
Read more:

