FaceTime is the undisputed favorite for video-calling. However, issues like dropped calls, frozen screens, distorted audio, or unexpected app crashes after updating to macOS Sonoma can make your FaceTime experience unpleasant.

Fortunately, you can use quick troubleshooting techniques to fix FaceTime not working on Mac.
Table of Content
- Why is FaceTime not working on MacBook?
- What to do if FaceTime is not working on your Mac after the macOS Sonoma update
- 1. Check Apple's System Status
- 2. Force quit and reopen FaceTime
- 3. Perform mic, camera, and speaker tests
- 4. Check internet connection
- 5. Restart your Mac
- 6. Sign in with the correct Apple ID on the Mac
- 7. Set the correct date and time on the Mac
- 8. Update macOS
- 9. Sign out of FaceTime and log in again
- 10. Sign out of Apple ID and sign in again
- 11. Check if FaceTime is disabled in Screen Time
- 12. Check your firewall settings on the Mac
- Contact Apple Support
Why is FaceTime not working on MacBook?
FaceTime may not work as expected on your Mac due to several reasons.
- If you can’t use FaceTime at all, it’s likely that the service is not available in your region or there’s a server outage. To check for geo and carrier restrictions, visit the Apple Support page.
- You may not be able to make calls if your internet connection is slow or network settings are misconfigured.
- The wrong email address or phone number assigned in FaceTime settings can prevent incoming calls from reaching you. You might also have blocked the contact or vice versa.
- If you can make or receive calls, but your camera or mic does not function properly, it may be due to software glitches or hardware damage.
What to do if FaceTime is not working on your Mac after the macOS Sonoma update
Whatever is causing the trouble, our troubleshooting tips can surely fix it. Take a look!
1. Check Apple’s System Status
Before trying any complex troubleshooting steps, ensure Apple servers are up. From the Apple System Status page, you can quickly see if FaceTime is experiencing any outages or disruptions.
If you don’t see a green dot next to FaceTime, you can be sure that Apple is already working on fixing it. So, just wait until the server gets fine!
2. Force quit and reopen FaceTime
Force quitting FaceTime is a simple yet powerful fix that provides a quick and easy solution for addressing common FaceTime video problems and ensuring a smoother user experience.
To do so, click FaceTime on the menu bar and select Quit FaceTime. This step removes the app from running in the background, clearing potential glitches.
Additionally, terminating the app and reopening it establishes a fresh connection to the internet, resolving connectivity issues that could hinder its functionality.
While you are at it, make sure no other video-calling app is interfering with FaceTime in the background. If you spot one, force-quit it.
3. Perform mic, camera, and speaker tests
Performing mic, camera, and speaker tests can be helpful if your Mac’s FaceTime app video or audio is not functioning as expected.
You may record a voice memo to ensure that your Mac’s microphone is functioning correctly. Next, head to the Photo Booth app to test the camera and verify if it captures clear photos or videos.
Lastly, by playing music or making a call on the speaker, you can ensure the audio output is clear and audible. These tests enable you to identify any specific hardware or software issues and take the necessary steps to resolve them.
Also, click Video in the menu bar when FaceTime is opened. Here, ensure your desired camera and mic are selected for use in the video call.
4. Check internet connection
FaceTime relies on a stable internet connection for proper functionality. Verify that your Ethernet or Wi-Fi connection is active and reliable. Good connectivity on your Mac resolves issues like connection alerts, low-quality audio or video, or an exclamation mark error.
Go to Apple Menu → System Settings → Wi-Fi Ensure you’re connected to the correct network.
Also, check if someone is consuming your Wi-Fi bandwidth. It may slow down the internet speed. However, if you’re having trouble connecting to Wi-Fi on a Mac, you can read our article.
5. Restart your Mac
Often, a simple restart of your Mac can solve minor glitches that prevent FaceTime from working properly. To do so, go to the Apple menu → Select Restart.
6. Sign in with the correct Apple ID on the Mac
When you encounter problems with FaceTime, double-check that you have logged in with the correct account on your Apple device.
Sometimes, I unintentionally log in with an incorrect Apple ID or iCloud account, leading to difficulties initiating or receiving FaceTime calls.
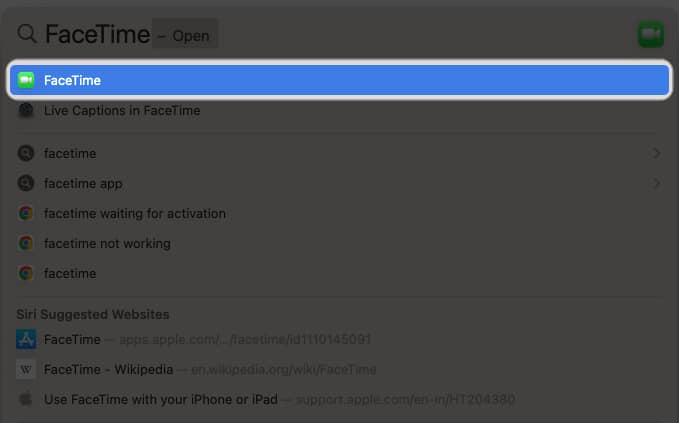
- Launch Spotlight (Command ⌘ + Space Bar) → Search and open FaceTime.
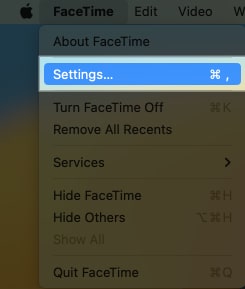
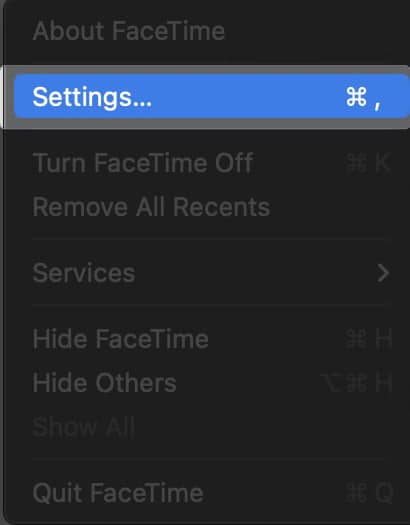
- Click FaceTime on the menu bar → Select Settings.
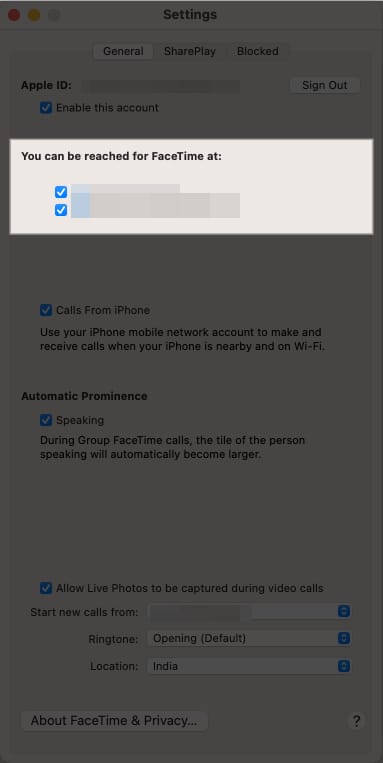
- Select the FaceTime IDs beneath You can be reached for FaceTime at.
Ensure the email address and phone number are correct.
Tip: Untick the Enable this account checkbox under your Apple ID, restart your Mac, and enable it again following the same steps to reset your FaceTime account.
7. Set the correct date and time on the Mac
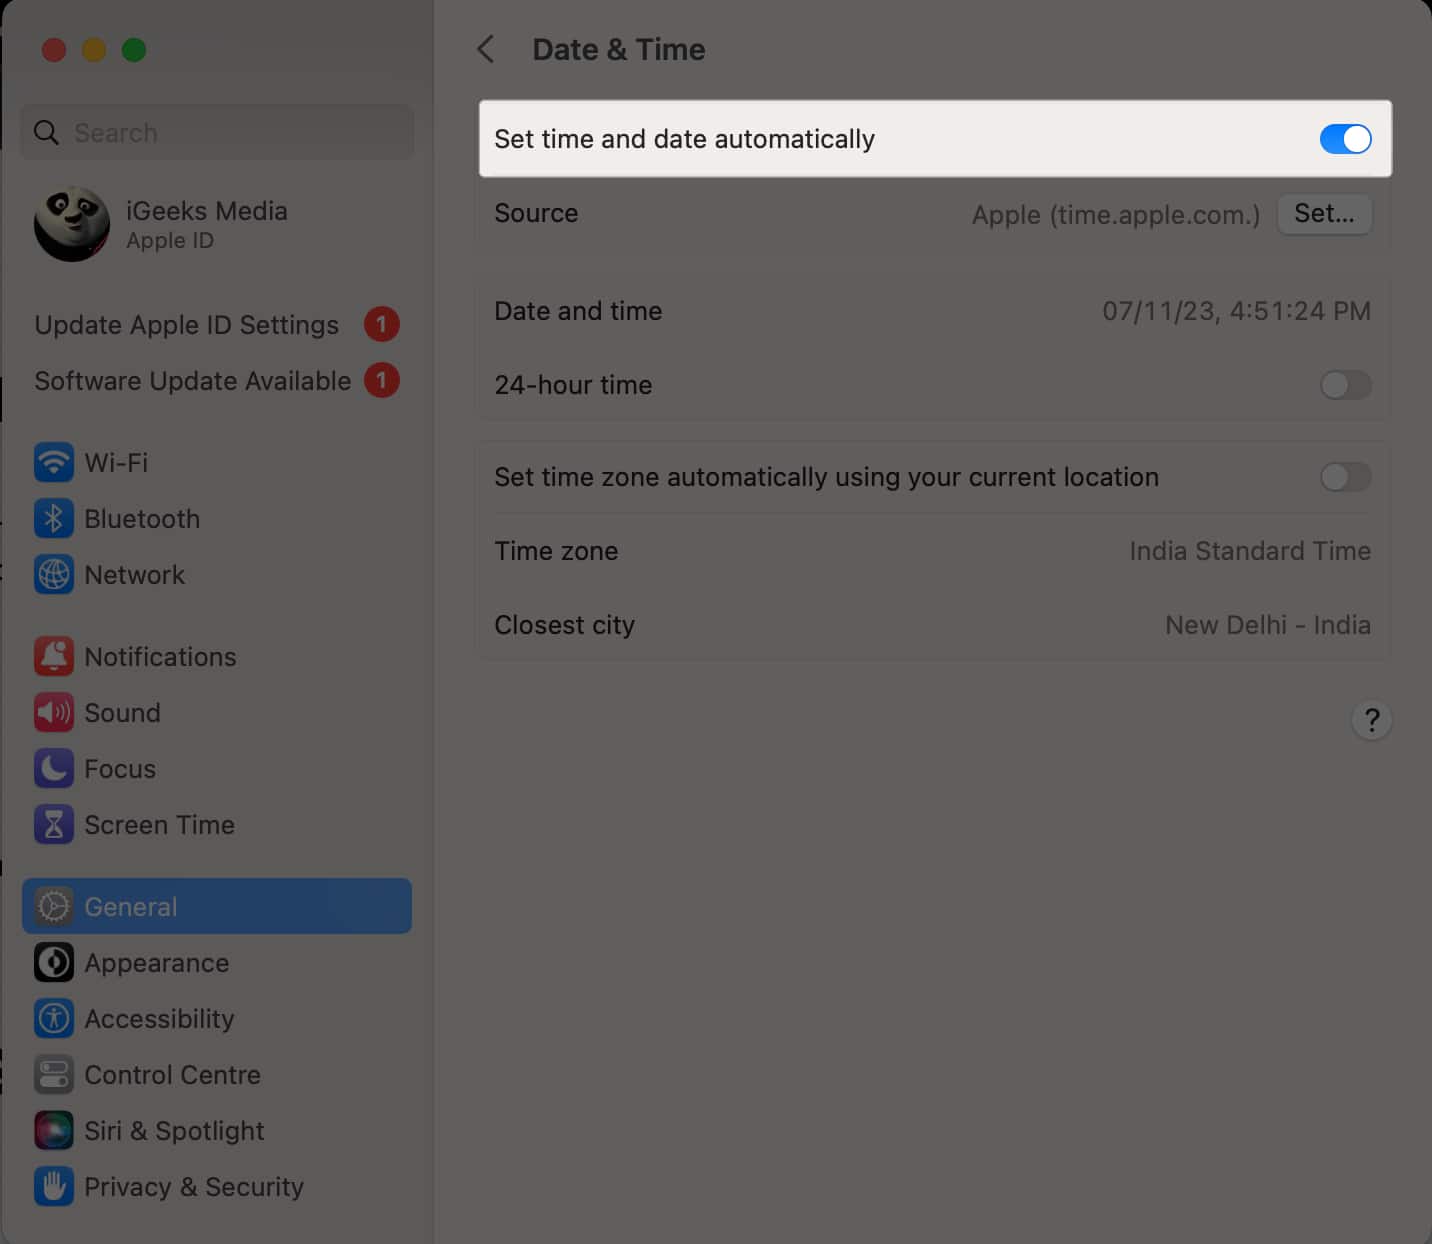
If FaceTime is not functioning on your Mac but working on your iPhone, check if your macOS is showing the correct date and time.
Incorrect system date and time information interfere with establishing an internet connection.
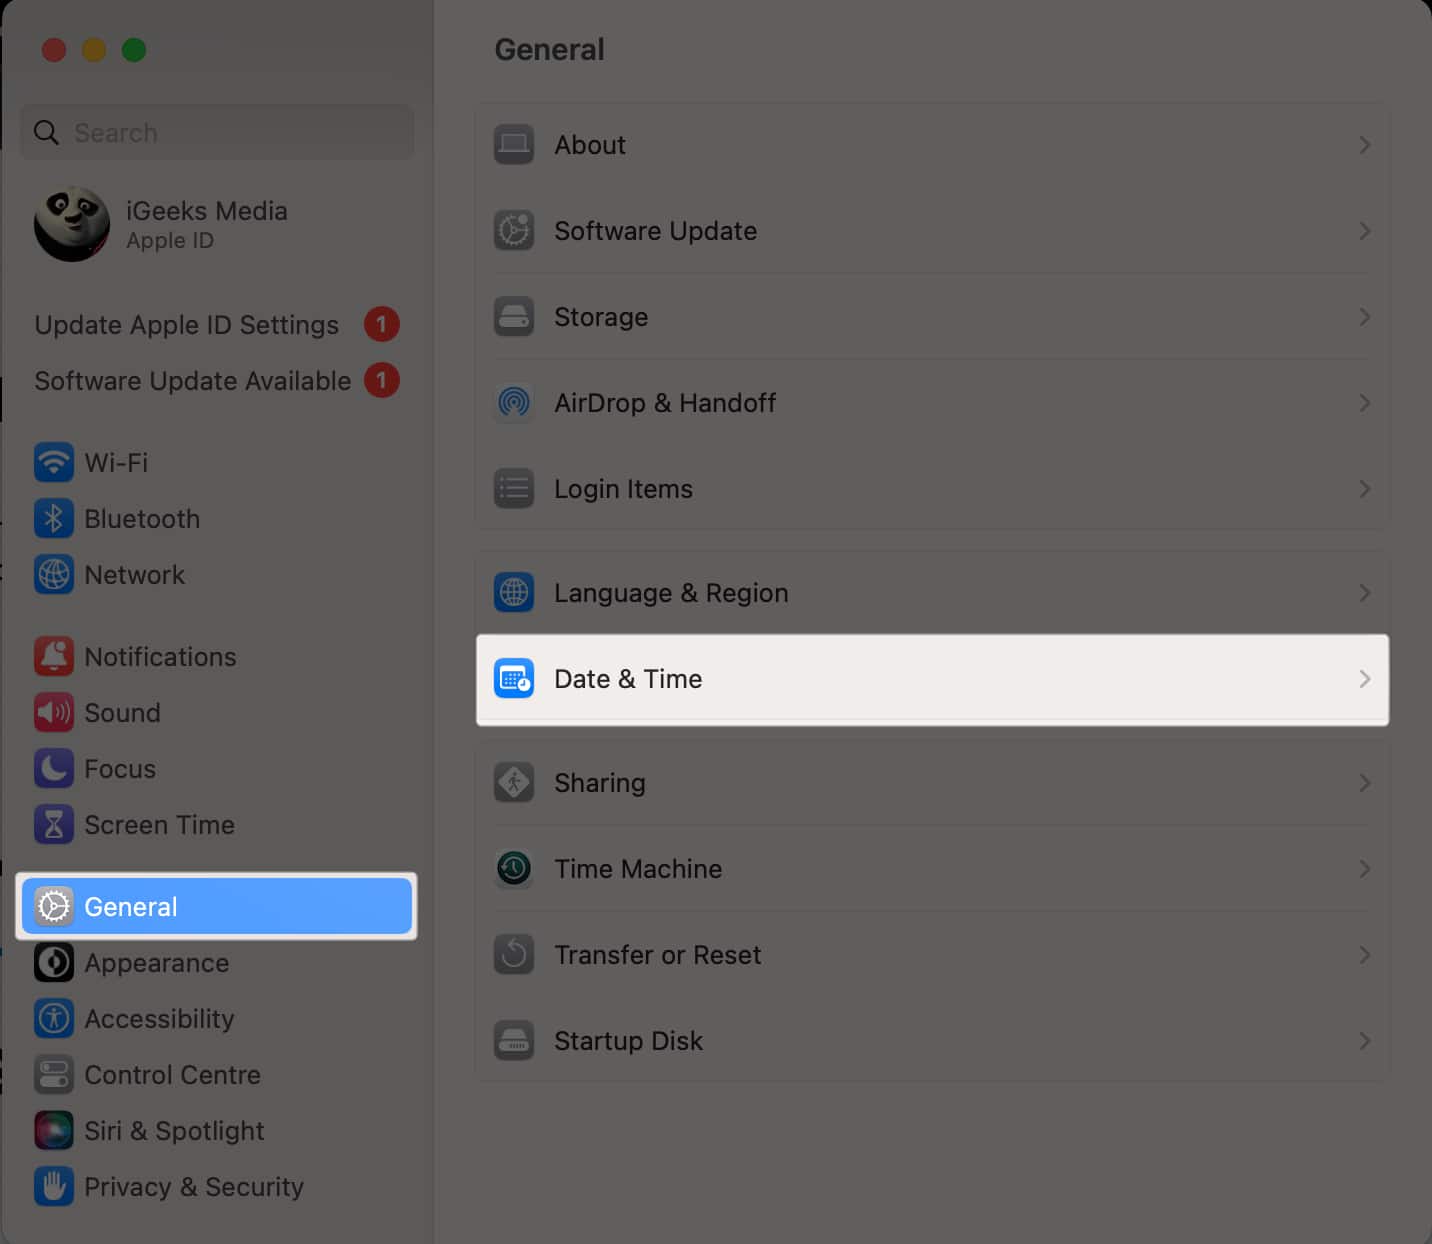
- Go to System Settings → Select General → Date & Time.
- Toggle on Set time and date automatically.
Also, ensure Set time zone automatically using your current location is enabled.
8. Update macOS
Since FaceTime is a system app, it receives an update with the overall macOS update. So, I suggest updating your macOS regularly to receive the same.
Additionally, updating macOS ensures that any system glitches interfering with FaceTime are resolved.
Go to System Settings → General → Software Update. If a new macOS version is available, click Update Now.
9. Sign out of FaceTime and log in again
Whether you’re encountering call quality issues, connection failures, or other technical difficulties on FaceTime, signing out and back in is a troubleshooting step worth considering.
It refreshes the connection between your device and the FaceTime servers, fixing any temporary glitches or connectivity problems.
- Launch FaceTime app → Click FaceTime on the menu bar.
- Select Settings.
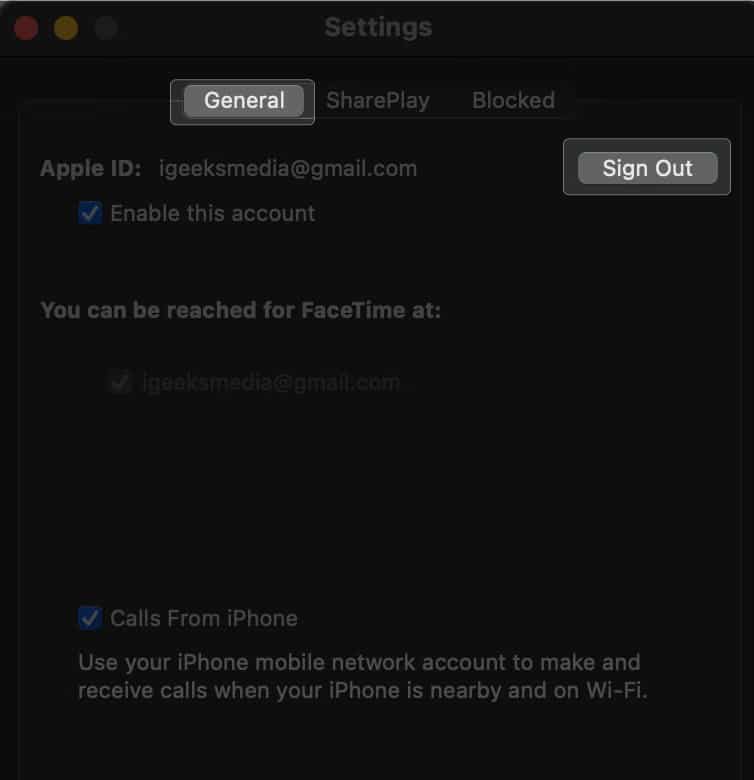
- Under General, click Sign Out.
- Select Sign Out on the popup to confirm.
- Again, open FaceTime.
- Enter your Apple ID and password.
- Click Next.
Now check if you can make or receive FaceTime calls as expected.
10. Sign out of Apple ID and sign in again
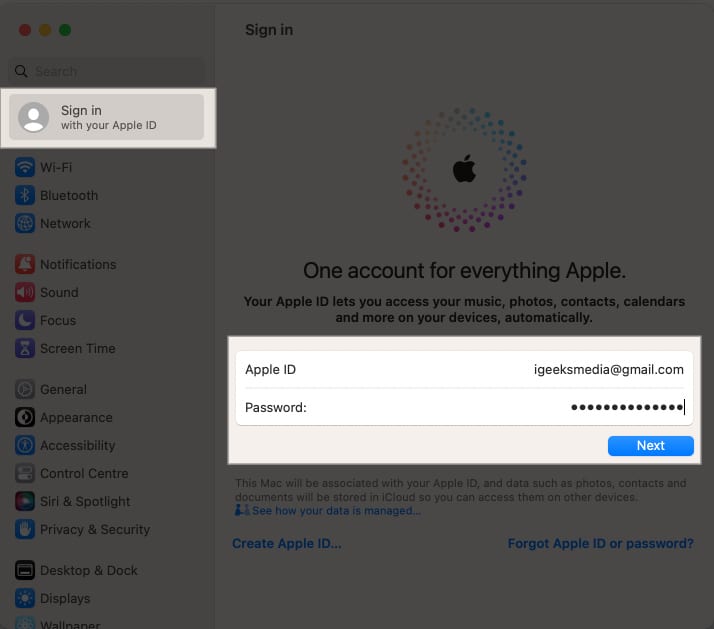
Sometimes, conflicts in Apple ID can hamper your FaceTime experience. So, try disconnecting your Mac from your Apple ID account and reconnecting it to give your device a clean slate and bid farewell to any persistent issues. This will also initiate an automatic logout and login process within the FaceTime app.
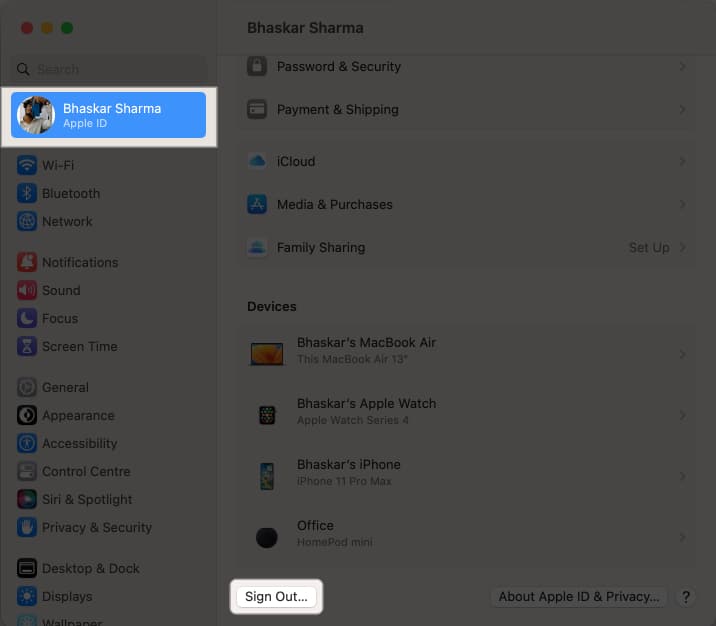
- Go to the Apple logo → Choose System Settings.
- Click [your name] on the left pane → Scroll down and pick Sign Out.
- Follow the onscreen instructions for copying and downloading your data stored in iCloud.
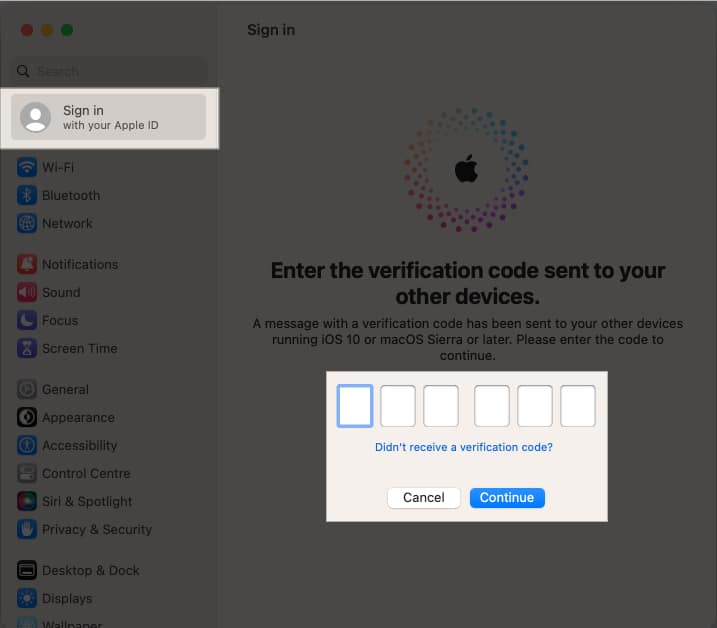
Now you’ve successfully logged out from your Apple ID on your Mac. Proceed with the steps outlined below to log back in. - Enter your Apple ID and Password → Click Next on the screen.
- Type the code sent to your other device.
If you have two-factor authentication enabled. - Enter your Mac’s password → Press Continue.
11. Check if FaceTime is disabled in Screen Time
If you have enabled content restrictions in Screen Time, ensure FaceTime is allowed. To ensure this, go to System Settings → Screen Time → Content & Privacy → App Restrictions.
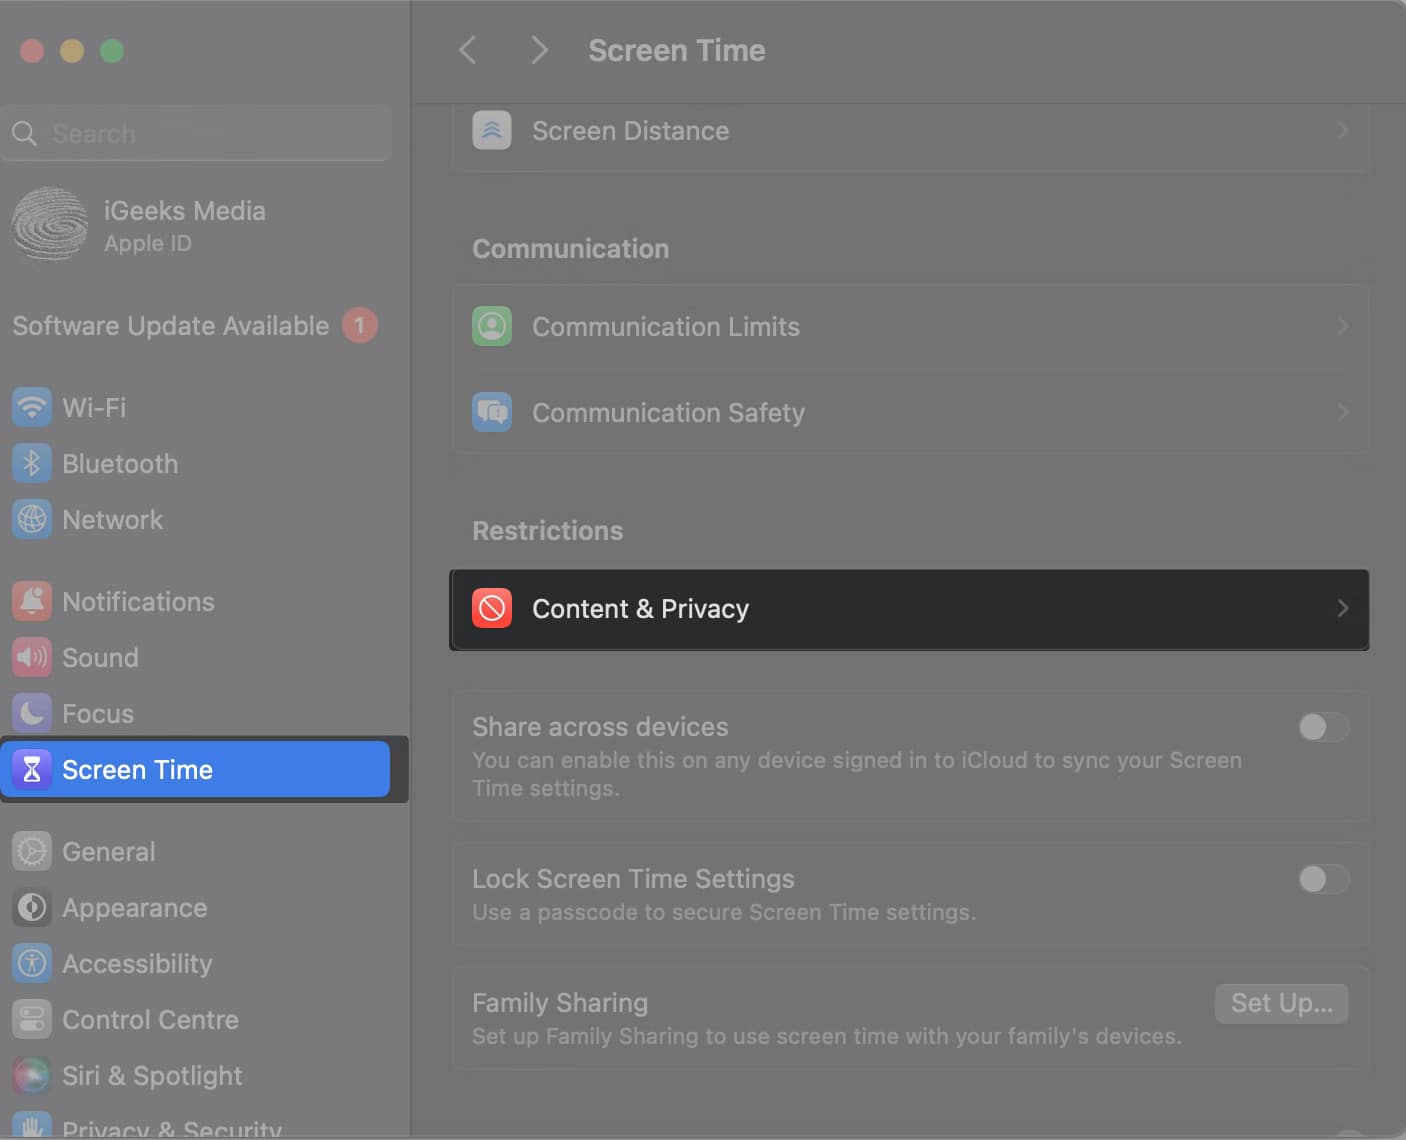
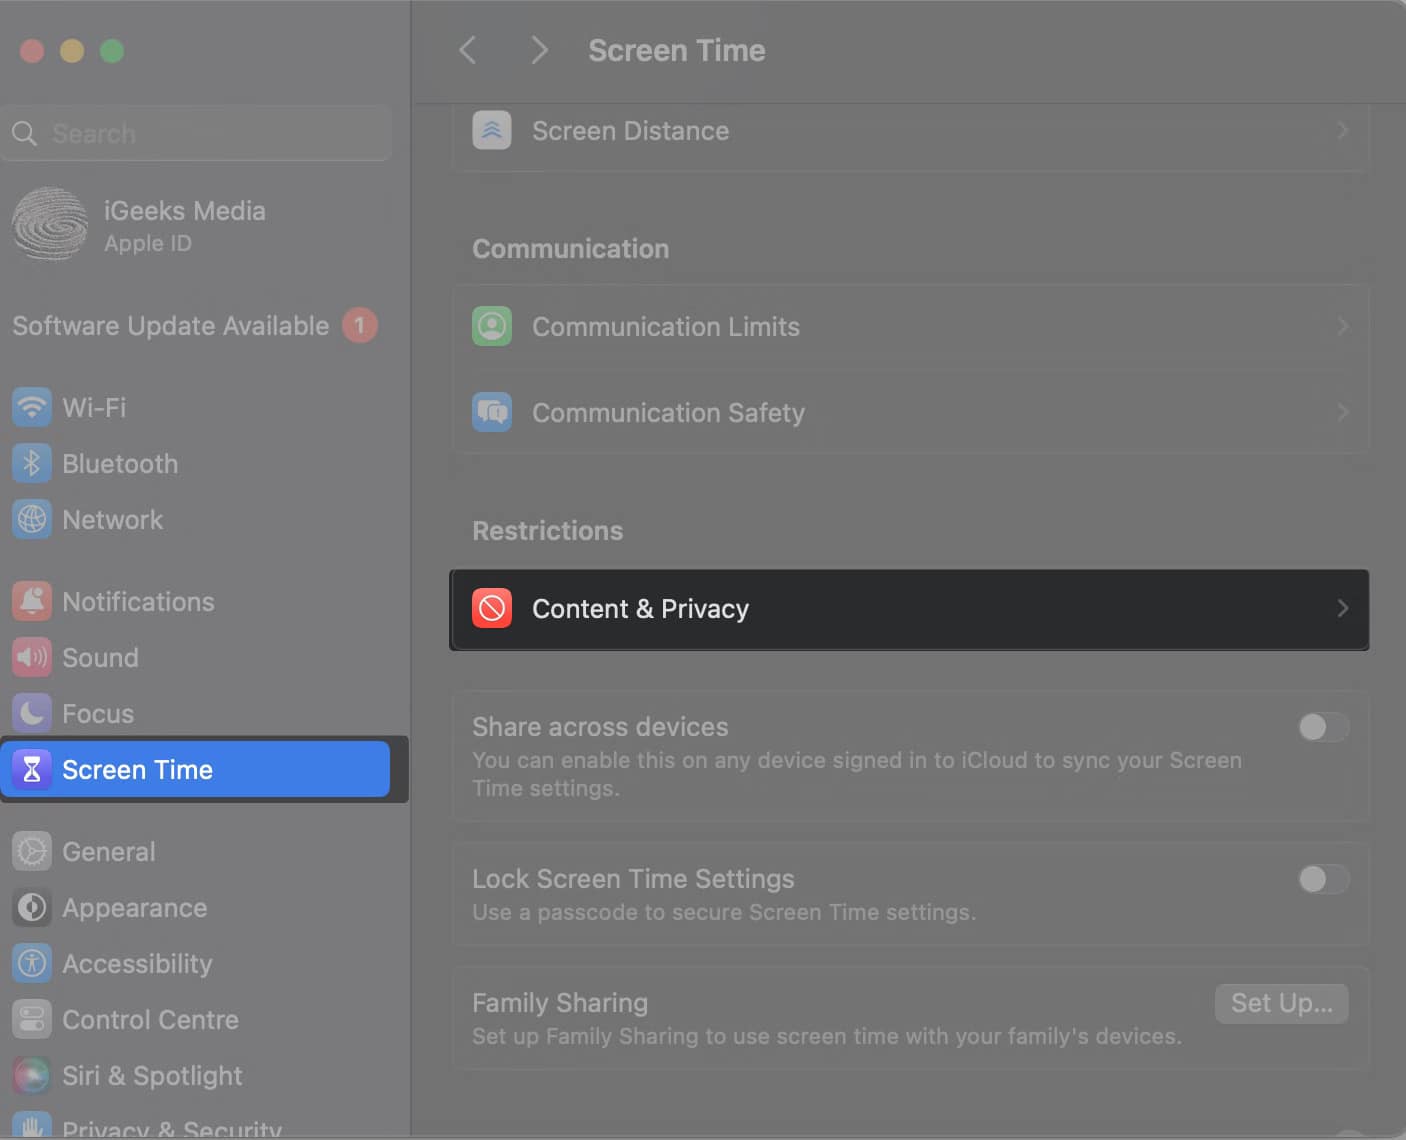
You may toggle off App Limits altogether or disable the Social App category.
Also, access Content & Privacy and toggle it off to ensure FaceTime works smoothly without any restrictions.
Besides, if you use Parental Controls to control and impose limitations on features and applications on your child’s device, you can follow the steps shown below to determine if FaceTime is disabled.
- In the parent’s Mac, navigate to System Settings.
- Select Family → Pick the minor ID.
- Head to Screen Time → Click on Open (minor ID name) Screen Time.
- Click Content & Privacy → Enable Content & Privacy → Choose App Restrictions.
- Ensure that Allow FaceTime is toggled on → Select Done.
12. Check your firewall settings on the Mac
Firewalls are security features that monitor and control incoming and outgoing network traffic.
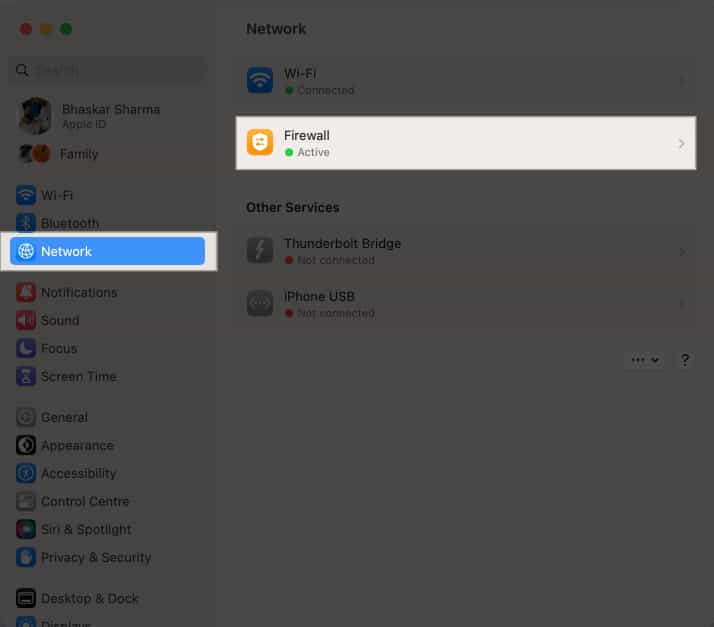
Sometimes, these settings can inadvertently block FaceTime from functioning correctly. Here’s how you can check and control your firewall settings:
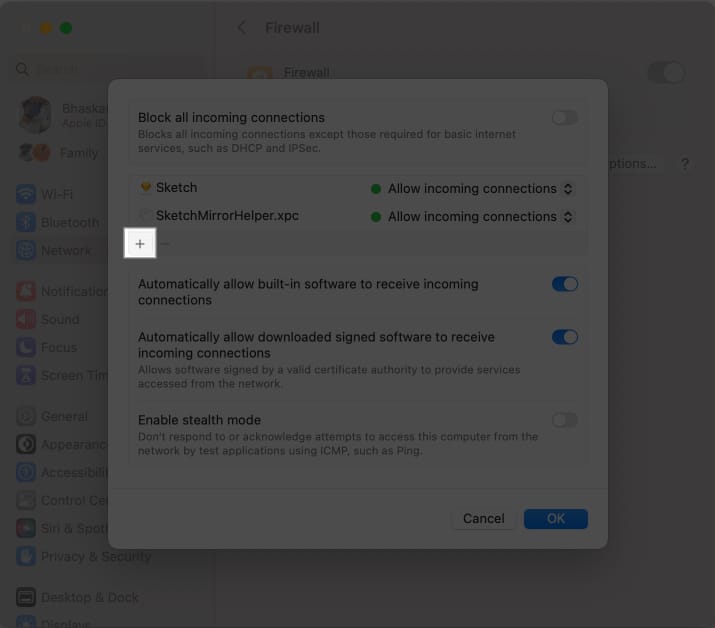
- Launch the System Settings → Head to Network → Choose Firewall.
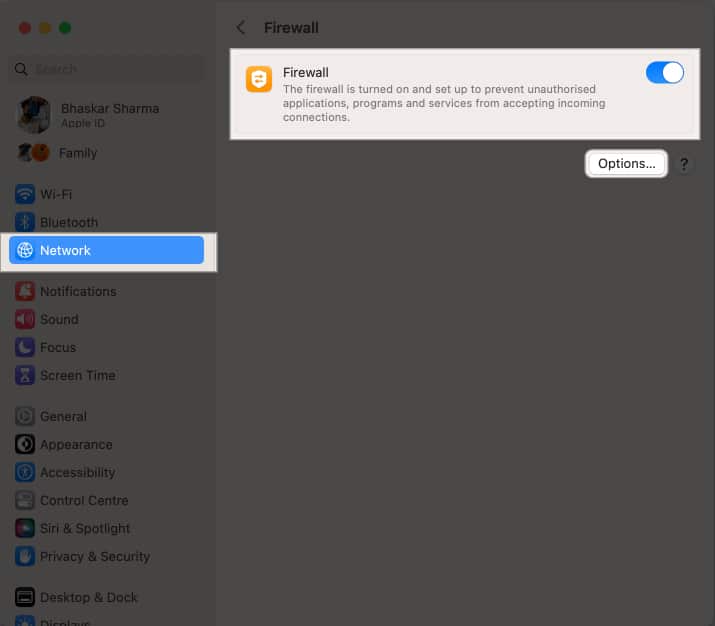
- Toggle on Firewall → Click Options.
- Select the plus (+) icon.
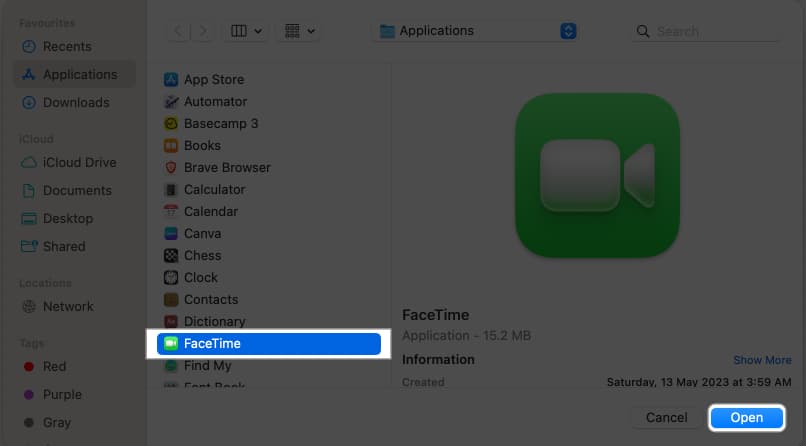
- Locate and pick FaceTime → Choose Open.
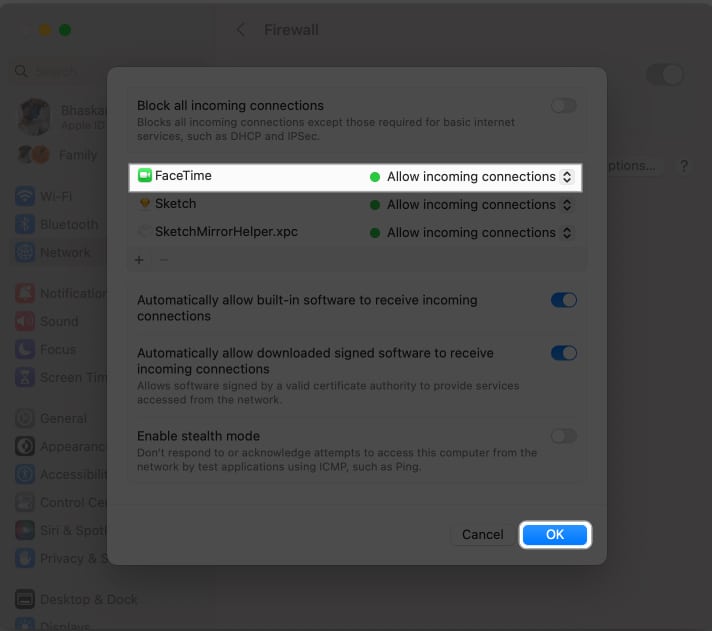
- Set the dropdown to Allow incoming connections → Select OK.
Contact Apple Support
The Apple support team can provide specialized guidance and help locate any hardware or software issues that might cause FaceTime to not work on a Mac. So, contact Apple Support and get customized solutions based on your unique situation.
Is your FaceTime up and running?
I hope that with the fixes mentioned above, you will have resolved the FaceTime not working on Mac.
Please tell me in the feedback section which fixes helped resolve the issue or if there were any other fixes I did not mention.

