External hard drives are among the perfect storage solutions to locally save gigabytes of data. You just have to plug the drive into your Mac and access them on the desktop or Finder. However, when an external drive fails to mount and appear, things get problematic.
But don’t worry! I have rounded up the best fixes to eliminate the issue of an external hard drive not showing up on a Mac. But first, let’s understand the possible reasons behind this.
Table of Contents
- Why is my external hard drive not showing up on Mac?
- How to fix an external hard drive not recognized on Mac
- 1. Change Finder preferences to show the drive on Mac
- 2. Make sure the drive is powered adequately
- 3. Change USB ports or USB Dongle
- 4. Check the connecting drive cable
- 5. Restart your Mac
- 6. Try using another Mac or PC
- 7. Access the drive using macOS Disk Utility
- 8. Change the drive format
- 9. Reset NVRAM or PRAM on Mac
Why is my external hard drive not showing up on Mac?
Here are 7 reasons why your external pen drive, HDD, SSD, or other such drives may not be appearing on your Mac.
- The drives are underpowered.
- There is a problem with Mac’s USB port.
- The external drive is not formatted in a macOS-recognized file format.
- There is a temporary issue with your Mac.
- You have chosen not to show external drives on your Mac’s desktop.
- The cable connecting the disk and Mac is broken, loose, or damaged.
- Your external drive has physical damage.
Note: If it’s either of the last two, the mentioned fixes won’t work. You will have to buy a new cable or contact a data recovery service like DriveSavers.
Now that you know the basics, let’s look at the fixes. External Hard Drive Not Recognized on Mac
How to fix an external hard drive not recognized on Mac
1. Change Finder preferences to show the drive on Mac
The first step is to ensure that external drives are allowed to show up on Mac’s desktop.
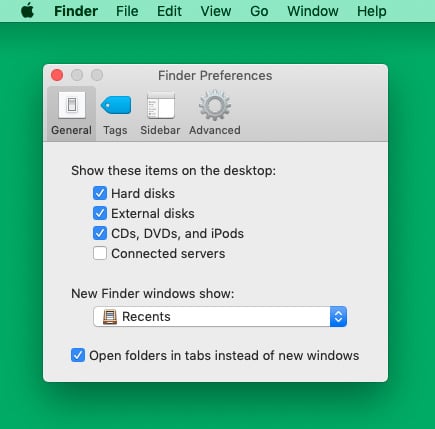
- Stay on Mac’s desktop. Click Finder at the top menu bar and choose Preferences.
- Click General.
- Make sure ‘External disks‘ is checked.
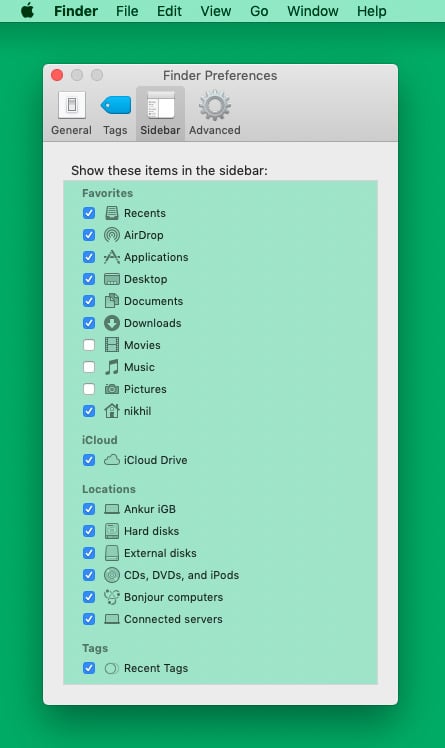
- Next, click ‘Sidebar‘ and make sure ‘External disks’ is checked.
If the options are already checked, move on to the next fix.
2. Make sure the drive is powered adequately
Small hard drives, SSD, and pen drives might not require additional power. The power they get from Mac’s USB port is sufficient.
But if you have a big hard drive that requires external power, ensure you satisfy that. Secondly, some drives have two ports, and both must be plugged into the computer. If everything is fine here, move on to the next step.
3. Change USB ports or USB Dongle
This is a pretty common trick to solve such problems. I am confident you already tried this. But if you did not, unplug the drive from the current Mac’s USB port and plug it into another. Give it a few seconds and see if it is visible.
Secondly, if you are using a USB-C dongle/hub, unplug it from your Mac and plug it into a different type-C port. In case the dongle is too hot, give it a few minutes to cool, and then try. This should probably fix the issue.
If it didn’t, don’t panic! Move on to the next one.
4. Check the connecting drive cable
Is the cable connecting your hard drive to the Mac wobbly at either end? If yes, do not force it as it may aggravate the problem. Place the Mac on a table or floor. Now, do the same for the drive and connect it to Mac carefully. See if it appears on the desktop or in the Finder.
If it appears, I would advise copying most essential data to the Mac or other drive. You may also consider getting a new drive cable or a new drive.
In case the hard drive is not visible on your Mac, gently move the cable on the joints (where it connects with the drive and Mac) and see if it helps.
5. Restart your Mac
Restarting is one of the simplest (and my favorite) methods to solve several Mac and iPhone issues with pretty remarkable success rates. If you cannot see your drive after following the above fixes, go ahead and restart your Mac.
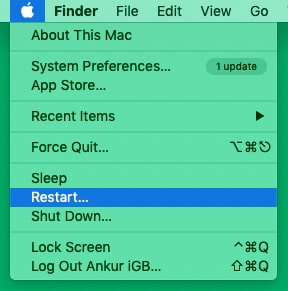
Click the Apple logo at the screen’s top left and choose Restart. Once your Mac powers on, connect the external drive, and it should be visible on the desktop and inside Finder.
Important Tip: If a simple restart does not help, go ahead and boot your Mac in safe mode. This will help you understand if the problem is related to any software/app on your Mac.
If you see the external drive after booting in safe mode, that means the problem is caused by some app or software (like ones for cleaning your Mac, antivirus app, security apps, etc.). You might have to uninstall those apps.
6. Try using another Mac or PC
Before we move to the subsequent fixes, it is essential to determine whether the problem is with the drive or the Mac itself. To check this, borrow a Mac (or Windows PC) from a family member or friend. Plug the drive in that Mac and see if it shows up there.
If the drive shows up on a Windows PC but not on Mac, that means there is a formatting conflict. We will see how to fix that below.
7. Access the drive using macOS Disk Utility
- Press command + space bar to bring Spotlight Search. Now, type Disk Utility and open this app.
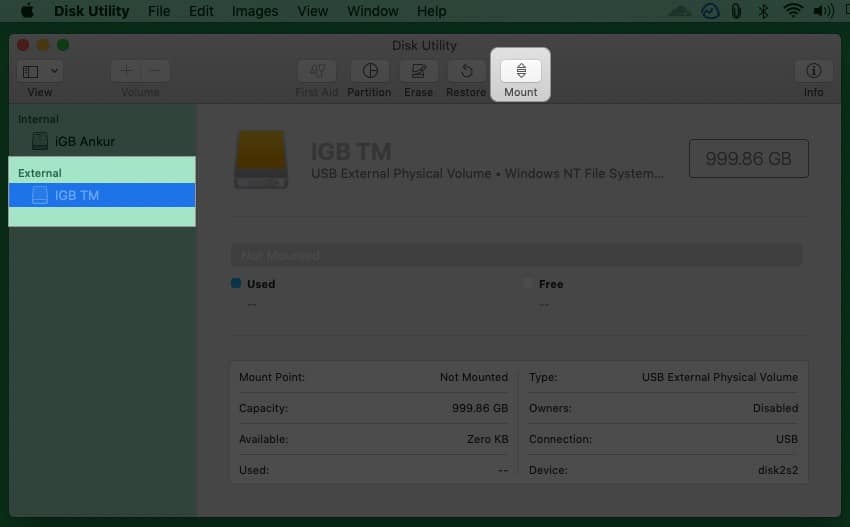
- Here, if the drive is not physically damaged, you should see it under the heading ‘External.’
- If the drive is not mounted, click to select it. Next, click Mount. You may also right-click it and choose Mount.
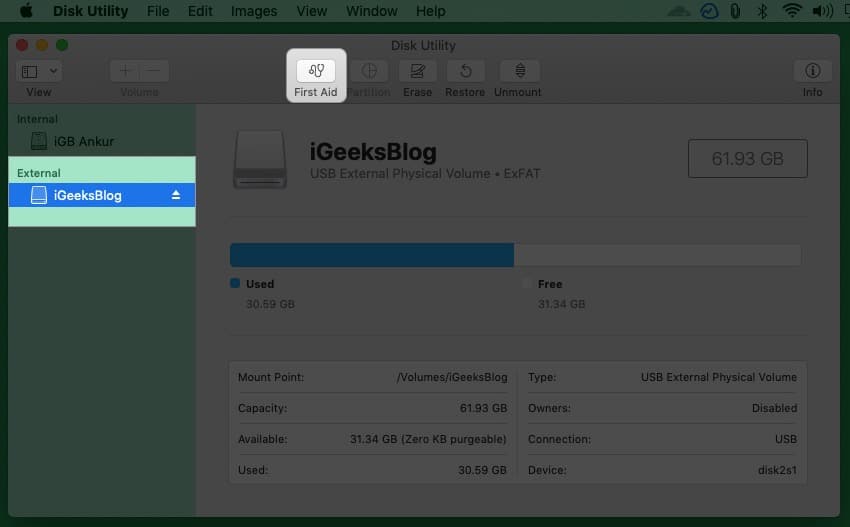
(If it is already mounted, you will see ‘Unmount.’ Do not do anything and see the next step.) - The next solution is to run First Aid, which checks for errors and performs the necessary fixes. To do this, select the drive from the left sidebar and click First Aid. Let it run, complete, and ask it to repair the found errors if prompted.
8. Change the drive format
If First Aid doesn’t solve the problem, you will have to change the drive format, which will erase everything that is on it. Before you do that, it is essential to know more about it.
| File Format | Operating System |
| HFS+ (also known as Mac OS Extended or HFS Extended) | Mac running macOS Sierra and before |
| APFS (Apple File System) | Mac running macOS High Sierra and later |
| NTFS | This is the file format used in Windows PC. macOS can read NTFS but not write to it. |
| exFAT or FAT32 | Both Windows and Mac can read and write this file format. If you have to choose between the two, in almost all cases, choose exFAT. It is newer and better than FAT32 (shown as MS-DOS (FAT) in Disk Utility). |
Looking at the above table, we can derive the following:
- If you are on a new macOS version and wish to use the external drive only with Mac, format it in APFS format.
- Next, if you also have an old Mac, you can format it in HFS+, which you can use on both new and older Macs.
- If you wish to use your external drive on both Mac and Windows, format it in exFAT (or FAT32 if you have Windows XP or earlier).
- And if you wish to use your external drive mainly with Windows PC, format it in NTFS. You can still read files on it when you connect this drive to Mac.
Thus, depending on your situation, here is how to format the external drive using Disk Utility.
Note: It will erase all data currently on it. Thus, ensure to copy it somewhere before proceeding. You may also connect the drive to a Windows PC, copy everything on the PC or other drive, and then format it using Mac to the desired file format.
How to format an external drive using Disk Utility on Mac
- Connect the drive to your Mac and open Disk Utility.
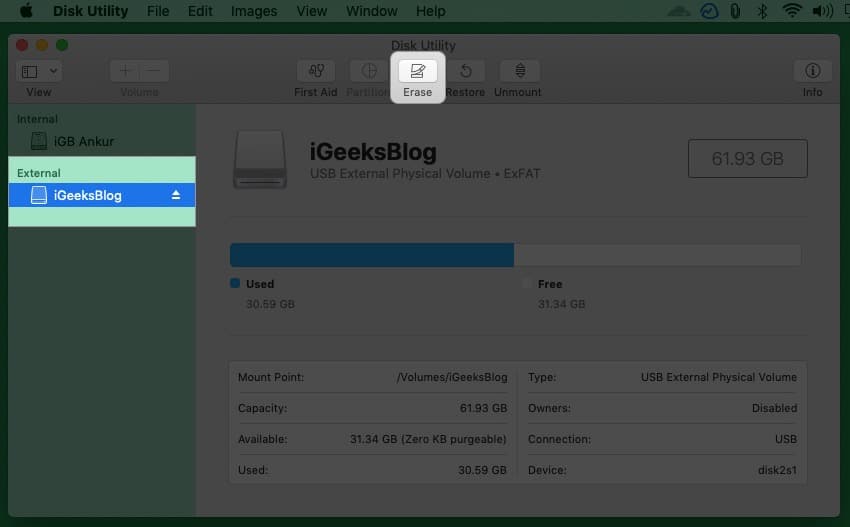
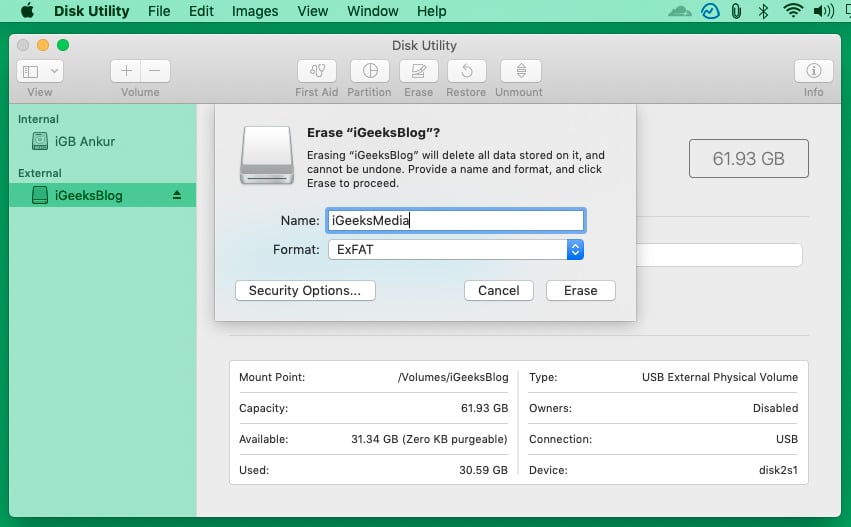
- From the left sidebar, select the external drive and click Erase.
- Give it the desired name.
- Under ‘Format:’ choose the desired option. Since I would like to use the drive with both Mac and Windows, I am choosing ExFAT.
- Click Erase and let the process complete.
Once done, you will be able to see the drive on your Mac.
9. Reset NVRAM or PRAM on Mac
Finally, is the file format correct? Are the cable, USB ports, and everything else works fine? But you still cannot see the external drive? Go ahead and reset NVRAM. If your Mac shuts down when you plug an external drive, fix it by resetting the SMC.
These are the ways to solve the problem of ‘external drive not showing on Mac.’ I hope the solutions helped, and now you can use your drive. If you have some queries, check the following section.
Got more questions or suggestions? Shoot them in the comments below!
FAQs
No. You cannot track your lost external hard drive because it doesn’t have the ability to connect to the internet or Bluetooth to show their location on the map.
Make sure to keep the Mac and the connected hard drive on a solid, stable, flat surface like a table. This will prevent unnecessary tug that disconnects them. Also, use a single cable instead of several cables to connect the drive to the Mac. Finally, get a reputed USB-C hub if you use newer MacBooks.
No. But multiple hard drives will consume more power which may affect the overall performance. If you have a competent power supply, this should not be an issue. Also, after copying large files from the hard drive to the Mac, everything might feel slow. Restart your computer to fix this.
Read next:

