Apple hit a home run with the AirPods lineup. The true wireless buds offer exceptional sound quality in a compact form factor. However, Apple recently added a new feature to Find My that warns if you leave your AirPods behind. Now, many users claim the feature to be malfunctioning and causing a major annoyance.

If you are facing this issue, scroll down to know more about it and how to fix it.
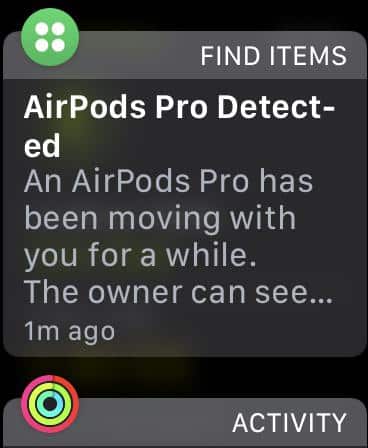
Why are you getting the ‘AirPods Pro Detected’ notification?

Ideally, the notification should pop up whenever you leave behind your AirPods to reduce misplacement and minimize risk. So the trigger is activated after moving a certain distance away from the device. However, AirPods users are getting notifications even when the device is with them due to the bug.
The notification pops up only if you don’t use AirPods for some hours. It seems like Find My is pushing the notification whenever AirPods reconnect. Don’t worry! We have a few workarounds to help you overcome the problem till Apple fixes the bug.
4 Ways to fix the ‘AirPods Detected’ issue in Find My
After experimenting with several possible fixes, we have shortlisted 4 that work. Let’s go through them one by one.
- Deactivate ‘Notify when left behind’ in Find My
- Add locations where you don’t want to be notified
- Update AirPods to the latest firmware
- Factory Reset AirPods
1. Deactivate ‘Notify when left behind’ in Find My
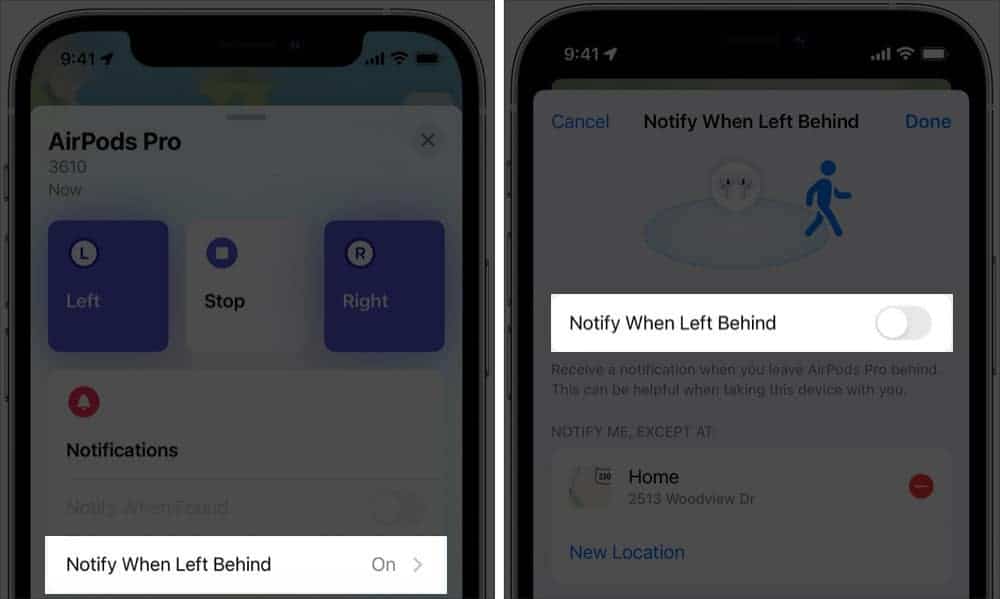
As the name suggests, Set up Notify When Left Behind warns you of leaving the device behind. Follow the steps below to change the Find My setting and stop the ”AirPod Pro Detected” notification from appearing.
- Open the Find My app on your iPhone, iPad, or Mac.
- Tap Devices.
- Select your AirPods.
- Toggle off Notify When Left Behind below Notifications.
Note: Once you turn this feature off, Find My will not warn you. Moreover, the chances of recovering lost AirPods become slim. Hence, if you don’t want to take this risk, move on to the next method.
2. Add locations where you don’t want to be notified
I feel this is a better option compared to the previous one. FindMy lets you add locations wherein you will not get AirPods detected notifications. Add locations where you spend most of your day, for instance, office or home.
Avoid adding public places to the list. Here is how to do it.
- Open the Find My app on your iPhone, iPad, or Mac.
- Tap Devices.
- Select your AirPods.
Below Notify When Left Behind option, you will get Notify Me, Except AT: - Tap New Location and add your home and office location.
Find My lets you restrict notification in multiple locations.
Note: Tap the red minus icon next to the location to remove it from the exceptions.
3. Update AirPods to the latest firmware
Consider updating your AirPods Pro to 4C165. Apple released the firmware in December with bug fixes and other improvements. Unfortunately, you don’t get a feature to force update AirPods.
Some users claim that the issue is fixed on the latest firmware. Follow the guide to update AirPods firmware.
4. Factory Reset AirPods
Still facing the “AirPods Detected” issue? The last option is to reset AirPods and see if it does any good. Follow the steps in this article to reset AirPods 1, 2, 3, and AirPods Pro. Before resetting, you have to unpair the device from iPhone/iPad. This should help fix minor software issues. Now, set up your AirPods as a new device.
That’s it!
I hope this guide helped you fix the ‘AirPods detected’ notification issue. If you were still unable to fix it, contact Apple Support as a last resort. They should help you out.
Do you have any other queries or issues regarding your Apple products? Share them in the comments below. I will try my best to answer your queries.
Read more:


