Do you know that even if you use the strongest password, you’re still prone to data leaks and cyber-attacks? That’s why Apple introduced passkeys—a safer and more convenient way to sign in to apps and websites without using traditional passwords. In this guide, I’ll share what a passkey is, its functionality, and how to set up and use Apple passkeys for secure sign-ins on your iPhone, iPad, and Mac. So, let’s get started.
What are Apple passkeys?
Apple’s passkeys are a new password-less authentication method for signing in to supported apps and websites. Instead of remembering and typing passwords, passkeys let you use your device’s security features, like Face ID and Touch ID, to log in securely and easily.
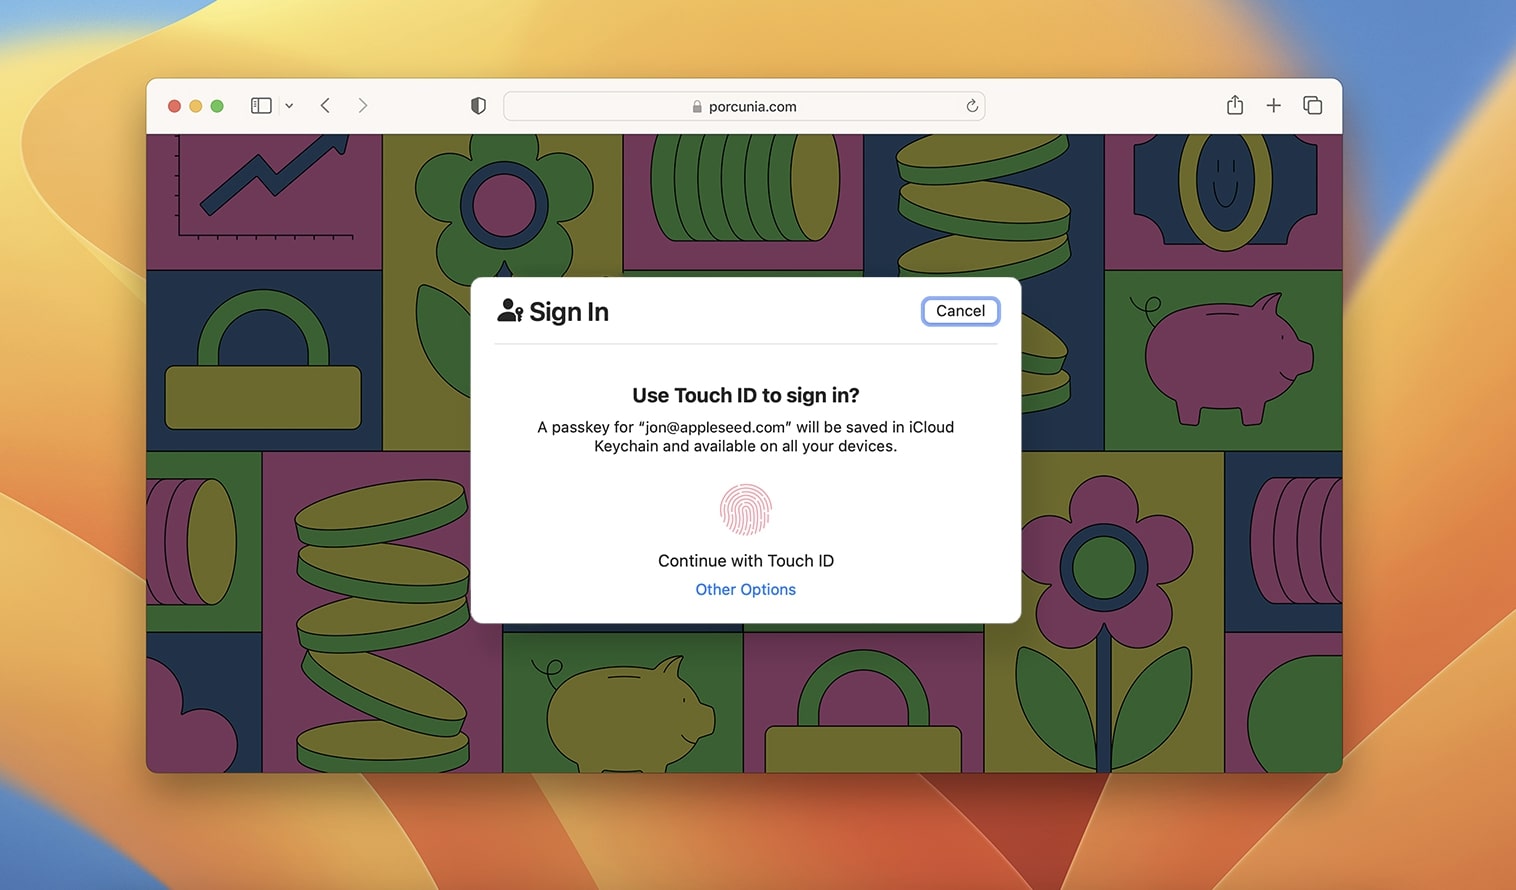
When you log in, the app or website prompts you to authenticate your biometrics to confirm your identity. This process ensures that only you can access your account, even if someone else knows your username. We will discuss how passkey security works later in this post.
Additionally, your passkeys are end-to-end encrypted using your iCloud Keychain. Thus, Apple also can’t access them. Moreover, passkeys are synced across your Apple devices so you can log into your accounts from anywhere. You can use it with non-Apple devices within proximity as well.
If you are still not sure, let me share a few security advantages of passkeys over traditional passwords:
- Phishing protection: Since the private key never leaves your device and isn’t shared, attackers can’t trick you into giving it away.
- No passwords to remember: You don’t need to create or remember complex passwords. So, it reduces the risk of using weak or reused passwords.
- Resistant to data breaches: Even if a website is hacked, your private key remains safe on your device, keeping your account secure.
By replacing passwords with passkeys, Apple makes signing in more secure and user-friendly across your iPhone, iPad, and Mac. Now, let’s see where you can use this feature!
Compatibility and requirements to use passkey
To utilize passkeys, ensure your devices meet the following criteria:
- Your iPhone, iPad, or Mac is running the latest software versions.
- iCloud Keychain must be enabled to store and sync passkeys across your devices.
- Set up two-factor authentication for your Apple ID.
- The app or website should support the FIDO Standard. For example, browsers such as Safari and Google and apps and websites like Best Buy, eBay, Kayak, GoDaddy, CardPointers, Carnival, Dashlane, Nvidia.com, PayPal, etc.
How to set up Apple passkeys
You can set up passkeys when you first access a compatible app or website. You’ll initially be prompted to register or create an account.
- Tap the Register or Sign Up button. Enter your credentials, possibly an email account, your Apple ID, or a username.
- A prompt will appear asking you to authenticate with your Face ID or Touch ID.
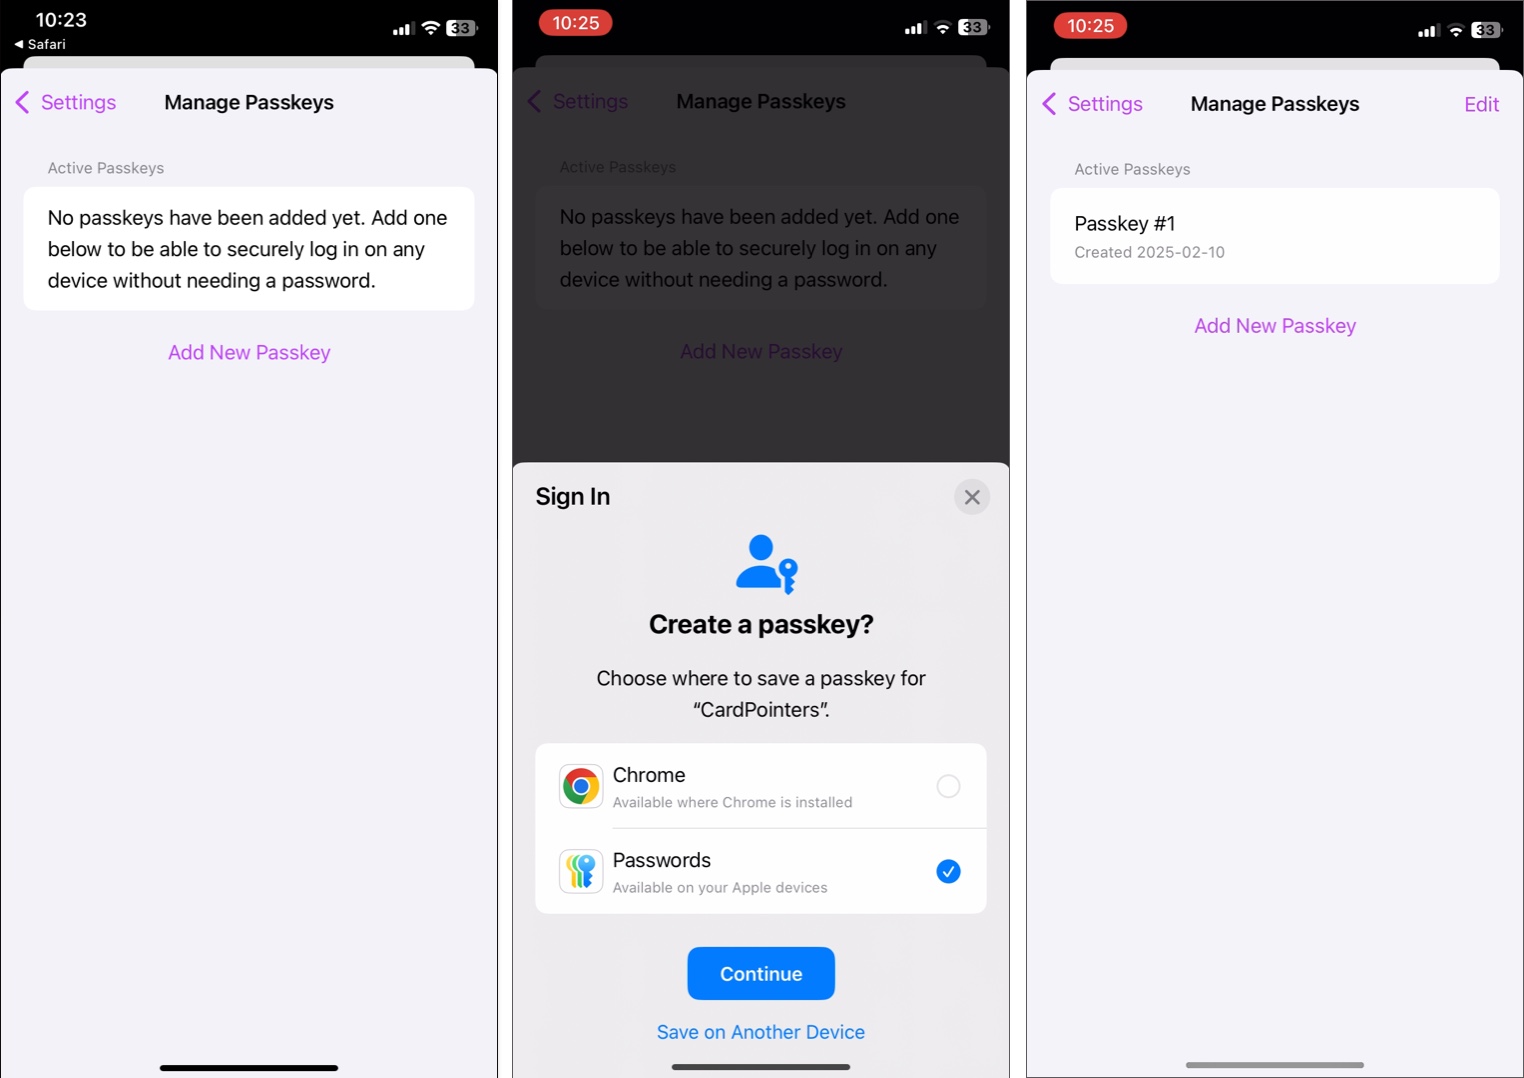
- Tap Continue to proceed. Your passkey is created and saved on your iCloud Keychain and Passwords app.
These are the general steps. The process may differ based on the app, website, or browser you use. But most of the time, whenever you enter credentials in a supported app or website, your iPhone or iPad will ask you to generate the passkey. If you don’t see any prompts, the app or website may not support this security feature yet.
If you already have an account on that app or website, fret not; you can generate passkeys for them. You may log into your account using your current credentials. Then, go to the account settings or security section and look for the Passkey option. Here, your device will prompt you to select a password manager app and authenticate your biometrics.
Below, I have shown the steps for creating passkeys in the CardPointers app.
How to use Apple passkeys to log in to apps and websites
Once you’ve created and saved a passkey, logging in becomes straightforward. Simply, navigate to the login page of the website or app and tap the account name field. Now, you will see a suggestion with your account name linked to the passkey will appear.
Tap the suggested account and authenticate using Face ID, Touch ID, or your device passcode. The Passkey stored on your device will automatically complete the sign-in process.
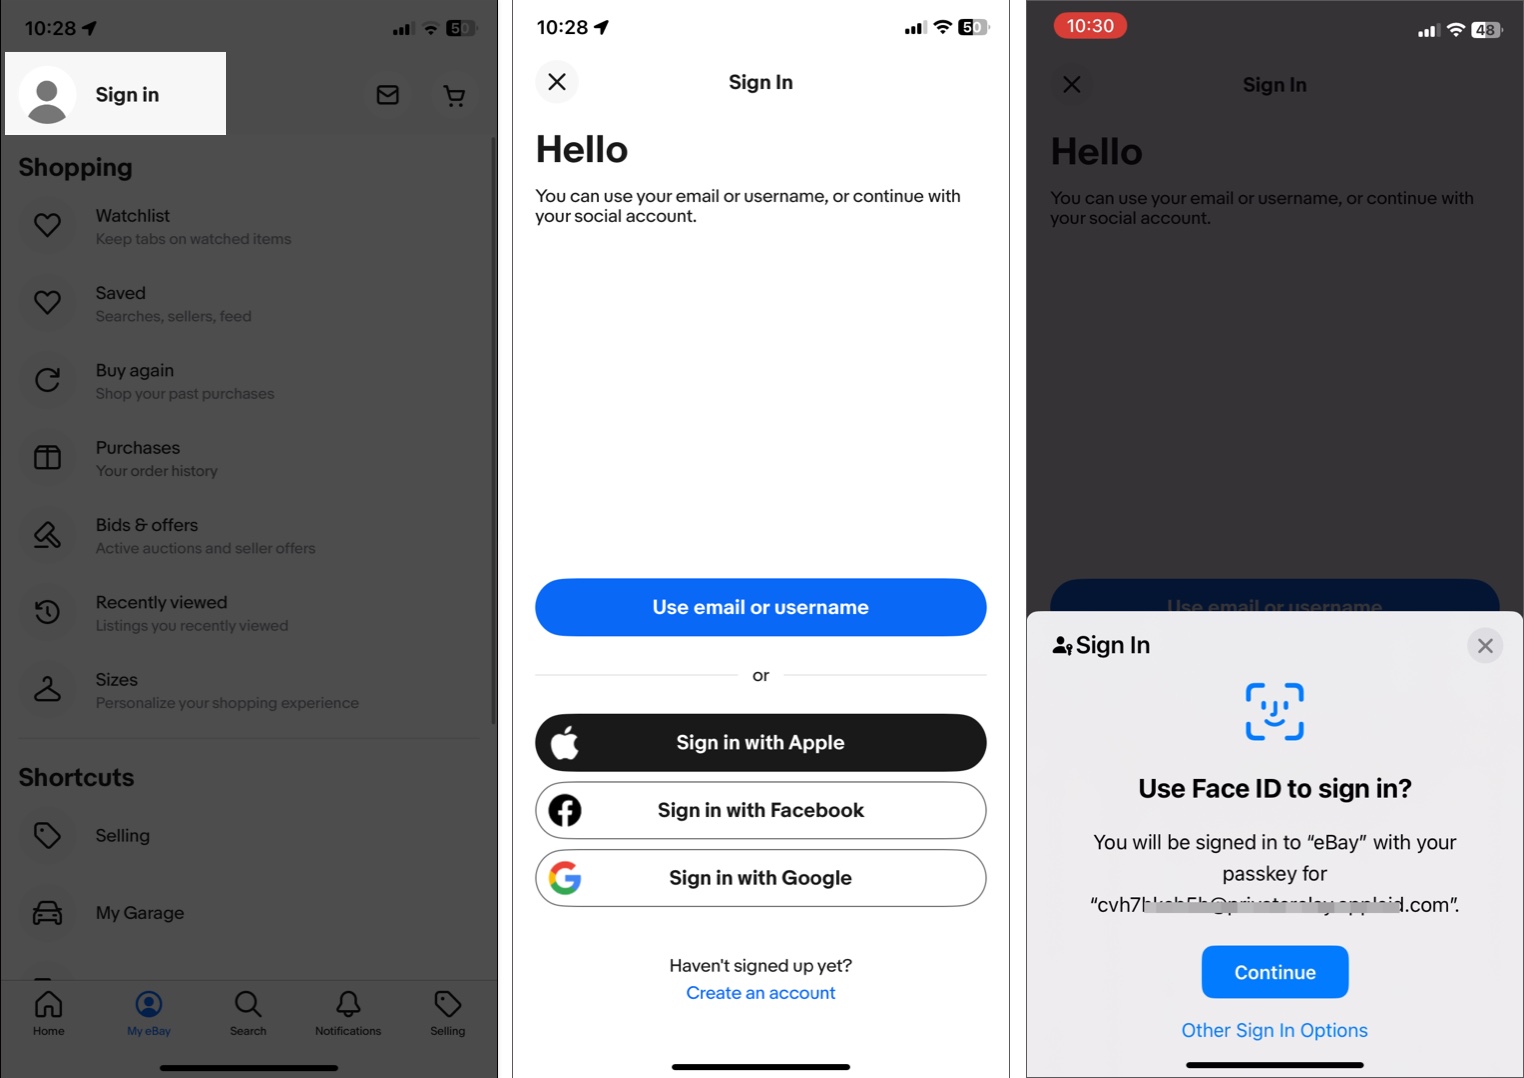
Here, I am using the eBay app to show you the process. I already had created a passkey for this app. So, first I opened the eBay app, moved to the My eBay tab, and selected Sign in at the top. Now, on the login page, my iPhone prompted me to use Face ID to sign in. I tapped Continue and authenticated it.
If you don’t have your iPhone or iPad nearby, you can complete the sign-in using any non-Apple device. Let’s see how!
Use passkeys on a non-Apple device
You no longer have to worry about accessing your accounts on non-Apple devices, which is a hassle for many users. Neither do you need to export your iCloud Keychain passwords elsewhere because Apple passkeys promise a convenient cross-platform experience?
Many platforms, including Google and Windows, have also implemented the FIDO Standard. That being said, you can sign in on a device other than your own or a non-Apple device.
The catch with Apple passkeys is that you’d need your Apple device to use the feature. So, while you can log in using a non-Apple device, your Apple device must be nearby simply because the process will require a Bluetooth connection.
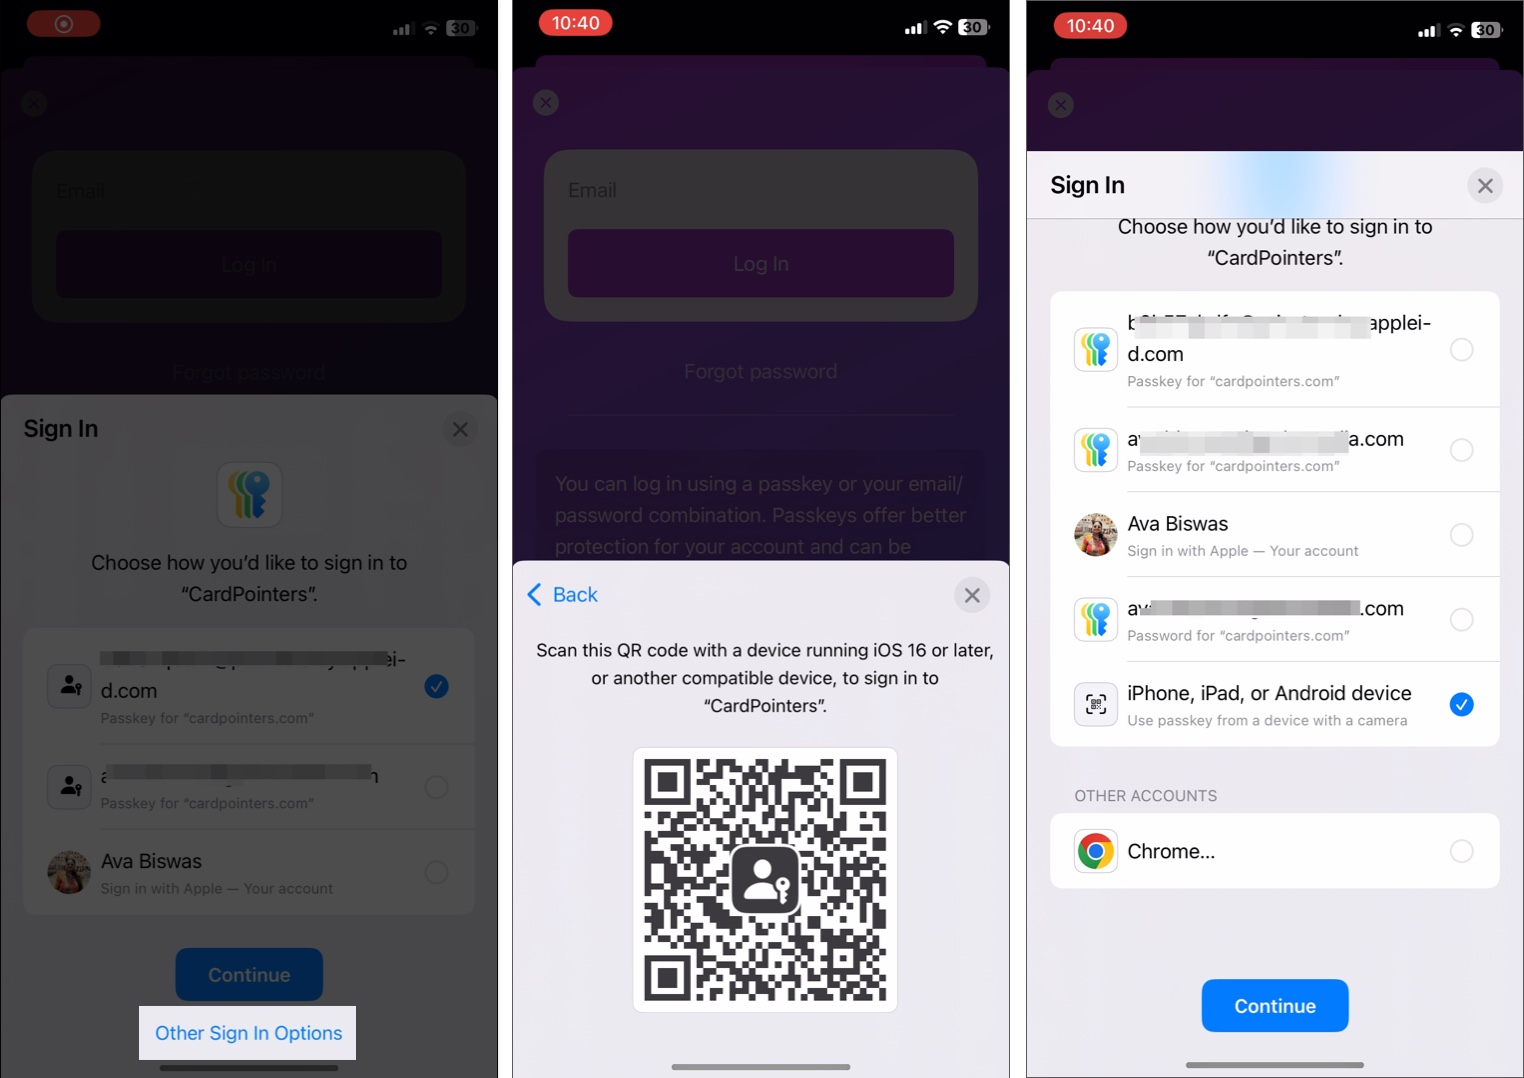
To use passkeys on a non-Apple device:
- Log in to the website or app.
- Just select Other Sign-In Options, then generate a QR code.
- Scan this QR code using your device and authenticate using your Face ID or Touch ID.
Notably, sending a photo of the QR code and scanning it with your Apple device while you’re far away won’t work. Plus, if you’re using another Apple device that isn’t yours, you have the option to share the passkey via AirDrop.
The security behind Apple Passkeys
Apple devices are generally well-protected. However, you can still fall victim to social engineering attacks and phishing scams. Hackers can also directly breach websites and access all the passwords stored on their servers.
Apple passkeys incorporate the Web Authentication API (WebAuthn) for a much more robust security measure. The authentication relies on a person’s biometrics to authorize using a “key” stored in the user’s device to access a website or app.
This process eliminates the need for one-time passwords (OTPs) sent via SMS, which skilled hackers can easily spoof. According to Apple’s passkeys support page, whenever you register an account, your device generates a unique cryptographic key pair that will be associated with every account you register on that site or app.
This key pair consists of a public key stored on the server and a private key stored in the person’s device—in the case of Apple devices, in the iCloud Keychain, not visible to the user. Using WebAuthn, the user needs to prove to the server that they have the private key.
They need to use their Touch ID or Face ID to authorize the use of the passkey stored in their device. If the private key matches the public key stored in the server, the user is permitted to access the system. Phishing attacks are impossible in WebAuthn because your device will verify the site’s public key and cannot be tricked into sharing your passkey on a fake website.
Data leaks are also impossible because the server does not hold the person’s password. This is in contrast to traditional security measures, where the server has both your username and password and gives you access to the system when you show it the same key (i.e., enter the password).
How to recover your Apple passkey if you lose your device
As mentioned, the catch with using Apple passkeys is that you need your Apple device to authenticate access to websites and apps. But what happens when you lose your device?
If you lose one of your devices, you can still access it through your remaining devices since your passkeys are synced across your Apple devices.
However, suppose you lose all your associated devices. In that case, you can still recover your passkeys using iCloud keychain escrow, a secure infrastructure that prevents unauthorized users, even Apple itself, from brute-force attacks.
You’ll need your iCloud account, password, and elected phone number, to which Apple will send an SMS. Then, you’ll need to enter your iCloud security code and authenticate using your device passcode.
Note that you only have a maximum of 10 attempts to authenticate and retrieve your escrow record. After the failed attempt, your escrow record and the Keychain will be destroyed and lost forever.
You may also set up an account recovery contact to ensure that you can always access your account even when you forget your device passcode and Apple ID password.
Signing off
Though using passkeys seems daunting on pen and paper, it’s as easy as using your Touch ID or Apple ID to log in to a website or app. Once set up, you no longer have to remember complex passwords or deal with security breaches. As more websites and apps adopt this technology, passkeys will become the new standard for online authentication.
What do you think of passkeys? Share your thoughts below!
Read more:

