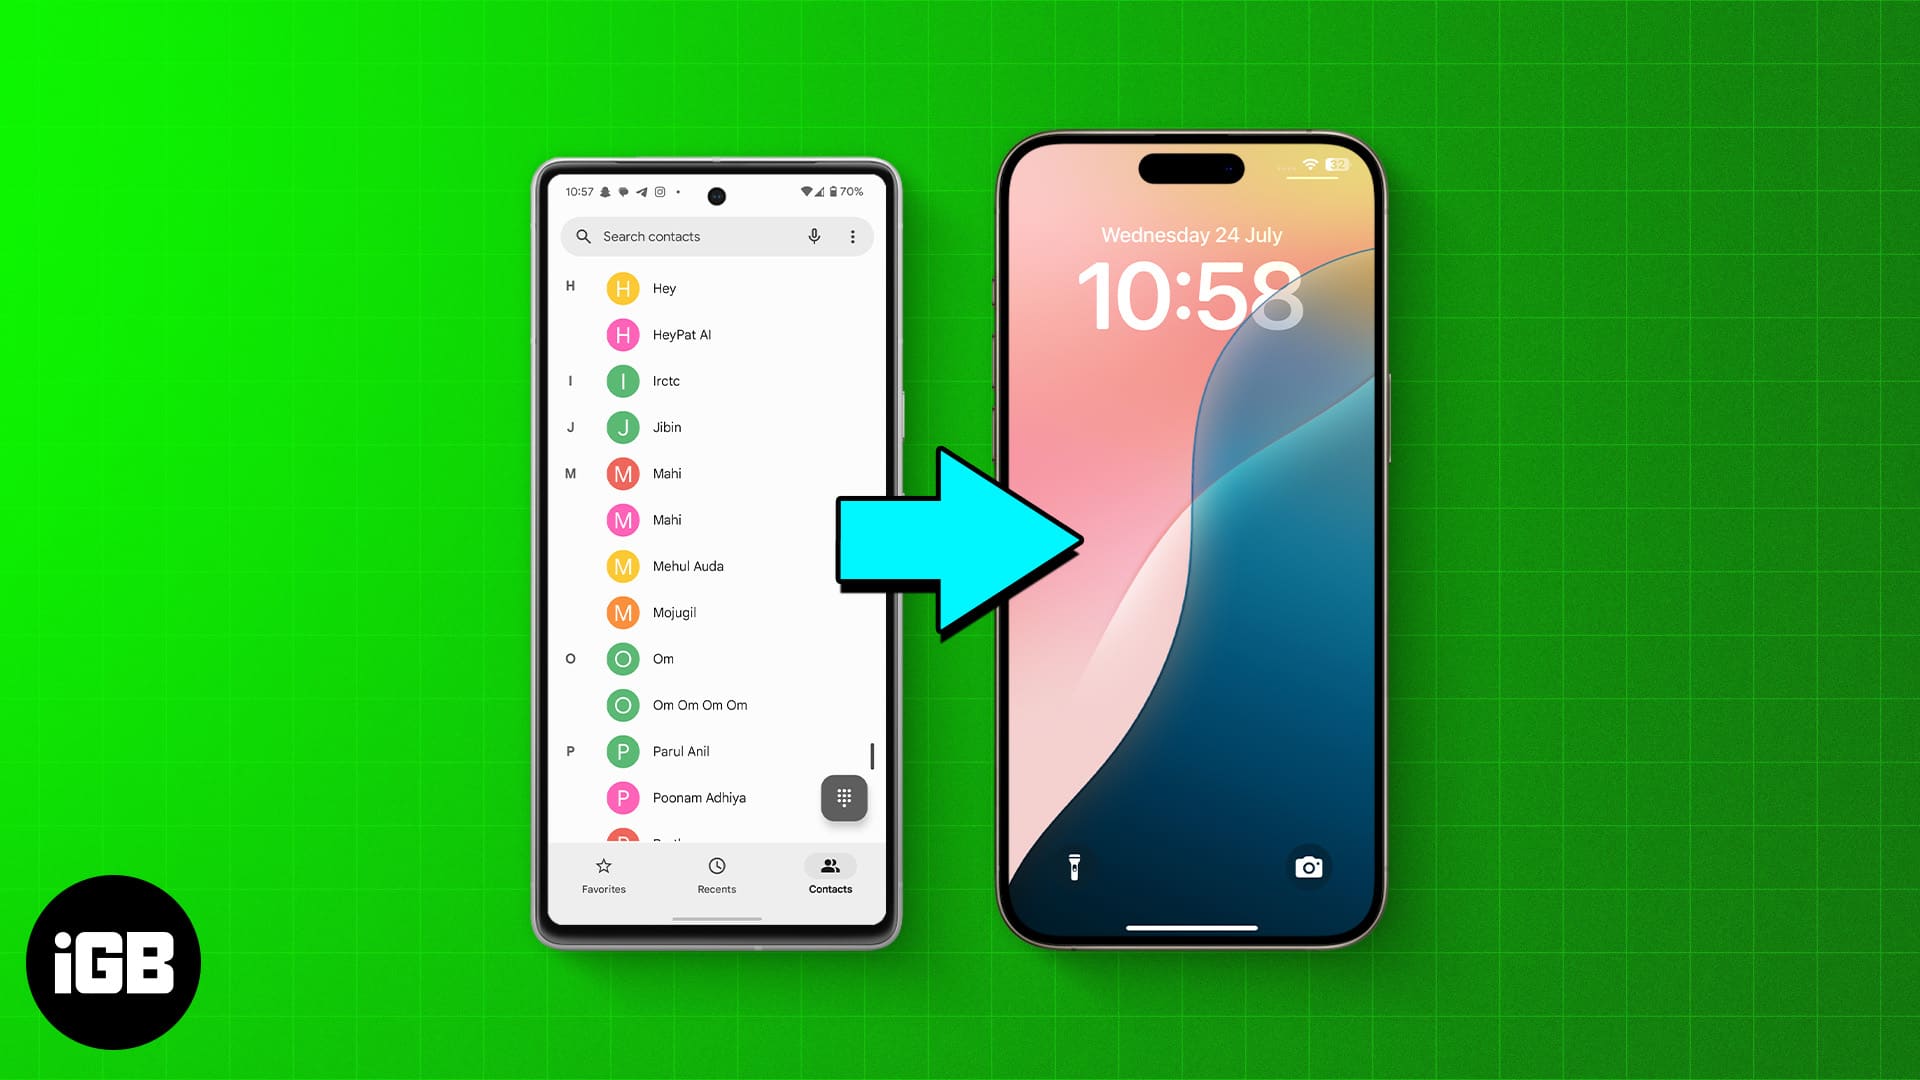
Switching from an Android to an iPhone is exciting, but transferring all your important contacts may seem intimidating. In this article, we’ll check out some easy and effective ways of transferring contacts from Android to iPhone. Whether you’re setting up your iPhone for the first time or have been using it for a while, we’ve got you covered.
5 methods to transfer contacts from Android to iPhone
Switching from an Android to an iPhone has become much easier over the years. Here are five effective methods to transfer your contacts seamlessly.
1. Transfer contacts using Move to iOS
Apple’s Move to iOS app is one of the easiest ways to transfer contacts from Android to a new iPhone. The app is designed specifically for moving data, such as transferring your messages, media, web bookmarks, mail accounts, etc., from Android to iOS during the setup process. Here’s how to use it:
- On the iPhone you’re setting up, tap Set Up Without Another Device.
- Follow the instructions until you see Transfer Your Apps & Data screen.
- Here, select the From Android option, and you’ll see a Move from Android screen.
- Tap the Continue button. You’ll now see a six or ten digit code on the screen.
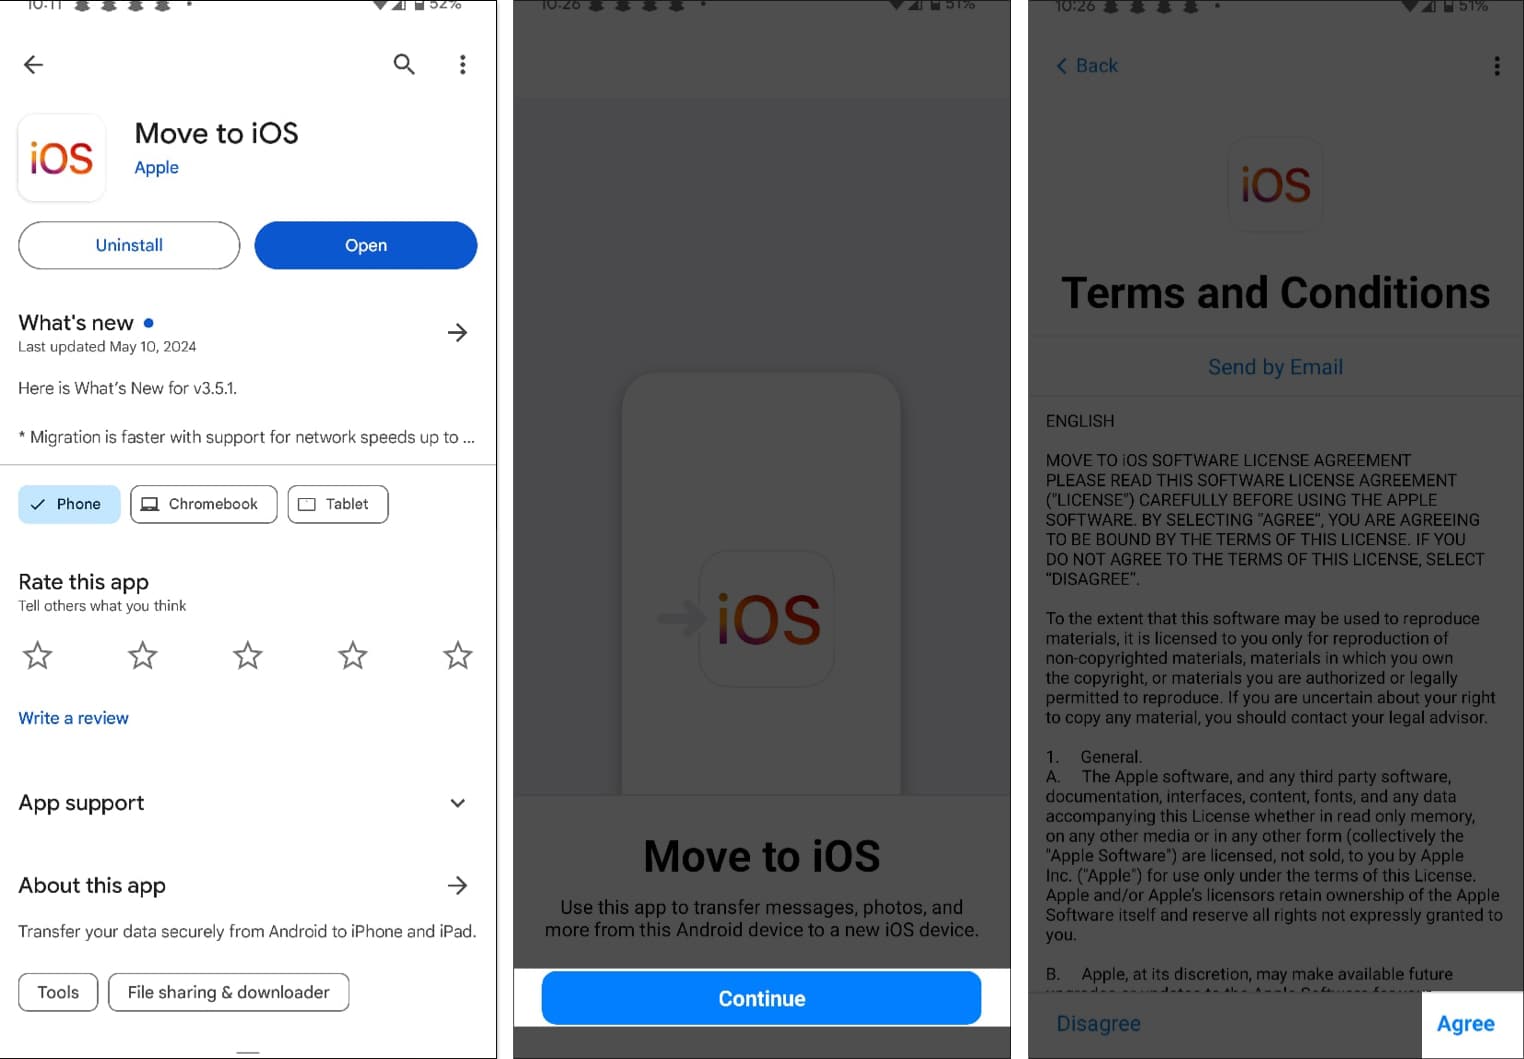
- Now, head to your Android phone and download the Move to iOS app from Google Play Store.
- Hit Agree to agree to Apple’s privacy policy.
- Similarly, hit Agree to accept the app’s Terms and Conditions.
- When asked whether you want to send app usage to Apple, tap Don’t Send to deny. Alternatively, tap Automatically Send if you’re fine sharing your app usage data with Apple.
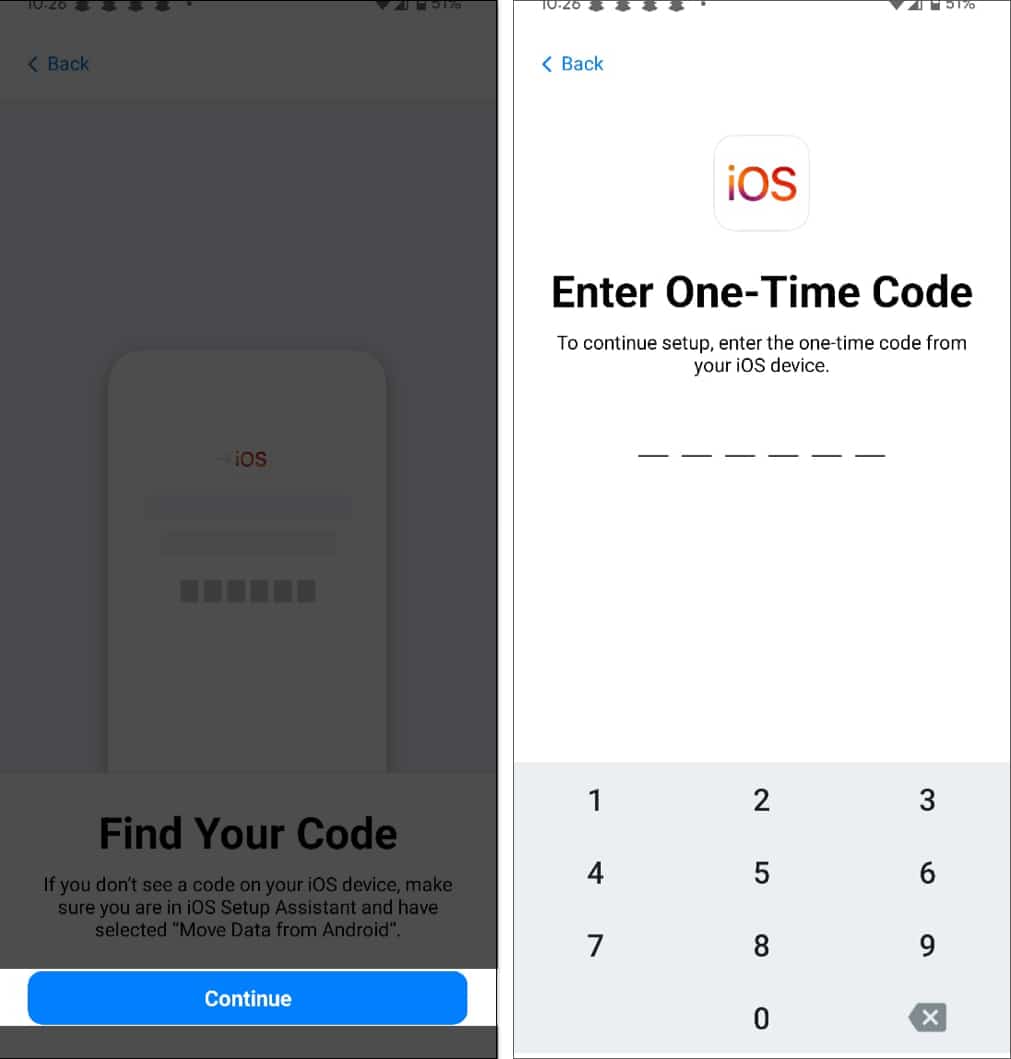
- Hit Continue on the Find Your Code screen.
- Now, enter the single-use code from from your iPhone on the Move to iOS app on your Android phone.
- A temporary Wi-Fi network will be established by your iOS device. Connect your Android device to that network when prompted.
- Select the data from the Transfer Data screen which you want to transfer to your iPhone and tap on Continue.
- Wait for a while as the process gets finished on both devices. Tap on Continue to proceed setting up your iPhone.
As mentioned already, this method only works on the iPhone you’re setting up for the first time or resetting. If you’ve already set up your iPhone, use the following methods.
2. Transfer contacts from Android to iPhone using Google sync
Many Android phones have Google Contacts as the default contacts app. As such, you can quickly access your contacts from any device by logging into your Google account.
However, if your Android doesn’t back up your contacts by default, you can easily enable Google sync like this:
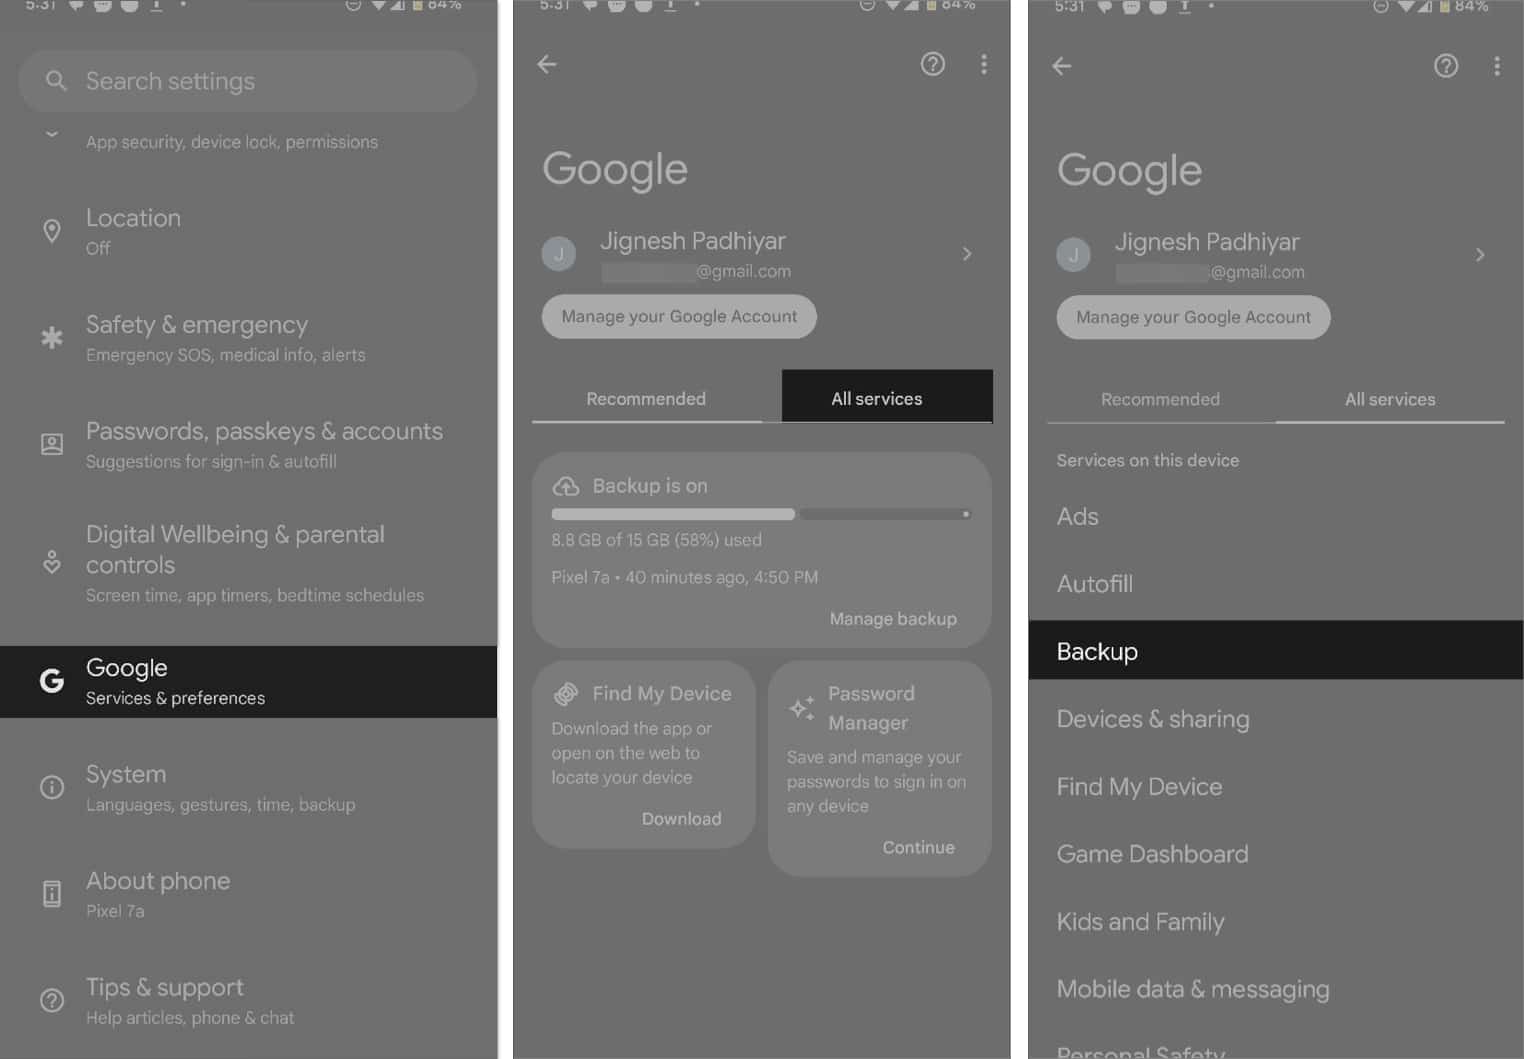
- Open Settings on your device.
- Scroll down and select Google.
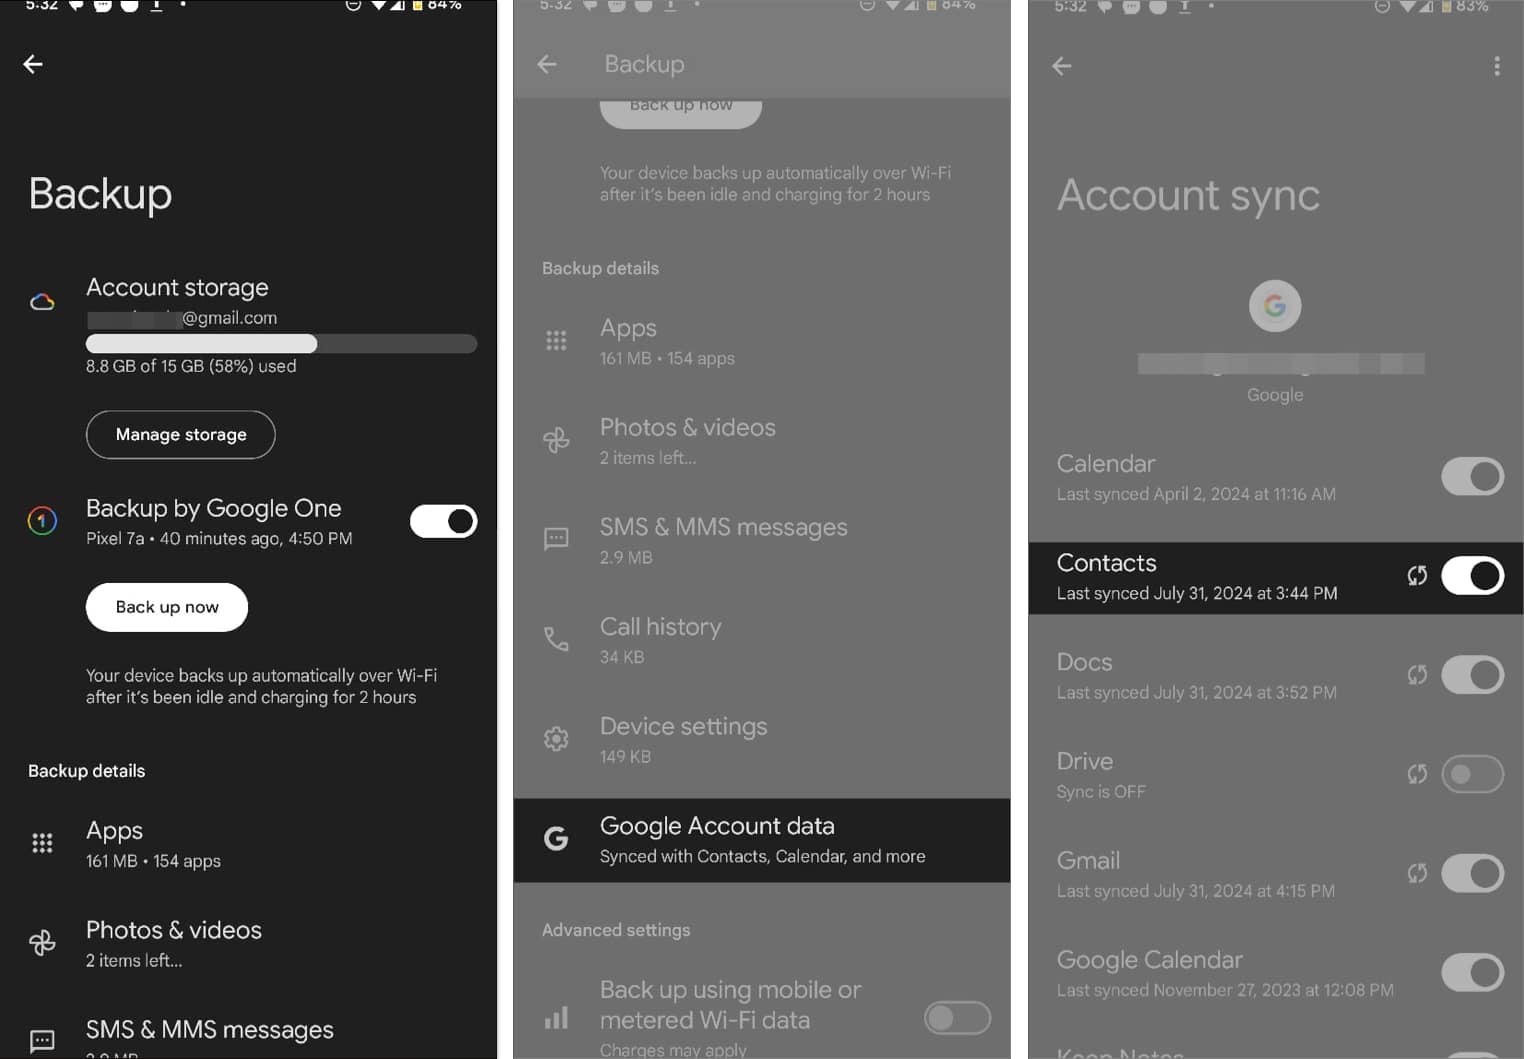
- Here, you can see the Google account logged in to your device. Move to the All Services tab and tap on Backup.
- If your device isn’t backed up yet, follow the on-screen instructions to back it up first.
- Scroll down and select Google Account Data.
- Toggle on Contacts.
You can also ensure your contacts are synced with your Google account from the Contacts app. Here’s how:
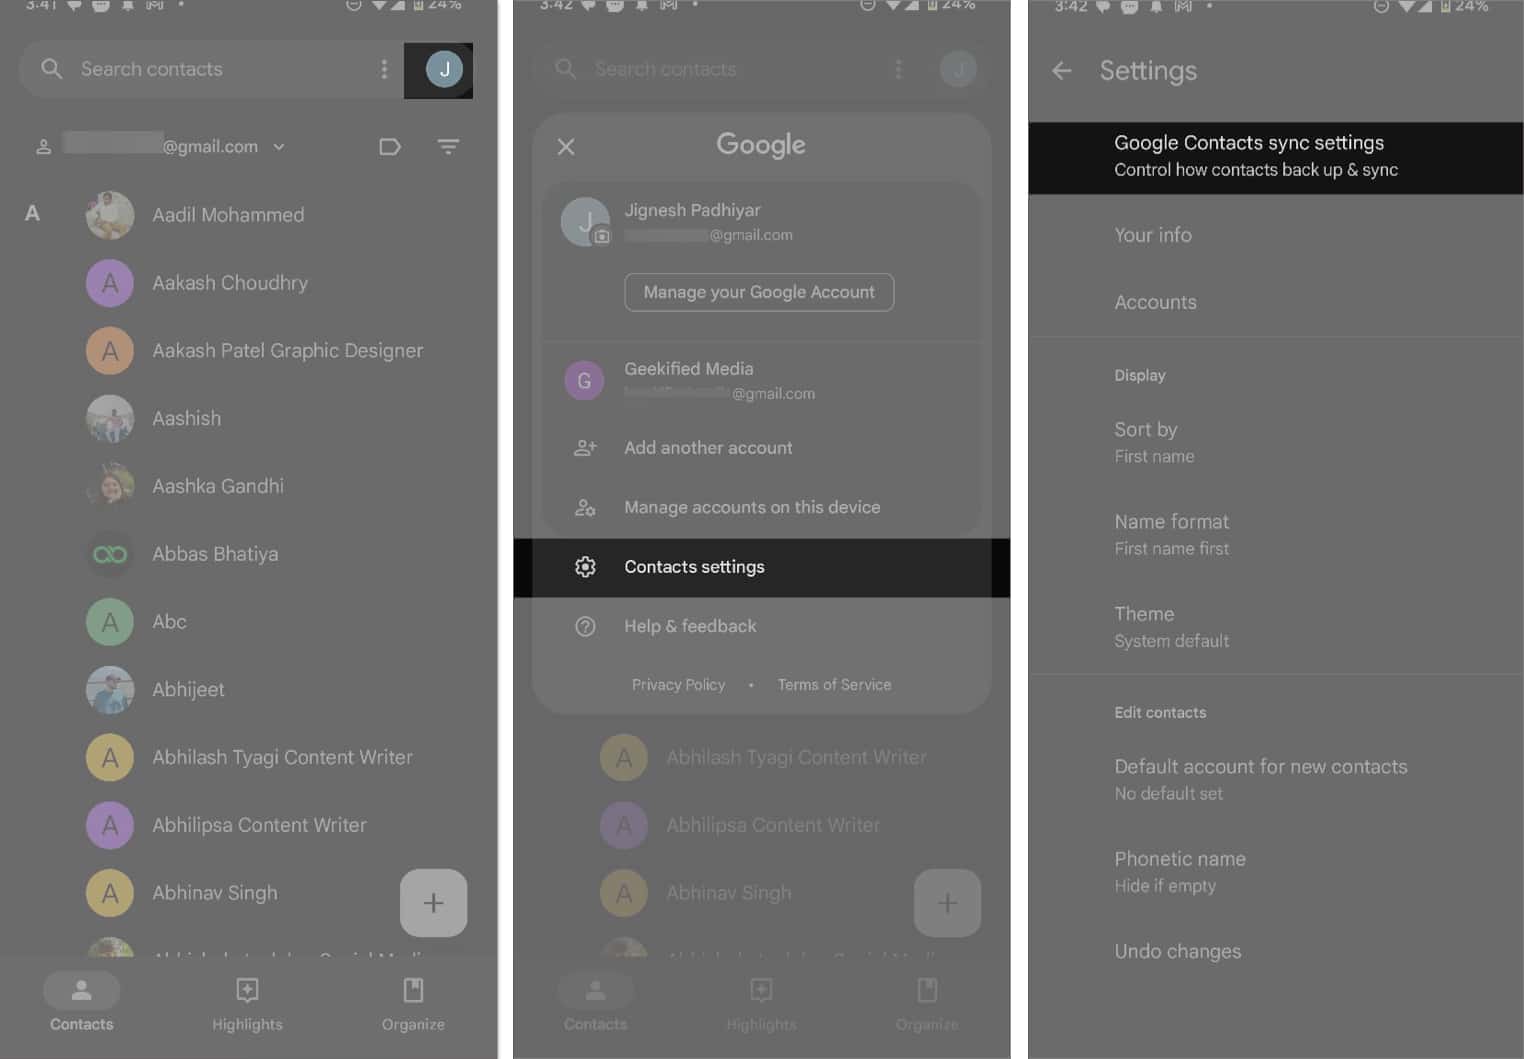
- Launch the Contacts app in your Android phone.
- Select your profile picture in the top-right corner.
- Now, tap on Contacts Settings and select the Google Contacts Sync Settings option.
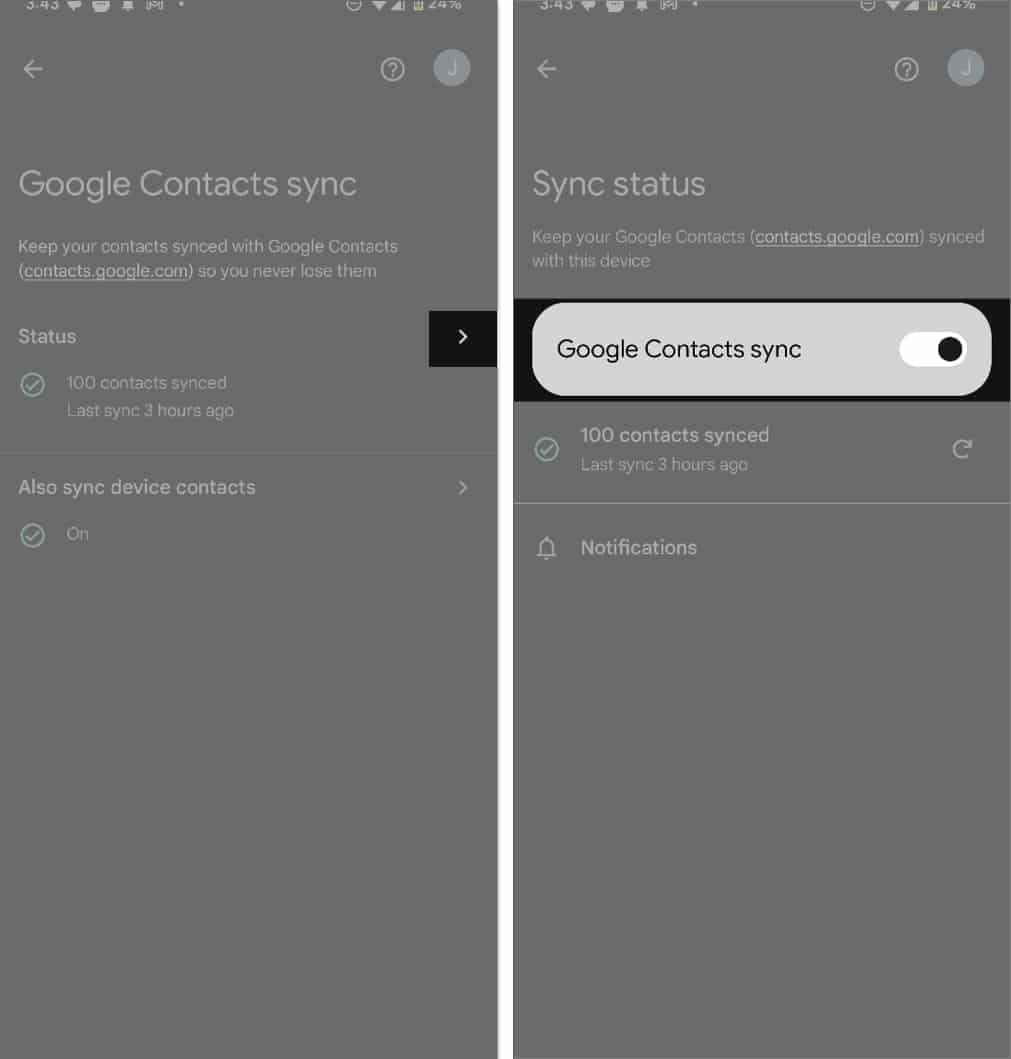
- Next, tap the arrow beside Status and check if Google Contacts sync is enabled.
If you have additional contacts saved on your device’s local storage, you must sync them to your Google account. Here’s how:
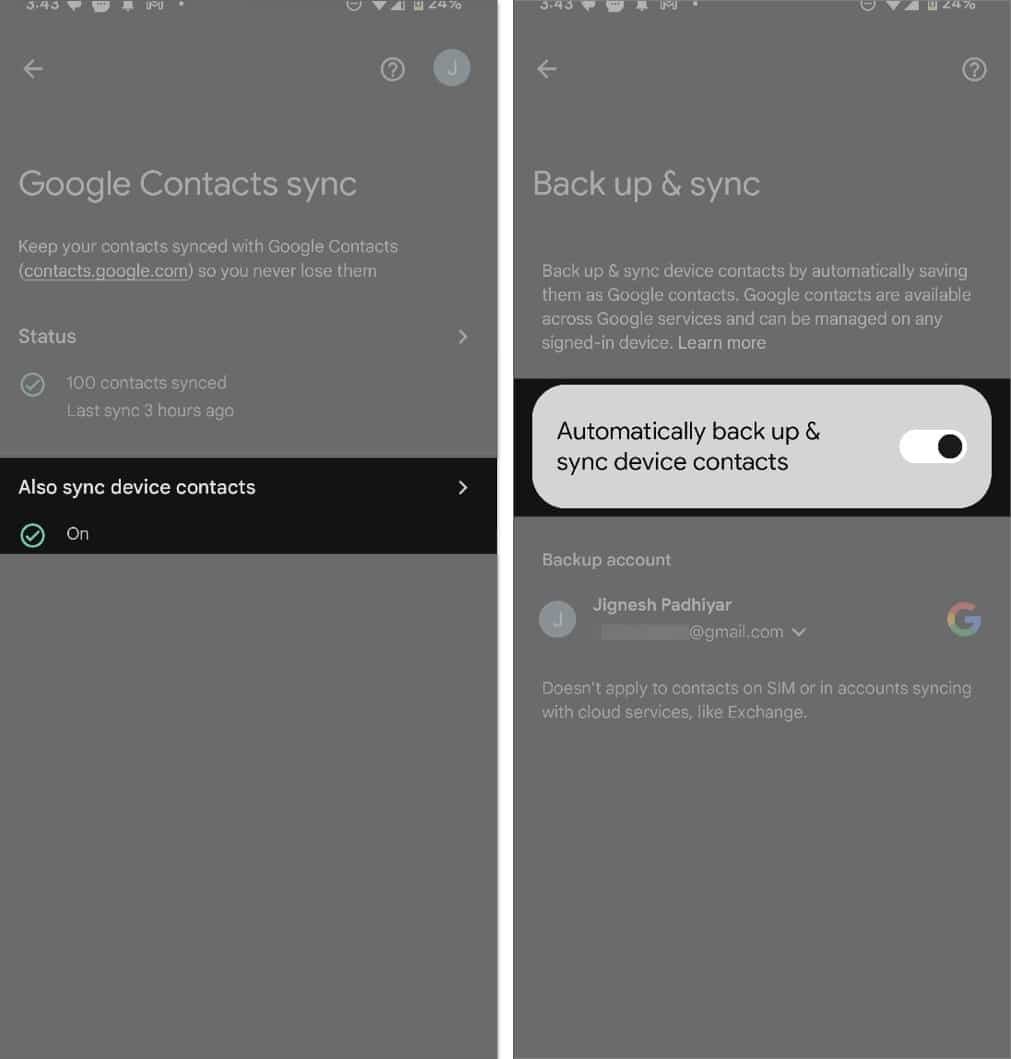
- Tap the Also Sync Device Contacts option on the Google Contacts Sync page.
- Now, toggle on Automatically Back Up & Sync Device Contacts.
However, note that this won’t back up contacts saved on your SIM card and synced with other cloud services.
With your contacts synced, let’s see how to transfer and access them on your iPhone.
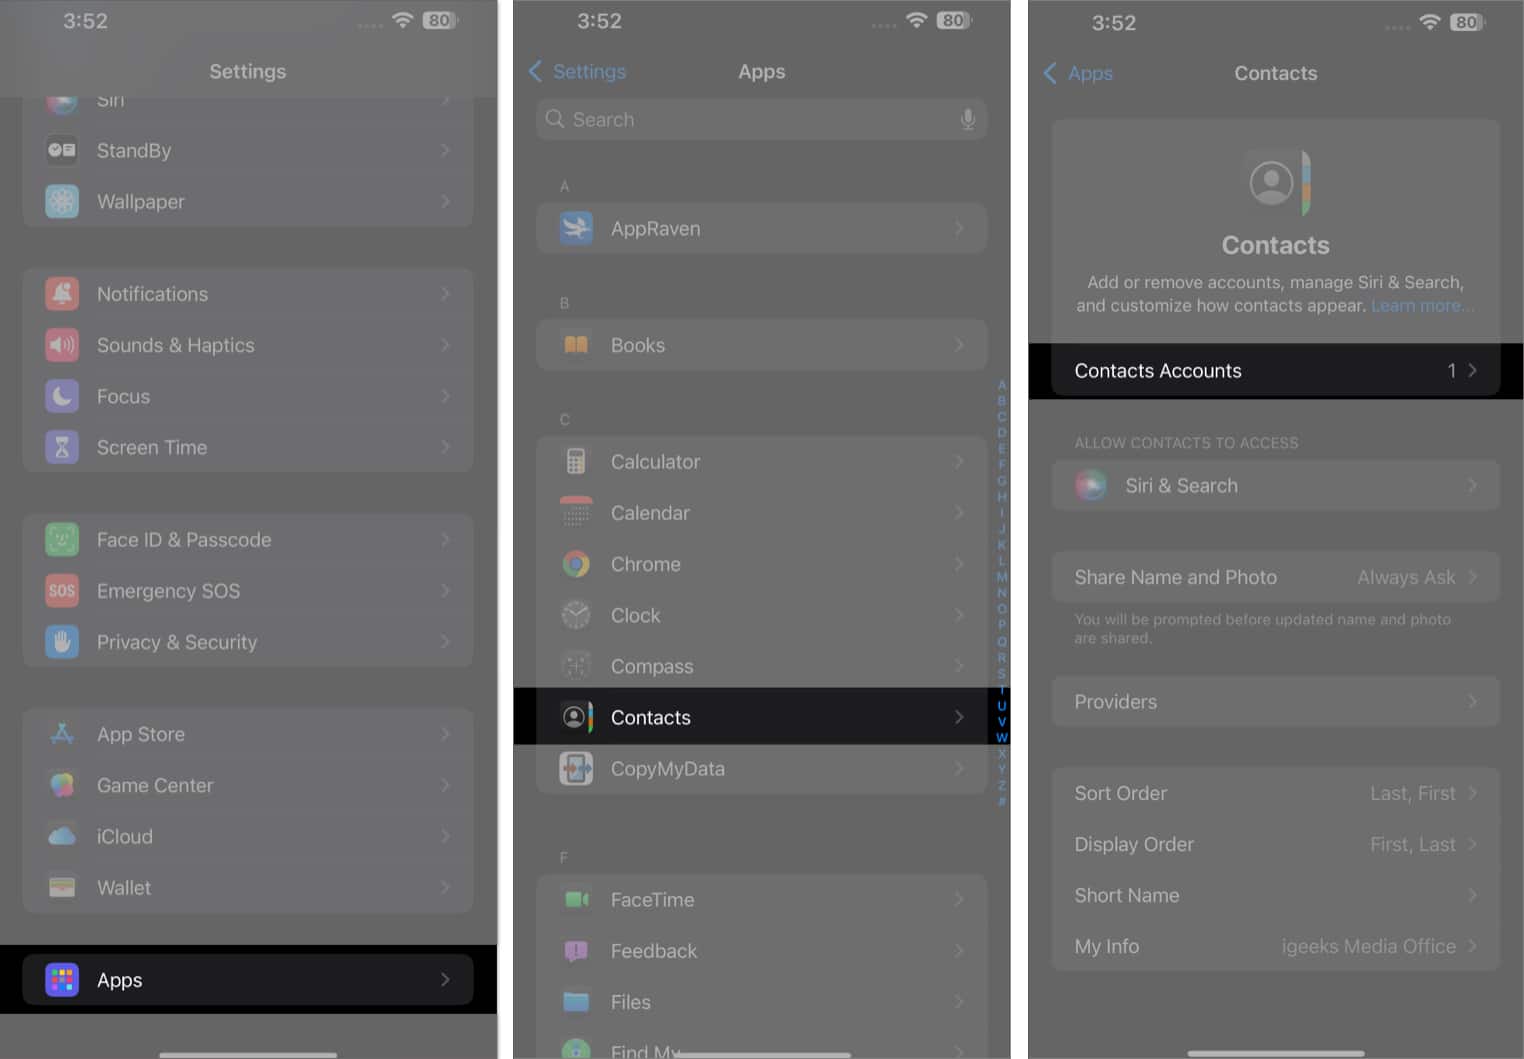
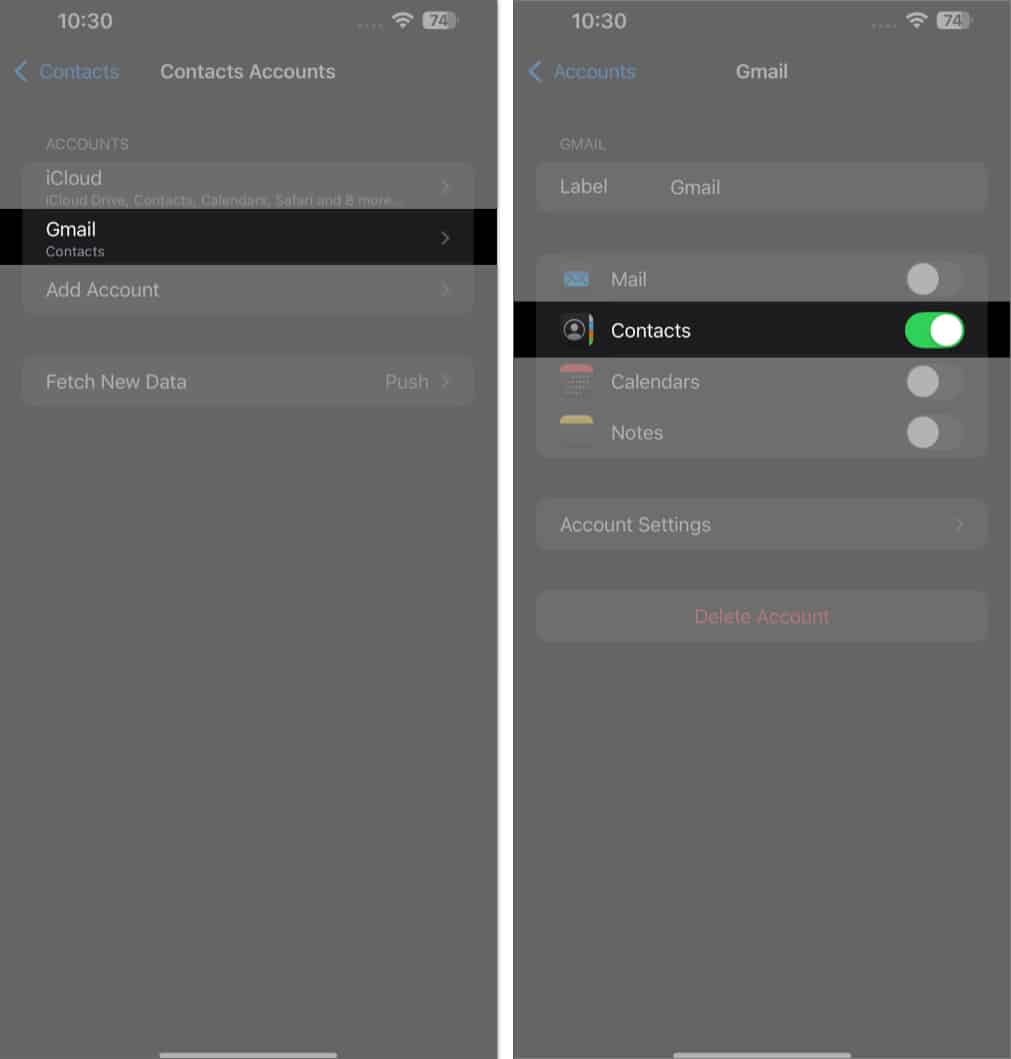
- Go to the Settings app on your iPhone.
- Tap Apps at the bottom and select Contacts.
- Here, tap on Contacts Accounts.
- Select your Gmail account if you logged in already. Else, tap on Add Account, select Google, and log in using your credentials.
- Toggle on Contacts.
Wait for a few seconds, and it should start fetching the contacts saved on your Google account. Head to the Contacts app to see the added contacts.
3. Transfer contacts from your SIM card and eSIM
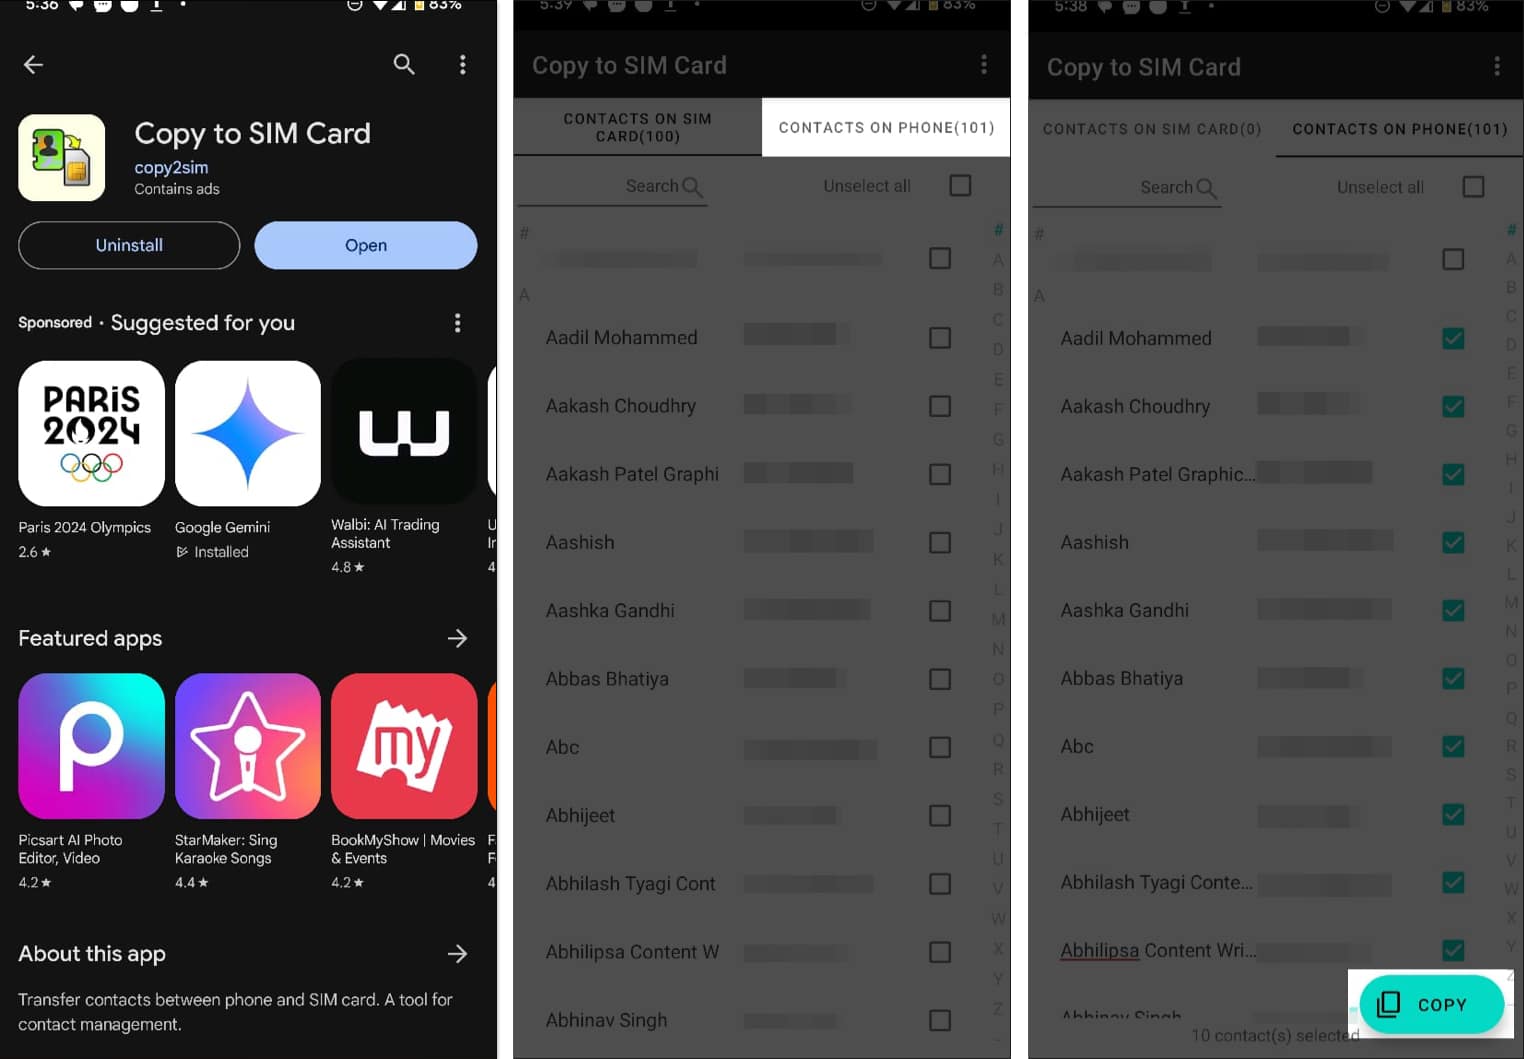
You can also transfer contacts using your physical SIM card, though this method requires a bit more effort. Most modern smartphones don’t allow you to export contacts to a SIM card via the Google Contacts app. However, you may use third-party apps such as Copy to SIM Card to store the contacts on the SIM.
- Download Copy to SIM Card app on your Android phone from the Play Store.
- Open the app.
- Move to the Contacts on Phone tab.
- Select the contacts you want to export and hit the Copy button at the bottom.
- Alternatively, tap the three-dot button in the top-right corner and select Copy All to SIM to copy all contacts in one go.
Now, wait for your contacts to be saved on your SIM card.
Once done, insert the SIM card on your iPhone and follow the steps below to import the contacts to your iPhone:
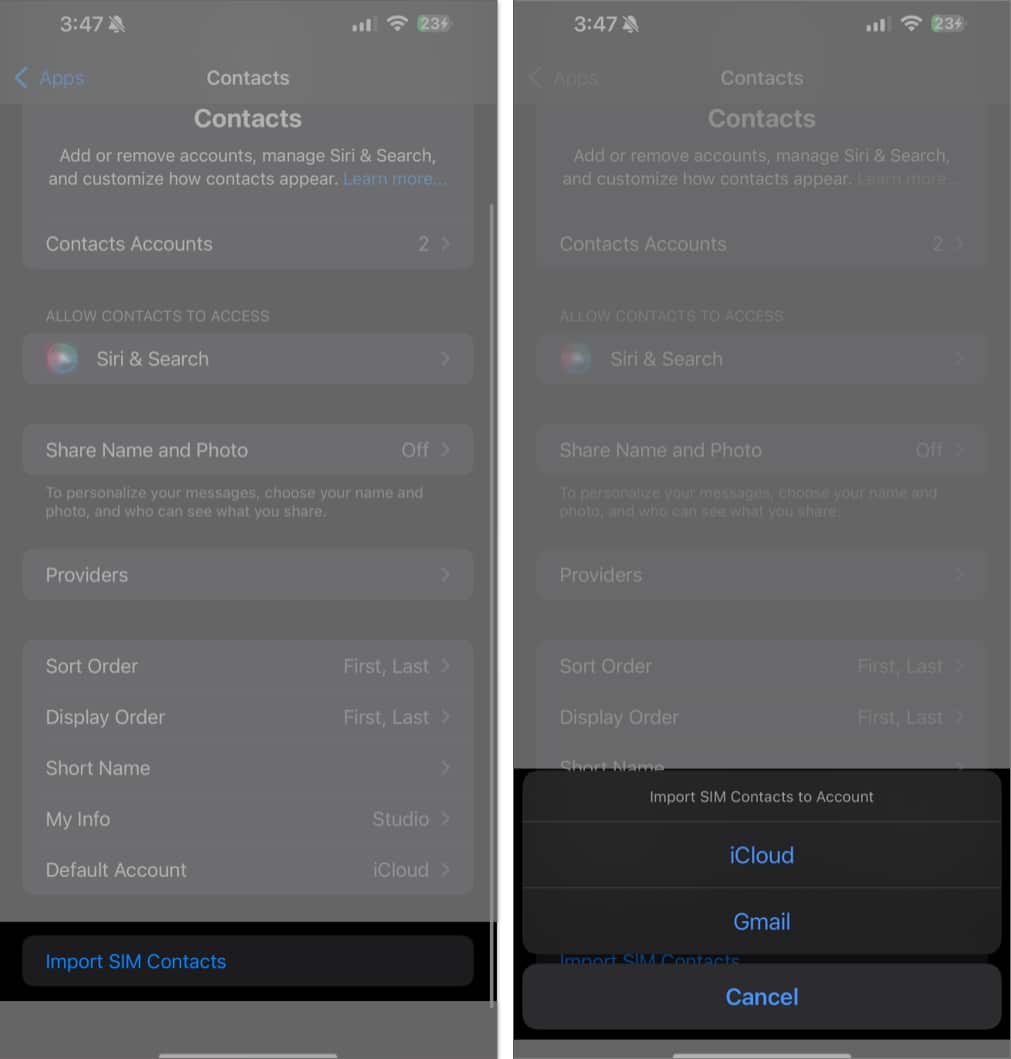
- Open the Settings app on your iPhone.
- Go to Apps and select Contacts.
- Tap on Import SIM Contacts.
- Choose iCloud or Gmail as your preferred destination for the imported SIM contacts.
- Again, select the account where you would want to import it.
If you’re using an eSIM, worry not; you can follow the same method to export your Android phone contacts to the eSIM and then transfer the eSIM to your iPhone.
4. Transfer contacts from Android to iPhone using a vCard file
If you want a more manual approach, you can create a vCard file. Using this approach, you export your Android device’s contacts, transfer them to your iPhone, and then import the contacts straight from the file.
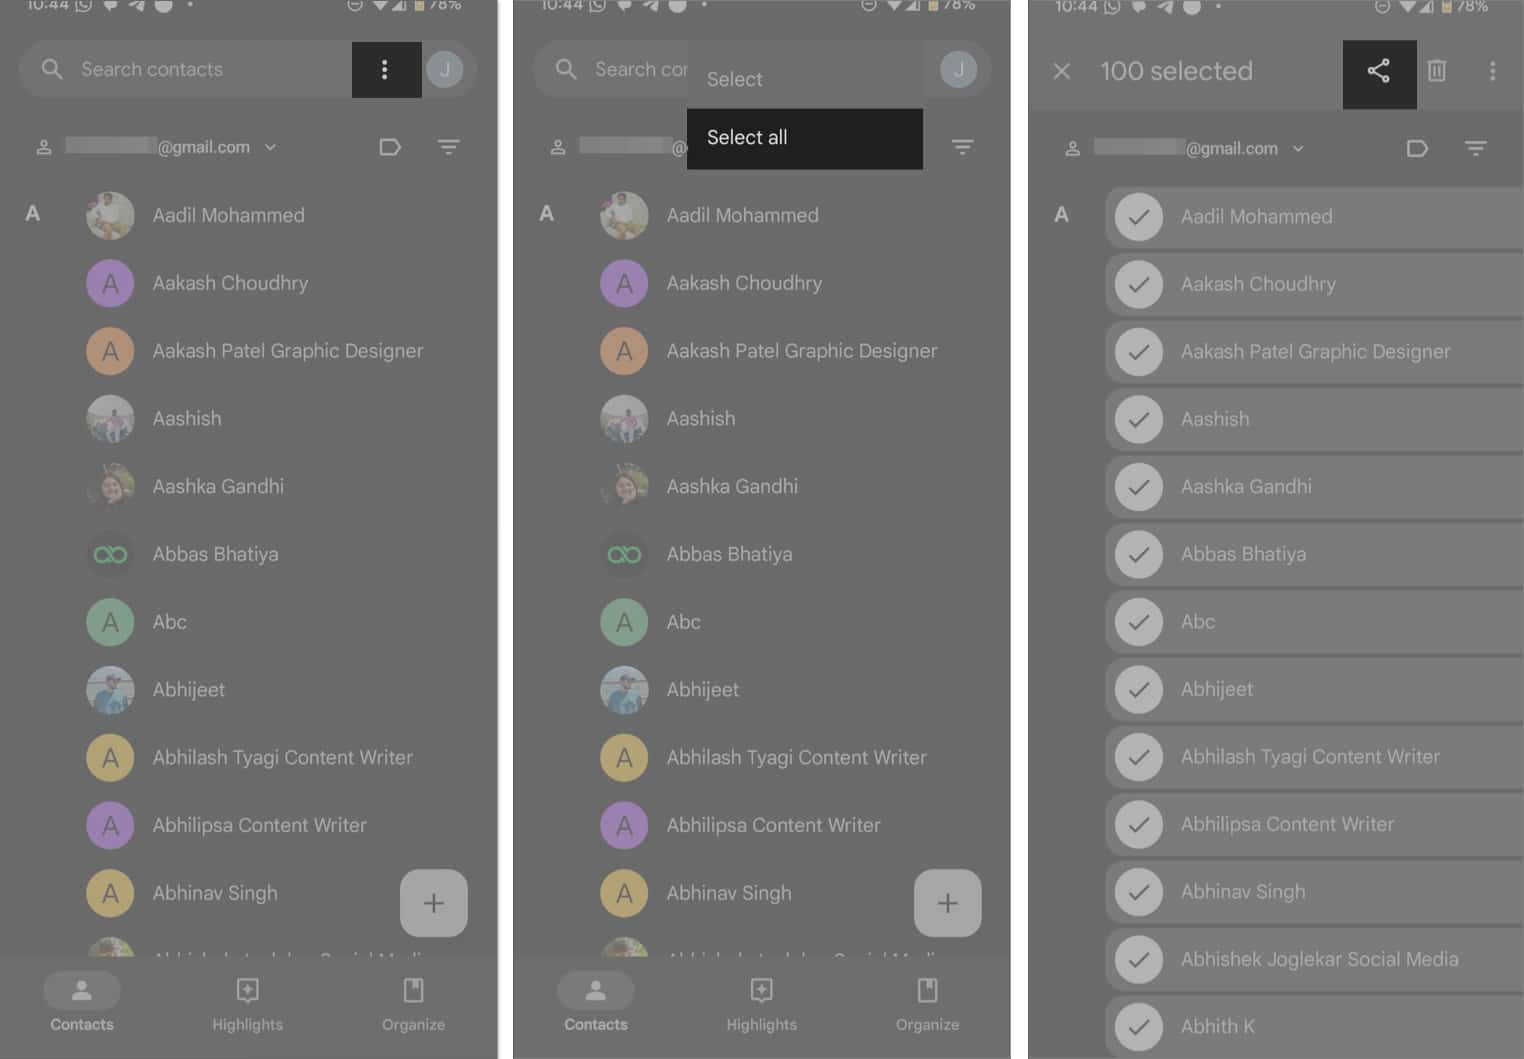
- Open the Contacts app on your Android.
- Tap on the three-dot menu button and choose the Select All option from the menu.
- Hit the Share button.
- Now, send the .vcf file to your iPhone. I suggest sharing via mail.
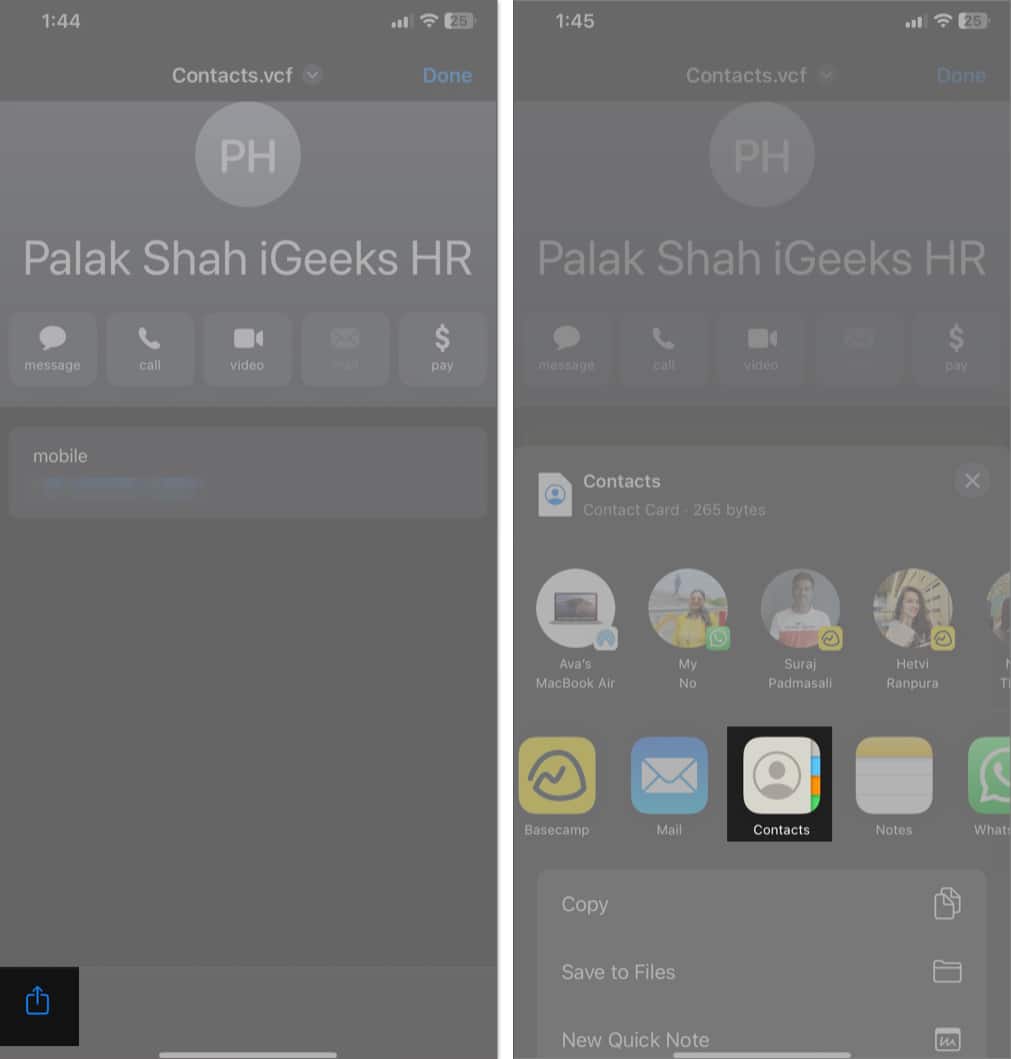
- On your iPhone, download and open the .vcf file.
- You’ll now see one contact from the file. Tap on the Share button and select Contacts on the Share Sheet. (Depending on the sharing method, the file may directly open in the Contacts app.)
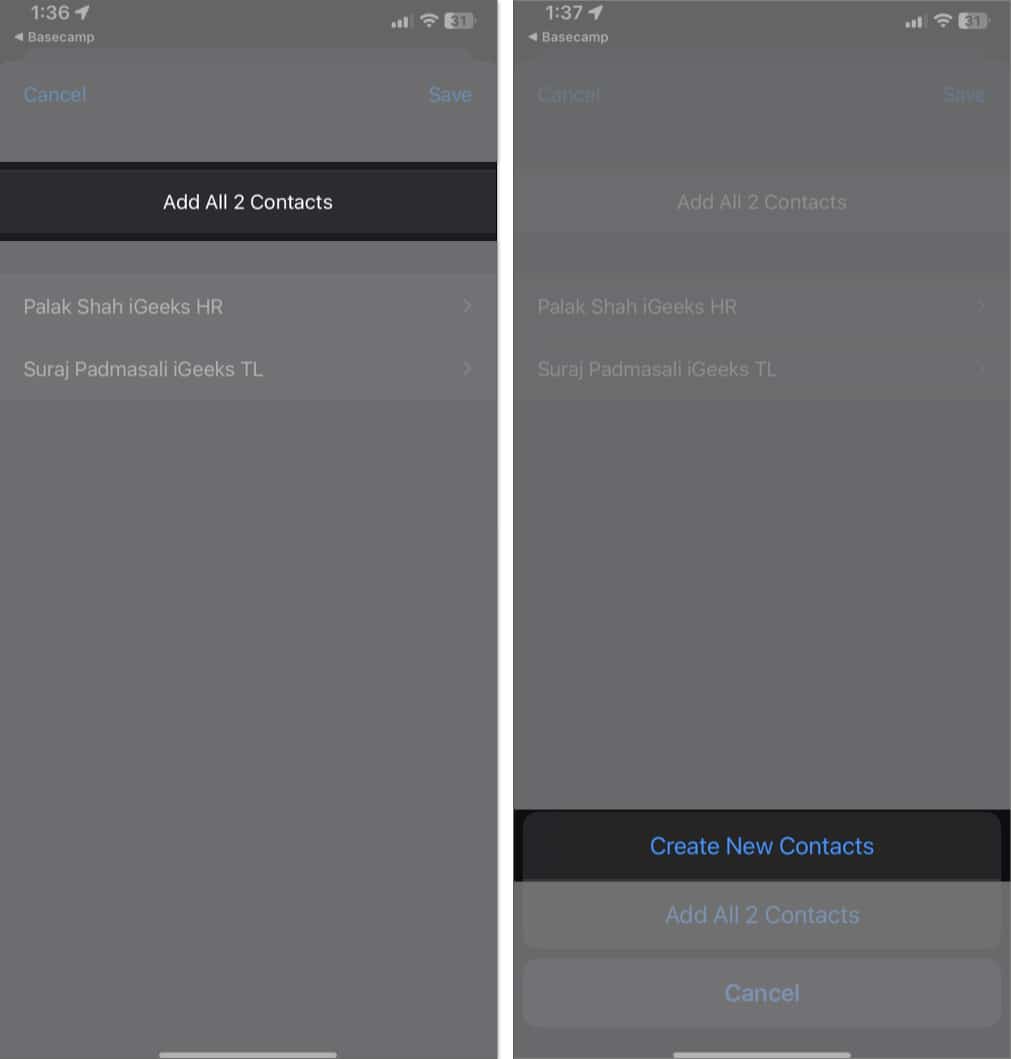
- Tap on Add All X Contacts at the top and select Create New Contacts.
This method is handy if you have limited internet access or prefer not to upload contacts to the cloud.
5. Use a third-party app to transfer contacts from Android to iPhone
There are many third-party apps available that can simplify the process of transferring contacts from Android to iPhone. However, do note that there can be privacy issues with these apps. So keep it your last resort for when other apps aren’t working or running you into errors.
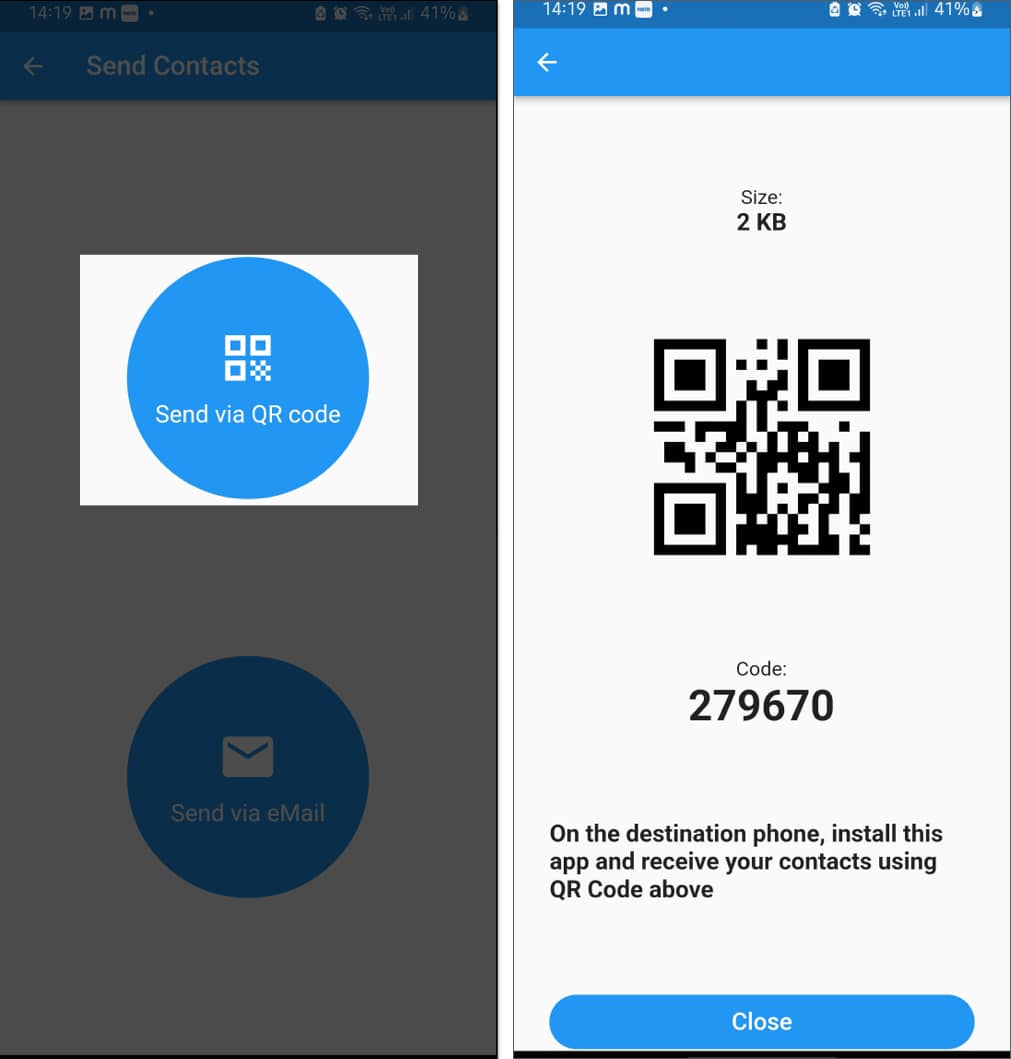
Of the various apps available, we found the Contact Transfer App reliable for moving contacts. Available on the App Store and Google Play store, it shares your contacts from one device to another using a QR code.
- Download and open the Contacts Transfer app on both your Android and iPhone.
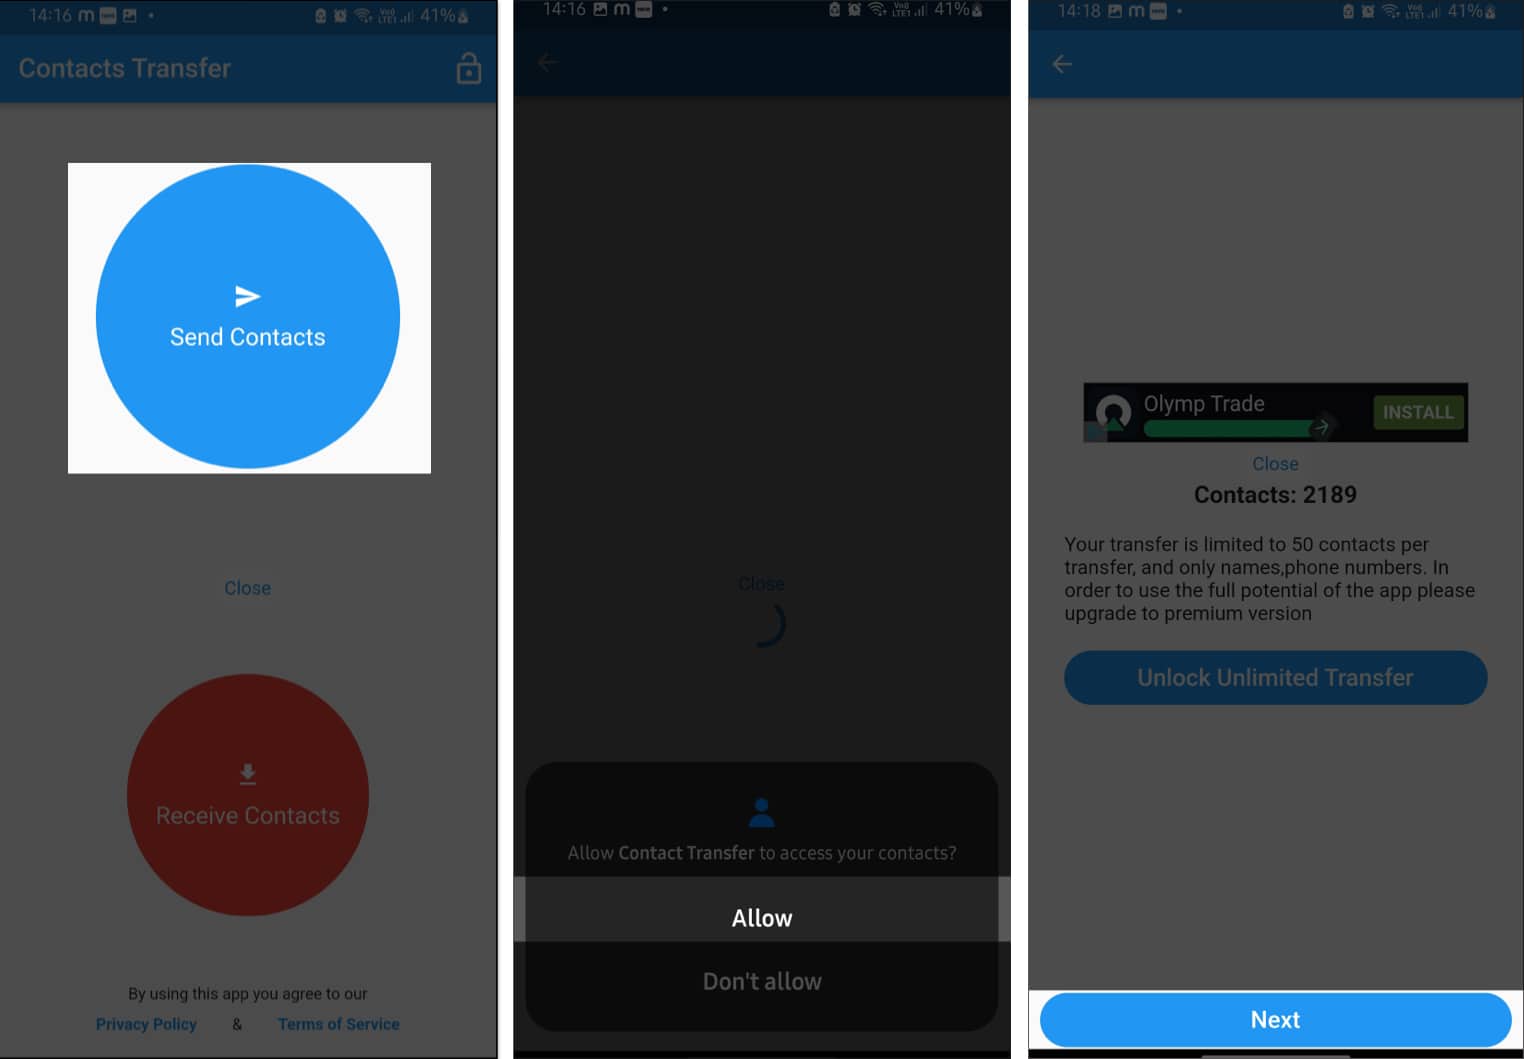
- On your Android, tap on the Send Contacts button. Tap Allow on the pop-up to grant access to your contacts.
- Hit Next to proceed.
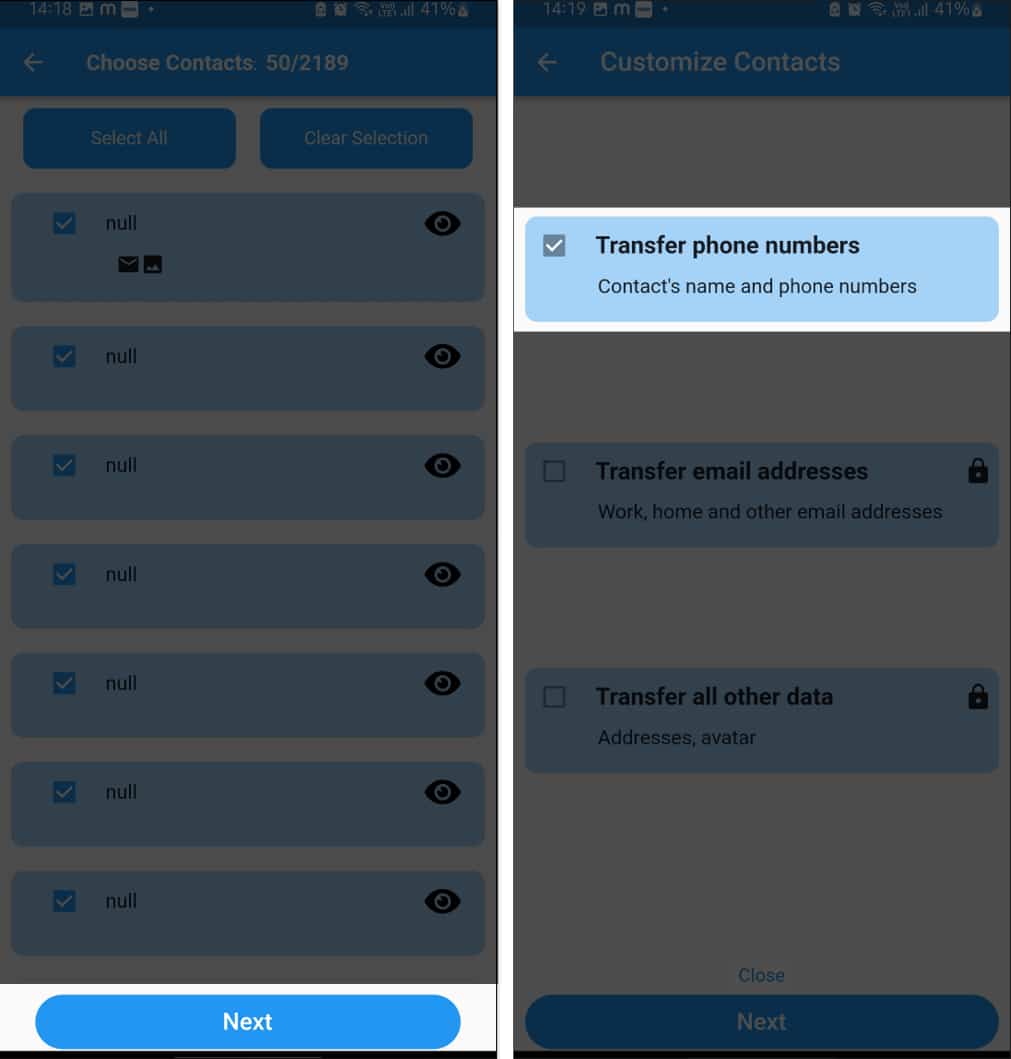
- Select the contacts you want to share and tap Next.
- Ensure the Transfer Phone Numbers checkbox is selected and hit Next.
- Select Send via QR code, and it’ll show a QR code on your screen.
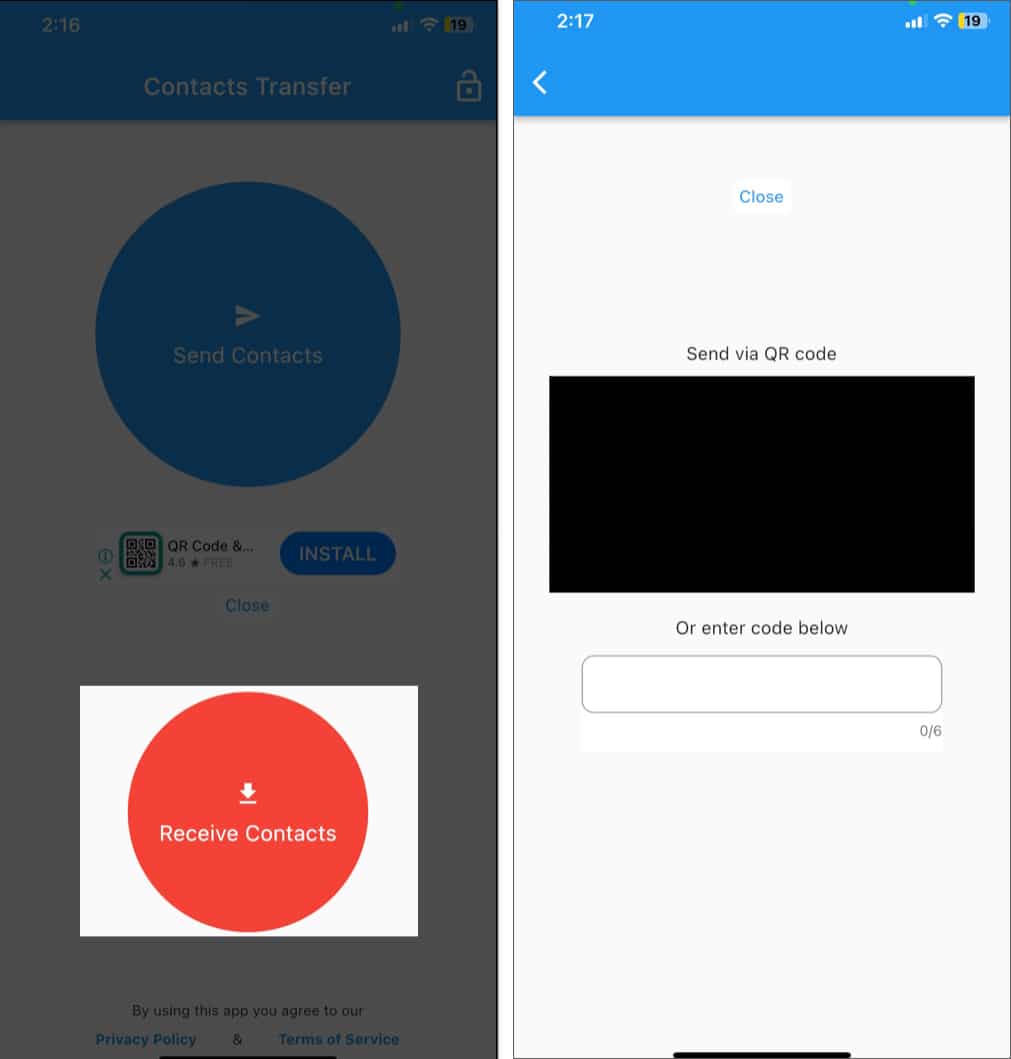
- Now, tap on Receive Contacts on your iPhone.
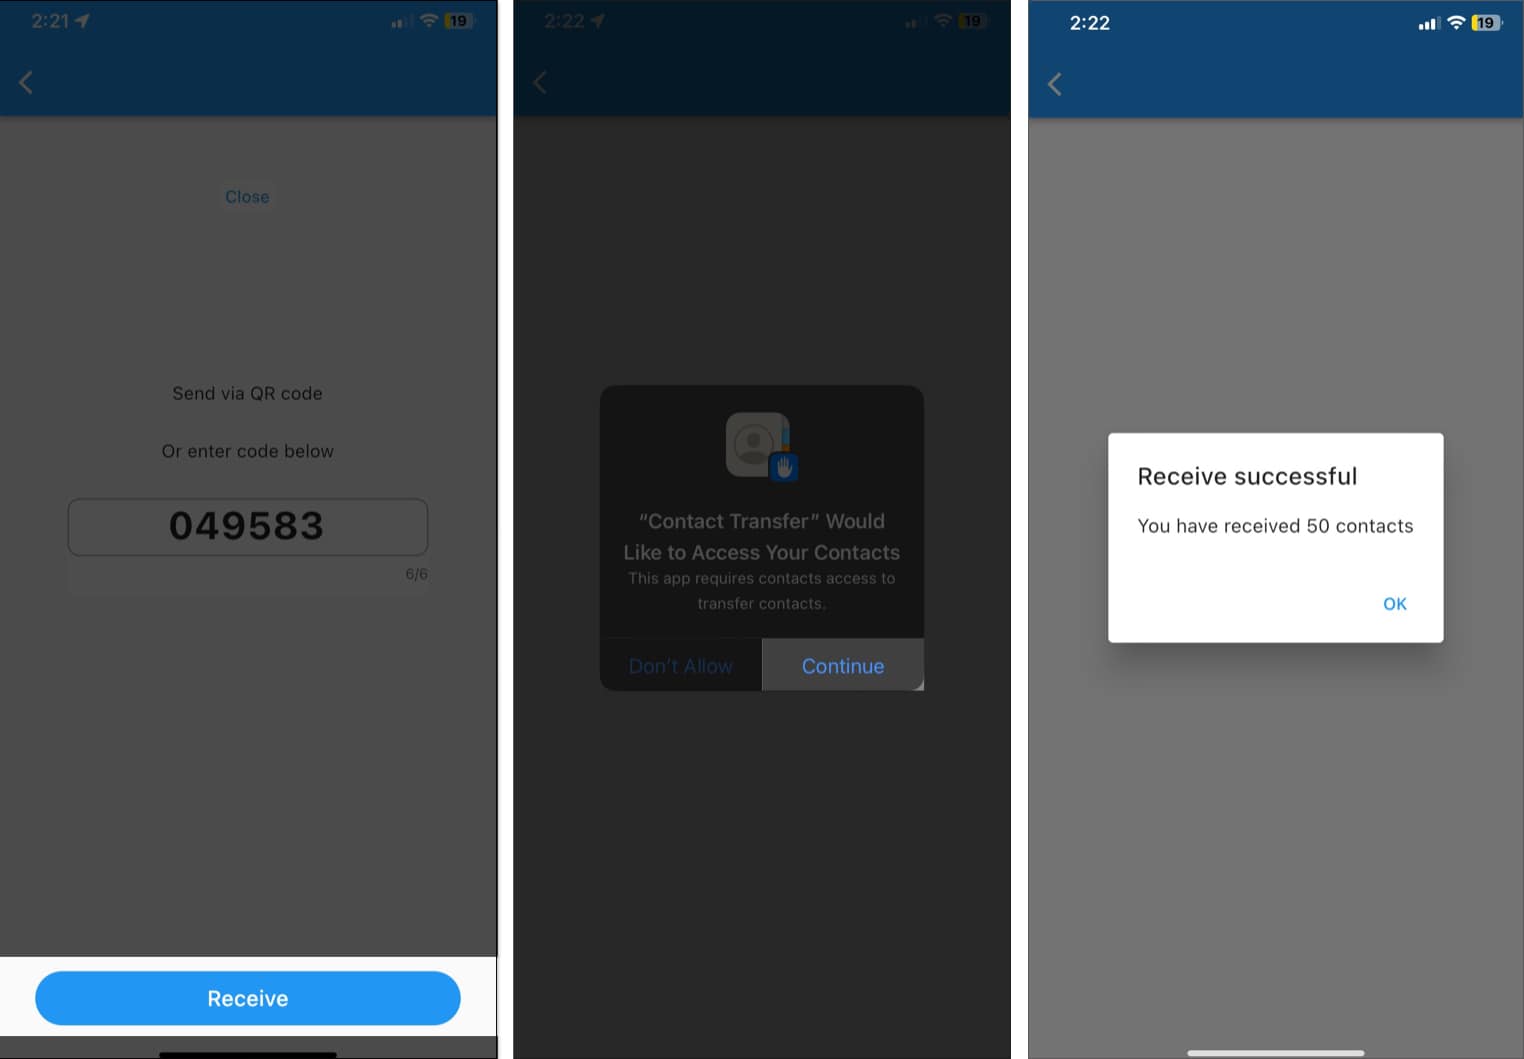
- Scan your Android device code with your iPhone. Or enter the code generated on Android phone.
- Tap Receive to proceed. Allow access to your Contacts app by tapping Continue on the prompt.
- You’ll see the Receive Successful message on your screen once the process is finished.
While the app works seamlessly, the intrusive ads are annoying. Also, you can send only 50 contacts per transfer in the free version.
Signing off…
Switching to a new phone can be a hassle, but with these simple methods, transferring your contacts from an Android phone to an iPhone is straightforward and stress-free. Whether you prefer using apps, syncing with Google, or even going the old-school route with a SIM card, there’s a solution that fits your needs.
If you face any issues during the process, please drop them in the comments below, and we’ll be happy to help!
FAQs
No, you can’t Airdrop contacts from Android to iPhone; Apple restricts the Airdrop to be only available across their ecosystem of devices.
Yes, you can. To transfer your contacts through Bluetooth, export them into the .vcf file and share the file via Bluetooth to your iPhone.
Read More :

