When I wake up, the first thing I do is check notifications on my iPhone (I’m aware it’s not a healthy habit). But there are times when certain notifications are delayed, thus, missing out on time-sensitive notifications. If you’ve been facing delayed notifications on your iPhone, this can be due to numerous reasons.
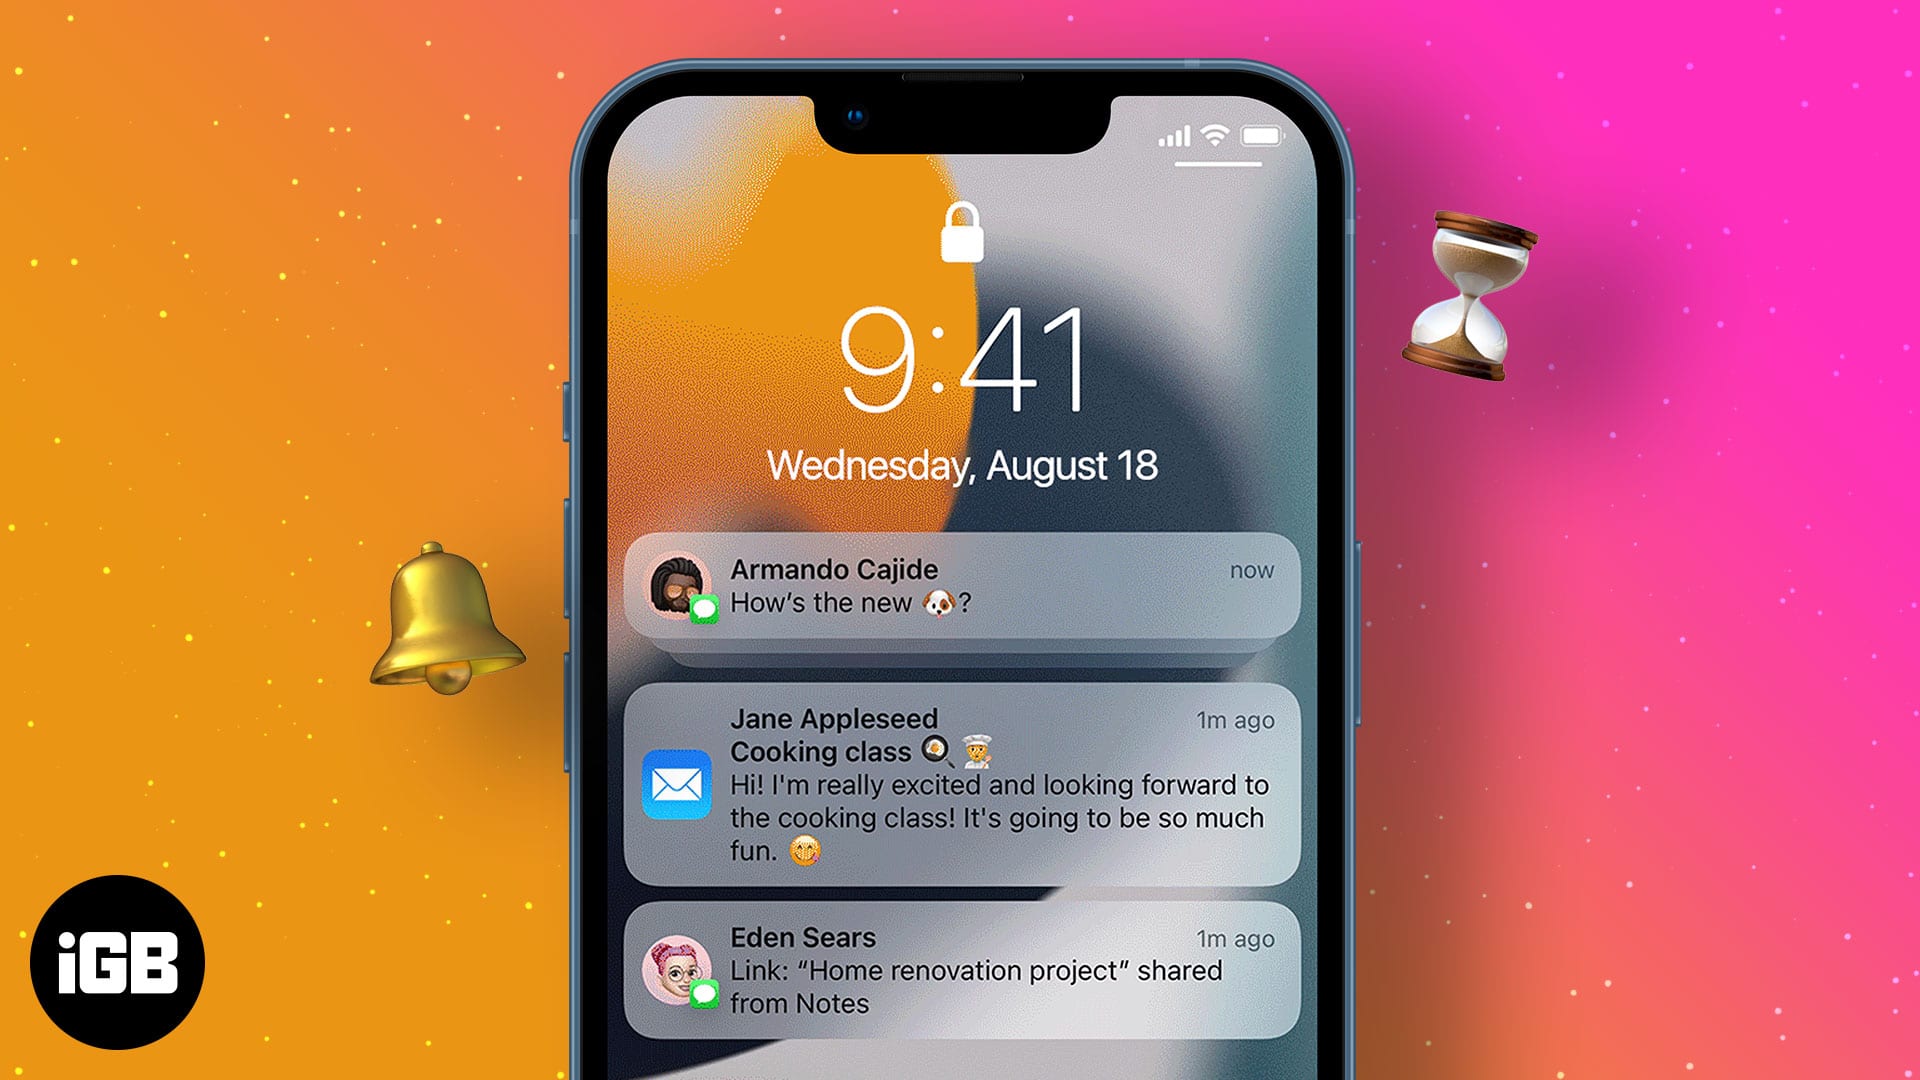
Read on to understand what’s causing the issue and how to fix it!
Why am I not getting notifications on my iPhone?
The most prominent issue leading to delayed notification is a slow internet connection, both cellular or Wi-Fi. Another reason could be if you’ve enabled Low Data Mode under Wi-Fi or Mobile Data options.
Enabling Low Power Mode also delays notifications as it does not let apps run in the background to prevent the battery from draining quickly. Especially when the battery is under 20%, you are prone to get delayed notifications.
Note: If you’re not receiving any notifications at all, check out our explainer on fixing Notifications not working on iPhone.
How to fix delayed notifications on iPhone
Now that you are aware of the multiple reasons for notifications getting delayed, here are 10 fixes to dealing with the issue.
- Switch off notification summary
- Switch off DND
- Turn on Notifications
- Restart your iPhone
- Check your cellular and Wi-Fi connection
- Disable Low Power Mode
- Turn off Low Data Mode
- Update app(s)
- Check for iPhone software updates
- Reset Network Settings
1. Switch off notification summary
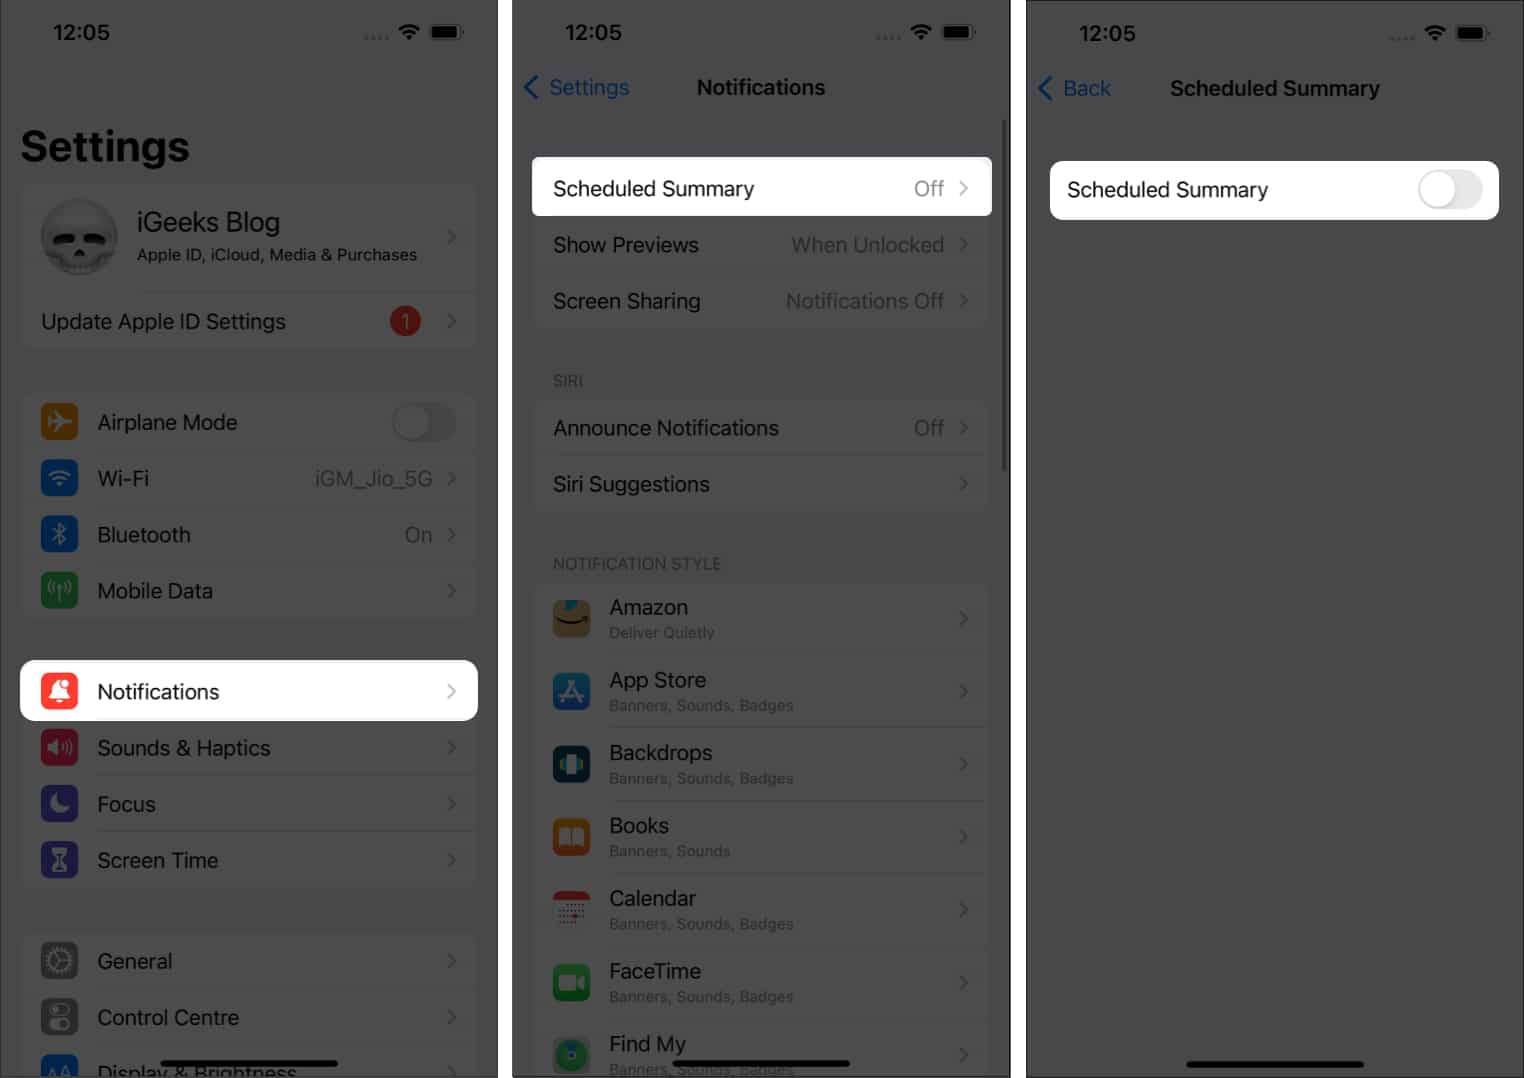
With iOS 15, Apple launched a new feature called Notification Summary. It allows users to schedule certain times when they will receive a summary of the notifications received all day. If you’re facing delayed notifications, I suggest you turn off this feature, and to do so, follow the steps below.
- Open Settings.
- Tap Notifications.
- Select the Scheduled Summary tab and turn it off on the next screen.
2. Switch off DND
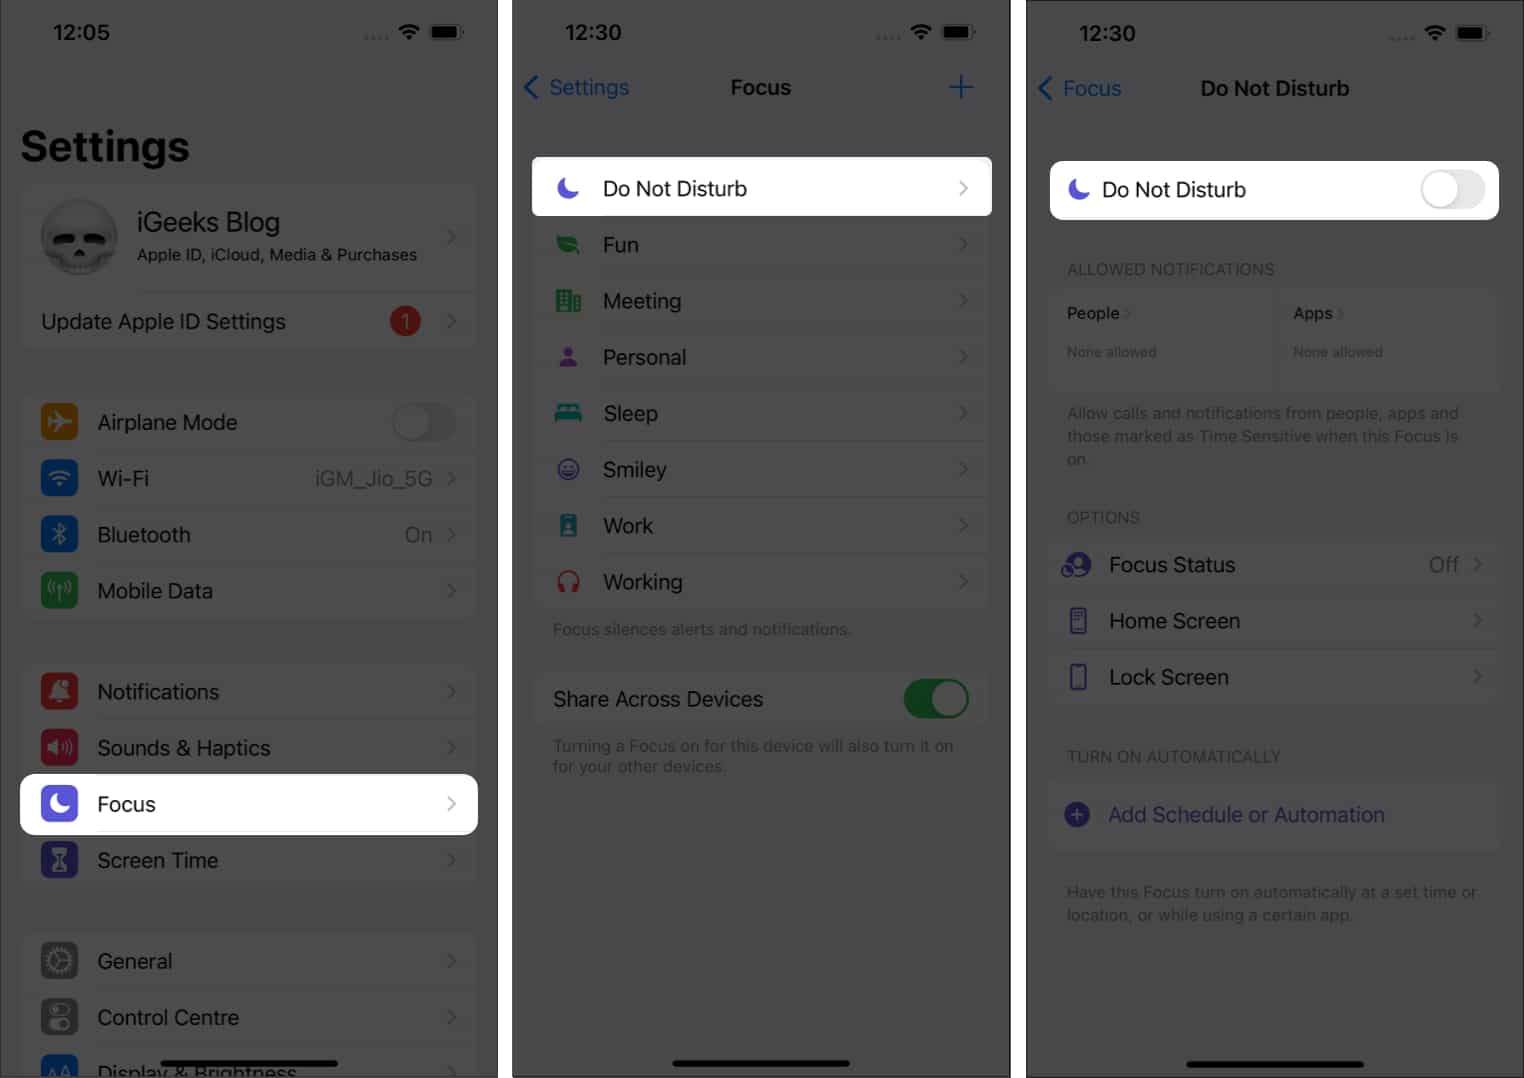
If you’ve turned on Do Not Disturb, it is quite obvious that you won’t be receiving notifications. It is also possible that you’ve scheduled the DND to turn on automatically at a certain time, and so notifications are showing up late. Here’s how you can turn it off:
- Open Settings.
- Tap Focus.
- Select Do Not Disturb.
- Now, toggle it off.
3. Turn on Notifications
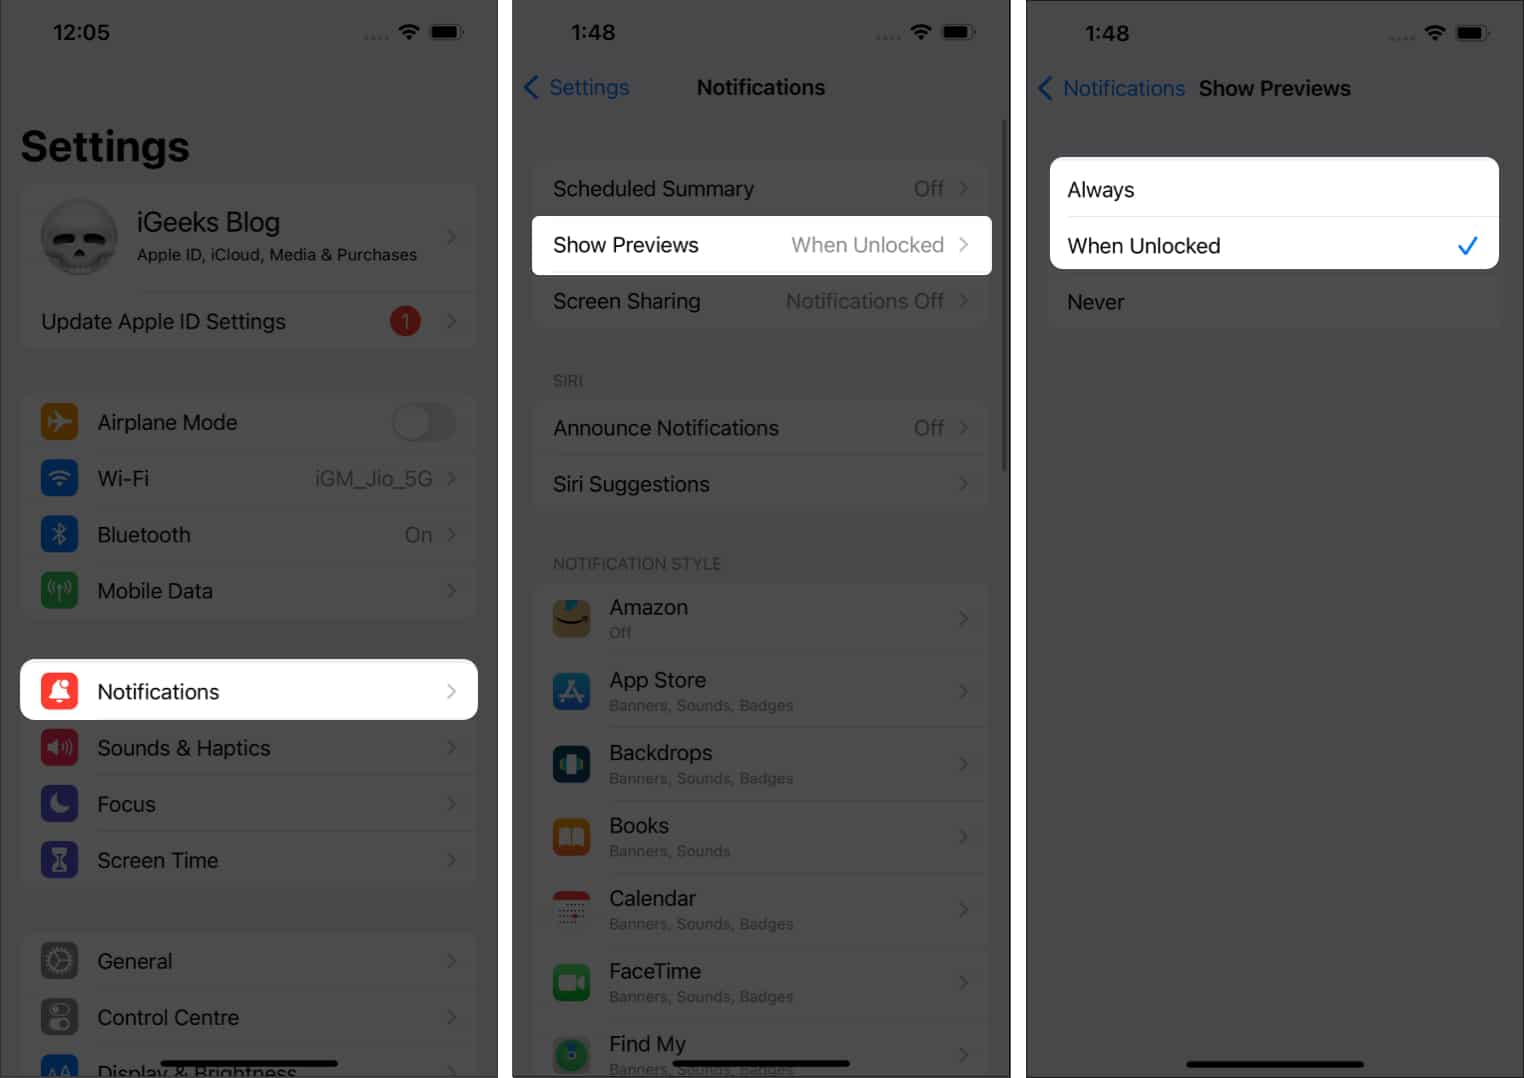
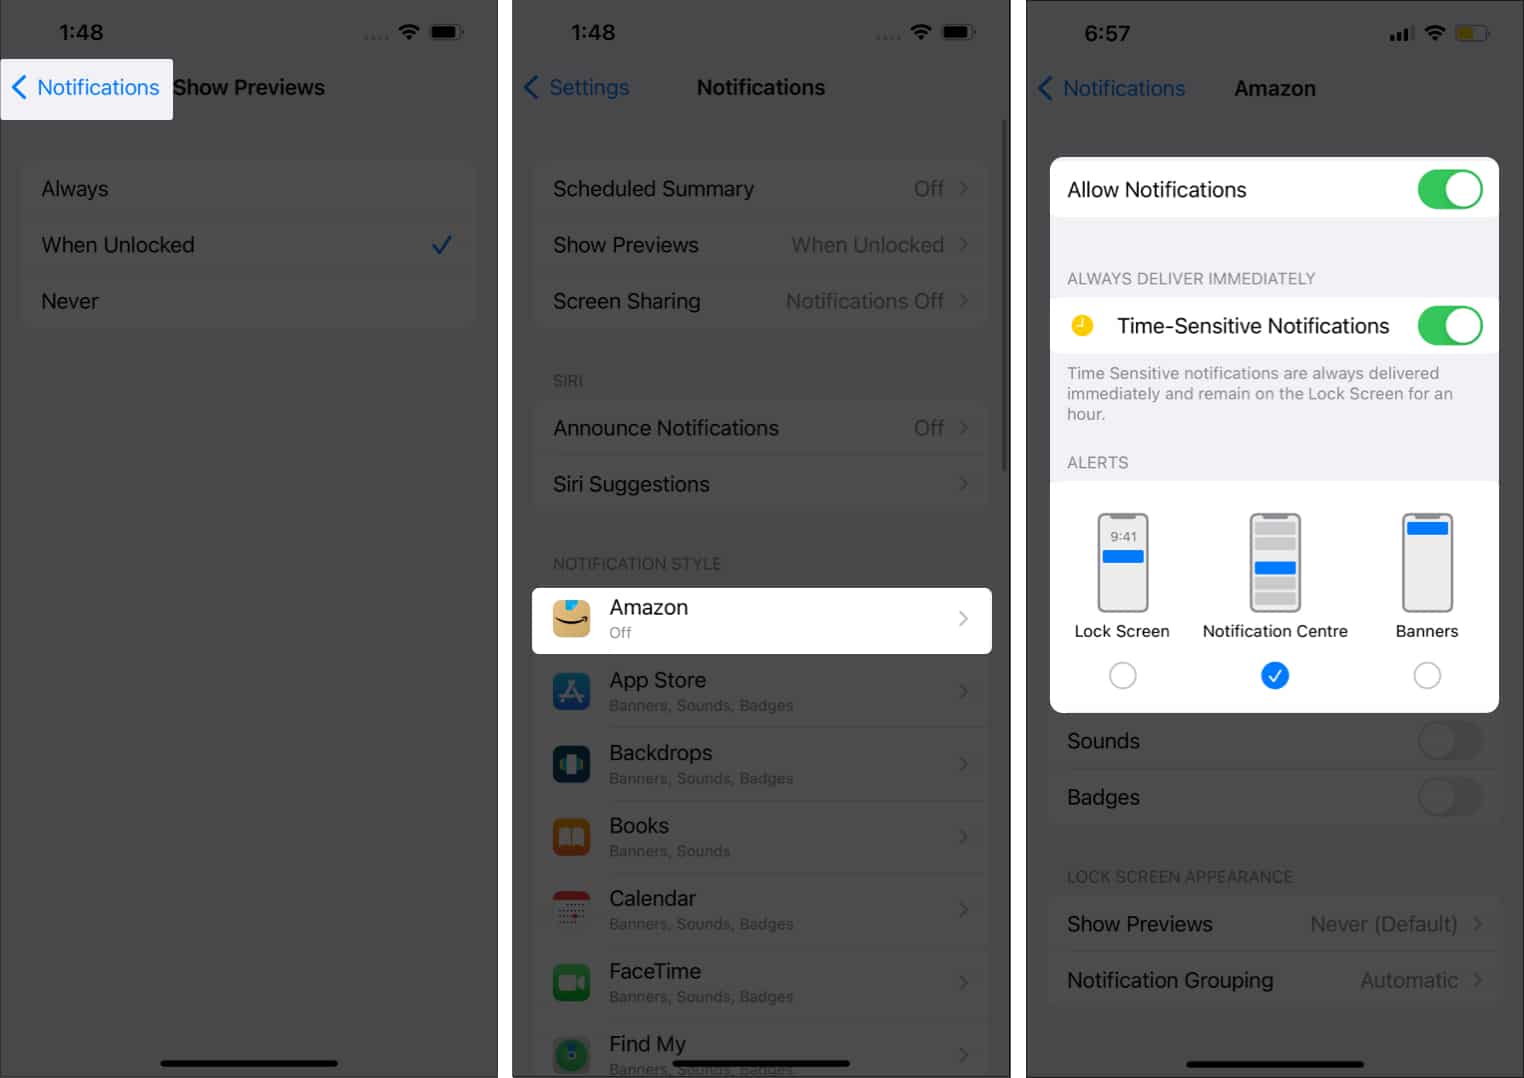
You need to turn on Notification Preview and check and change Notification Styles.
- Open Settings.
- Tap Notifications.
- Select Show Previews → select Always or When Unlocked.
- Tap <Notifications at the top left to go back.
- Scroll down to the app that’s delaying notifications.
- Once opened, toggle on Allow Notifications → select the alert style.
4. Restart your iPhone
Restarting your iPhone is one solution that is always recommended as it is known for resolving issues. No matter which iPhone you’re using, refer to our article on how to restart iPhone for a step-by-step guide.
5. Check your cellular and Wi-Fi connection
Applications like Instagram, Snapchat, etc., need an internet connection. Similarly, they’d only send notifications when connected to the internet. So, if you’re facing late notifications from such apps, make sure to check your internet connection. To do so:
- Summon Control Center:
- On iPhone with Touch ID: Swipe up from the bottom.
- On iPhone with Face ID: Swipe up from the top.
- Check if you are connected to Mobile Data or Wi-Fi.
- If not, turn them on.
6. Disable Low Power Mode
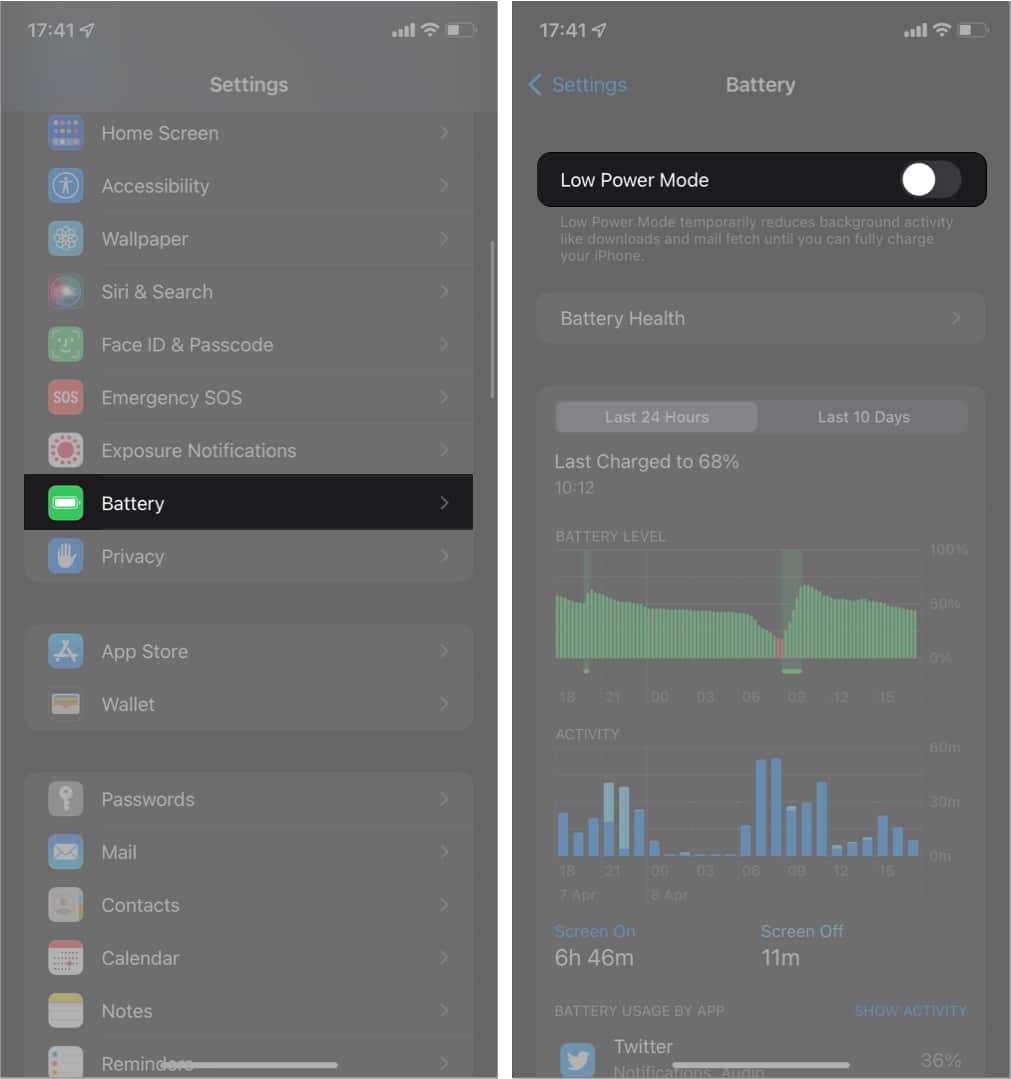
Enabling Low Power Mode restricts apps from running in the background. It does so to prevent the battery from draining. In preserving battery life, you miss out on notifications from apps in the background. Turn off Low Power Mode if you want timely notifications. Here’s how to do it:
- Open Settings.
- Navigate to Battery.
- Toggle off Low Power Mode.
7. Turn off Low Data Mode
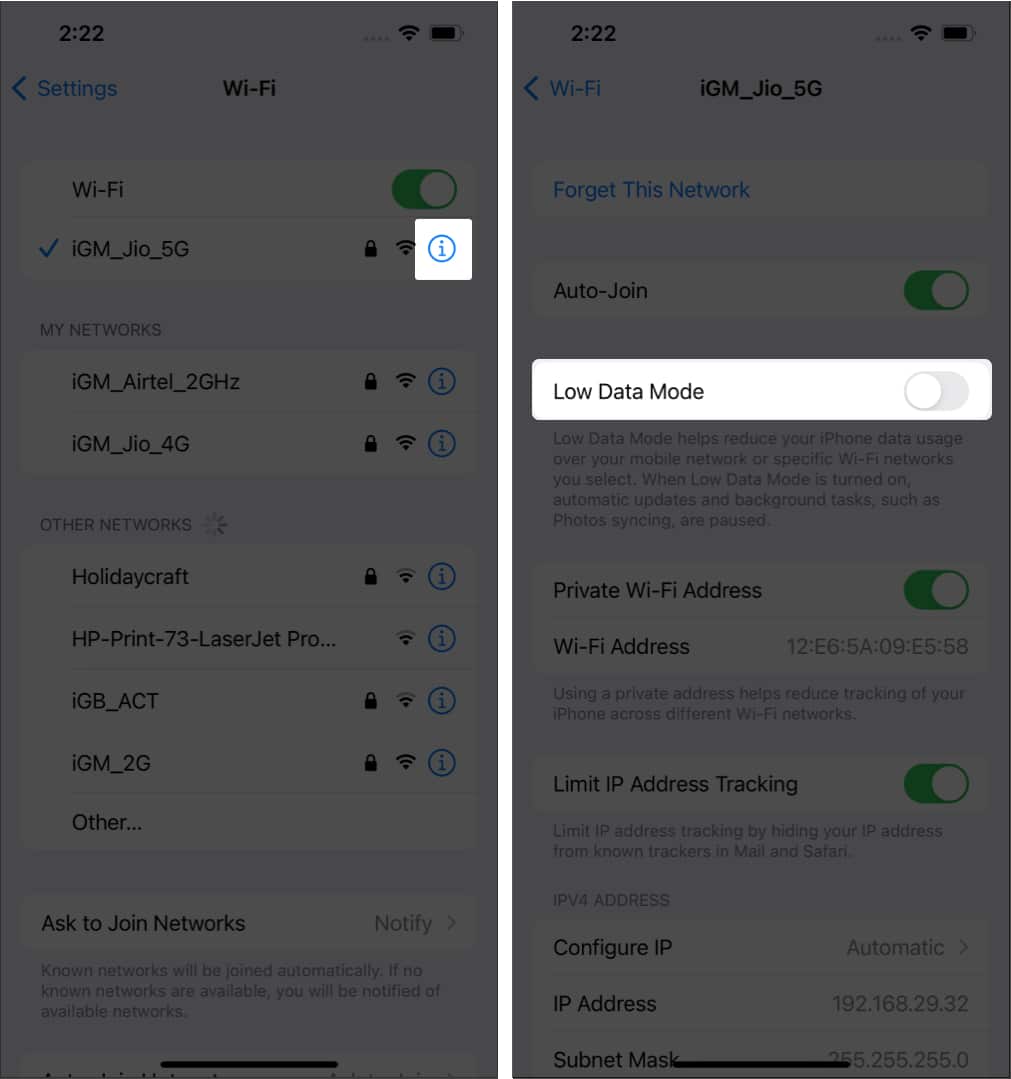
Like Low Power Mode, Low Data Mode restricts apps from accessing the internet in the background. You need to turn it off from both Wi-Fi and Mobile Data settings.
For Wi-Fi,
- Open Settings.
- Tap Wi-Fi.
- Tap the “i” icon located beside the connected network.
- Now, toggle off Low Data Mode.
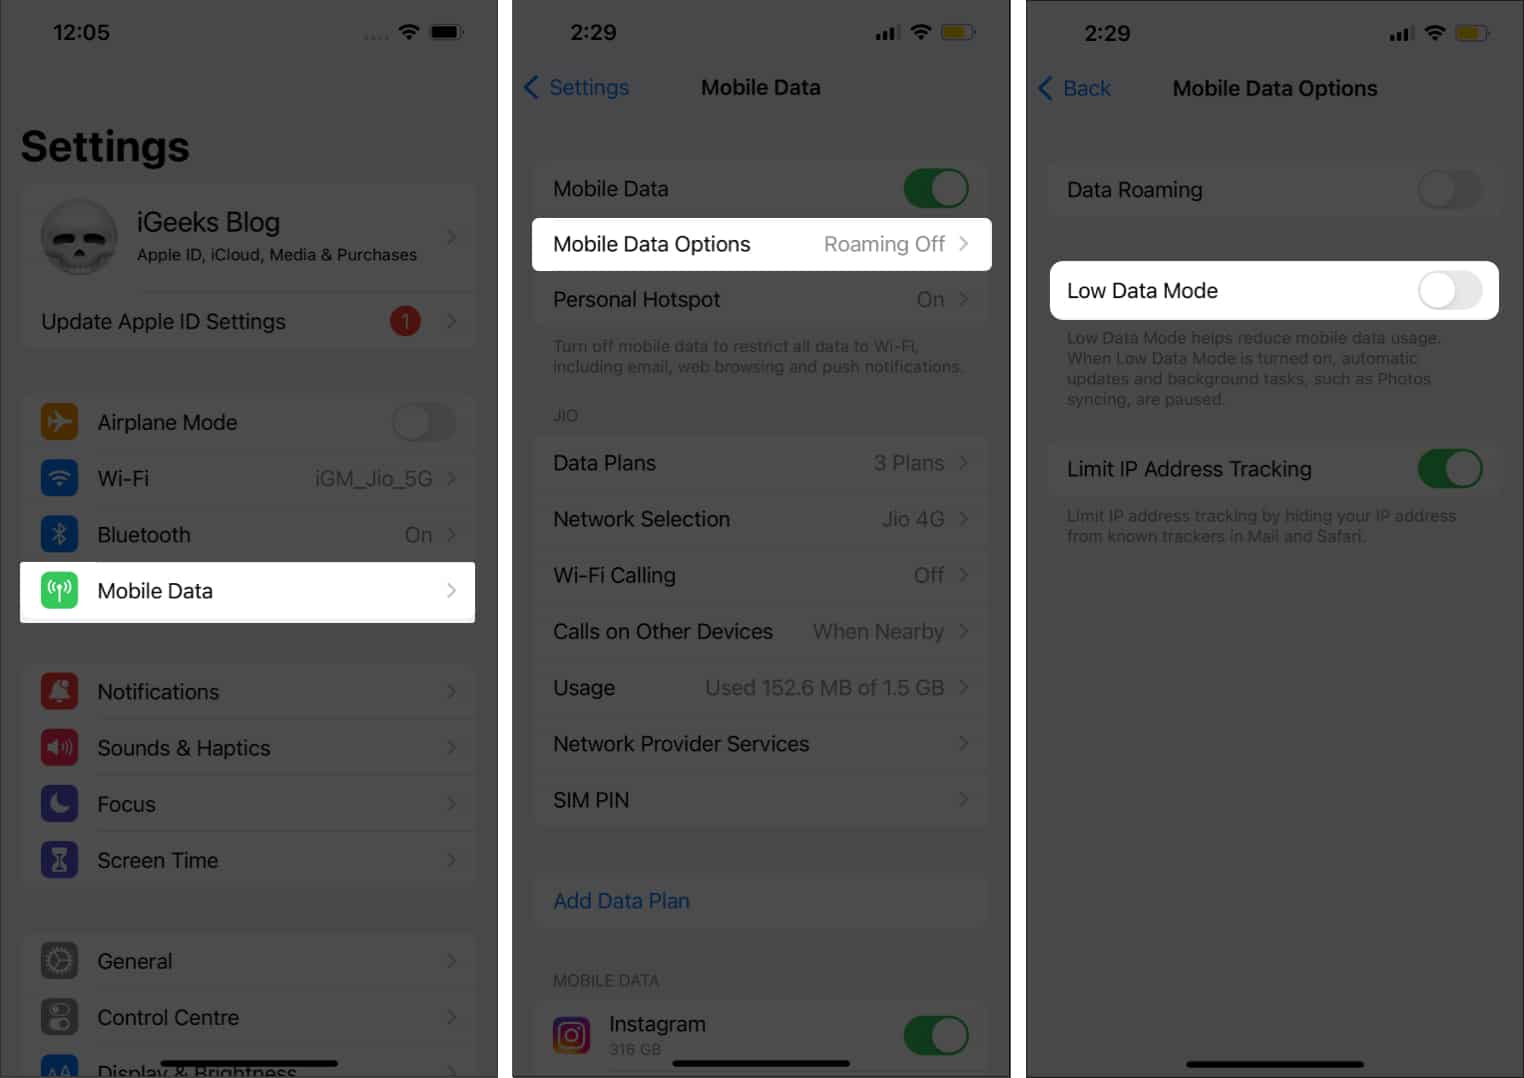
For Mobile Data,
- Open Settings.
- Select Mobile Data/Cellular.
- Tap Mobile Data Options/Cellular Data.
- Now, turn off the Low Data Mode.
8. Update app(s)
Software bugs need no introduction. At times, app updates are buggy, thus, delaying or preventing notifications. Usually, developers fix these issues as soon as possible. If you’ve been facing delayed notifications for Instagram or the likes, ensure to update the app on iPhone and even turn on Automatic updates for them.
9. Check for iPhone software updates
Just like applications, iOS too has bugs from time to time. Apple ensures to fix these bugs by providing software updates regularly. Check out our guide to update the iOS version of your iPhone.
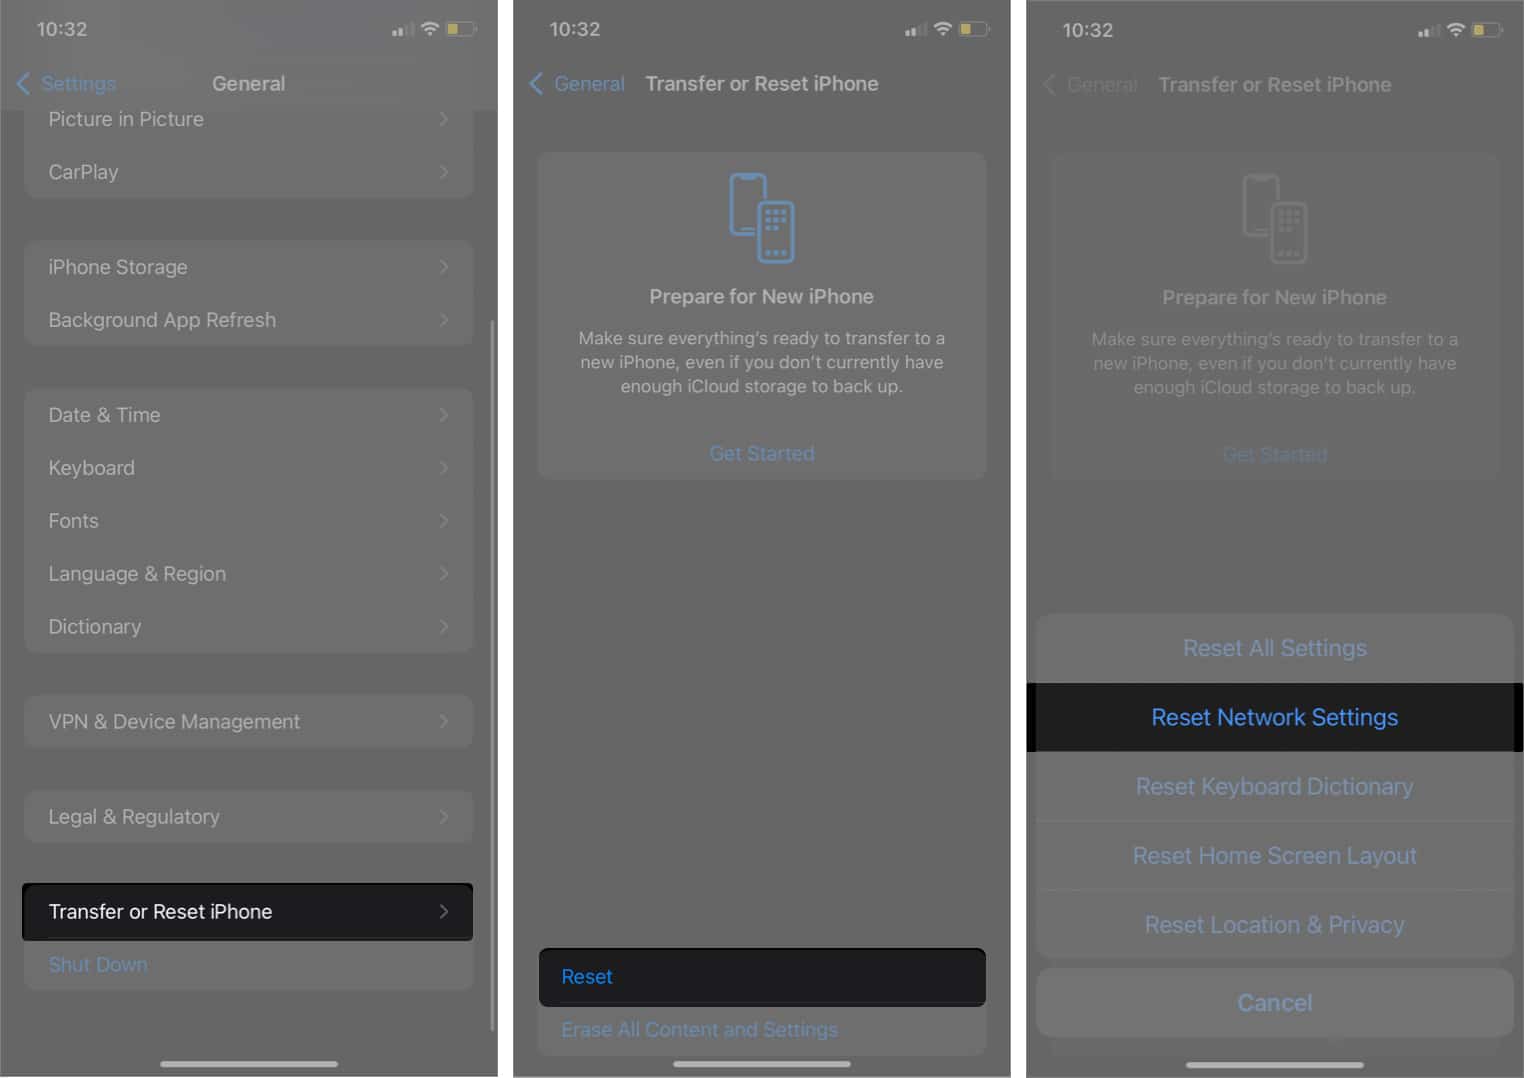
10. Reset Network Settings
If none of the steps bear fruit, you should reset the network settings as there might be some bug in the saved settings. While you won’t lose any data, remember to take a backup of your iPhone. Here’s a guide to help you backup your iPhone.
- Go to Settings → General.
- Select Transfer or Reset iPhone → Reset Network Settings.
- Now, tap Reset Network Settings.
- Enter the password to confirm your selection.
I hope these steps help fix the delayed notifications on your iPhone. If you are still facing any issues, let us know in the comments below, and we will try our best to help you.
Facing more issues on your iPhone? Check the below guides:

Very helpful! Def appreciate the concise and accurate layout