iCloud backup makes it convenient to keep your data secure and within reach. Therefore, it can be annoying to run into the ‘iCloud Backup Failed’ error. This is relatively common, but the good news is that you can try several solutions to fix it. Let’s dig deeper and learn what causes and how to fix the iCloud backup failure issue.
Why does iCloud backup keep failing on my iPhone?
Some of the most common reasons why your iCloud backup might fail are:
- Your iPhone is not connected to a stable WiFi network.
- Your storage is full.
- Your iOS device isn’t connected to a power source.
So, first, ensure that your phone is connected to a WiFi network and a power supply. Then, try the tips below to fix the iCloud backup failed issue.
How to fix iCloud backup issue on your iPhone
1. Check iCloud server status
There’s also a possibility that the servers related to iCloud backup might’ve gone offline for maintenance or are experiencing issues due to a technical glitch that can prevent you from creating an iCloud backup of your device.
To check if iCloud servers are online, go to Apple’s System Status Page, then see if there is a green indicator beside the service for iCloud backup. If you see a grey box, the servers are undergoing maintenance, and you will need to wait until they are back online to successfully back up your iPhone/ iPad.
2. Ensure that iCloud backup is enabled
iPhones and iPads always ask if you want to enable iCloud backup for your data during the initial setup. However, if you somehow missed this option or accidentally turned it off in the Settings app, iCloud backups won’t work for you. Here’s how you can check if iCloud backup is enabled on your device.
- Open the Settings app on your iPhone or iPad.
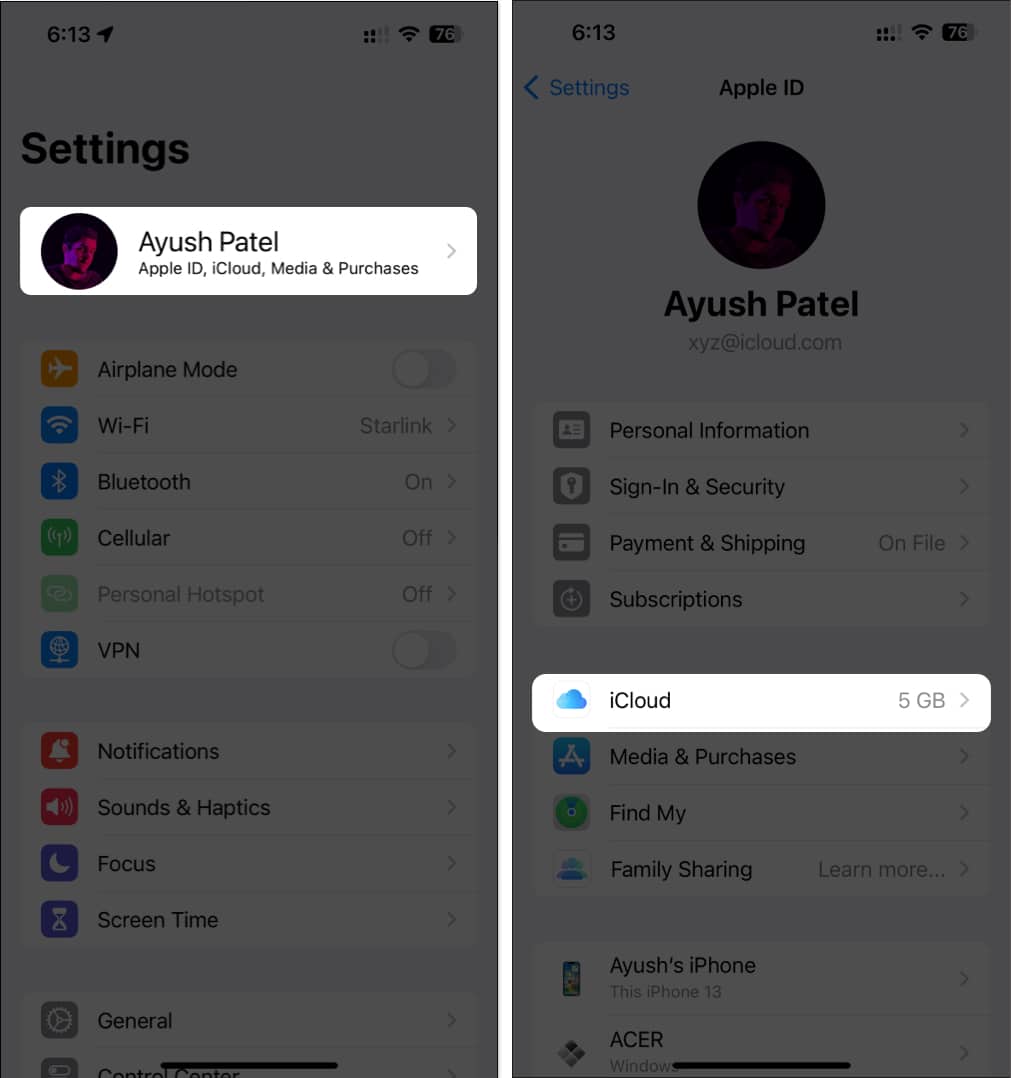
- Tap the Apple ID banner with your name → Select iCloud.
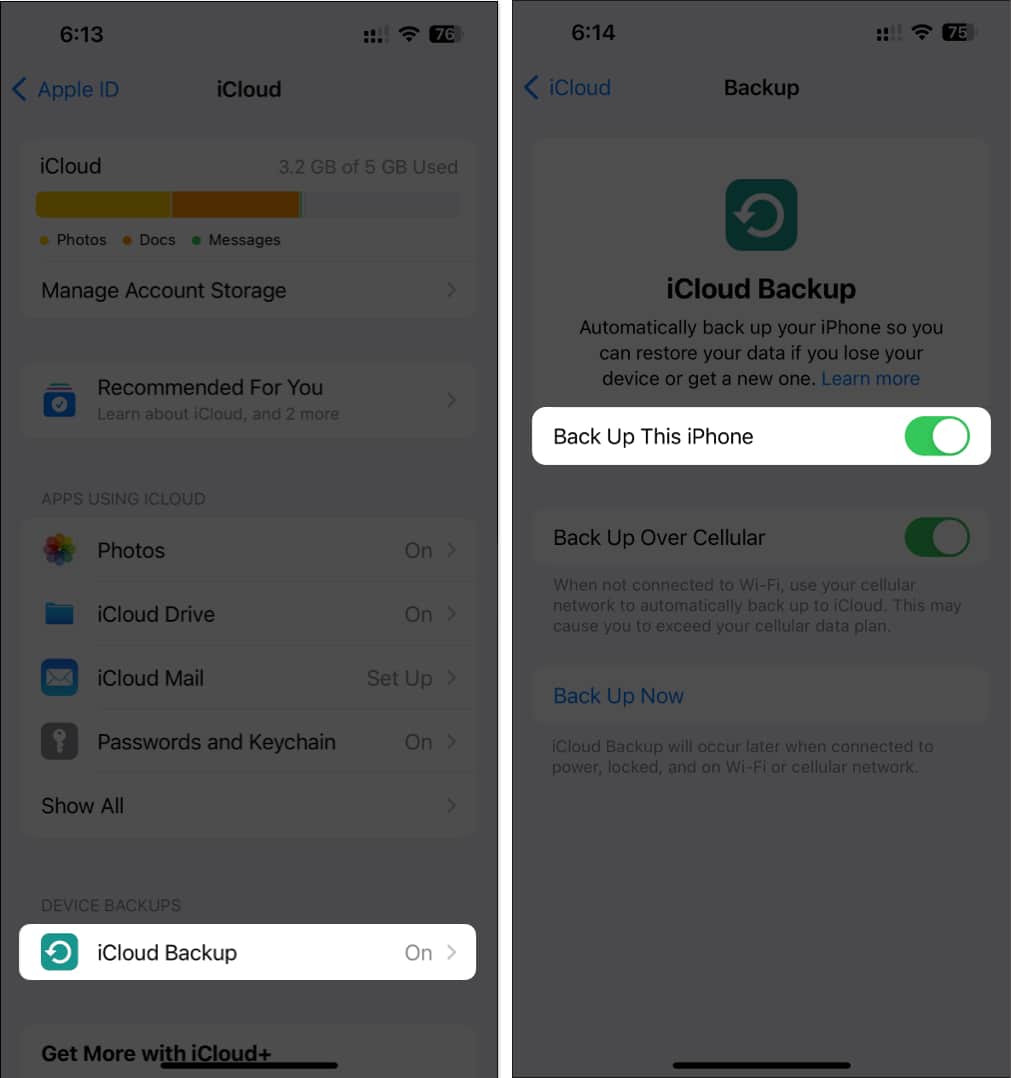
- Tap iCloud Backup → Toggle on Back Up This iPhone (or iPad).
On 5G–supported models, you can also turn on Backup Over Cellular.
3. Check if you have sufficient iCloud storage
iCloud provides you with 5GB of free storage space to back up your data. If your iCloud storage has already reached this limit, you can’t back up more data without upgrading your plan. In this case, it’s better to check the storage space and free up data, if needed. Here’s how you can do it.
- Open the Setting app on your iPhone or iPad.
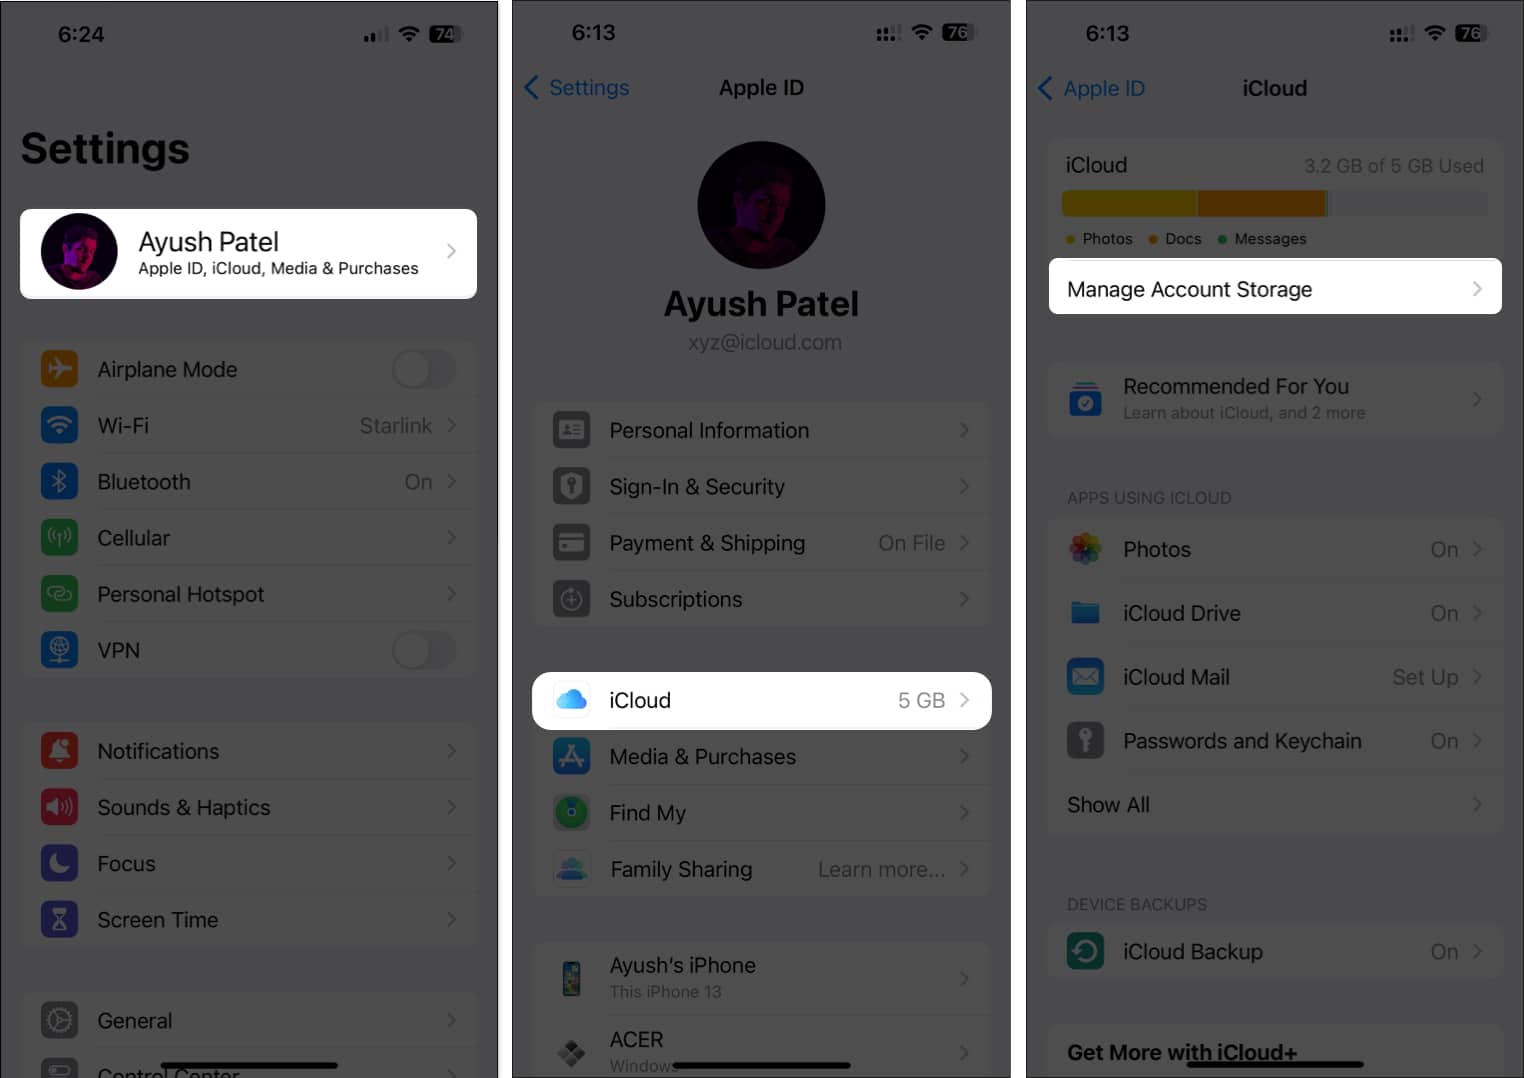
- Tap the Apple ID banner → Select iCloud.
- Tap Manage Account Storage to access additional details.
If the storage is full, learn how to delete old iCloud backups to free up some space.
4. Disable Low Power and Low Data Mode
While Low Power and Low Data Mode are designed to reduce your device’s battery and cellular data usage, using them can prevent iCloud backups from working. Hence, you must disable them to see if that fixes the issue.
- To toggle off Low Power Mode:
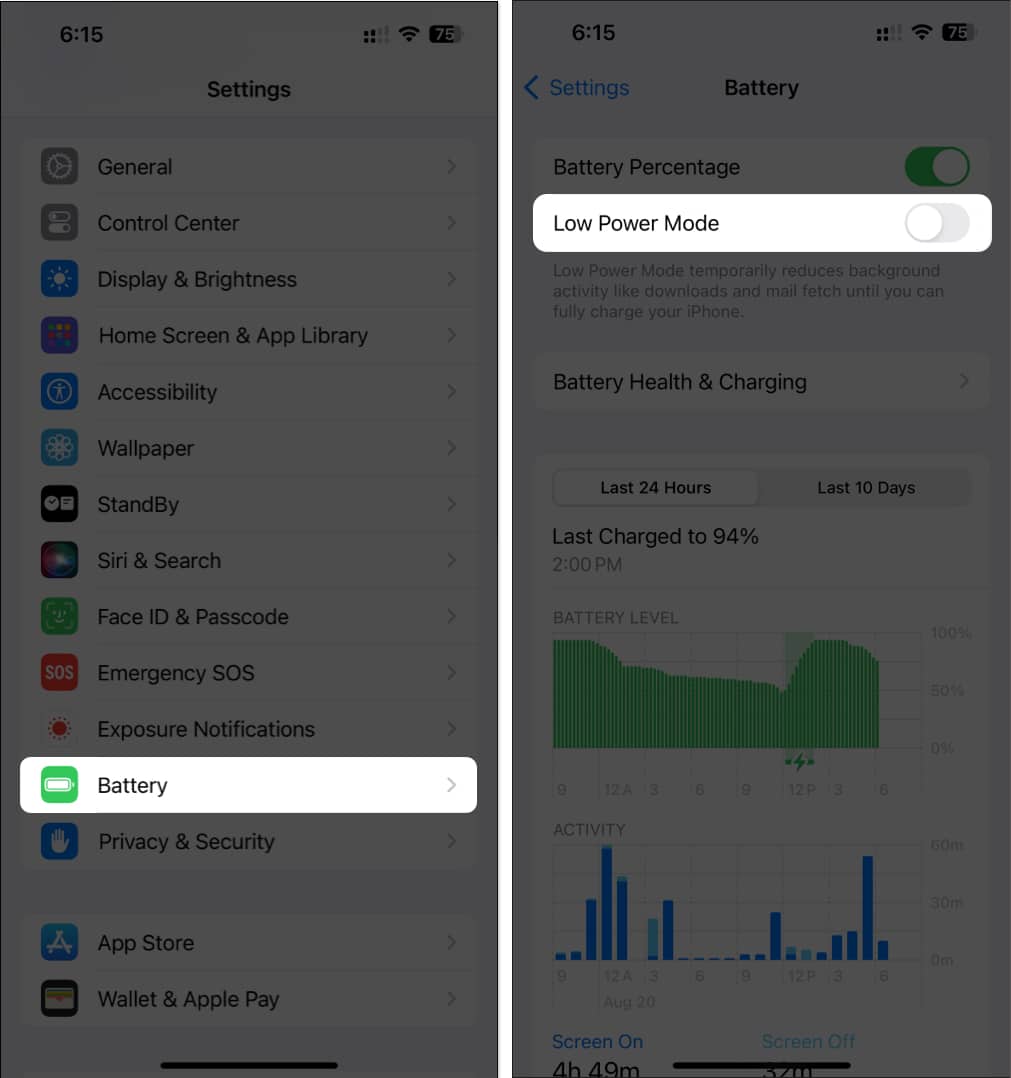
- Go to Settings → Battery → Toggle off Low Power Mode.
- Go to Settings → Battery → Toggle off Low Power Mode.
- To toggle off Low Data Mode for Cellular:
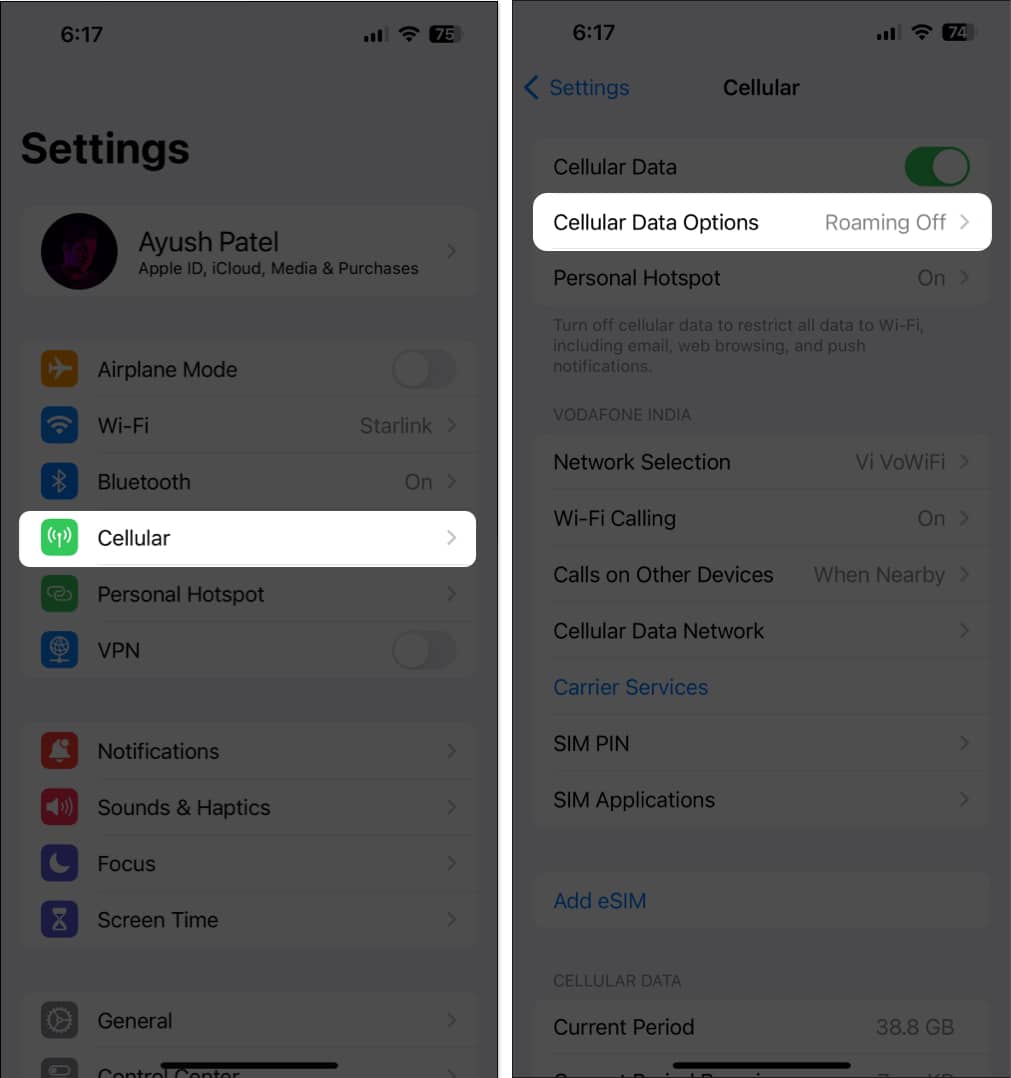
- Go to Settings → Cellular → Cellular Data Options.
If you use dual SIMs, select a SIM to locate Cellular Data Options.
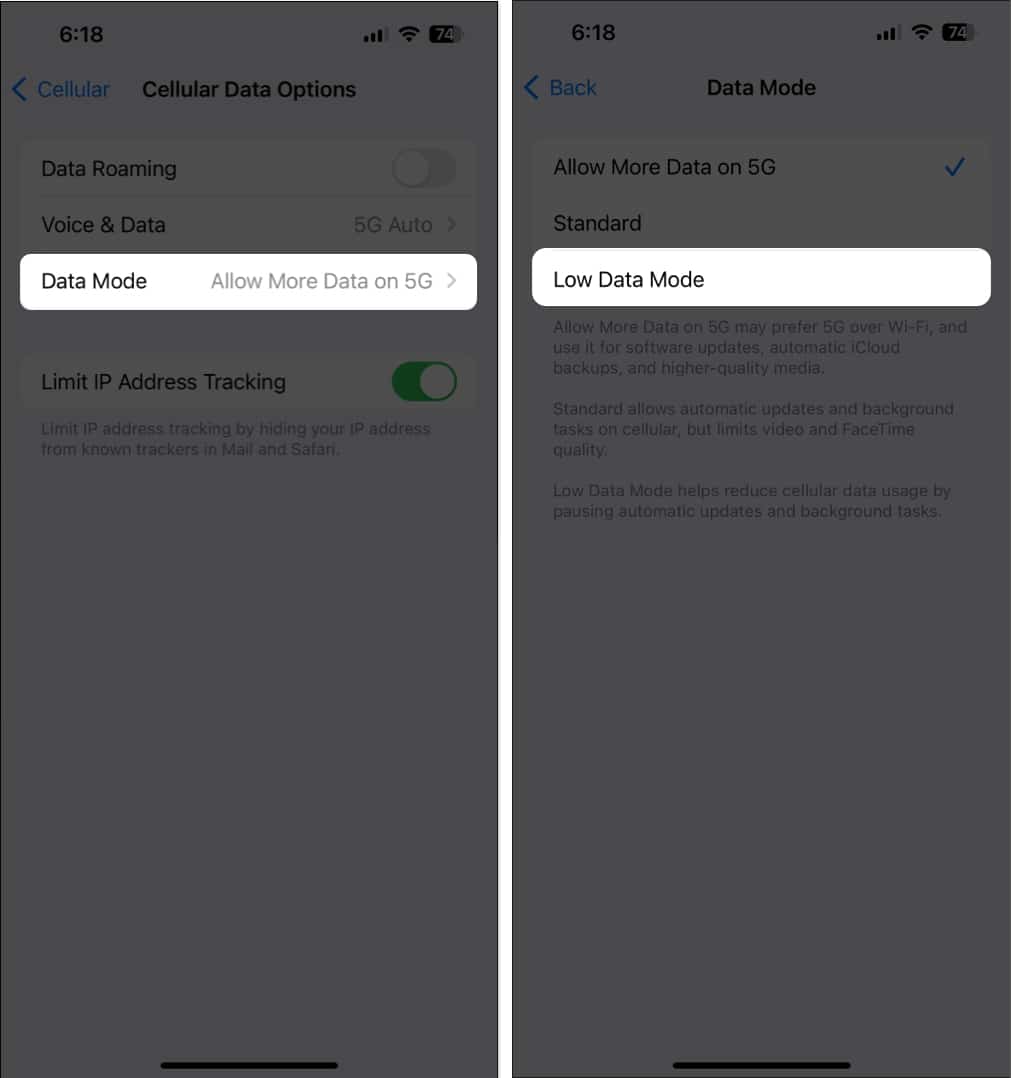
- Tap Data Mode → Deselect Low Data Mode.
- Go to Settings → Cellular → Cellular Data Options.
- To disable Low Data Mode for Wi-Fi:
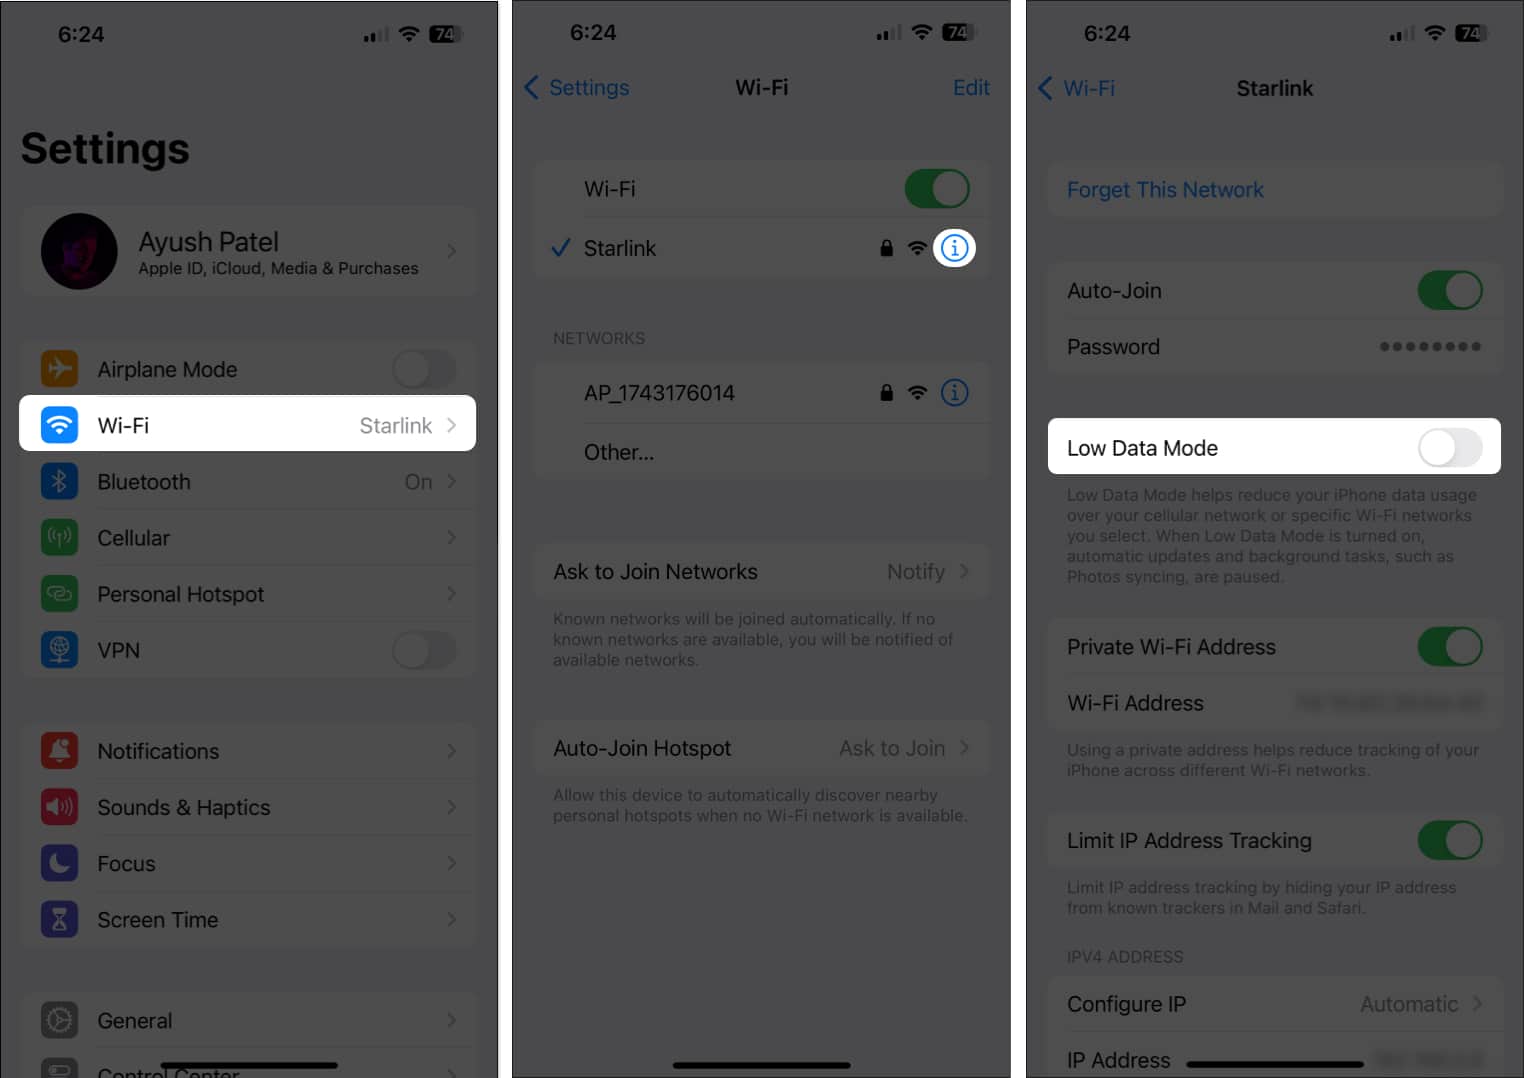
- go to Settings → Wi-Fi.
- Tap blue ‘i’ icon next to a network → Toggle off Low Data Mode.
5. Force restart your iPhone or iPad
If the preliminary fixes didn’t help resolve the issue, you should force restart your device. This will help you resolve temporary glitches that may prevent iCloud backups from working correctly. However, if you don’t know how you can do that, check out this guide on how to force restart an iPhone or iPad.
6. Ensure that VPN is turned off
VPNs offer a great way to mask your digital footprint and protect your data from the websites you visit. However, using VPNs often introduces network latency, which can interfere with your device’s ability to create backups. You should turn off VPN on your device before backing up your data via iCloud.
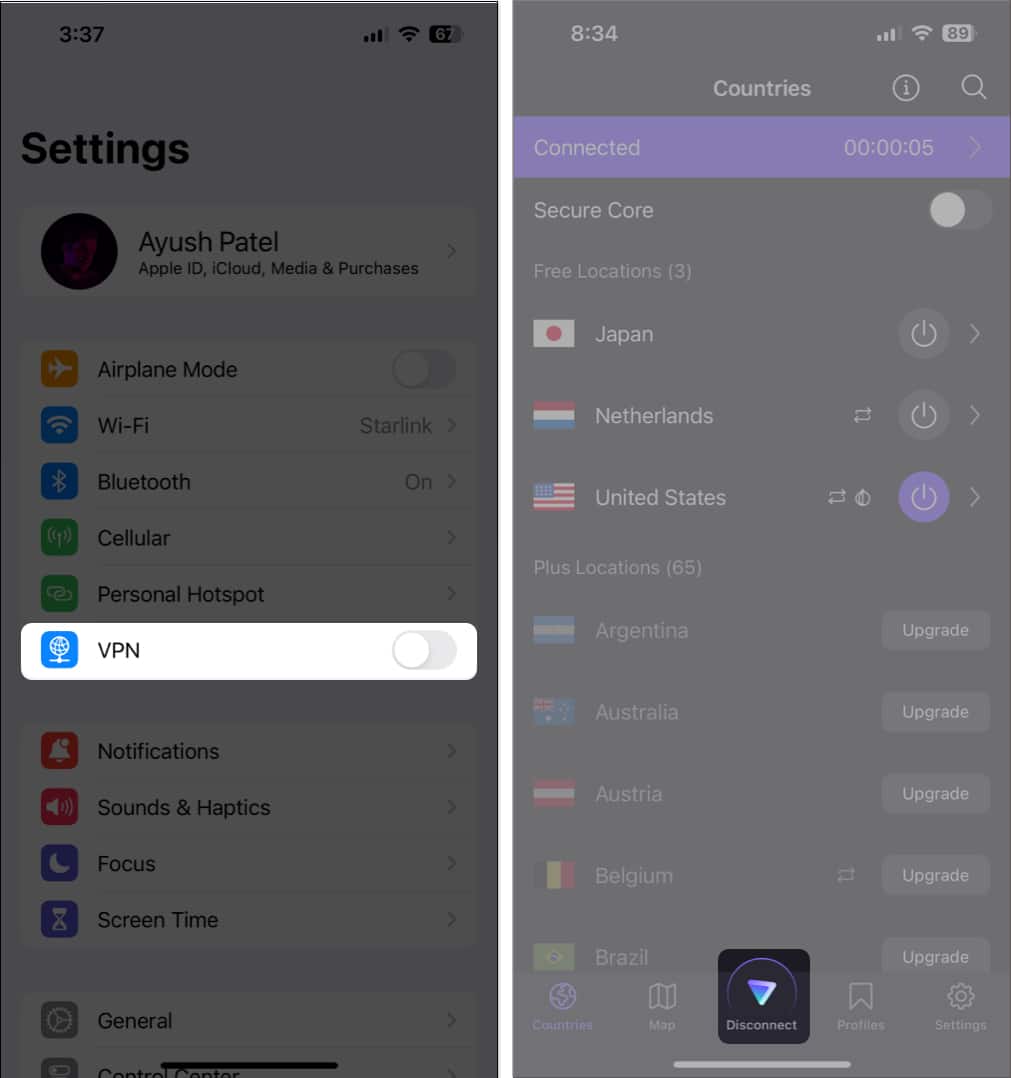
- If you’ve configured a VPN manually, go to Settings → toggle off VPN.
- If you use any other VPN service, open the VPN app → tap Disconnect.
7. Check for system updates
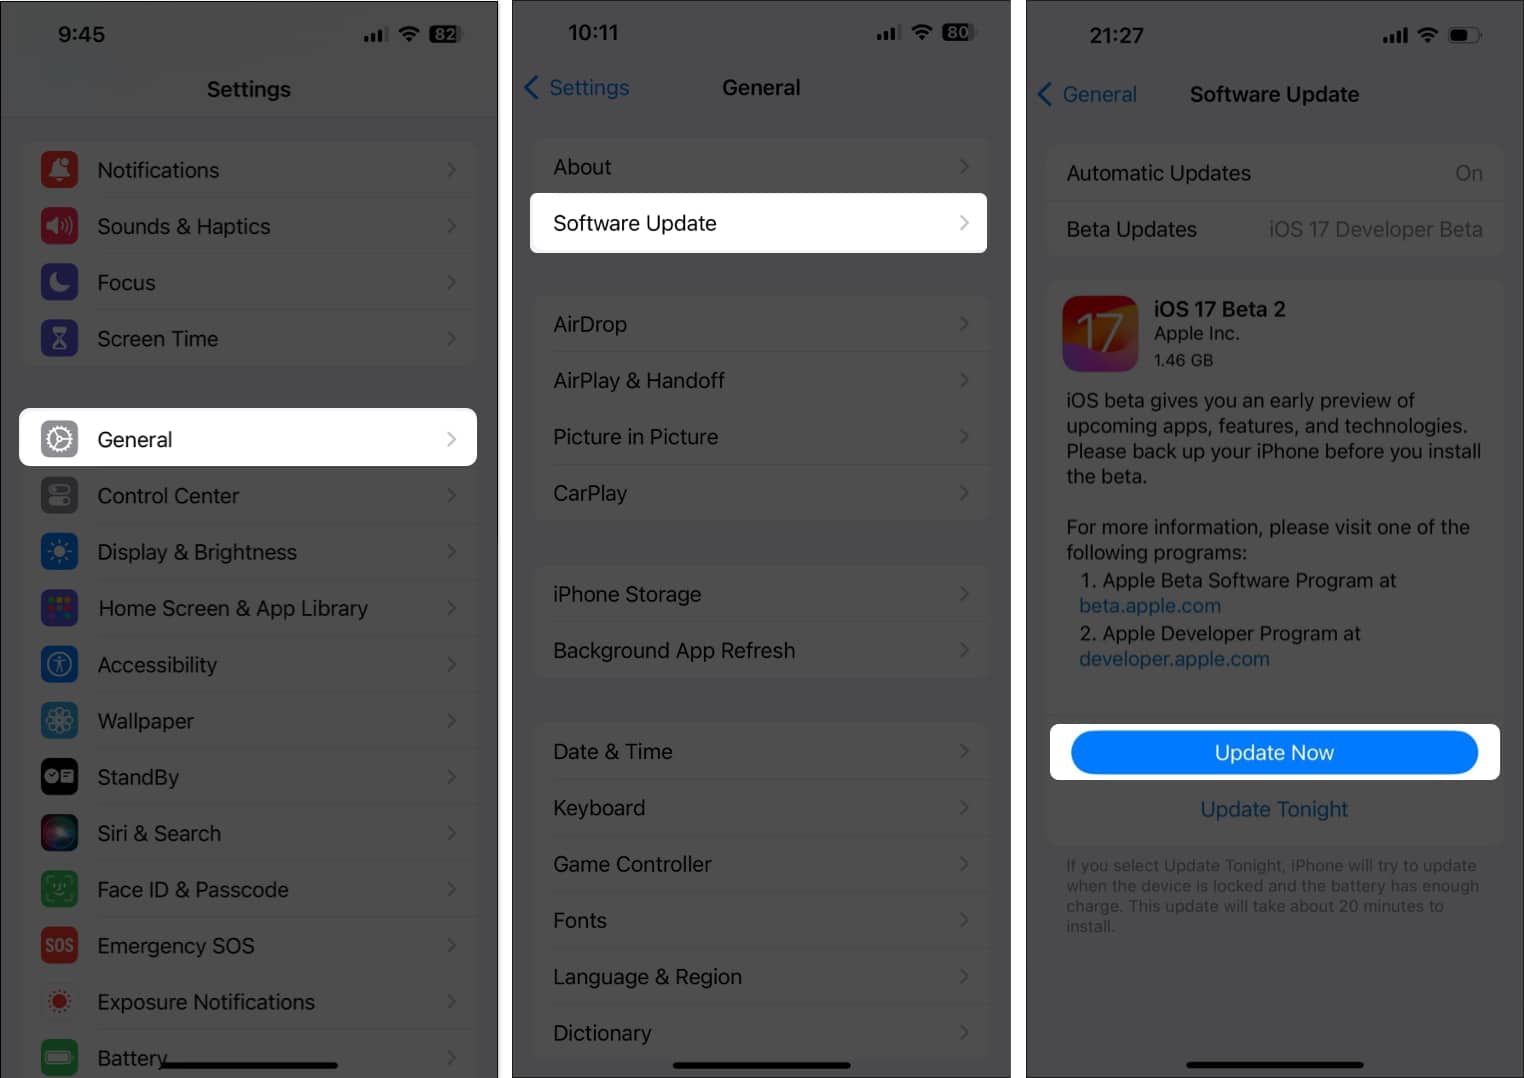
Glitches in iOS can also prevent you from creating an iCloud backup. If you think that’s the case with your iPhone, follow the steps given below to check if Apple has issued a software update with new bug fixes to patch the issue.
- Go to Settings → General → Software Update.
- Tap Update Now if an update is available.
8. Sign out and sign in to your Apple ID
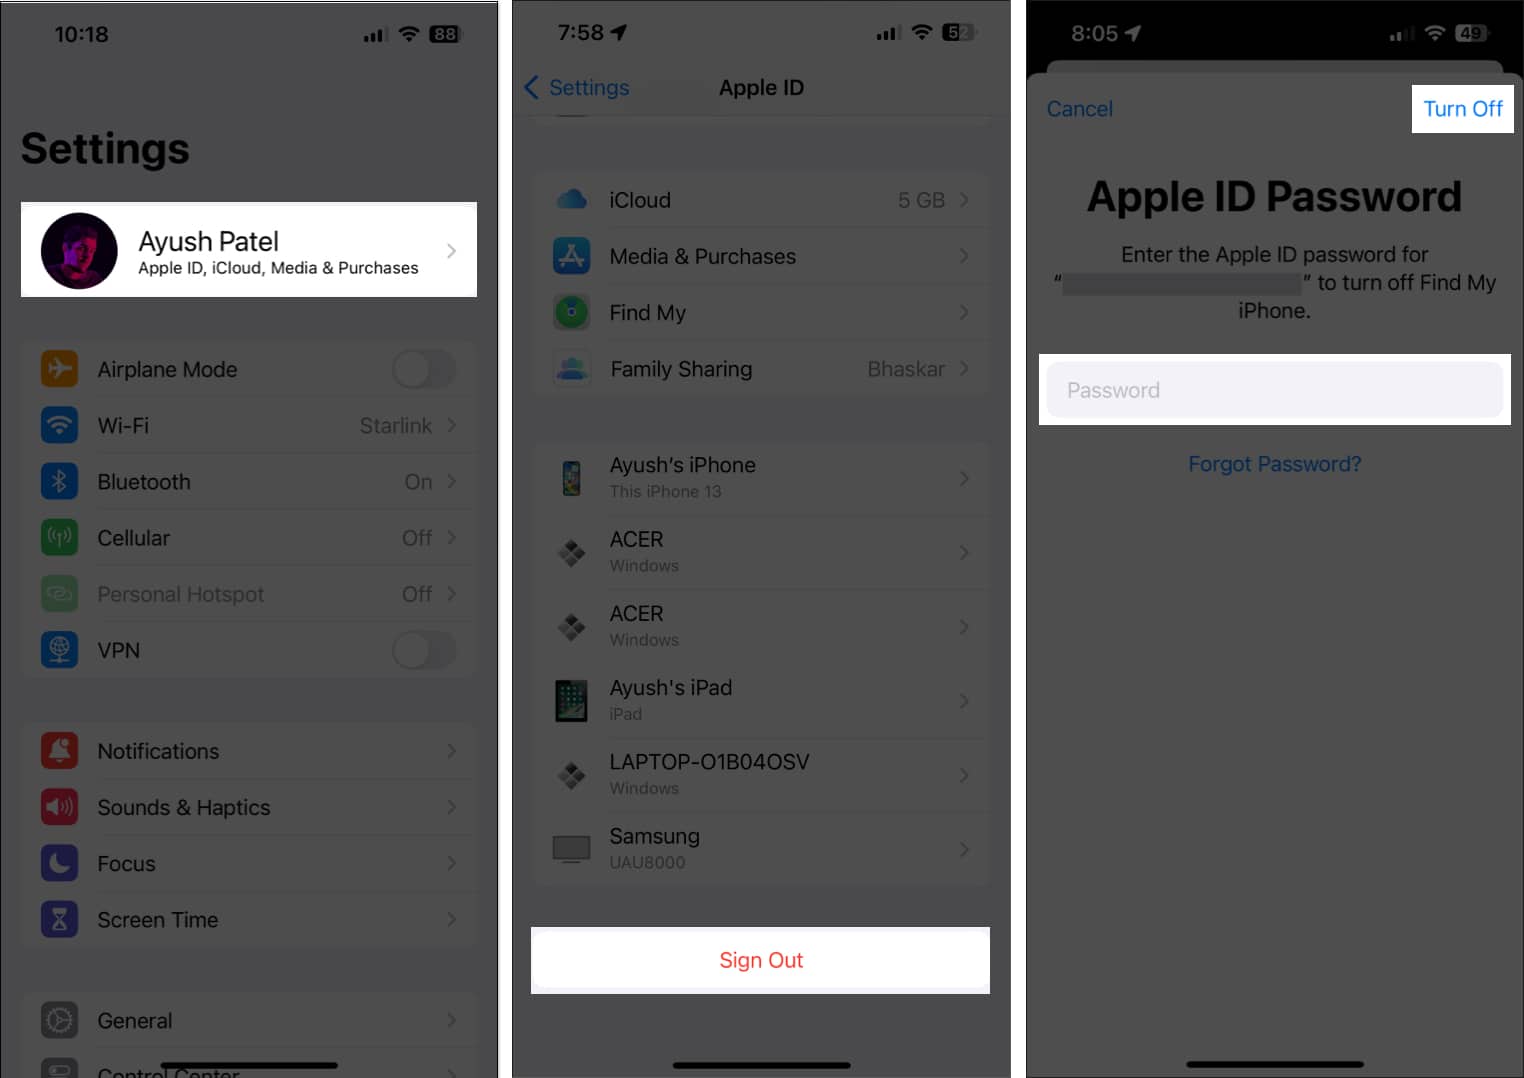
If you’re still facing difficulty in getting your devices to create an iCloud backup, it’s possible that there’s a glitch with your Apple ID or the device you’re using. If you want to phase out the possibility of such glitches, you can try logging out and back into your Apple ID by following these steps:
- Launch the Settings app → Tap the Apple ID banner.
- Scroll down and tap Sign Out.
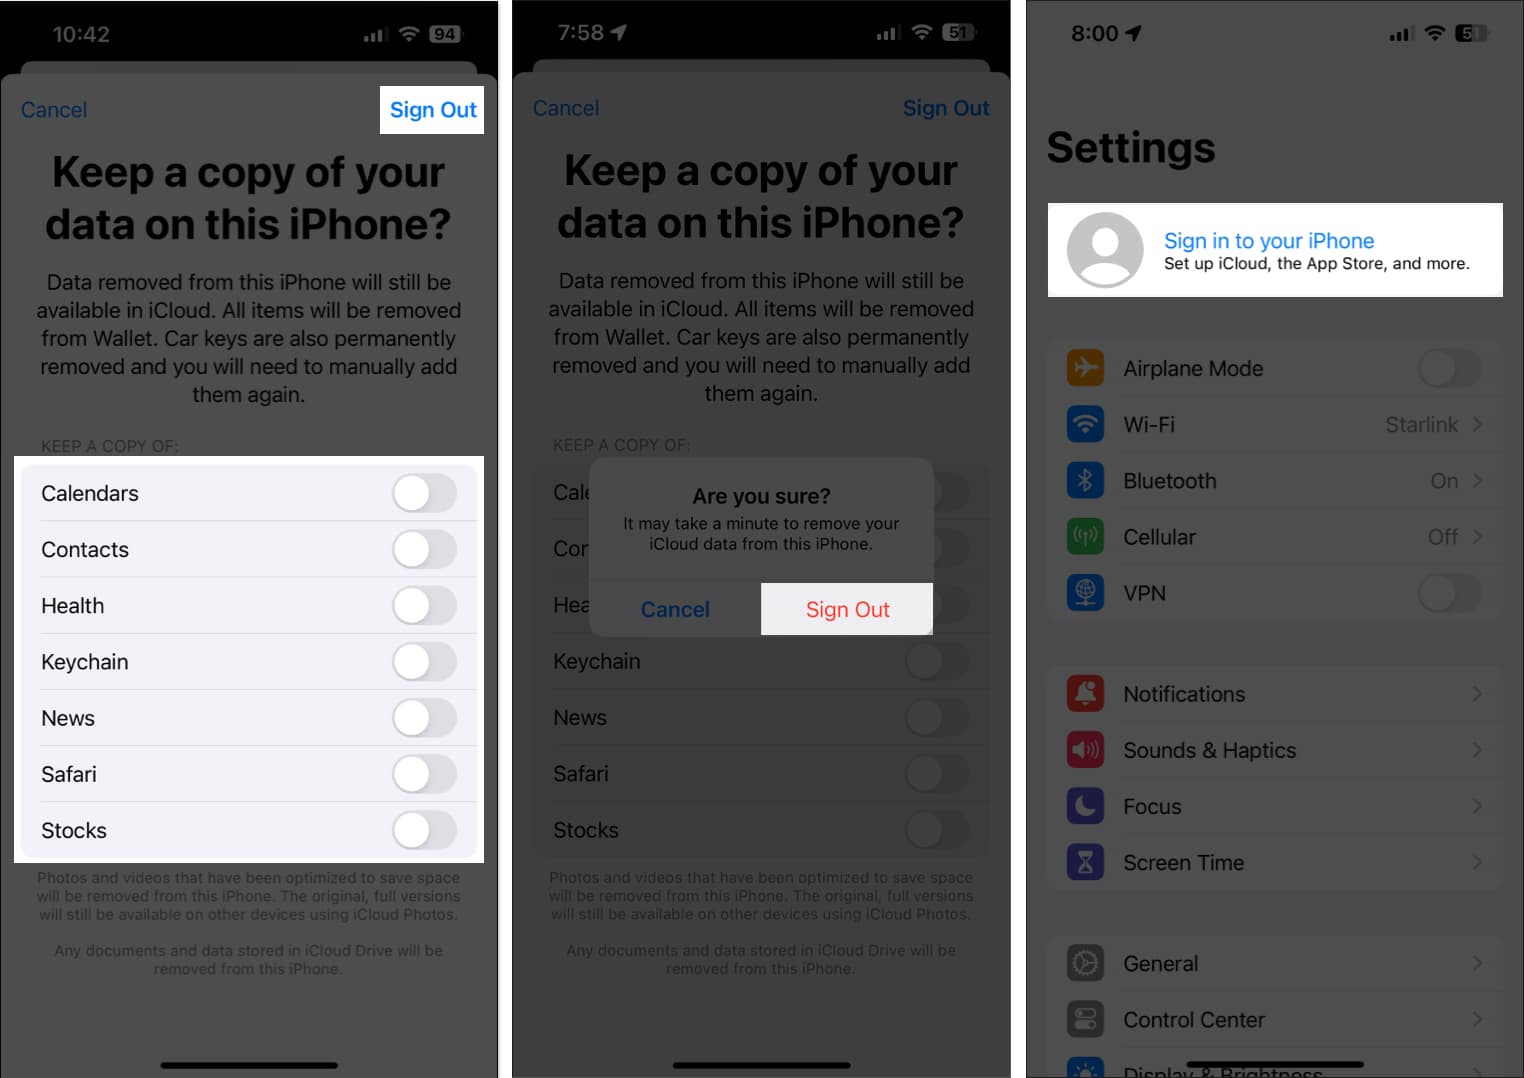
- Enter your Apple ID’s password → tap Turn off.
- Select the content you want to store offline. Then, tap Sign out.
- Sign in to your Apple account again.
9. Reset All Settings
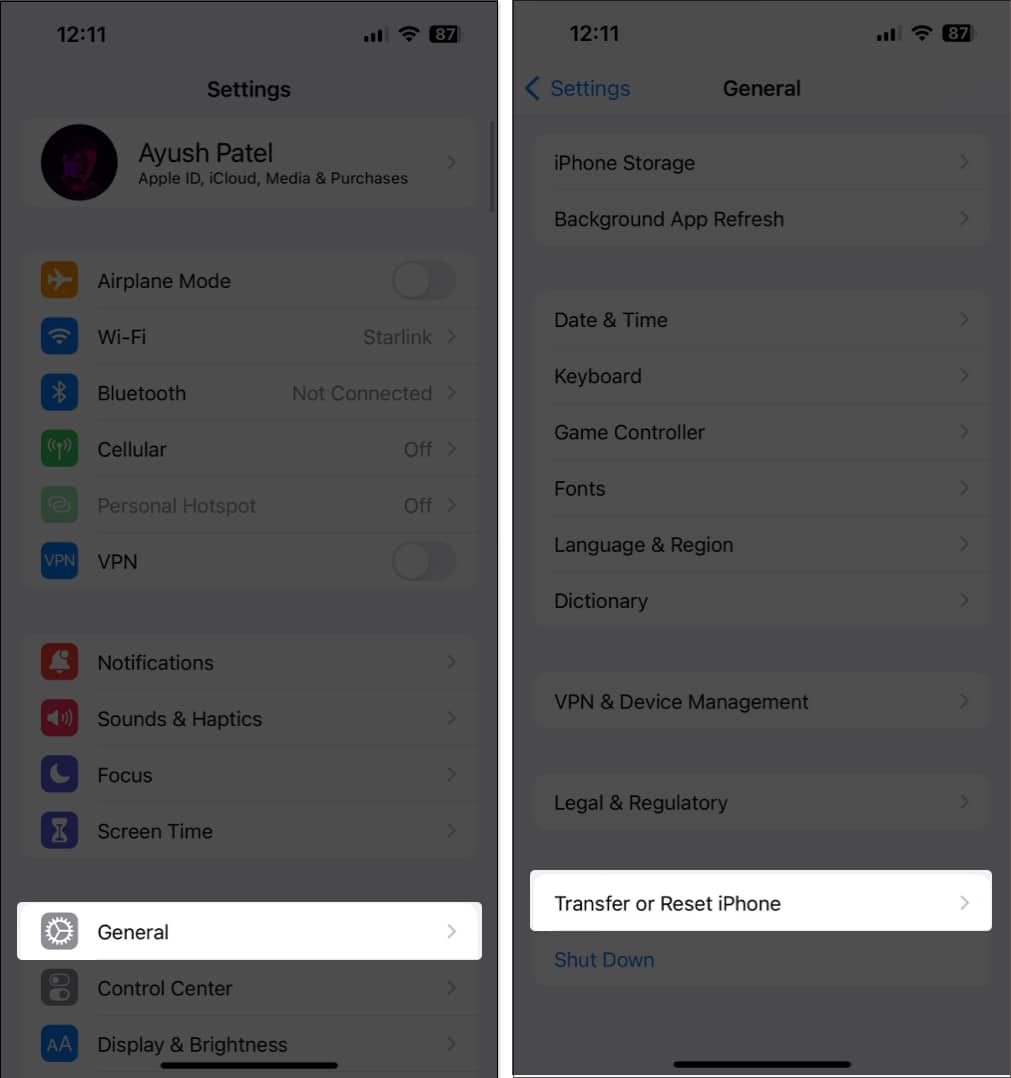
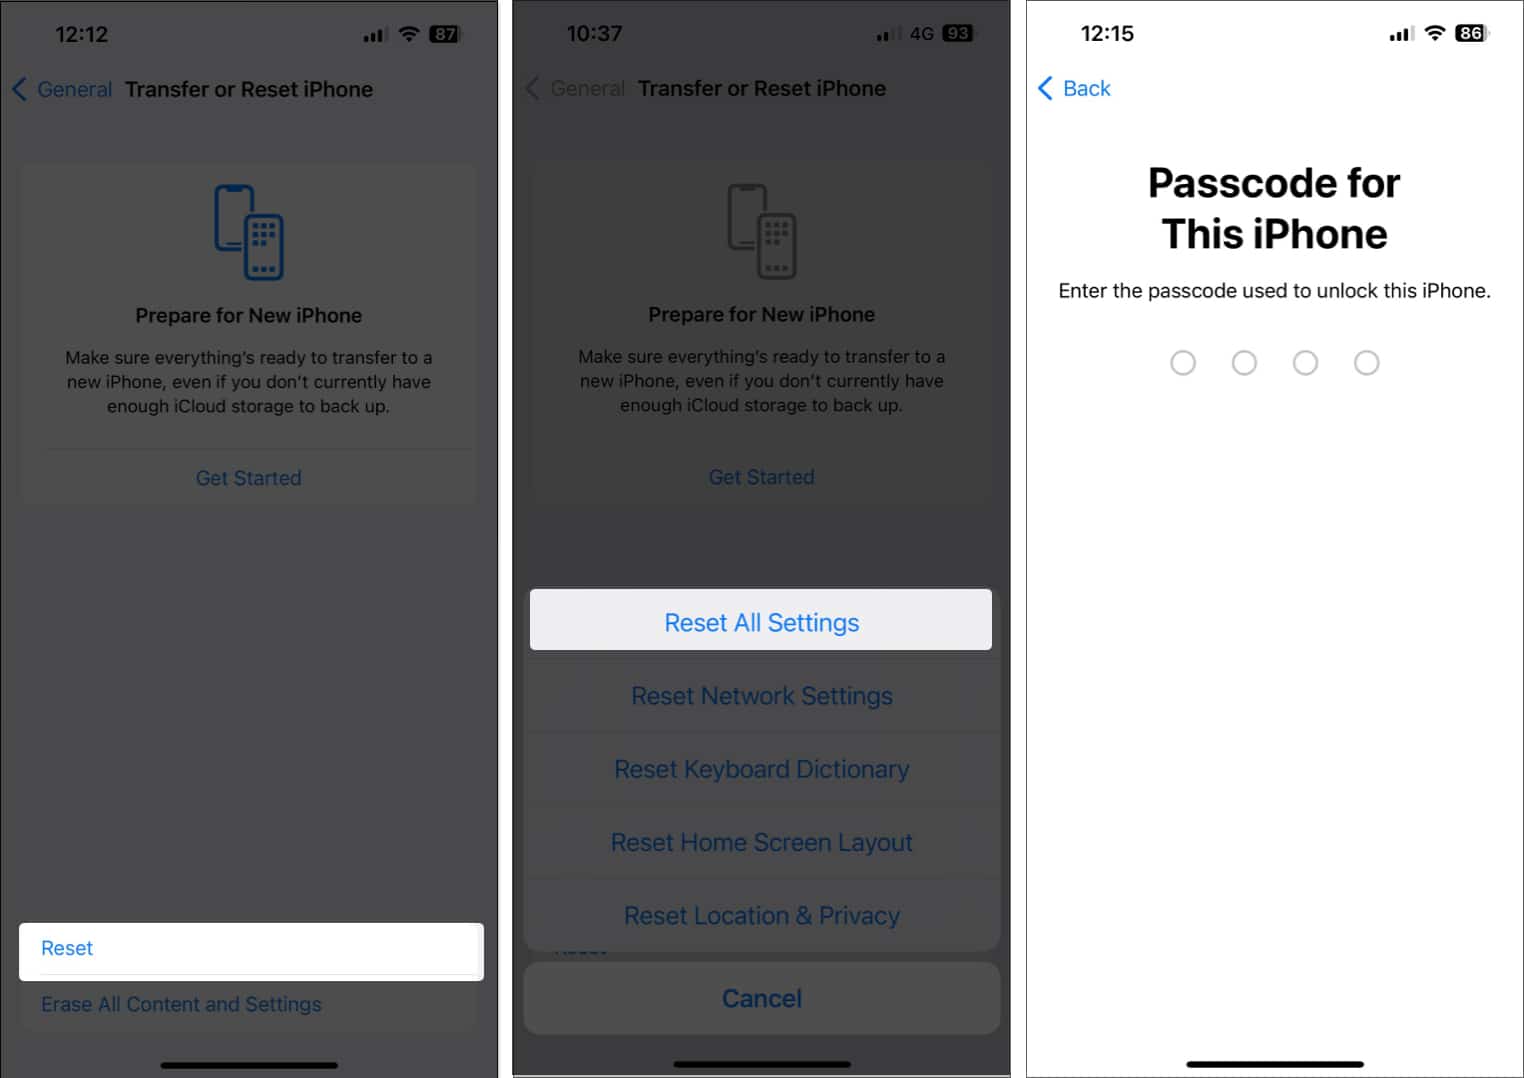
If most solutions fail, you can reset all settings on your iPhone/iPad to see if that helps fix the issue. This action will restore all settings to their default values while leaving your data untouched. Here’s how you can do this:
- Go to Settings → General → Transfer or Reset iPhone (or iPad).
- Tap Reset → Reset All Settings.
- Enter your iPhone or iPad’s Passcode.
- Tap Reset All Settings again to complete the process.
10. Create a local backup on Mac or PC
Although iCloud backups are convenient, they can’t be created without an active internet connection. Therefore, the best way to back up an iPhone or iPad is to connect it to your Mac or PC via a cable to create a local backup.
If you’re using a Mac, you can back up your devices via Finder. However, if you have a PC, you will have to use iTunes to back up your devices locally.
11. Contact Apple support
If you’ve tried all of the solutions given above, but you’re still unable to back up your iPhone or iPad to iCloud, it’s recommended that you contact Apple Support. They can assist you over the phone or help schedule a Genius Bar appointment at a nearby Apple Store to diagnose and resolve your issue.
Generally, iCloud backups don’t take more than a few minutes to a couple of hours to finish. However, this might change depending on your internet network’s upload speed and the size of data that needs to be backed up.
iCloud backups happen automatically when your device is connected to Wi-Fi, charging, and locked. You cannot set a specific schedule for iCloud backups, but they should happen regularly when these conditions are met.
iCloud backups generally include your device’s entire data. Nevertheless, you can still manage which apps use iCloud and turn off backups for them.
Signing off…
iCloud backups ensure that all your essential data, including your photos, stays secure in case your device runs into a technical issue, gets broken, or is stolen. But, if you aren’t able to back up your iPhone or iPad to iCloud, the solutions mentioned in this troubleshooting guide can help you resolve this.
Also read:

