The Files app is the native file manager on the iPhone and iPad. But since it’s Apple, it has made sure to make this app stand out from the crowd by providing support for third-party cloud storage apps like Google Drive, Dropbox, etc. So, other than this, what can you do with the Files app? Well, the answer to that lies in this guide. So, launch the Files app on your iPhone or iPad and join us as we explore every feature of the app and how to use it.
You can access the following files from Files app
Here are the files that you will be able to access from the Files app:
- Files on iPhone, iPad, or iPod touch.
- Pages, Numbers, and Keynote documents on iCloud drive.
- Files from other cloud services and apps, such as Dropbox, OneDrive, Adobe Creative Cloud, Google Drive, and others.
This could surprise you, but the Files app doesn’t support the iPhone’s photo library. We have mentioned the steps for that in one of the following sections.
Enable access to third-party apps in Files app
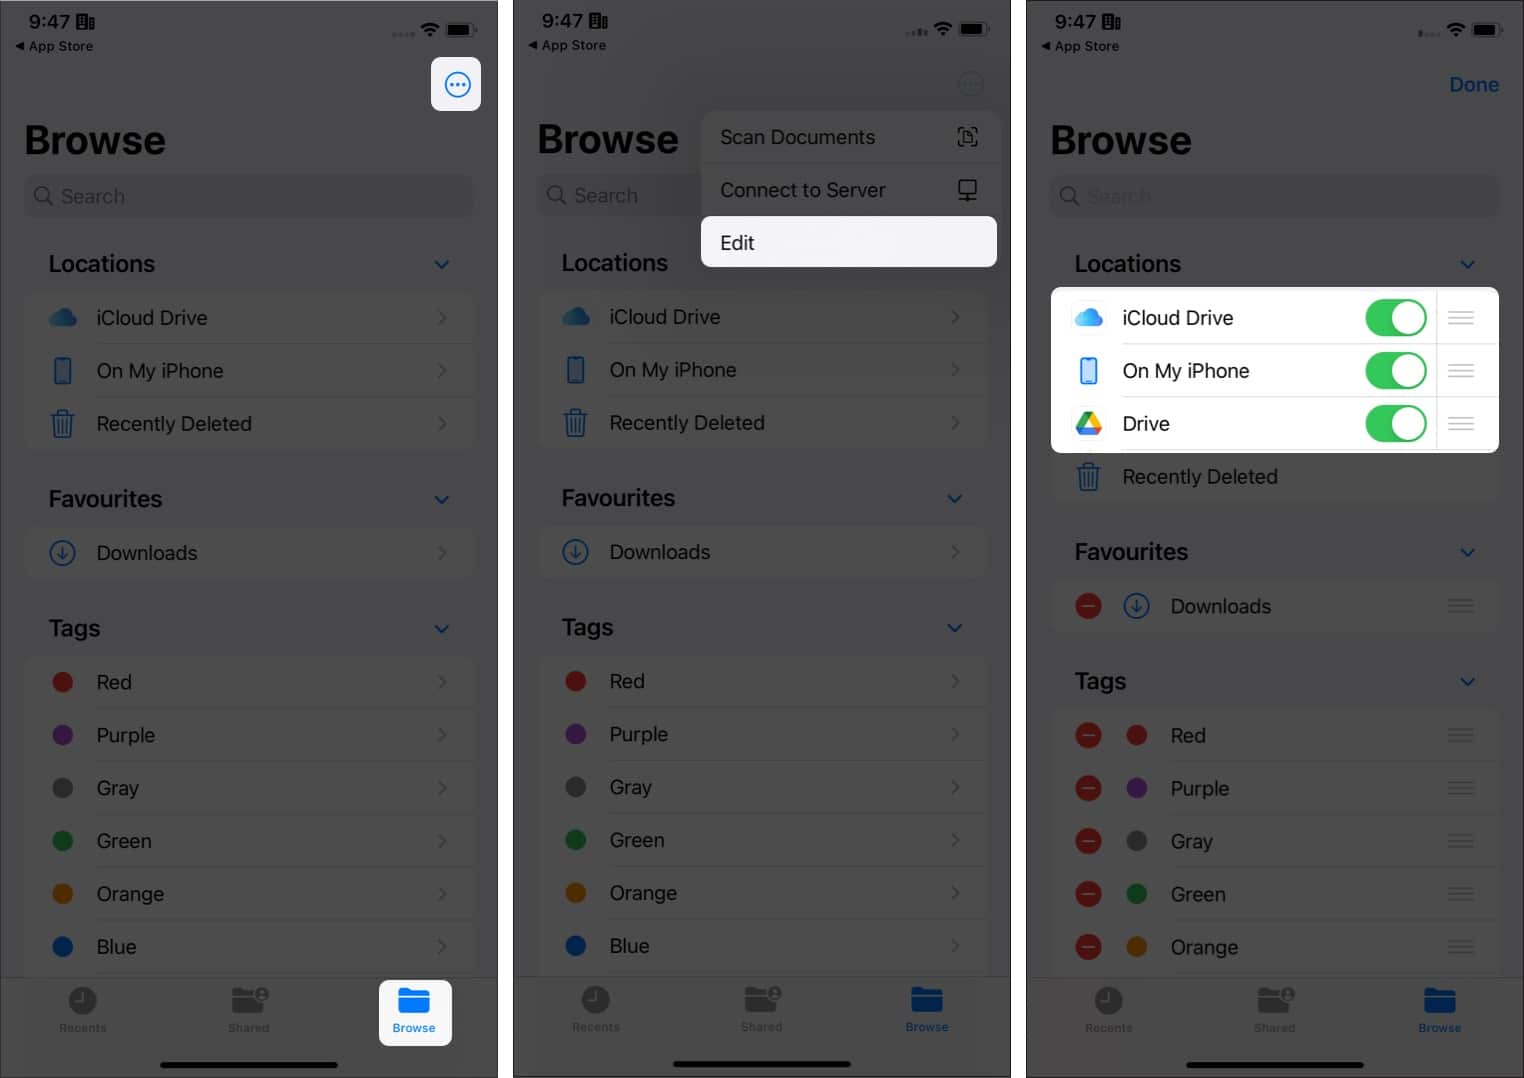
By default, the Files app doesn’t have access to certain file formats inside your iPhone. I guess Apple took user privacy protection a bit too seriously. So, to access the files of these apps, you need to:
- Open the Files app on your iPhone.
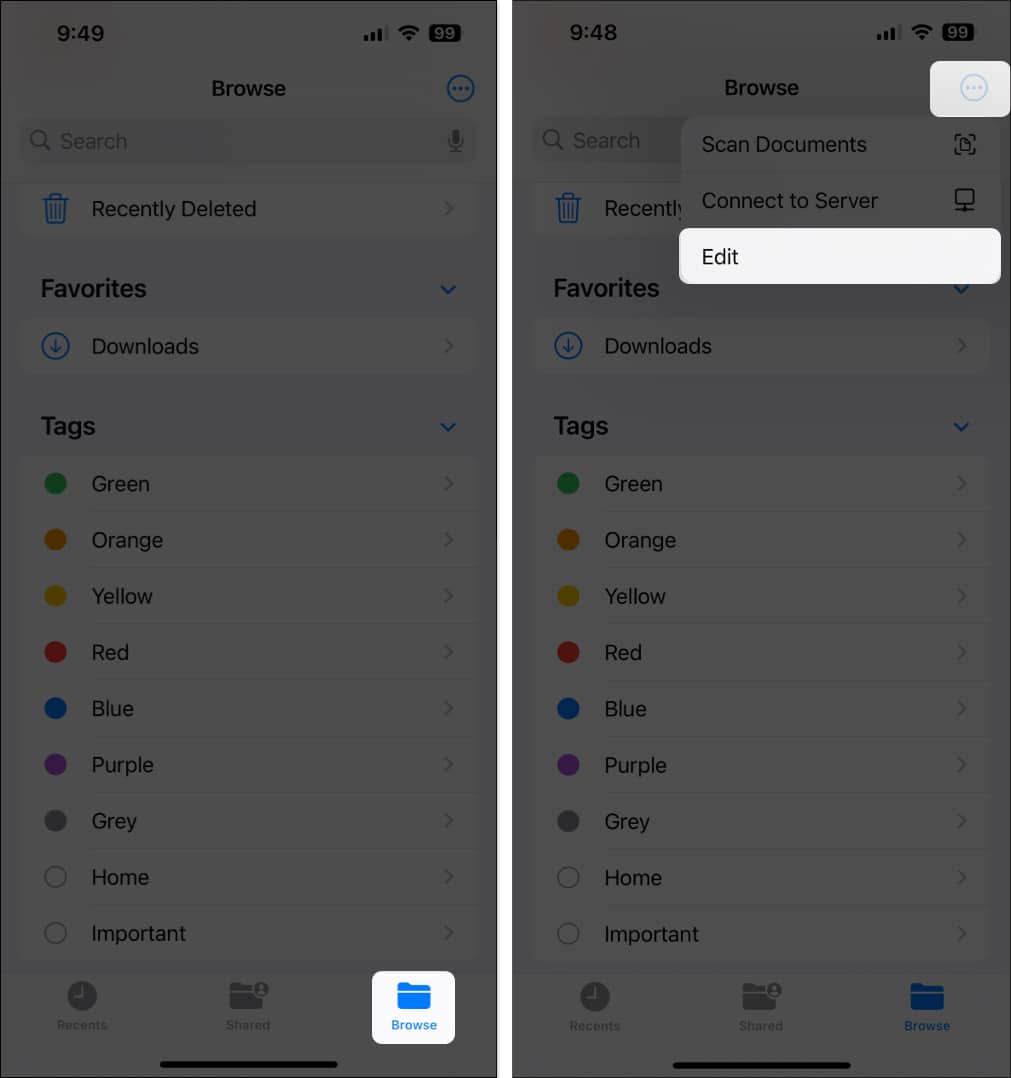
- Tap Browse.
To ensure you are on the main page of Browse, tap Browse again. - Select the three dots icon from the top right.
- Now, tap Edit.
- Toggle on the apps you wish to give access to and tap Done.
Check files stored locally on iPhone or iPad
Since the main purpose of the Files app is to view the documents inside your iPhone or iPad, here’s how you can view the files on your iPhone:
- Open Files and tap Browse.
- Next, tap On My Phone.
If you do not see the option for On My iPhone, follow the steps mentioned above and toggle on On This iPhone.
Save items to the Files app
You can also use the Files app to save files to your iPhone and then access them. Here’s how you can do it.
Save files on your iPhone or iPad
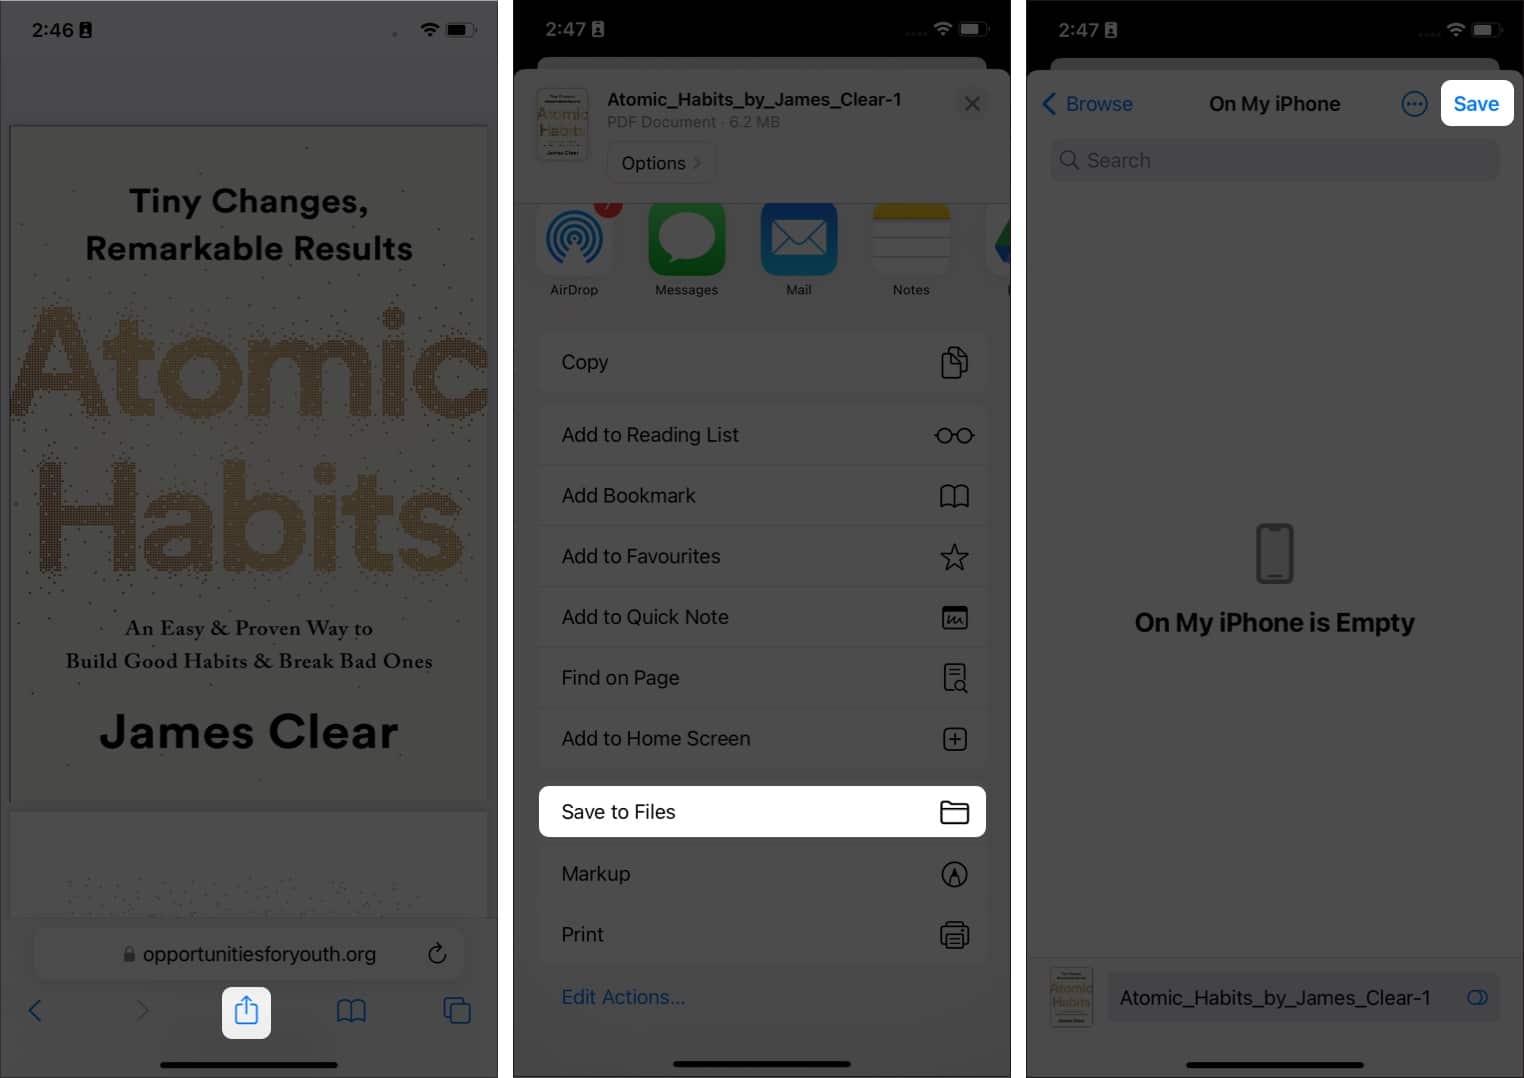
Let’s say you saw an interesting image on Safari or want to save a document to your iPhone. How can you save it to Files? It’s quite simple if you follow the following steps:
- Tap the Share button.
- Select Save to Files.
- Choose a location and tap Save.
Save pictures from the Photos app to Files
- Open the image you want to share.
- Tap the Share button.
- Scroll down and tap Save to Files.
- Select the location and tap Save.
Connect external devices to the Files app
The Files app can access files from iPhone and cloud storage and read external devices. To do so, connect external devices to your iPhone or iPad, and then you will see them under Locations in the Files app.
Create new folders
You can also create folders inside the app and then move them. For those who are wondering how to create folders on iPhone, here’s how.
- Launch Files app and tap Browse.
Ensure you are on the main Browse page by taping again. - Next, open either iCloud Drive or On My iPhone.
- Now, touch and hold an empty area. A contextual menu will pop up.
- Tap on New Folder.
- Name the folder and tap Done.
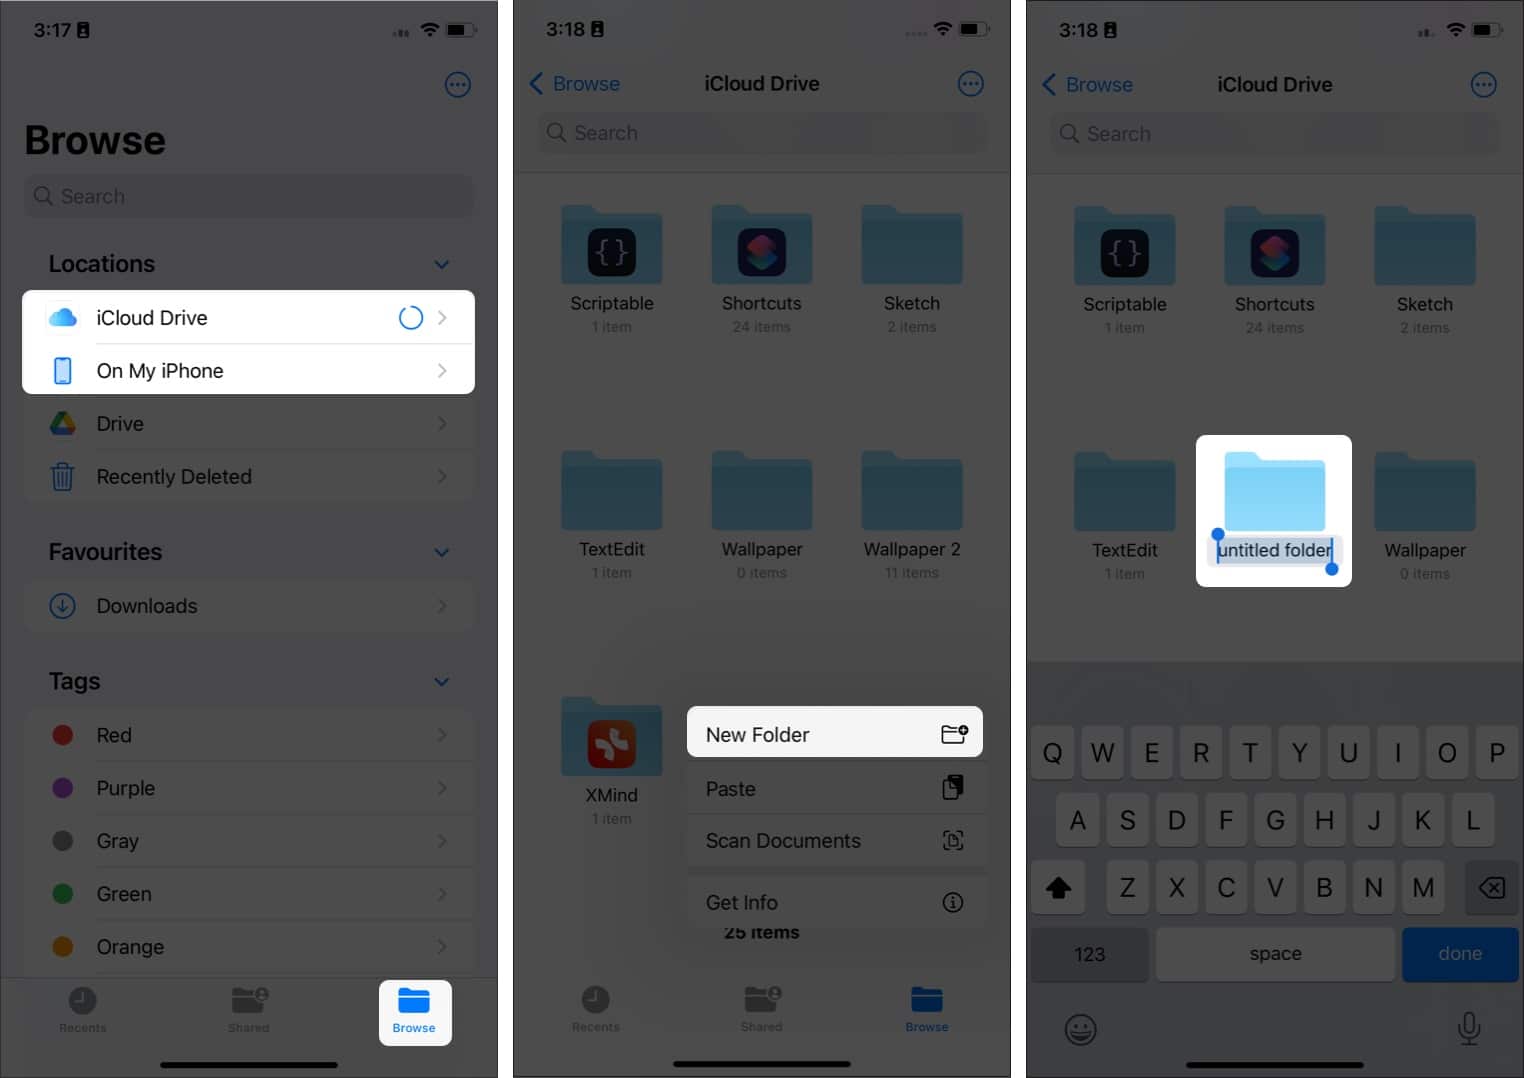
You can also tap the three dots on the top and select New Folder to create one.
Move documents
- Open the folder from where you want to move.
- Tap and hold the file you wish to move.
- Select Move.
- Choose the location and tap Move.
If you are moving a file from iCloud to On My iPhone, it will be Copy
How to use drag and drop to move files
Another great feature of the Files app is the option to drag and drop. To do this, you tap and hold the file until it lifts, tap and hold again, and then drag and drop where you want to save the file.
Move multiple docs at once in Files app manually
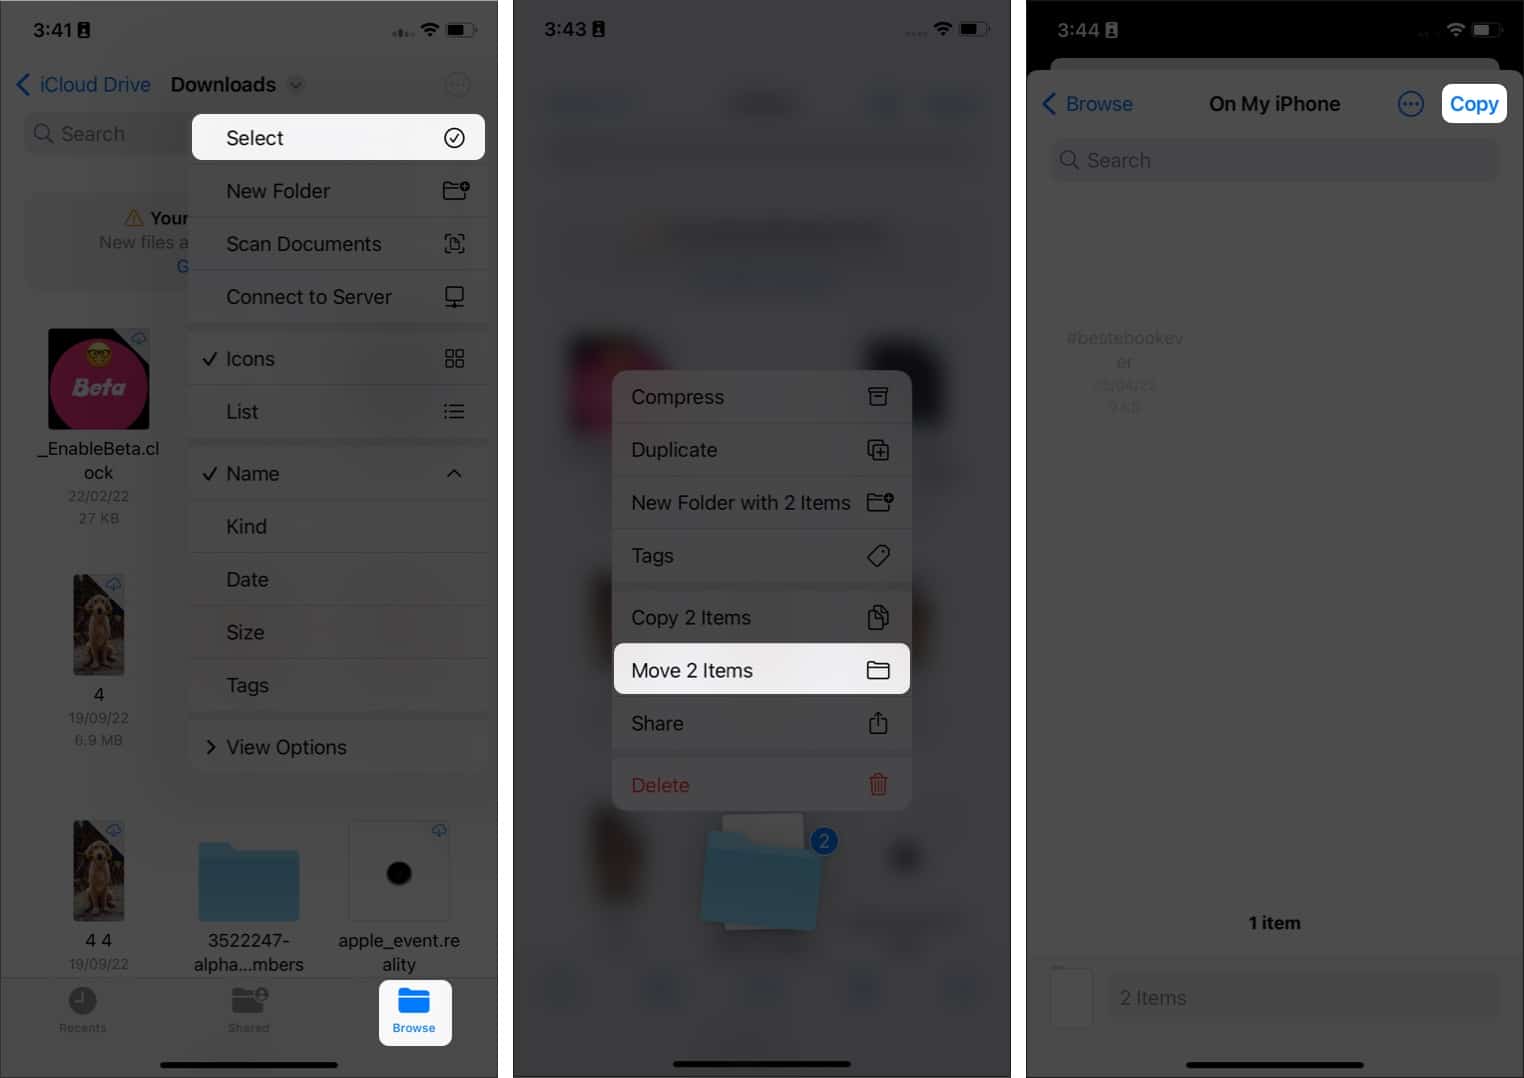
- Open the Files app → Browse.
- Go to the location from where you want to move files.
- Tap the three dots on the top right corner and tap Select.
- Now select the files to move.
- Tap and hold any of the file and select Move (x) items.
- Navigate to the location and tap Move.
If you are moving from iCloud to On My iPhone, it will be Copy.
Create a Duplicate
- Open the Files app.
- Tap Browse.
- Go to the location where your desired file is.
- Tap and hold the file you want to duplicate.
- Select Duplicate.
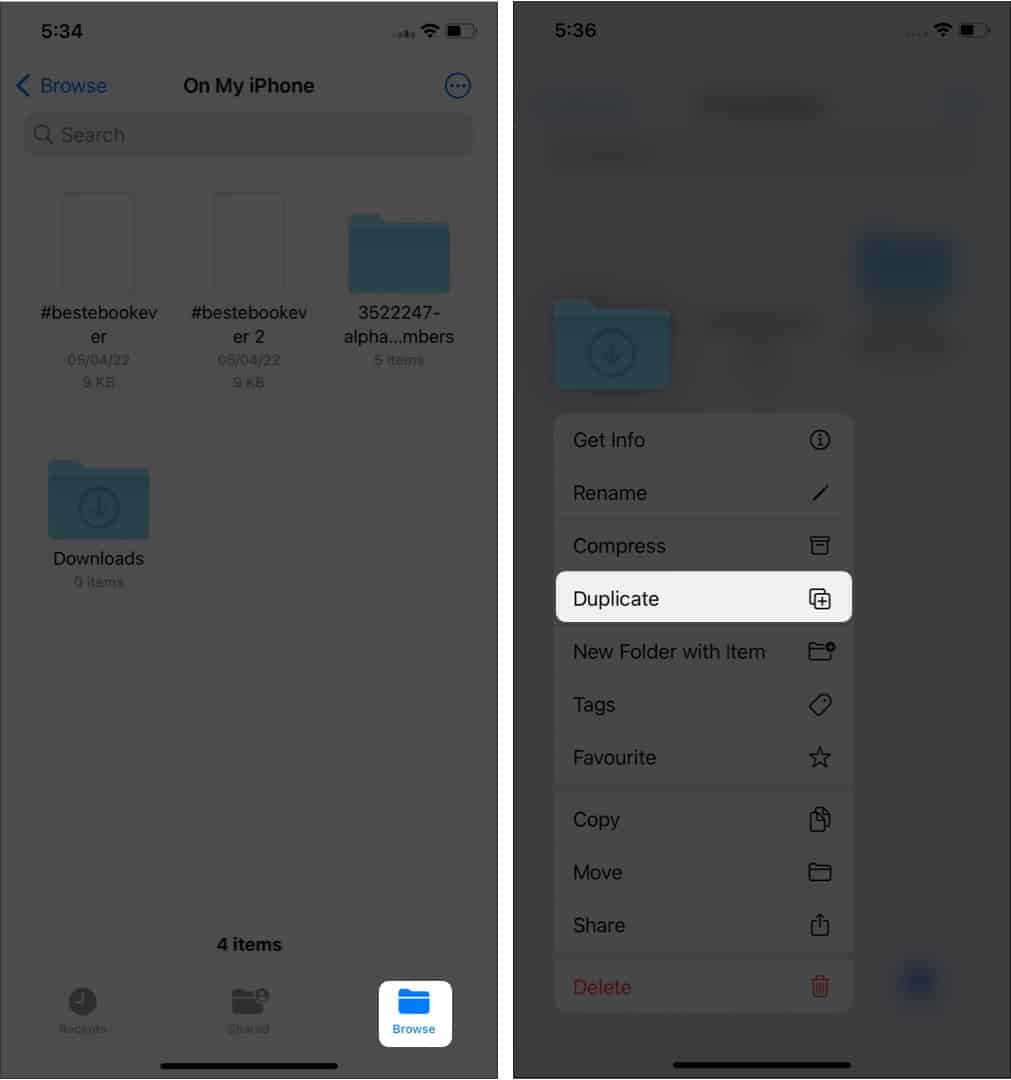
Another file will be created with the same name, except it will have a number next to it to show that it’s a copy of the original file.
Duplicate multiple docs at once
- Open Files → Browse → location where the files you wish to duplicate are.
- Tap the three dots on the top right corner and choose Select.
- Next, select all the files to be duplicated.
- Tap the icon with four squares with a plus at the bottom.
Duplicates of the selected files will be created. These files will have the word ‘2’ at the end of the file name. (The file name will depend on the number of times you have duplicated.)
Search files or folders in the Files app
It won’t be easy to find the right file that you want to find if there are lots of them. So here’s how you can search in the Files app:
- Open the Files app.
- Tap the search bar on top.
- Now enter the search term and tap Search.
Create a Favorite folder
If there are a lot of files on your iPhone, it is best to mark the important ones as favorites so that you don’t have to look around or even search the next time you want them. Here’s how you can mark the files as favorites in the Files app:
- Open the Files app → Browse.
- Choose the location where the folder is.
- Tap and hold the folder you want to mark as Favorite.
- Select Favorite.
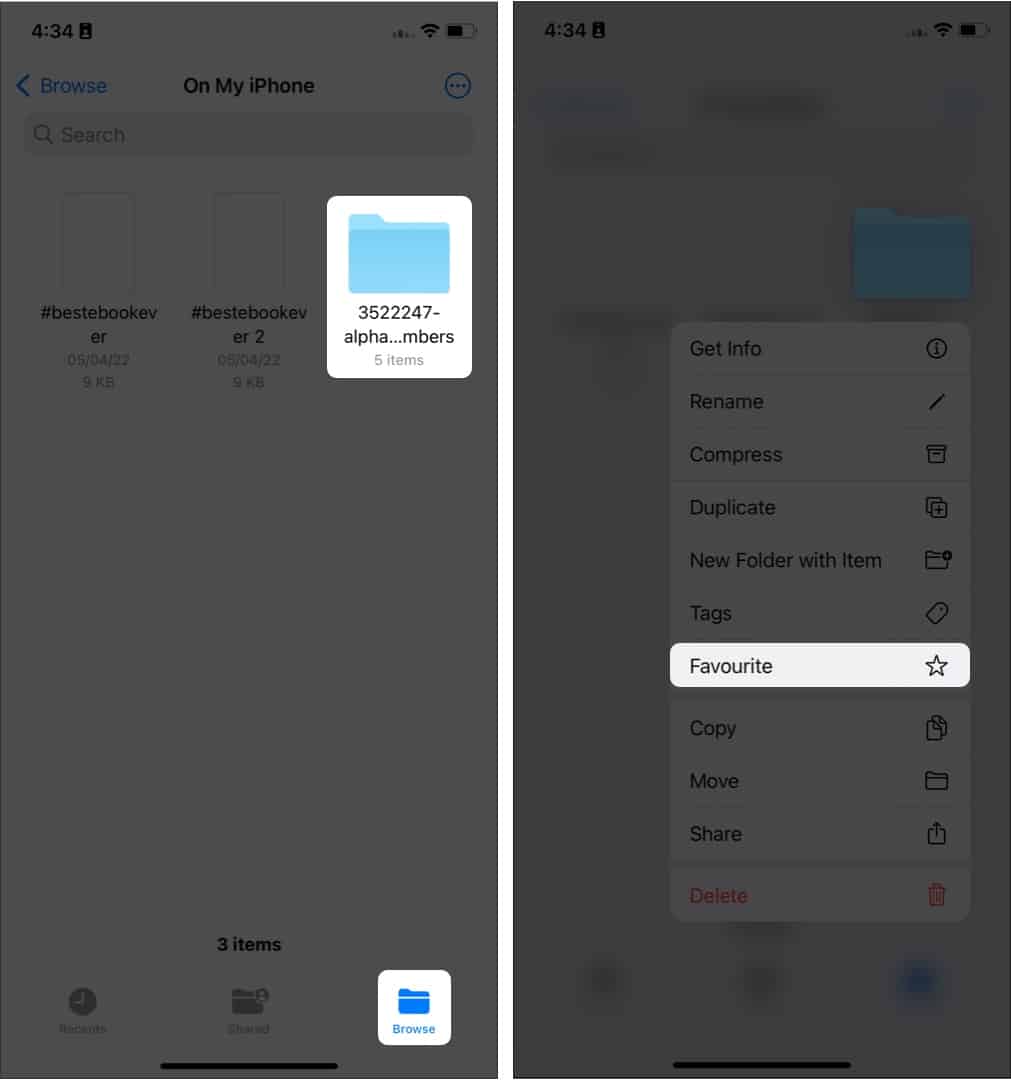
That’s it! Now, you will see the selected folder under the Favorites section on the Browse page.
Remove folders from Favorites
No one can be the favorite of someone every day. That’s the same case for those folders you have marked as favorites. It’s time to remove them from your favorites list. Here’s how:
- Open Files.
- Tap Browser.
- Under Favorites, left swipe the folder which you want to remove. Then tap Remove.
You can swipe left from one end to another to remove it directly.
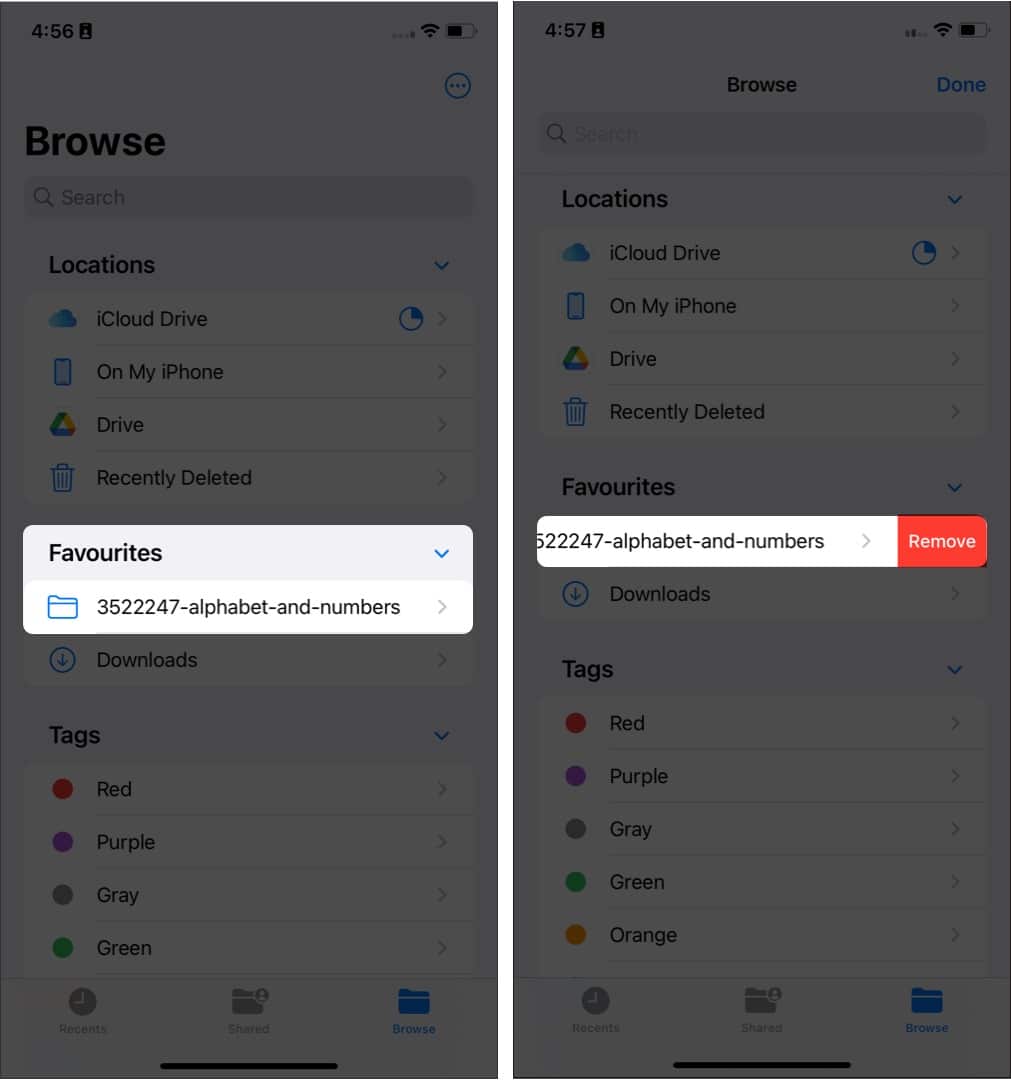
You can also tap and hold the folder. Select Remove to delete them from Favorites.
View recently accessed files
- Open the Files app.
- Tap on Recents.
From here, you can see the recent files that you have accessed through the Files app. You can organize the view by tapping the four squares on top and selecting the option of your choice.
Share docs or folders from the Files app
- Open the Files → Browse → location where the file is shared.
- Touch and hold the document.
- Tap Share.
- Select an option from the Share Sheet.
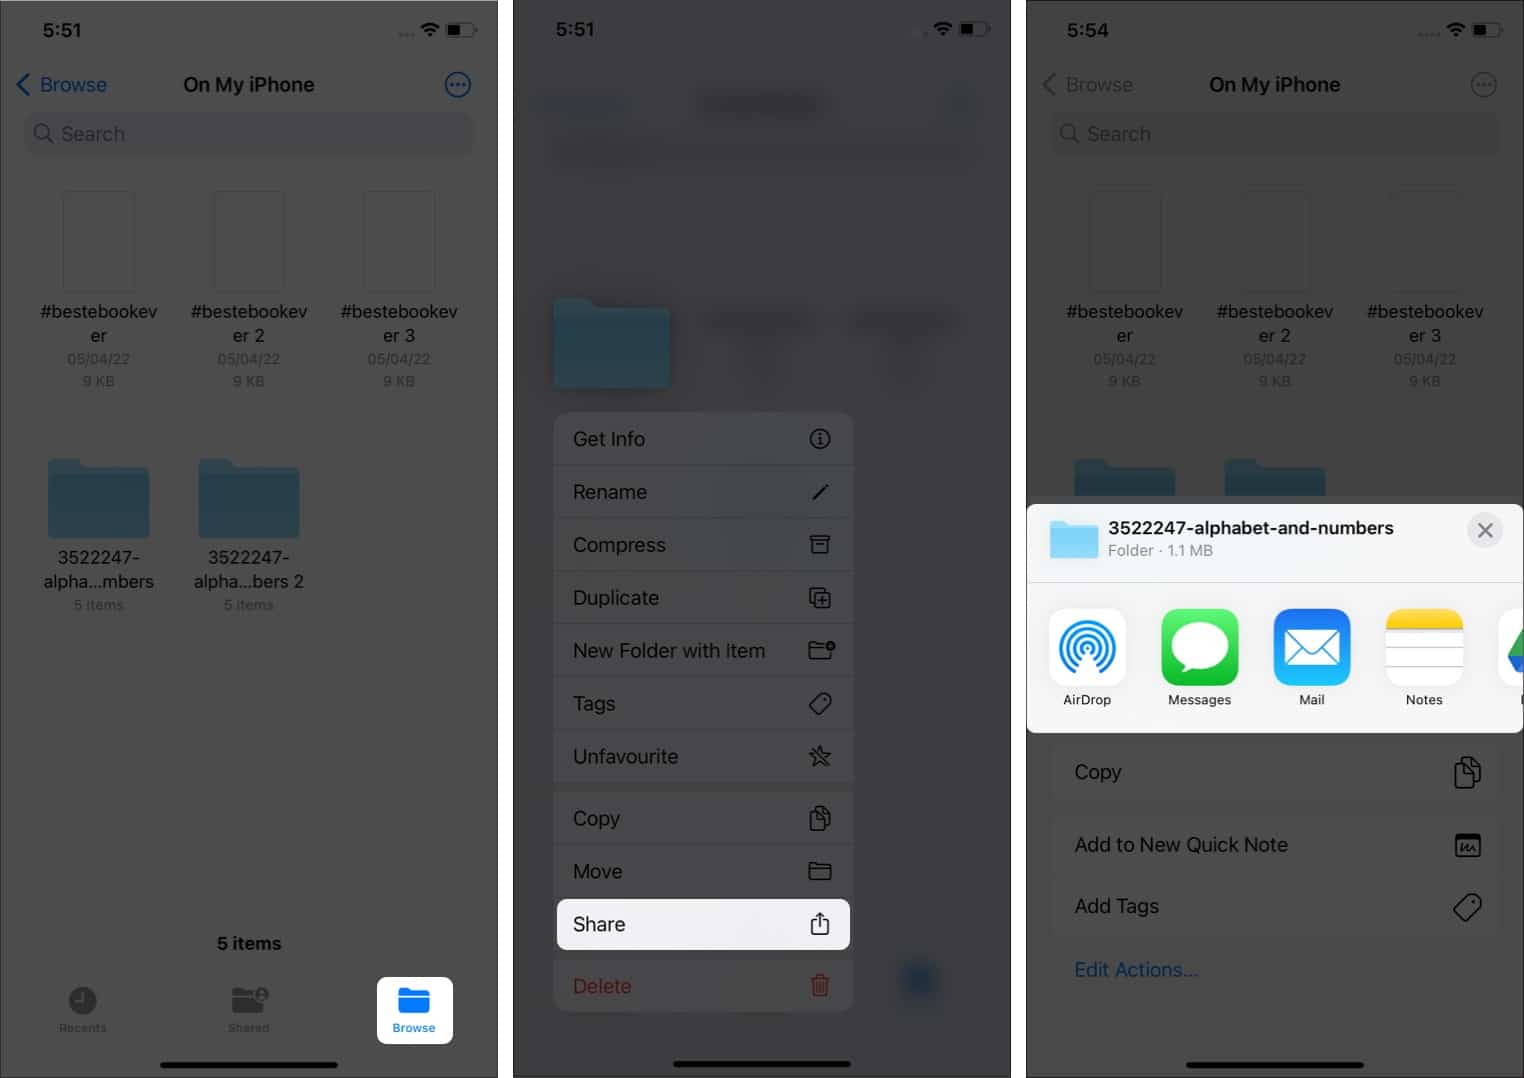
To share multiple Docs and Folders in Files App, tap the three dots and choose Select. Then select all the files, tap the Share button, and choose how you want to share the file.
How to use Tags in Files app
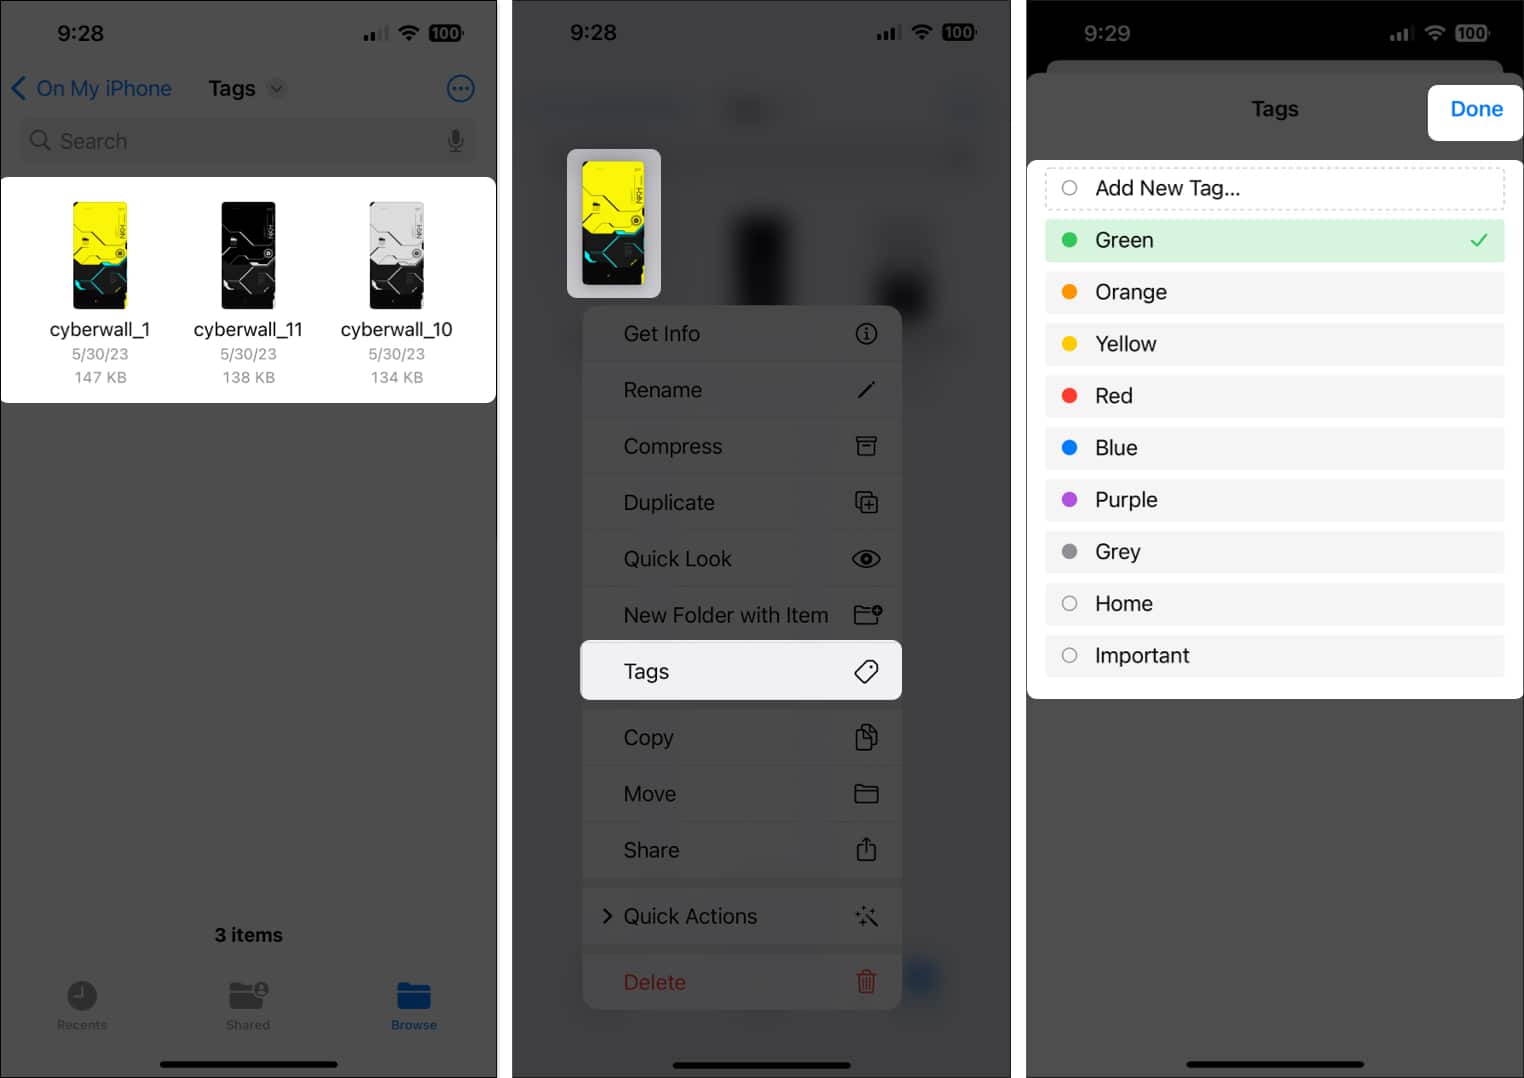
Just like Finder in macOS, the Files app on your iPhone and iPad also offers the ability to tag files and folders. This allows you to easily search for your files and folders by keeping things organized. Here’s how you can use Tags in Files app:
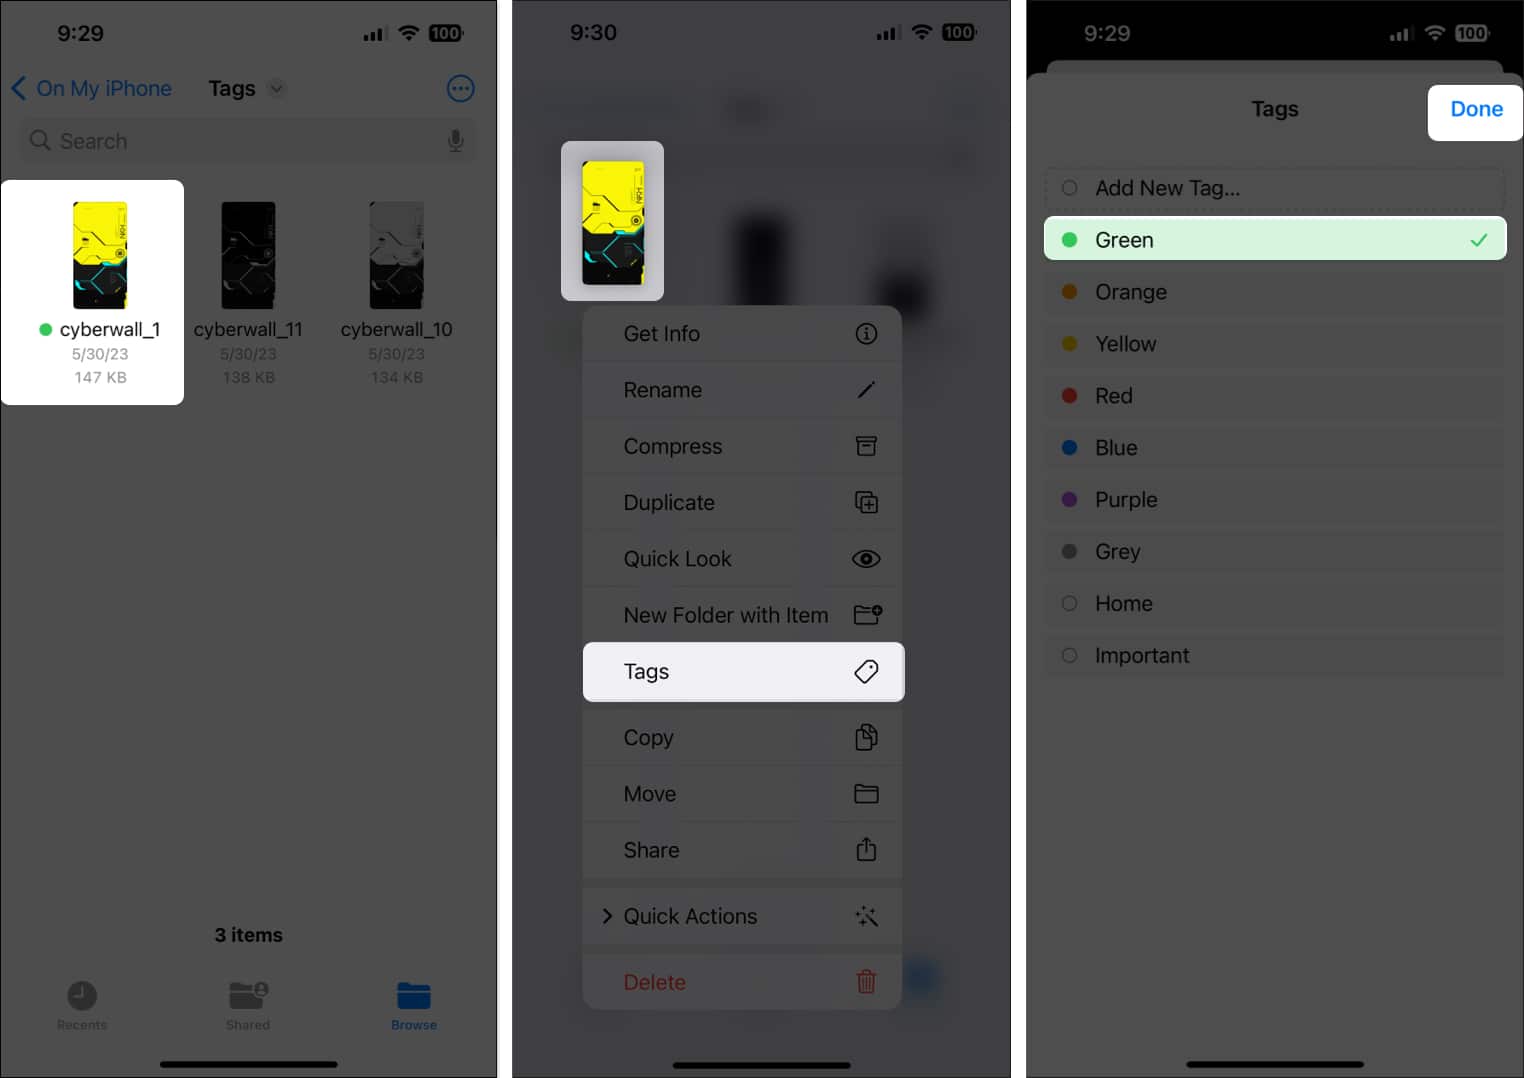
Add Tags for individual file or folder
- Open the Files app on your iPhone or iPad.
- Now, tap and hold a file or folder. Then, select Tags.
- Select a tag according to your preference. Then, tap Done.
If you don’t find the existing tags useful, tap Add New Tag.
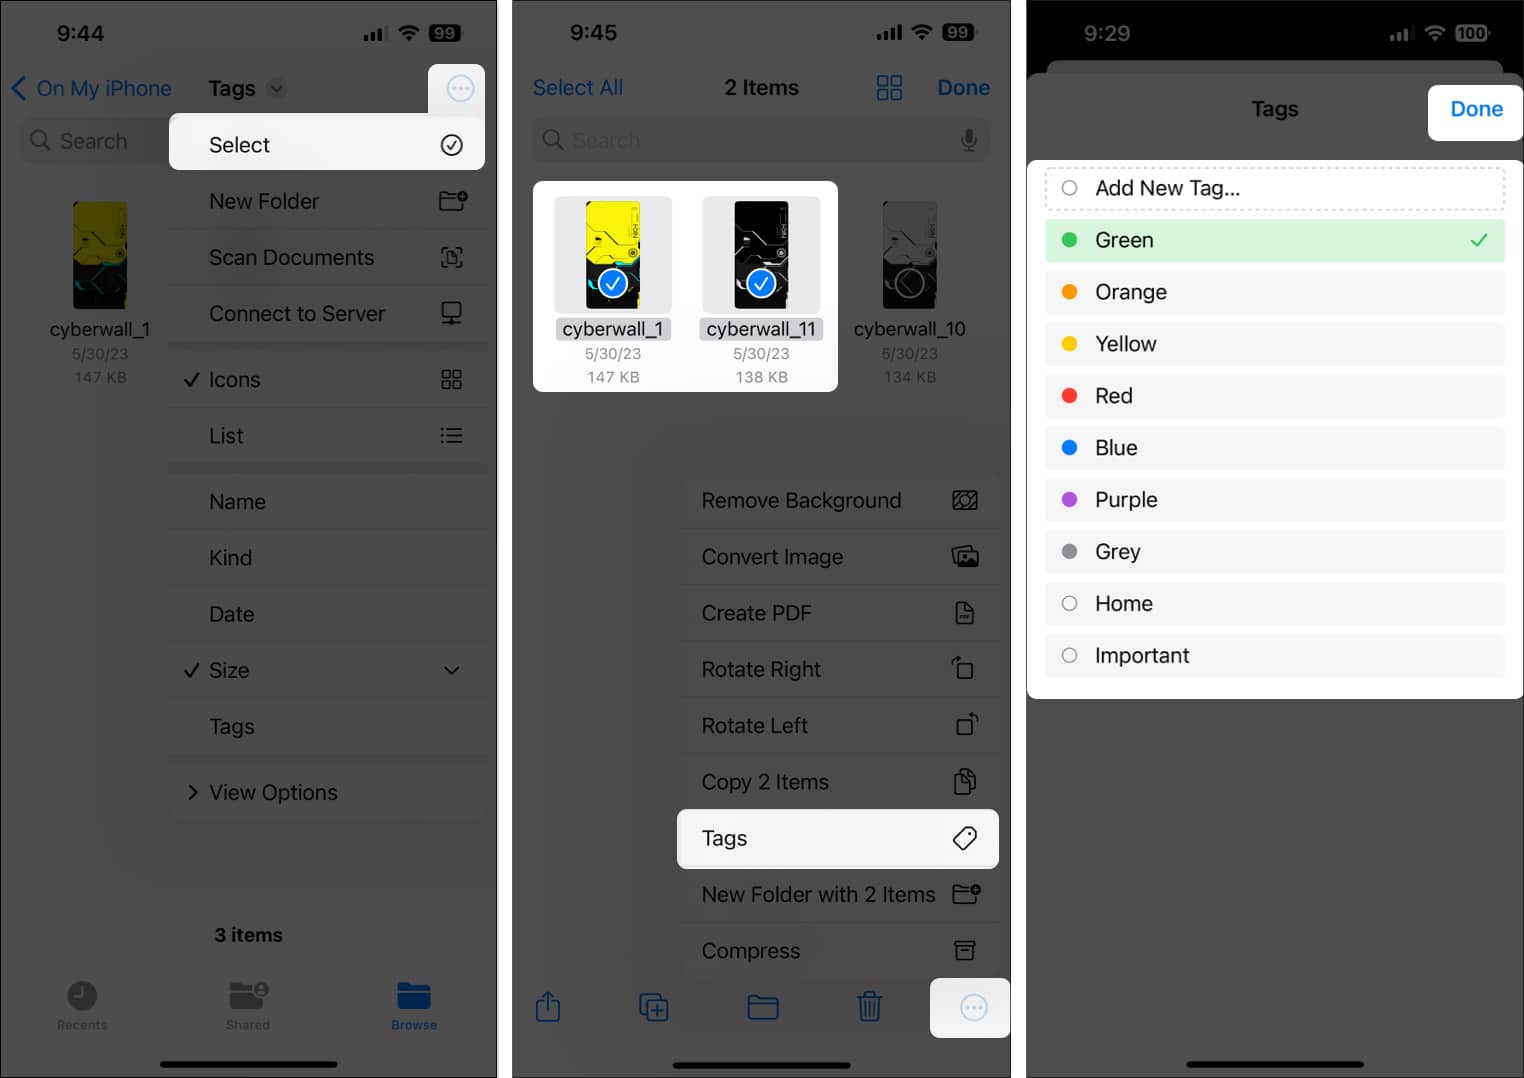
Add Tags for multiple files or folders
- Locate and open the Files app on your iPhone or iPad.
- Tap the three dots button located in the top right corner.
- Tap Select and choose the files and folders you want to tag.
- Now tap the three dots in the bottom right corner and tap Tag.
- Select any tag according to your preference. Then, tap Done.
If you don’t find the existing tags useful, tap Add New Tag.
Untag files and folders in the Files app
In case you want to untag a tagged file or folder, follow these quick steps:
- Locate and open the Files app on your iPhone or iPad.
- Tap and hold a tagged file or folder you want to untag.
- Tap Tags and deselect the existing tag. Then, tap Done.
Remove Tags in the Files app
If you don’t like an existing tag and want to get rid of it, follow these steps:
- Open the Files app and go to the home page of the Browse tab.
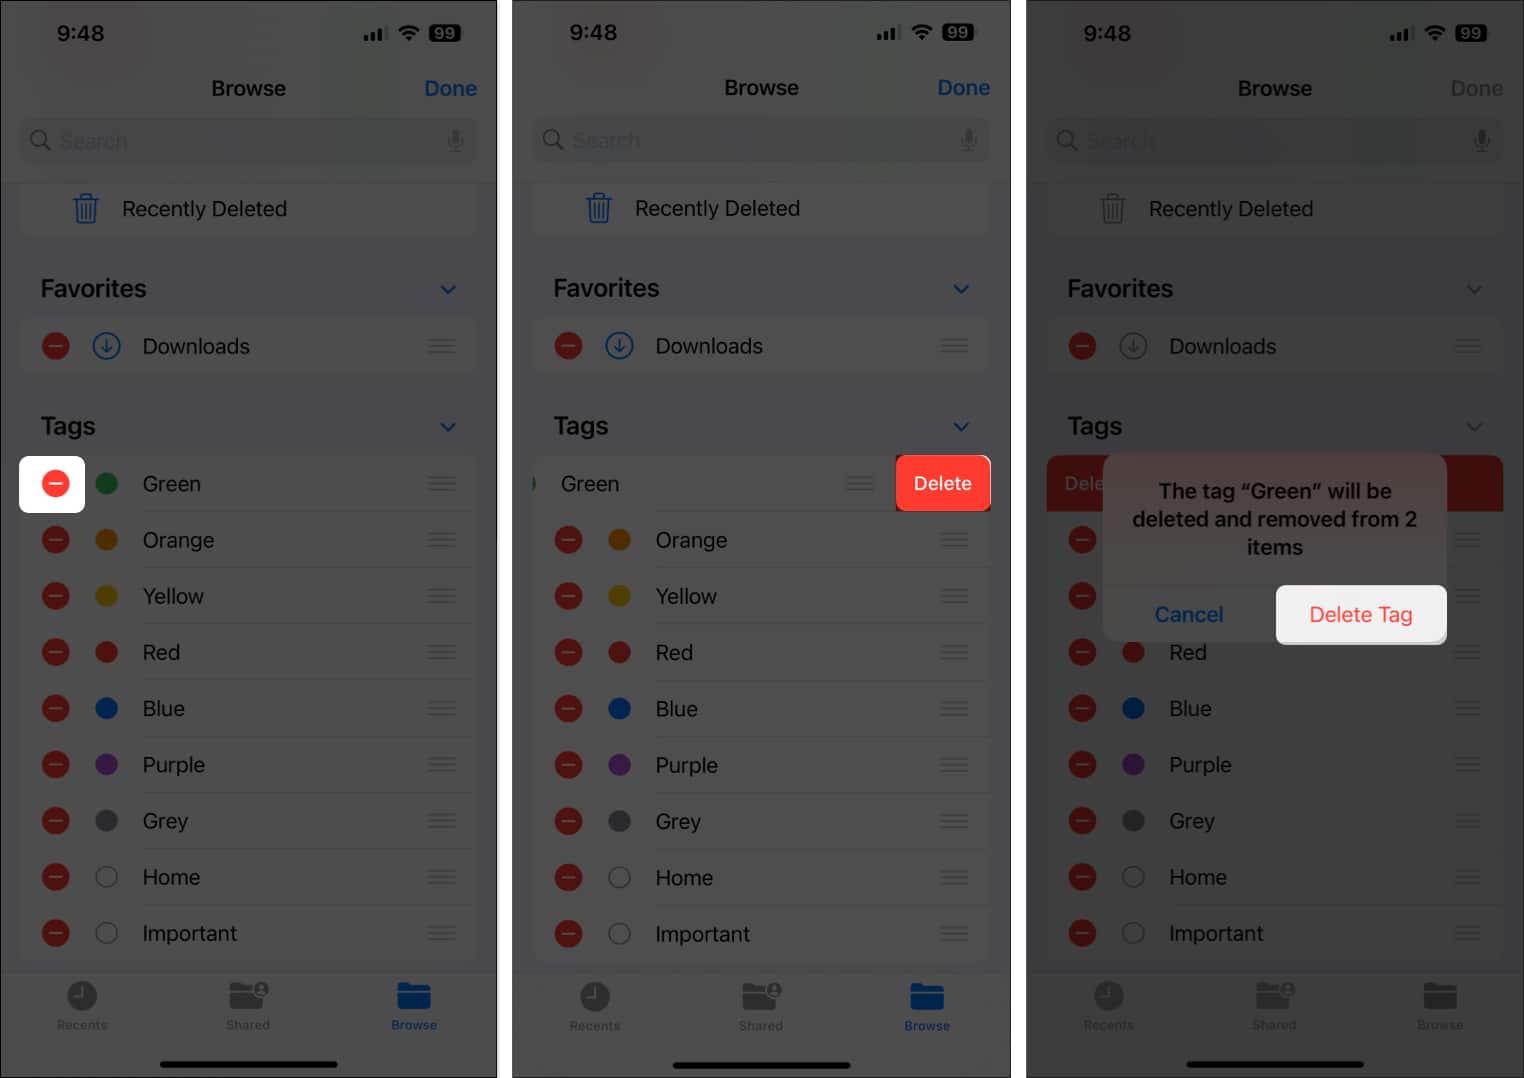
- Now, tap the three dots button in the top right corner. Then, tap Edit.
- Tap the red minus icon next to a tag. Then, tap Delete → Delete Tag.
Rearrange Tags in Files app
Don’t like how tags are arranged in the Browse tab or the tags menu when tagging files or folders? Well, you can rearrange tags using the steps below:
- Open the Files app and go to the home page of the Browse tab.
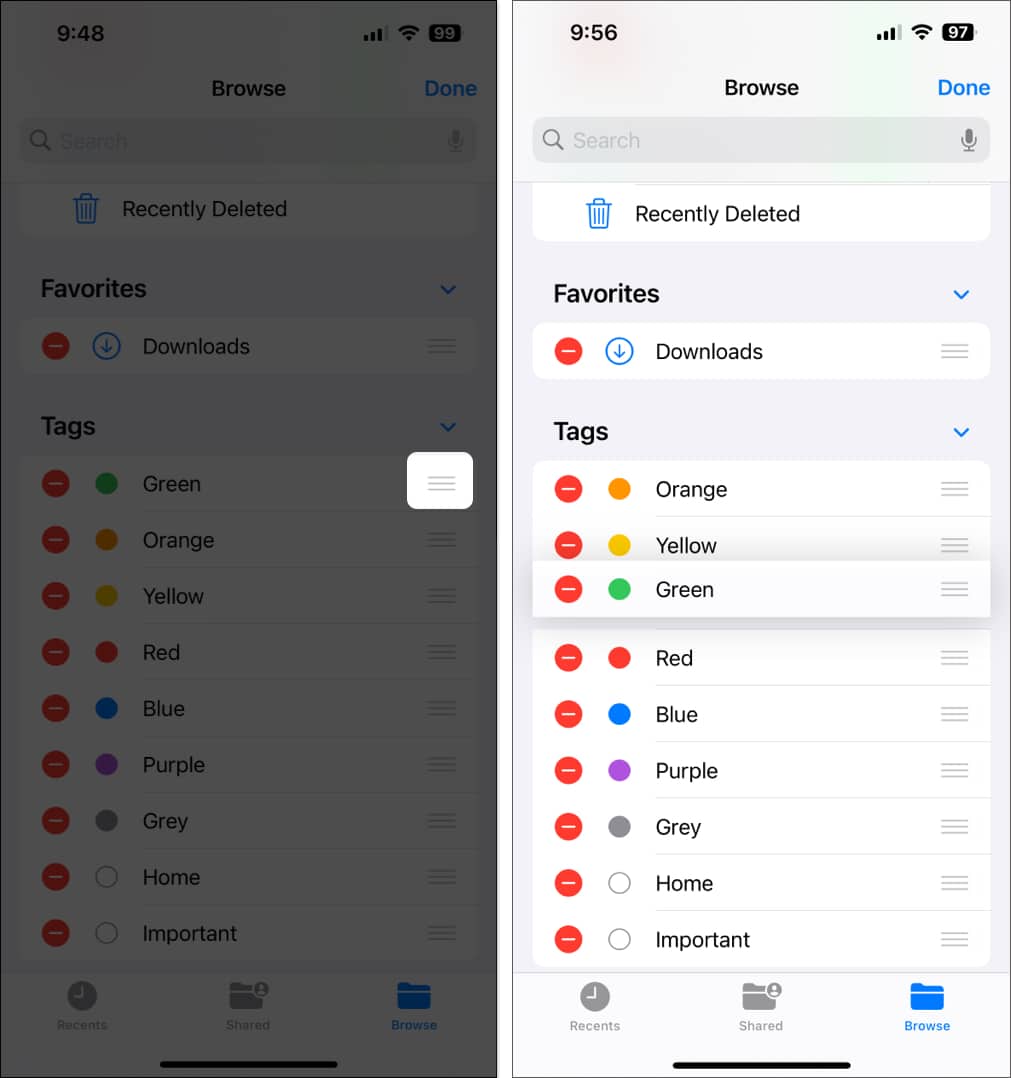
- Now, tap the three dots icon in the top right corner. Then, tap Edit.
- Tap and hold the four vertical lines next to a tag you want to rearrange.
- Slide the tags up or down to rearrange them as required. Then, tap Done.
Delete document
- Open Files → Browse → location of the file
- Tap and hold a file → select Delete.
To permanently delete the files:
- Go to Browse → Recently Deleted.
- Tap and hold the file and select Delete Now.
- Confirm by selecting Delete.
Delete multiple docs
- Open Files→ Browse tab → location where you have multiple files to delete.
- Tap the three dots from the upper right corner and tap Select.
- Now, select the files.
- Tap the delete icon from the bottom row.
To permanently delete multiple files:
- Open Files and tap on Browse.
- Tap Recently Deleted under Locations.
- Now, tap and hold the file and then select Delete.
- Confirm by selecting Delete.
Recover recently deleted items in the Files app
Let’s accept it, life is a mess, and we won’t be able to recover the moments with people who have been gone forever. But at least you can recover the deleted documents from the Files app. Here’s how:
- Open Files and tap Browse.
- Tap Recently Deleted under Locations.
- Now, tap and hold the file and then select Recover.
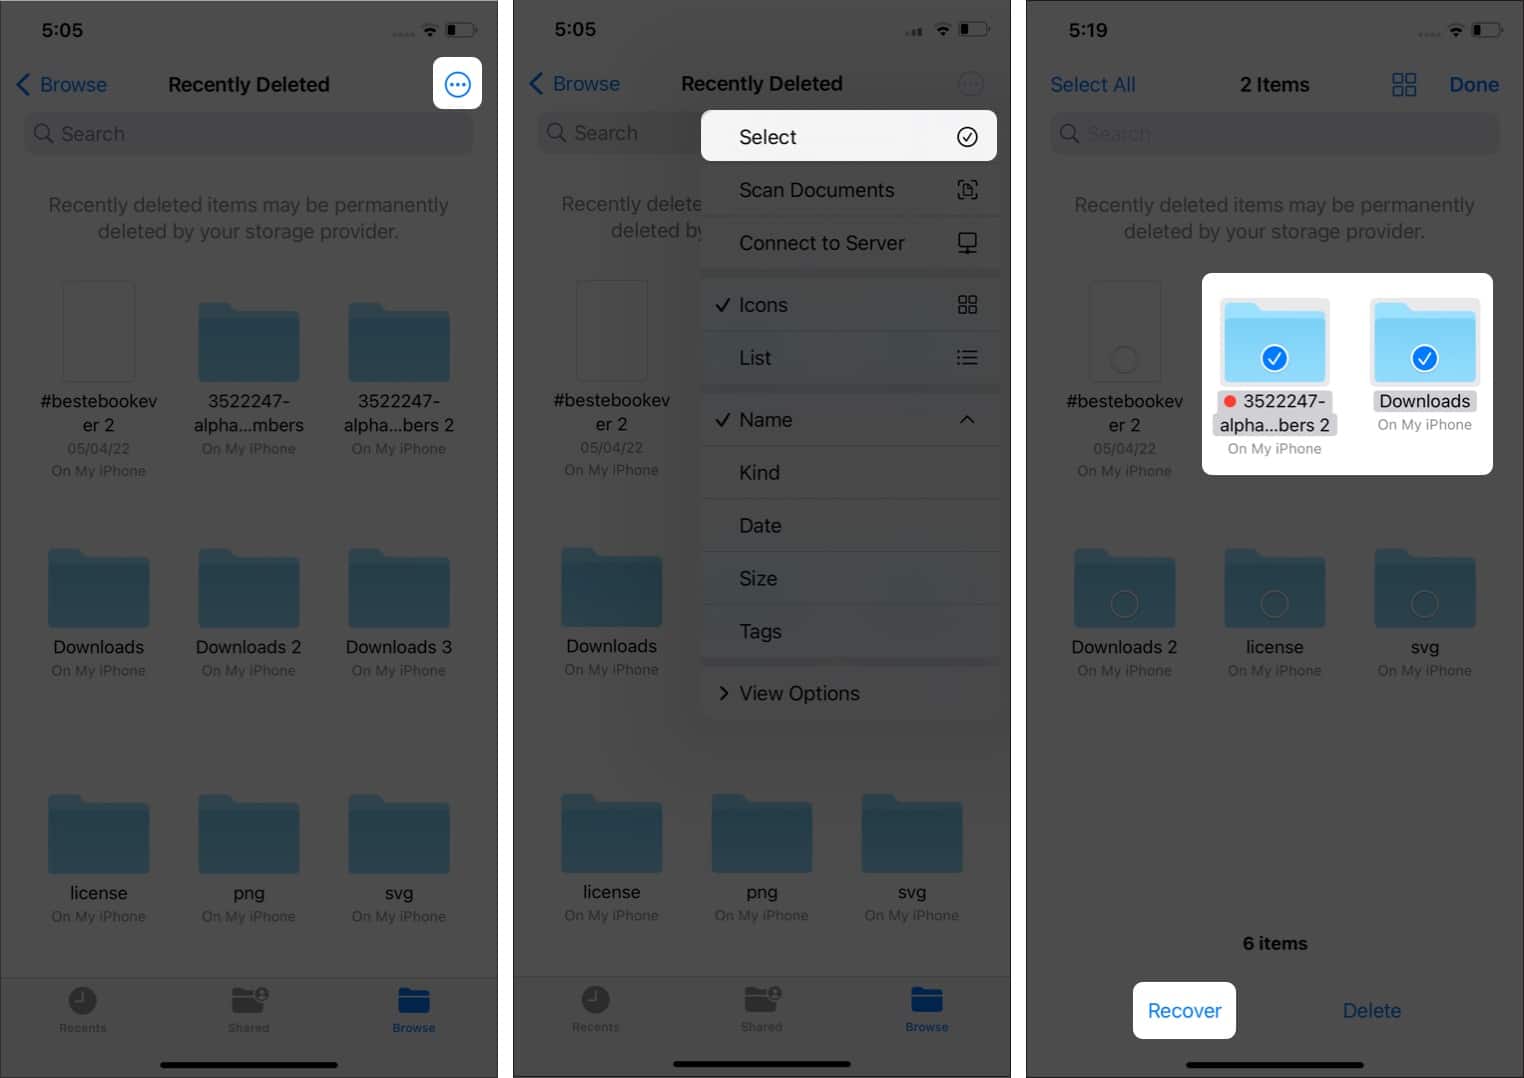
Recover multiple items
- Open Files and tap Browse → Recently Deleted.
- Tap the three dots in the top right corner.
- Now, tap Select and choose the files.
- Then tap Recover.
Use coloring or drawing tools in Files app
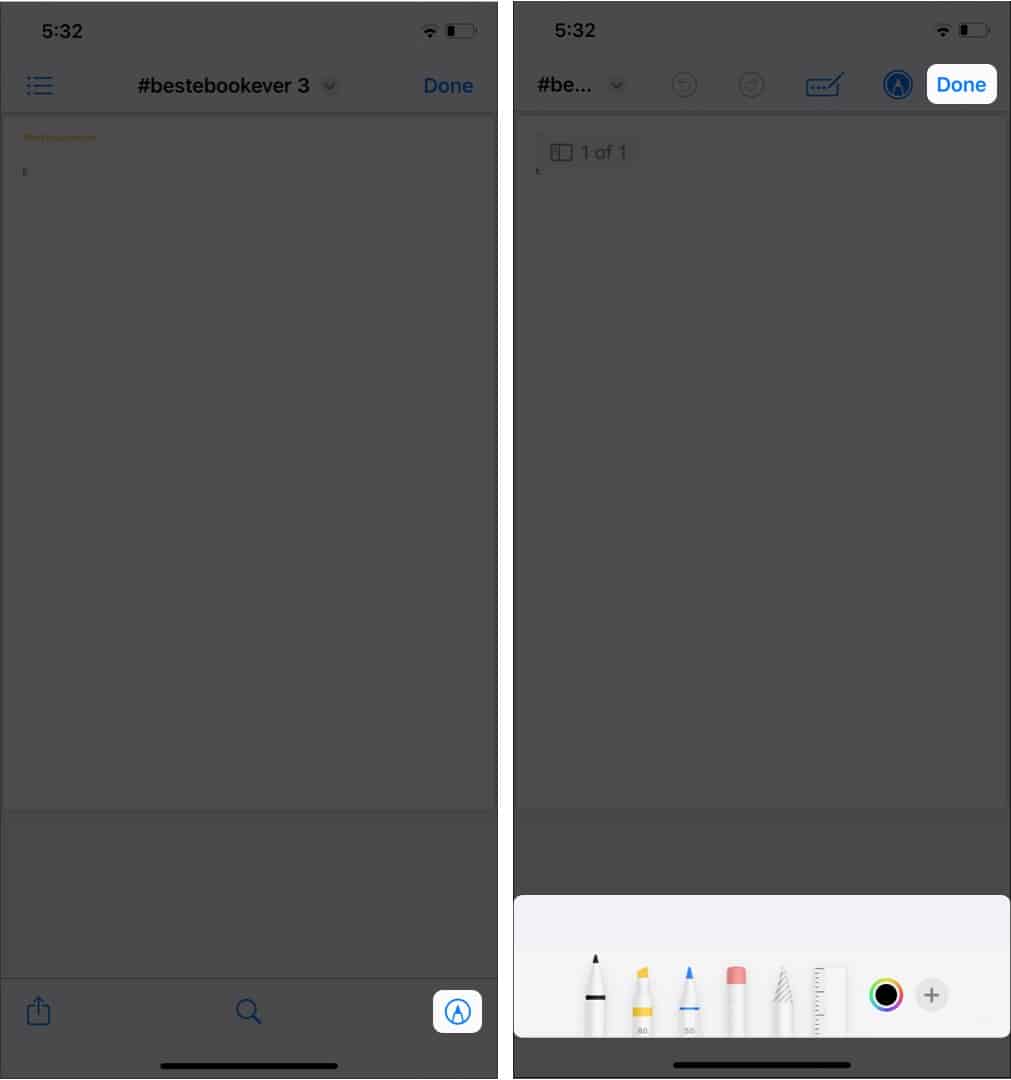
You can use markup tools on certain file types in the Files app to color and draw. For example, you can add a signature, text, magnifier, sketch, draw on images, and Edit PDFs. For this:
- Open the Files app, and open a file.
- Tap the round pencil icon from the bottom right.
- Choose the tool of your choice, and you can do what you please to do with them.
- After that, tap Done to complete.
Zip and unzip files on iPhone
It is effortless to zip and unzip files in the Files app. You can learn more about it here with proper screenshots. But keep in mind the Files app won’t be able to open password-protected and encrypted files.
Use keyboard shortcuts in the Files app
If you have paired your device with a physical keyboard, you can quickly carry out your tasks using keyboard shortcuts. Read our guide to learn how to use keyboard shortcuts in the Files app on the iPad.
That’s it!
Phew! That was a long ride, wasn’t it? Still, with this detailed guide, I hope you can understand all the features you can use with the Files app. If you still have any doubts or queries, let me know in the comments.
Read more:

